Advertisement
Quick Links
Microcomputer Temperature Controller User Manual
Model:RC-112E
Product Introduction
The product adopts the latest electronic technique with LED display, which learn from the
advantages and experience of stand-alone edition temperature controllers domestically
and overseas. It is the most economical product with simple operation, stable performance,
small size and intelligent control, cool and heat shift functions, which applies to various
refrigeration and heating places and equipments.
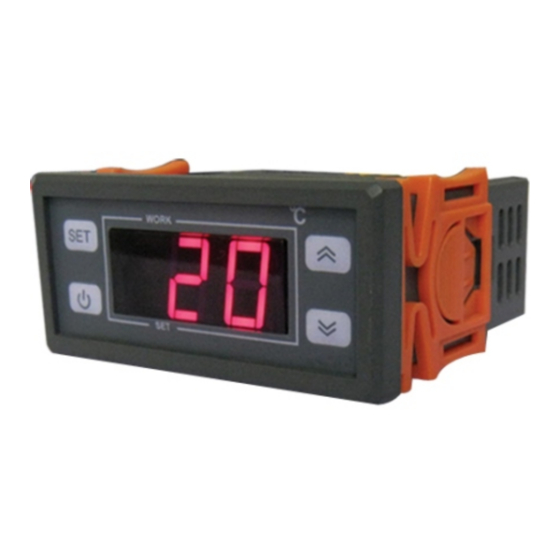
Product Pi ct ure
Parameters
Temperature measure range:-40~99℃
Resolution: 1
Accuracy: ±1℃
Power supply:220VAC/110VAC/12V±10%,50/60HZ
Input: one NTC sensor
Output: one relay 10A/220VAC
Ambient requirements: temperature: -10~60°C; humidity: 20~85% (No condensate)
Cut-out size:71mm×29mm
Consumption: ≤3W
Indicator Description
WORK indicator: means the output load is in working status; Normally on means work;
flash means delay;Off means not work.
SET indicator: means set status, Normally on means work; Off means not work.
Operation I nstruction
Buttons:SET ,UP
,DOWN
1. Temperature setting:
, POWER
In normal working status, press SET, display the current temperature value, use UP or DOWN
button to adjust the ideal temperature you want. Tips: press on UP or DOWN can enter into
rapid adjustment. After adjustment, press SET to return to normal working status, or without
any operation for 15 seconds, the controller will return to normal working status and save the
adjustments.
2. Maintain Parameters Setting:
In normal working status, press on SET for 3 seconds, set indicator is on, and enter into
maintain menu. When display HC, use UP or DOWN button to adjust the mode you want. Tips:
press on UP or DOWN can enter into rapid adjustment. After adjustment, press SET to the
next parameter, use the same method to set the rest parameters. When finishing, press on
SET for 3 seconds or without any operation for 15 seconds, the controller will return to normal
working status and save the adjustments.
3. Switch on and off:
In the off status, press POWER button to switch on; in the on status, press POWER button 5
seconds to switch off the controller.
Function M enu
Code
Functi on
S etting Rang e
: co ol
:hea t
mode
d ifferen tial
1~1 5
low temp.
-40~ se tting temp.
high temp.
setting temp.~ 99
cal ibration
-5~5
d elay time
0~1 5
Function Description
1. Temperature Calibration
When there is difference between the measuring temp. and the standard temp., this function
can keep the measuring temp. same as the standard temp.
Temp. after calibration =Temp. before calibration.+adjusted value
Page1/2
Default
Unit
/
3
C
-40
C
99
C
0
C
3
Min.
Advertisement

Summary of Contents for Ringder RC-112E
- Page 1 In normal working status, press SET, display the current temperature value, use UP or DOWN button to adjust the ideal temperature you want. Tips: press on UP or DOWN can enter into Model:RC-112E rapid adjustment. After adjustment, press SET to return to normal working status, or without...
- Page 2 Page2/2 2. Cool and Heat Function: Accessary In cool mode: Cooling systems works in below situation: One sensor wire/two plastic supports/one user maual The measuring temperature ≥ the set temperature + the temperature differential Cooling systems stop working in below situation: Wiring Diagram The measuring temperature ≤...


Need help?
Do you have a question about the RC-112E and is the answer not in the manual?
Questions and answers
Hi have set the lower temperature on 30 and the higher at forty but the light is switching off at 30 degrees. i ve repeated the setting lots of time but nothing changes.
The Ringder RC-112E operates based on a temperature differential setting. If the lower temperature is set to 30°C and the higher to 40°C, the cooling or heating system will activate or deactivate depending on the measured temperature and the temperature differential.
If the device is in cooling mode:
- It stops cooling when the measured temperature reaches the set temperature (30°C).
- It starts cooling again when the temperature rises above the set temperature plus the differential.
If the device is in heating mode:
- It stops heating when the measured temperature reaches the set temperature (40°C).
- It starts heating again when the temperature drops below the set temperature minus the differential.
If the light is switching off at 30°C, it likely indicates that the system is stopping operation because the measured temperature has reached the set lower limit. You may need to check the temperature differential setting to adjust the behavior.
This answer is automatically generated
How do I set it to get the heat transfer
To set up the Ringder RC-112E for heat transfer, follow these steps:
1. Power On: Press the POWER button to turn on the controller.
2. Enter Setting Mode: Press and hold the SET button.
3. Select Heating Mode: Use the UP or DOWN buttons to choose the "heat" mode.
4. Set Temperature: Adjust the desired set temperature using the UP or DOWN buttons.
5. Set Temperature Differential: Adjust the differential value (1–15°C) using the UP or DOWN buttons.
6. Set Delay Time: Adjust the delay time (0–15 minutes) if needed.
7. Save Settings: Press and hold SET for 3 seconds or wait 15 seconds for the controller to save and return to normal mode.
The heating system will activate when the measured temperature is below the set temperature minus the differential and will stop when the measured temperature reaches the set temperature.
This answer is automatically generated
Hello, I have question about this device. I need set calibration, but after holding SET I only get parameter for temp. that I want to set, there is no MENU. Can you please help me? Best regards.