
Related Manuals for NewAir CC-300


Summary of Contents for NewAir CC-300
- Page 1 CC-300 Thermoelectric Cigar Cooler OWNERS MANUAL Read and save these instructions.
- Page 2 Count on NewAir. As a proud NewAir owner, welcome to our family. There are no robots here, real people shipped your product and real people are here to help you.
-
Page 3: Table Of Contents
Cleaning & Maintenance ..................8 Cleaning Your Cooler..................8 Moving Your Cooler ..................9 Cigar Storage Guide ..................... 9 Troubleshooting ....................10 Limited Manufacturer’s Warranty ..............12 SPECIFICATIONS CC-300 ODEL 11-120V AC / 60Hz ATED OLTAGE 70W / 1 A OWER... -
Page 4: Before First Use
Do not store or use gasoline or any other flammable vapors and liquids near this or any other appliance. Do not store perishable foods in the cigar cooler, as the interior temperature will not be low enough to prevent food spoilage. http://www.NewAir.com... -
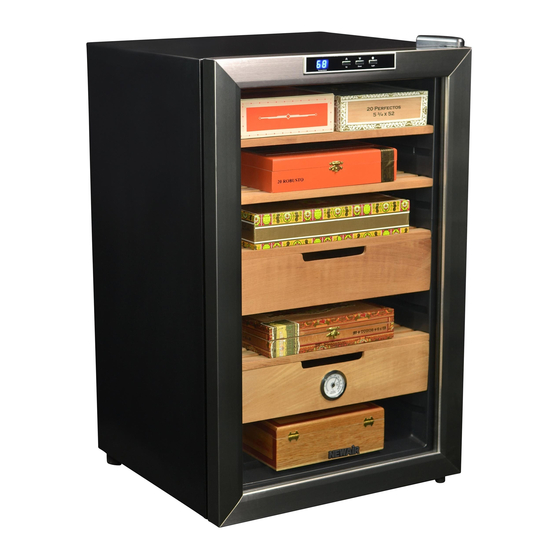
Page 5: Parts List
Shock Hazard – Electrical Grounding Required This cooler should be properly grounded for your safety, and in order to minimize the possibility of electrical shock, the power cord of this unit is equipped with a 3-prong plug which fits 3-prong wall outlets. Improper use of the grounded plug can result in electrical shock. -
Page 6: Installation
When finished, let the unit run a full day to complete the airing out process. RAWER The drawers and shelves included with this cooler are designed to sit flush with the front edge of the cabinet. This will allow air to circulate freely through the http://www.NewAir.com... -
Page 7: Operating Instructions
unit. When inserting the drawers and shelves, avoid pushing them all the way against the rear wall of the cabinet. EASONING IGAR OOLER It is best to season your wood shelves and drawers before adding your cigars so that the wood is at an ideal relative humidity (RH) and does not absorb humidity from your cigars. -
Page 8: How To Use The Buttons On The Display Panel
Remove the shelves and drawers and wash the inside of the unit with a solution made of warm water and baking soda solution (2 tablespoons of baking soda to one quart of water). Unscrew the water reservoir at the bottom of the unit and rinse with water. http://www.NewAir.com... -
Page 9: Moving Your Cooler
The ideal temperature for storing cigars is between 65° and 73°F. The ideal relative humidity (RH) for storing cigars is between 65% and 75% RH. To properly maintain RH in the CC-300, you will need to include a method of adding humidity. For your convenience, a moisture container is included. -
Page 10: Troubleshooting
The door is not Make sure the door is closed completely. closed securely. The door seal does Replace the seal on the door. Replacements can be not seal properly. acquired from the NewAir customer support department. http://www.NewAir.com... - Page 11 5 inches clearance between the back of the clearance. unit and any adjacent walls. The light does not There may be a Contact the NewAir work. problem with the customer support display board. department. The cooler vibrates The unit is not sitting Make sure the unit’s feet...
-
Page 12: Limited Manufacturer's Warranty
When making a warranty claim, please have the original bill of purchase with purchase date available. Once confirmed that your appliance is eligible for warranty service, all repairs will be performed by a NewAir™ authorized repair facility. The purchaser will be responsible for any removal or transportation costs.
Need help?
Do you have a question about the CC-300 and is the answer not in the manual?
Questions and answers
My newair cc300 temp will not stop at setting. It keeps going the the mac setting
The NewAir CC-300 temperature may keep exceeding the set temperature due to insufficient clearance around the unit, preventing proper ventilation. Ensure there is at least 5 inches of clearance between the back of the unit and any adjacent walls.
This answer is automatically generated