VTech CS6919 User Manual
Dect 6.0 cordless telephone
Hide thumbs
Also See for CS6919:
- User manual (45 pages) ,
- User manual (42 pages) ,
- User manual (48 pages)
Table of Contents
Advertisement
Quick Links
CS6919
CS6919-19
Go to
www.vtechcanada.com
CS6919-15
CS6919-2
for the latest VTech product
CS6919-16
CS6919-26
news.
CS6919-17
CS6919-3
CS6919-4
DECT 6.0 cordless telephone
Abridged user's manual
(Canada version)
4.
Connect the power adapter.
Charge the battery
Place the handset in the telephone base or the
charger to charge.
Install and charge the battery
Install the battery
Install the battery as shown below.
NOTES
•
Use only the battery provided.
•
Charge the battery provided with this product only
in accordance with the instructions and limitations
specified in this manual.
•
If the handset will not be used for a long time,
Once you have installed the battery, the
disconnect and remove the battery to prevent
handset LCD display indicates the battery
possible leakage.
status (see the table below).
NOTES
•
For best performance, keep the handset in the
telephone base or charger when not in use.
•
The battery is fully charged after 12 hours of
continuous charging.
Battery
Battery status
Action
indicators
The screen
The battery
Charge without
is blank, or
has no charge
interruption
shows Put in
or very little
(at least 30
charger and
charge. The
minutes).
flashes.
handset cannot
be used.
The screen
The battery has
Charge without
shows Low
enough charge
interruption
battery and
to be used for a
(at least 30
flashes.
short time.
minutes).
The screen
The battery is
To keep the
shows
charged.
battery charged,
HANDSET X.
place it in the
telephone base
or charger when
not in use.
Congratulations
What's in the box
on purchasing your new VTech product. Before
Your product package contains the following
using this product, please read Important
items. Save your sales receipt and original
safety instructions.
packaging in the event warranty service is
necessary.
This abridged user's manual provides you with
basic installation and use instructions. A limited
set of features are described in abbreviated form.
Please refer to the User's manual for a full set of
installation and operation instructions at
www.vtechcanada.com.
Compatible with
Telephones identified with this
Hearing Aid T-Coil
logo have reduced noise and
interference when used with
most T-coil equipped hearing
aids and cochlear implants.
The TIA-1083 Compliant
Logo is a trademark of the
T
Telecommunications Industry
TIA-1083
Association. Used under license.
1 set for CS6919/
CS6919-15/CS6919-16/
CS6919-17/CS6919-19
2 sets for CS6919-2/
CS6919-26
3 sets for CS6919-3
4 sets for CS6919-4
1 set for CS6919-2/
CS6919-26
2 sets for CS6919-3
3 sets for CS6919-4
Abridged user's
manual
Before use
Using the handset menu
After you install your telephone or power returns
1.
Press MENU when the phone is not in use.
following a power outage, the handset will prompt
2.
Press
or
until the screen displays the
you to set the date and time.
desired feature menu.
Set date and time
3.
Press SELECT to enter that menu.
1. Use the dialing keys (0-9) to enter the
•
To return to the previous menu, press CANCEL.
month (MM), date (DD) and year (YY). Then
•
To return to idle mode, press and hold CANCEL.
press SELECT.
2. Use the dialing keys (0-9) to enter the hour
(HH) and minute (MM). Then press
or
Configure your telephone
to choose AM or PM.
3. Press SELECT to save.
Set language
The LCD language is preset to English. You can
Check for dial tone
select English, French or Spanish to be used in
Press
. If you hear a dial tone, the installation
all screen displays.
is successful.
1.
Press MENU when the handset is not in
use.
If you do not hear a dial tone:
2.
Scroll to to Settings, and then press SELECT
•
Make sure the installation procedures
twice.
described above are properly done.
3.
Scroll to choose English, Français or
•
It may be a wiring problem. If you have
Español, and then press SELECT to save.
changed your telephone service to digital
service from a cable company or a VoIP
Set date and time
service provider, the telephone line
Press MENU when the handset is not in
1.
may need to be rewired to allow all
use.
existing telephone jacks to work. Contact
2.
Scroll to Set date/time, and then press
your cable/VoIP service provider for more
information.
SELECT.
3. Use the dialing keys (0-9) to enter the
Operating range
month (MM), date (DD) and year (YY). Then
This cordless telephone operates with the
press SELECT.
maximum power allowed by the Federal
4. Use the dialing keys (0-9) to enter the hour
Communications Commission (FCC). Even
(HH) and minute (MM). Then press
or
so, this handset and telephone base can
to choose AM or PM.
communicate over only a certain distance
5. Press SELECT to save.
- which can vary with the locations of
the telephone base and handset, the
weather, and the layout of your home or office.
Temporary tone dialing
When the handset is out of range, the handset
If you have pulse (rotary) service only, you can
displays Out of range or no pwr at base.
switch from pulse to tone dialing temporarily
during a call.
If there is a call while the handset is out of range,
1.
During a call, press
.
it may not ring, or if it does ring, the call may not
connect well when you press
. Move closer
2.
Use the dialing keys to enter the relevant
to the telephone base, and then press
to
number. The telephone sends touch-tone
answer the call. If the handset moves out of
signals. It automatically returns to pulse
range during a telephone conversation, there
dialing mode after you end the call.
may be interference. To improve reception,
move closer to the telephone base.
9 –
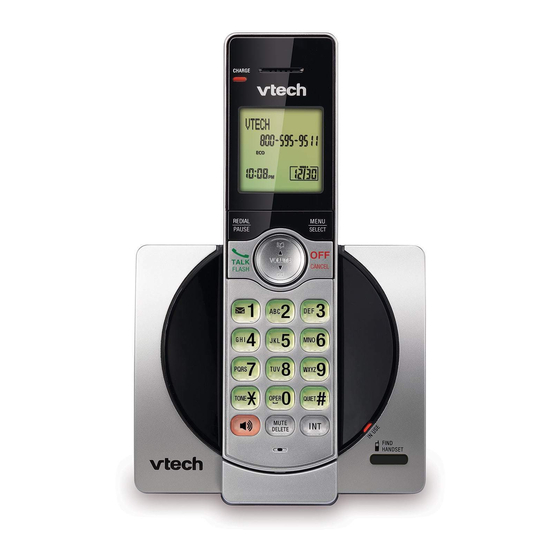
Handset overview
•
Make or answer a call using the handset
speakerphone.
•
During a call, press to switch between the
a
speakerphone and the handset earpiece.
p
10 –
• While you have set the dial mode to pulse
and on a call, press to switch to tone dialing
b
temporarily.
11 –
o
•
Press to add a space when entering names.
c
n
12 –
m
d
• Press repeatedly to add or remove 1 in front
of the caller ID log entry before dialing or
saving it to the phonebook.
l
• Press and hold to set or dial your voicemail
number.
k
13 –
• Make or answer a call.
j
e
• Answer an incoming call when you hear a call
i
waiting alert.
f
h
14 –
g
• Press repeatedly to review the redial list.
• Press and hold to insert a dialing pause while
entering a number.
1 – Handset earpiece
15 –
2 – LCD display
• Review the phonebook when the phone is not
3 –
in use.
• Show the menu.
• Increase the listening volume during a call.
• While in a menu, press to select an item, or
• Scroll up while in a menu, phonebook, caller
save an entry or setting.
ID log, or redial list.
4 –
• Move the cursor to the right when entering
numbers or names.
•
Hang up a call.
•
Silence the ringer temporarily while the
handset is ringing.
•
Review the caller ID log when the phone is not in
•
Press and hold to erase the missed call
use.
indicator while the phone is not in use.
•
Decrease the listening volume during a call.
•
Press to return to the previous menu; or
press and hold to return to idle mode, without
•
Scroll down while in a menu, phonebook,
making changes.
caller ID log, or redial list.
•
Move the cursor to the left when entering
5 –
numbers or names.
•
Press repeatedly to show other dialing
16 –
light
options when reviewing a caller ID log entry.
• On when the handset is charging.
6 –
•
Press to start an intercom conversation or
transfer a call (for multi-handset models only).
7 – Microphone
8 –
• Mute the microphone during a call.
• Delete digits or characters while using the
dialing keys.
•
Silence the ringer temporarily while the
handset is ringing.
Make a call
Telephone operation
•
Press
or
, and then dial the telephone
number.
Handset control key panel:
Answer a call
•
Press
,
, or any dialing key.
End a call
•
Press OFF on the handset, or put the handset
into the telephone base or charger.
Speakerphone
•
During a call, press
on the handset to
switch between speakerphone and handset
earpiece.
Volume
/VOLUME/
•
During a call, press
on the
handset to adjust the listening volume.
NOTE
•
The handset earpiece volume setting and
speakerphone volume setting are independent.
Mute
The mute function allows you to hear the other
party but the other party cannot hear you.
1.
During a call, press MUTE on the handset.
The screen displays Muted.
2.
Press MUTE again to resume the
conversation. The screen displays
Microphone on.
Join a call in progress
You can use up to two system handsets at a
time on an outside call.
•
When a handset is already on a call, press
or
on another handset to join the call.
•
Press OFF or place the handset in the
telephone base or charger to exit the call.
The call continues until all handsets hang up.
Call waiting
When you subscribe to call waiting service from
your telephone service provider, you hear an
alert tone if there is an incoming call while you
are on another call.
Press FLASH to put the current call on hold
•
and take the new call.
•
Press FLASH to switch back and forth
between calls.
Telephone base overview
Display icons overview
The battery icon flashes when
the battery is low and needs
charging.
The battery icon animates when
the battery is charging.
c
a
The handset ringer is turned off.
There are new voicemail
b
received from your telephone
service provider.
ECO
The ECO mode activates
automatically to reduce power
1 –
light
consumption when the handset
• Flashes when there is an incoming call, or
is within range from the
another telephone sharing the same line is in use.
telephone base.
• Flashes when handsets are being deregistered.
NEW
There are new caller ID log
• On when the handset is in use or being
entries.
registered.
2 –
• Press to page all system handsets.
3 – Charging pole
Charger overview
a
1 – Charging pole
Find handset
Answer an incoming call during an
intercom call
Use this feature to find all system handsets.
If you receive an incoming call during an
To start paging:
intercom call, there is an alert tone.
•
Press /FIND HANDSET on the telephone
•
To answer a call, press
. The intercom call
base. All idle handsets ring and display
ends automatically.
** Paging **.
•
To end the intercom call without answering
To end paging:
the outside call, press OFF. The intercom call
•
Press /FIND HANDSET again on the
ends and the telephone continues to ring.
telephone base.
-OR-
Call transfer using intercom
•
Press
,
, OFF, or any dialing key on the
While on an outside call, you can use the
handset.
intercom feature to transfer the call from one
handset to another.
-OR-
Press INT on your handset during a call.
1.
•
Place the handset in the telephone base or
The current call is put on hold. Use the
charger.
dialing keys to enter a destination handset
NOTE
number if necessary.
•
Do not press and hold /FIND HANDSET for
2.
To answer the intercom call, press
,
, or
more than four seconds. It may lead to handset
any dialing key on the destination handset.
deregistration.
You can now have a private conservation
before transferring the call.
3.
From this intercom call, you have the
Redial list
following options:
•
You can let the destination handset join
Each handset stores the last 10 telephone
numbers dialed. When there are already 10
you on the outside call in a
entries, the oldest entry is deleted to make room
three-way conversation. Press and hold
for the new entry.
INT on the originating handset.
•
You can transfer the call. Press OFF, or
Review the redial list
place your handset back in the telephone
1.
Press REDIAL when the handset is not in
base or charger. Your handset displays
use.
Line in use. The destination handset is
2.
Press
,
, or REDIAL repeatedly until the
then connected to the outside call.
desired entry displays.
•
You can press INT to switch between the
outside call (Outside call displays) and
Dial a redial list entry
the intercom call (Intercom displays).
•
When the desired entry displays, press
or
•
The destination handset can end the
to dial.
intercom call by pressing OFF, or
by placing the handset back in the
Delete a redial list entry
telephone base or charger. The outside
•
When the desired redial entry displays, press
call continues with the original system
DELETE.
handset.
Intercom
Phonebook
Use the intercom features for conversations
The phonebook can store up to 50 entries, which
between two handsets.
are shared by all handsets. Each entry may
1.
Press INT on your handset when not in use.
consist of a telephone number up to
Use the dialing keys to enter a destination
30 digits, and a name up to 15 characters.
handset number if necessary.
2.
To answer the intercom call, press
,
, or
Add a phonebook entry
any dialing key on the destination handset.
1.
Press MENU when the phone is not in use.
3.
To end the intercom call, press OFF or
place the handset back in the telephone
2.
Press SELECT to choose Phonebook.
base or charger.
Mount the telephone base
Connect
1.
Connect the telephone line cord to the
telephone base. Route it through the wall
You can choose to connect the telephone base
mount bracket, and then connect it to the
for desktop usage or wall mounting.
wall jack.
NOTES
•
Use only the adapters provided.
•
Make sure the electrical outlets are not controlled
by wall switches.
•
The adapters are intended to be correctly oriented
in a vertical or floor mount position. The prongs
are not designed to hold the plug in place if it is
plugged into a ceiling, under-the-table or cabinet
outlet.
TIP
•
If you subscribe to digital subscriber line (DSL)
high-speed Internet service through your telephone
line, make sure you install a DSL filter (not
included) between the telephone line cord and
2
Align and place the wall mount bracket on
telephone wall jack. Contact your DSL service
the standard wall plate.
provider for more information.
A
Connect the telephone base
3. Align and place the telephone base on the
wall mount bracket. Slide it down until it
clicks securely in place.
Connect the charger
Press SELECT again to choose
3.
Caller ID
Add new entry.
4.
Use the dialing keys to enter the number
If you subscribe to caller ID service, information
(up to 30 digits).
about each caller appears after the first or
5. Press SELECT to move to enter the name.
second ring. If you answer a call before the
caller information appears on the screen, it will
6. Use the dialing keys to enter the name (up to
not be saved in the caller ID log.
15 characters). Additional key presses show
other characters of that particular key.
The caller ID log stores up to 30 entries. Each
7. Press SELECT to save.
entry has up to 24 digits for the phone number
While entering numbers and names, you can:
and 15 characters for the name.
•
Press DELETE to erase a digit or character.
If the telephone number has more that 15
Press and hold DELETE to erase the entire
digits, only the last 15 digits appear. If the name
•
has more than 15 characters, only the first 15
entry.
•
Press
or
to move the cursor to the left
to move the cursor to the left
characters are shown and saved in the caller ID
or right.
log.
•
Press and hold PAUSE to insert a dialing
Review a caller ID log entry
pause (for entering phone numbers only).
1.
Press CID when the phone is not in use.
Press 0 to add a space (for entering names
•
2.
Scroll to browse through the caller ID log.
only).
•
Press
to add
( appears) or
to
Missed call indicator
add # ( appears) (for entering phone
When there are calls that have not been
numbers only).
reviewed in the caller ID log, the handset
displays XX missed calls.
Review the phonebook entries
Each time you review a caller ID log entry
Entries are sorted alphabetically.
marked NEW, the number of missed calls
1.
Press
when the phone is not in use.
decreases by one.
2.
Scroll to browse through the phonebook, or
When you have reviewed all the missed calls,
use the dialing keys to start a name search.
the missed call indicator no longer displays.
If you do not want to review the missed calls
Edit a phonebook entry
one by one, press and hold CANCEL on the
1.
When the desired entry displays, press
idle handset to erase the missed call indicator.
SELECT.
All the entries are then considered old.
2.
Use the dialing keys to edit the number, and
then press SELECT.
Dial a caller ID log entry
3.
Use the dialing keys to edit the name, and
•
When the desired entry appears, press
then press SELECT to save.
or
to dial.
Delete a phonebook entry
Save a caller ID log entry to the
phonebook
1.
When the desired entry displays, press
DELETE.
1.
When the desired caller ID log entry
displays, press SELECT.
2.
When the screen displays Delete entry?,
press SELECT.
2. Press
Press SELECT to choose To Phonebook.
3. Use the dialing keys to modify the number,
Dial a phonebook entry
and then press SELECT.
•
When the desired entry appears, press
4. Use the dialing keys to modify the name,
or
to dial.
and then press SELECT to save.
Delete a caller ID log entry
•
When the desired caller ID log entry displays,
press DELETE.
Advertisement
Table of Contents

Related Manuals for VTech CS6919


Summary of Contents for VTech CS6919
- Page 1 Display icons overview Connect Connect the telephone line cord to the • Make or answer a call using the handset on purchasing your new VTech product. Before speakerphone. telephone base. Route it through the wall CS6919 CS6919-19 Your product package contains the following...
- Page 2 In no event shall VTech be liable conditions: (1) this device may not cause harmful “you”) that the Product and all accessories provided...
Need help?
Do you have a question about the CS6919 and is the answer not in the manual?
Questions and answers
how do i set up voicemail
To set up voicemail on the VTech CS6919, you need to use the voicemail service provided by your telephone service provider. Follow these steps:
1. Contact your telephone service provider to activate voicemail service on your plan.
2. Press and hold the key labeled for voicemail (this is usually the “1” key) to set or dial your voicemail number.
3. Follow the voice prompts from your service provider to complete voicemail setup.
Note: The voicemail system is not built into the phone—it is managed by your service provider. You may need to adjust ring settings so the built-in answering system does not answer before voicemail.
This answer is automatically generated
how to set up voice mail
To set up voicemail on the VTech CS6919:
1. Press MENU when the handset is not in use.
2. Use the arrow keys to select Settings, then press SELECT.
3. Select Voicemail #, then press SELECT.
4. Enter your voicemail access number (up to 30 digits) using the dialing keys.
5. Press SELECT to save. A confirmation tone will play.
You can then press and hold the assigned key to retrieve voicemail. Make sure your telephone service plan includes voicemail and it's configured by your service provider.
This answer is automatically generated
Can't find the information for changing the number of rings before the answer machine picks up. It's at 4 and I would like to move it to 6 if possible
The VTech CS6919 is not designed to allow users to adjust the number of rings before the answering machine picks up.
This answer is automatically generated