Advertisement
Quick Links
INSTRUCTIONS FOR INSTALLATION AND MAINTENANCE
• INSTALLER •
PLEASE GIVE THESE
OPERATING INSTRUCTIONS
TO THE BUILDING OWNER
INSTALLATION:
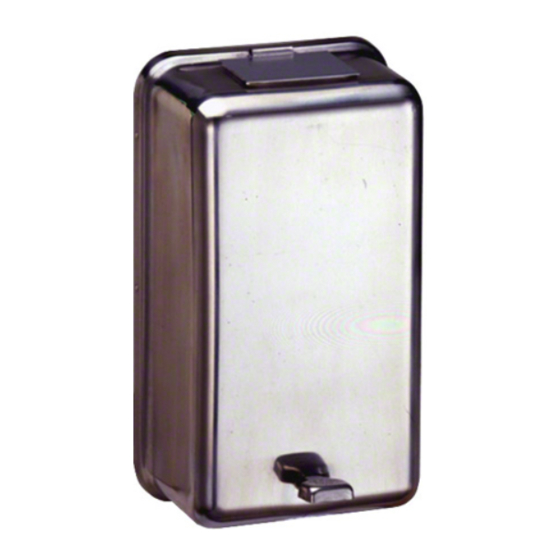
Locate Model B-132 dispenser (A) so the lever will be
over the lavatory. Allow a minimum 4" (102mm)
clearance between top of dispenser and bottom of any
shelf, cabinet, or other horizontal projection to provide
enough space to fully open the lid and fill dispenser
conveniently.
How To Mount The Wall Bracket:
Use the wall bracket (B) as a template to mark the
mounting hole locations on the wall for the three
mounting screws (C) furnished by manufacturer.
Remove the wall bracket, then drill the (3) mounting
holes. Finally, secure the wall bracket in place with the
mounting screws. The surface on which the unit is to be
mounted determines the specific type of mounting
required for best installation:
For plaster or dry wall construction, provide
concealed backing to comply with local building codes,
then secure wall bracket with screws furnished.
For hollow tile walls and other instances where
applicable, provide 1/8" (3mm) round-head toggle bolts.
For brick, concrete, or solid tile walls, provide #8
(4mm) fiber plugs or expansion shields for use with
screws furnished, or provide 1/8" (3mm) expansion
bolts.
How To Mount The Soap Dispenser:
1. Open the filler-top (E) by inserting BobKey (D) into
filler-top slot and then sliding latch to the left. Lift up
filler-top.
2. Using screwdriver, loosen locking screw (F).
BOBRICK MODEL B-132 POWDERED SOAP DISPENSER
3. Position dispenser so that edges of backplate (H) fit
into grooves of wall plate, then press dispenser
down into place.
4. Tighten locking screw. Dispenser locks into place
when point of locking screw is lodged under lug (G)
of wall plate.
5. Close filler-top and re-lock by inserting BobKey into
filler-top and sliding latch to the right.
MAINTENANCE:
1. To fill dispenser, open filler-top (E) by inserting
BobKey (D) into filler-top slot and then sliding latch
to the left. Lift up filler-top. Fill dispenser with free-
flowing granulated powdered soap. Close filler-top
and re-lock by inserting BobKey into filler-top and
sliding latch to the right.
2. Clean equipment operates better, lasts longer, and
requires less maintenance. Wipe the unit daily,
using damp cloth. Periodically give the dispenser an
overall cleaning. Remove the soap vessel by
loosening the locking screw and sliding vessel up
off the wall bracket. Warm water mixed with mild
soap is the best cleaning solution for all dispenser
parts. Pump warm water through the vessel
periodically to flush out any contaminates or dried
soap residue. NEVER USE ABRASIVE
CLEANERS.
3. To adjust for more or less soap per stroke, adjust
Phillips-head screw (33-21) located at bottom of
unit. Turn screw counterclockwise for less soap per
stroke or for use with very fine powdered soaps.
Turn screw clockwise for more soap per stroke or for
use with coarser grained soaps.
Advertisement

Subscribe to Our Youtube Channel
Related Manuals for Bobrick B-132


Summary of Contents for Bobrick B-132
- Page 1 INSTALLATION: 3. Position dispenser so that edges of backplate (H) fit into grooves of wall plate, then press dispenser Locate Model B-132 dispenser (A) so the lever will be down into place. over the lavatory. Allow a minimum 4" (102mm) clearance between top of dispenser and bottom of any 4.
-
Page 2: Replacement Parts List
200 Commerce Drive, Clifton Park, New York 12065-1350 • Tel: (518) 877-7444 • FAX: 518-877-5029 11611 Hart Street, North Hollywood, California 91605-5882 • Tel: (818) 982-9600 • FAX: 818-503-1102 225 Bobrick Drive, Jackson, Tennessee 38301-5635 • Tel: (901) 424-7000 • FAX: 901-424-7800 © 1998 by Bobrick Washroom Equipment, Inc.
Need help?
Do you have a question about the B-132 and is the answer not in the manual?
Questions and answers