Advertisement
Please dispose of packaging for the product in a responsible
manner. It is suitable for recycling. Help to protect the
environment, take the packaging to the local amenity tip
and place into the appropriate recycling bin.
Never dispose of electrical equipment or batteries in with
your domestic waste. If your supplier offers a disposal facili-
ty please use it or alternatively use a recognised re-cycling
agent. This will allow the recycling of raw materials and help
protect the environment.
FOR HELP OR ADVISE ON THIS PRODUCT PLEASE CONTACT YOUR DISTRIBUTOR,
OR SIP DIRECTLY ON:
TEL: 01509500400
EMAIL: sales@sip-group.com or technical@sip-group.com
www.sip-group.com
Ref: 030413
28
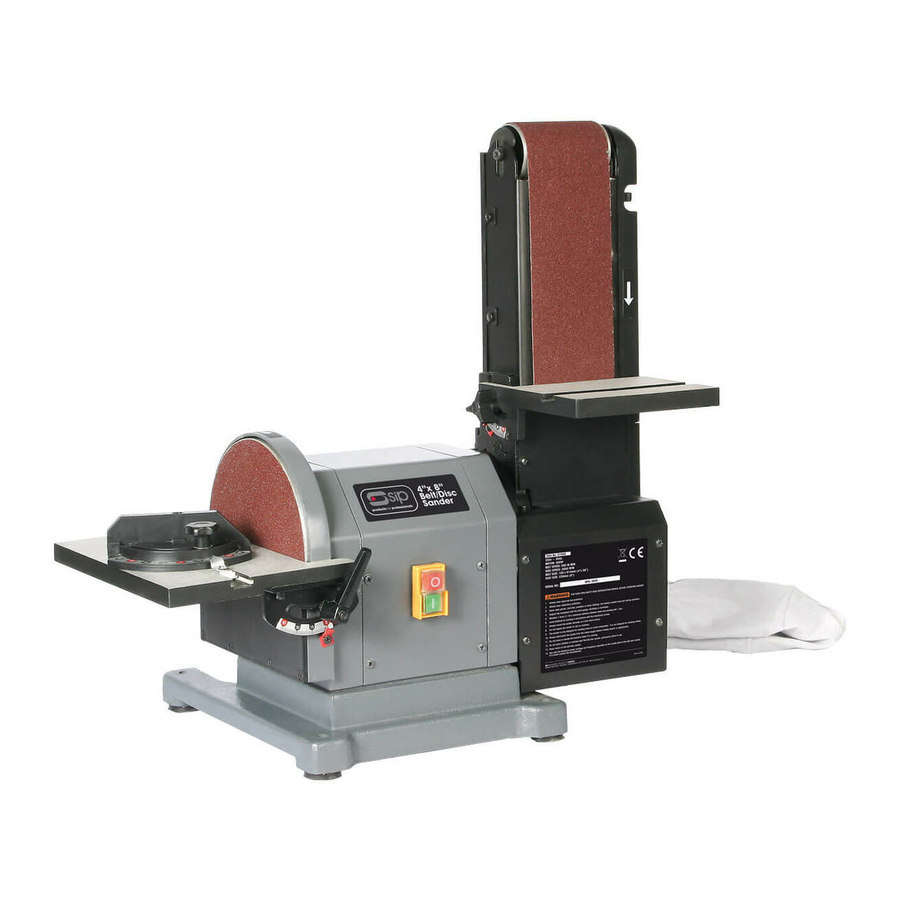
4" x 8"
Belt Disc Sander
01946
Please read and fully understand the instructions in
this manual before operation. Keep this manual
safe for future reference
1
Advertisement

Related Manuals for SIP 01946

Summary of Contents for SIP 01946
- Page 1 This will allow the recycling of raw materials and help protect the environment. FOR HELP OR ADVISE ON THIS PRODUCT PLEASE CONTACT YOUR DISTRIBUTOR, 01946 OR SIP DIRECTLY ON: TEL: 01509500400 EMAIL: sales@sip-group.com or technical@sip-group.com Please read and fully understand the instructions in www.sip-group.com...
-
Page 2: Declaration Of Conformity
Leicestershire LE12 9NH England As the manufacturer's authorised representative within the EC declare that the 4”x 8” Belt / Disc Sander - SIP Part. No. 01946 Conforms to the requirements of the following directive(s), as indicated. 2006/42/EC Machinery Directive 2006/95/EC... -
Page 3: Table Of Contents
NOTES CONTENTS Page No. Description Safety instructions Electrical connections Guarantee Technical specifications Getting to know your belt disc sander Contents and Accessories Assembly instructions Adjustments Operating instructions Care and maintenance Troubleshooting Exploded diagram Parts list Notes Declaration on conformity... -
Page 4: Safety Instructions
Disc plate WD01-00104 SIP recommends that this belt disc sander should not be modified or used for any ap- Flat washer M4 WD01-00105 plication other than that for which it was designed. If you are unsure of its relative ap- Hex screw M5×8... - Page 5 SAFETY INSTRUCTIONS….cont PARTS LIST….cont Do not leave the machine unattended when in use. Switch the machine off and Screw M4X12 WD01-00068 unplug from the mains supply before leaving the work area. Belt exhaust WD01-00069 Do not allow children or animals near the belt disc sander, particularly when in use. Collector mounting shaft WD01-00070 Ensure that the belt disc sander is correctly turned off when not in use and store in a...
- Page 6 SAFETY INSTRUCTIONS….cont PARTS LIST….cont Safety Symbols Used Throughout This Manual. Pin 5×10 WD01-00035 Screw M5×25 WD01-00036 Belt tracking knob WD01-00037 Danger / Caution: Indicates risk of personal injury and/or the possibility of Flat washer M6 WD01-00038 damage. Rubber washer WD01-00039 Adjust spring WD01-00040 Belt frame...
-
Page 7: Electrical Connections
WD01-00010 Collector bearing 6000RZ WD01-00011 This SIP sander is fitted with a standard 230v ~ 13 amp type plug. Before using the Spring washer D26 WD01-00012 machine, inspect the mains lead and plug to ensure that neither are damaged. If Screw ST4.2×15... -
Page 8: Guarantee
GUARANTEE Guarantee: This SIP belt / disc sander is covered by a 12 month parts and labour warranty, cover- ing failure due to manufacturers defects. This does not cover failure due to misuse or operating the sander outside the scope of this manual - any claims deemed to be outside the scope of the warranty may be subject to charges including, but not lim- ited to parts, labour and carriage costs. -
Page 9: Technical Specifications
TROUBLESHOOTING TECHNICAL SPECIFICATIONS Problem Possible cause Suggested corrective action Model No. 01946 1.Defective or broken ON/OFF switch. 1-3.Replace all broken or defec- tive parts before using sander. Supply 230v ~ 50Hz 2.Defective or damaged switch relay. 4.Contact supplier for repair. -
Page 10: Getting To Know Your Belt Disc Sander
GETTING TO KNOW YOUR BELT / DISC SANDER CARE AND MAINTENANCE….cont Worktable knob Sanding disc Belt worktable Angle pointer Mitre guage Worktable scale Disc worktable NVR switch Worktable scale Bench mounting hole Angle pointer Worktable handle 1.Remove the belt worktable. 2.Position the belt work support frame horizontally as shown in Fig. - Page 11 CARE AND MAINTENANCE….cont CONTENTS AND ACCESSORIES Ref. Description 1.Remove the disc worktable, and then remove the disc cover (1) by Belt / disc sander removing six screws (2). Mitre guide 2.Remove the existing disc, and Disc worktable clean any residue left on disc plate (3).
-
Page 12: Care And Maintenance
ASSEMBLEY INSTRUCTIONS….cont OPERATING INSTRUCTIONS….cont Sanding outside curves. 1.6mm Freehand sanding outside curves should be done on the sanding disc (1). Keep fingers a Fig.1 minimum of 1 in. (25.4 mm) from the sanding disc. Caution: To avoid trapping the work piece or fingers between the workta- ble (1) and the sanding disc (2), leave a maximum gap of 1.6mm as shown in fig.1 Attaching the belt worktable. - Page 13 ASSEMBLEY INSTRUCTIONS….cont OPERATING INSTRUCTIONS….cont Attaching the extraction port. Sanding inside curves. 1.Ensure that the belt bed (1) is in the vertical position (as shown on page12). Note: To avoid injury, do not apply the end of the work piece to the idler 2.Loosen the hex screw (2) using a 5mm hex screw, attach the dust extraction port (3) onto the dust port (4), and re-tighten the hex screw (2).
- Page 14 ADJUSTMENTS ADJUSTMENTS….cont Adjusting the table square with the disc. Tracking the belt. 1.Turn the sanding belt slowly by hand, noting if the belt (1) tends to slide off the bed, and to which side 1.Using a combination square (1), front or back. place one side of the square on the 2.If it doesn't slide from side to side disc worktable (2) with the other side...
Need help?
Do you have a question about the 01946 and is the answer not in the manual?
Questions and answers