Table of Contents
Advertisement
Quick Links
High-Precision AD-DA User Manual
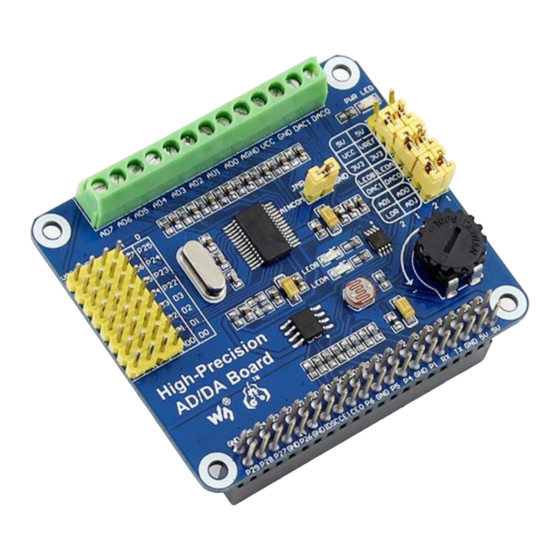
Overview
There's no AD/DA function on the
Raspberry Pi GPIO interface, this may
troubled you in the Pi development.
However, it won't be a problem anymore.
The High-Precision AD/DA Board allows you
to add high-precision AD/DA functions to
the Raspberry Pi.
Supported Pi
Raspberry Pi 1 Model A+
Raspberry Pi 1 Model B+
Raspberry Pi 2 Model B
Features
Onboard ADS1256, 8ch 24bit high-precision ADC (4ch differential input), 30ksps sampling rate
Onboard DAC8532, 2ch 16bit high-precision DAC
Onboard input interface via pinheaders, for connecting analog signal
the pinout is compatible with Waveshare sensor interface standard, easy to connect
various analog sensor modules
Onboard input/output interface via screw terminals, for connecting analog/digital signal
Features AD/DA detect circuit, easy for signal demonstration
Revision: 1.2. Date: October 30 2015. Author: Zhou Jie. Editor: Felix
High-Precision AD/DA Board
User Manual
1
Advertisement
Table of Contents

Related Manuals for Waveshare High-Precision AD/DA Board


Summary of Contents for Waveshare High-Precision AD/DA Board
- Page 1 Onboard DAC8532, 2ch 16bit high-precision DAC Onboard input interface via pinheaders, for connecting analog signal the pinout is compatible with Waveshare sensor interface standard, easy to connect various analog sensor modules Onboard input/output interface via screw terminals, for connecting analog/digital signal ...
- Page 2 What's on Board Raspberry Pi GPIO interface: for connecting with the Pi AD/DA input/output: screw terminals AD input: pinheaders, the pinout is compatible with Waveshare sensor interface standard, easy to connect various analog sensor modules 7.68M crystal LM285-2.5: provides reference voltage for the ADC chip...
- Page 3 High-Precision AD-DA User Manual Symbol descriptions AD/DA input/output (Tab 2) AD0-AD7: Analog input AGND: Analog ground GND: Digital ground VCC: Power supply (3.3V and 5V optional, can be switched by setting the Power selection jumper) DA0-DA1: Analog output Analog input (Tab 3) AD0-AD7: ADS1256 analog input D0-D3: GPIO of ADS1256 (See ADS1256 datasheet) P22-P25: GPIO of Raspberry Pi...
- Page 4 High-Precision AD-DA User Manual Basic operation of Raspberry Pi Before using the module with Raspberry Pi, such basic operations are required: Using Raspberry Pi image Using Linux Terminal If you have already known them, please skip this section directly. 1.1.
- Page 5 High-Precision AD-DA User Manual Getting started The following API source codes should be run under the bcm2835 library, which can be downloaded from http://www.airspayce.com/mikem/bcm2835/ 2.1. Analog to digital conversion Connect the High-Precision AD-DA Board to the Raspberry Pi. Jumper settings: Set the Power Supply to 5V: connect the pin 5V and VCC.
- Page 6 High-Precision AD-DA User Manual Jumper settings: Set the Power Supply to 5V: connect the pin 5V and VCC. Set the Reference Input Voltage to 5V: connect the pin 5V and VREF. Connect the pin DA0 to LEDA, the pin DA1 to LEDB. Then the brightness of LEDA indicator will be changed according to the voltage output of DA0 and the brightness of LEDB indicator will be changed according to the voltage output of DA1.
- Page 7 High-Precision AD-DA User Manual Interface Definition Symbol Description 1, 17 3.3V Power supply (3.3V) 2, 4 Power supply (5V) 3, 5, 7, 8, 10, 18, 22, 24, 26, 27, 28, 29, 32, 36, 38, 40 6, 9, 14, 20, 25, 30, Ground 34, 39 DRDY...
- Page 8 High-Precision AD-DA User Manual 4. Revision history Revision Changes Date Initial release June 26 2015 Released English version manual July 17 2015 Minor edits Changed “DAC8552” to “DAC8532”. October 30 2015 Revision: 1.2. Date: October 30 2015. Author: Zhou Jie. Editor: Felix...
Need help?
Do you have a question about the High-Precision AD/DA Board and is the answer not in the manual?
Questions and answers