
Related Manuals for Cobra CDR 895 D


Summary of Contents for Cobra CDR 895 D
- Page 1 CDR 895 D QUICK START GUIDE HDMI, the HDMI logo, and High-De nition Multimedia Interface are trademarks or registered trademarks of HDMI Licensing, LLC in the United States and/or other countries.
- Page 2 DUAL CAMERA SET-UP Car Power Adapter CAM 2 CAM 2 Power Cord 10 Ft. (3M) CAM 2 Extender Cable (Optional) Y-Splitter Cable CAM 1...
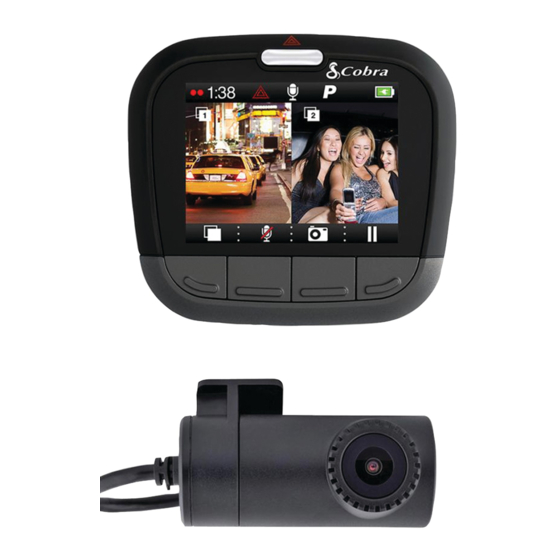
- Page 3 CONTROLS & CONNECTIONS Quick Release Emergency Recording Button Mount Power/Volume Button Indicator Micro USB Port GPS Port HDMI Output Micro SD Card Slot Button 4 Button 1 Reset Button Microphone Button 3 Button 2 The functions of Buttons 1-4 are indicated by the icon directly above each button and change depending on the state of the unit.
- Page 4 INSTALLATION continued POWER The CDR 895 D utilizes a Y-Splitter to offer maximum flexibility and clean installation without dangling wires. • Plug the Y-Splitter into the Micro USB Port on CAM 1. • Connect the Micro USB end of the power cord into the Y-Splitter.
-
Page 5: Basic Operation
BASIC OPERATION Press to stop recording and to start. When CAM 2 is connected is displayed instead of indicate dual recording. Pressing at any time will capture a still photo on both CAM 1 and CAM 2. Press to create an Emergency Recording. Emergency Recordings apply to both CAM 1 and CAM 2 video files and will not be overwritten by Continuous Loop Recording. -
Page 6: Computer Connection
COMPUTER CONNECTION To view videos on a computer connect to CAM 1 using the short Micro USB->USB Cable. Select Connect to Computer on the dash cam. It will mount as a drive on the computer called DriveHD. Movie clips and photos can be found in the DCIM folder. Video clips are saved as .MOV files and can be played by most video players on both PC and Mac.
Need help?
Do you have a question about the CDR 895 D and is the answer not in the manual?
Questions and answers