Bose T4S ToneMatch Owner's Manual
Hide thumbs
Also See for T4S ToneMatch:
- Quick start manual (81 pages) ,
- User manual ,
- Service manual (48 pages)
Table of Contents
Advertisement
Advertisement
Table of Contents

Related Manuals for Bose T4S ToneMatch


Summary of Contents for Bose T4S ToneMatch
- Page 1 T4S/T8S ToneMatch® Mixer Owner’s Guide...
-
Page 2: Important Safety Instructions
Where the mains plug or an appliance coupler is used as the disconnect device, the disconnect device shall remain readily operable. • Due to ventilation requirements, Bose does not recommend placing the product in a confined space such as in a wall cavity or in an enclosed cabinet. Regulatory Information... -
Page 3: Table Of Contents
T4S ToneMatch® Mixer ........ - Page 4 Bose Scenes ........
-
Page 5: Introduction
Engineered with powerful DSP engines and intuitive user controls, they offer studio-quality EQ, dynamics and effects processing. Sound great with integrated Bose® ToneMatch® processing and zEQ, especially when connected to a Bose L1 or F1 system for full end-to-end tonal control. Play confidently on stage with these rugged ToneMatch mixers using tactile controls, easy-to-read LED displays and scene recall. -
Page 6: Control And Connection Panels
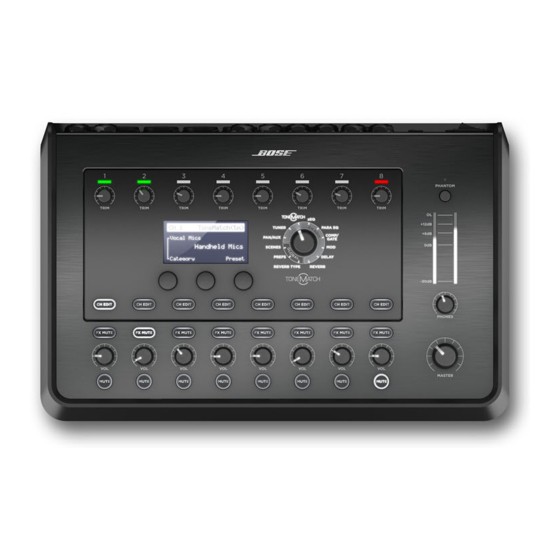
Control and Connection Panels T4S ToneMatch® Mixer Control Panel Figure 1. T4S Control Panel q INPUT SIGNAL/CLIP LEDs (1-4) – Displays the input signal status in color: Green: Indicates the presence of an input signal Red: Indicates input source clipping w TRIM CONTROLS (1-4) –... -
Page 7: Connection Panel
Control and Connection Panels Connection Panel Figure 2. T4S Connection Panel MONO USB AUDIO q POWER SWITCH – Turns the mixer on or off. w USB 2.0 TYPE-B – A USB interface that allows you to connect the mixer to your computer. e USB 2.0 TYPE-A –... -
Page 8: T8S Tonematch® Mixer
Control and Connection Panels T8S ToneMatch® Mixer Control Panel Figure 3. T8S Control Panel q INPUT SIGNAL/CLIP LEDs (1-8) – Displays the input signal status in color: Green: Indicates the presence of an input signal Red: Indicates input source clipping w TRIM CONTROLS (1-8) –... -
Page 9: Connection Panel
Control and Connection Panels Connection Panel Figure 4. T8S Connection Panel USB AUDIO MONO MAIN OUT q POWER SWITCH – Turns the mixer on or off. w USB 2.0 TYPE-B – A USB interface that allows you to connect the mixer to your computer. e USB 2.0 TYPE-A –... -
Page 10: System Setup
System Setup Removing/Attaching the Cover The T4S/T8S ToneMatch® mixer comes out of the carton with a cover installed on the top panel. The cover is designed to protect the control panel while transporting or storing the mixer. To remove the cover: Place thumbs on notches on front of cover and slide cover forward. -
Page 11: Mounting Options
System Setup Mounting Options The T4S/T8S comes with a 1/4" (6 mm) mounting screw insert. This enables it to be mounted onto a number of available products that include a 1/4" (6 mm) mounting screw, including a camera tripod stand. Mounting the T4S/T8S on a Camera Tripod Stand Extend the camera tripod legs and secure at desired height. -
Page 12: Connecting The T4S Via Digital Connection
System Setup Connecting the T4S via Digital Connection Make sure the L1 Model 1S/II and T4S are powered off and the T4S Master volume control is set to minimum. Plug one end of the ToneMatch® cable into the Power port/Digital Main Output R on the T4S. Plug the other end of the ToneMatch cable into the ToneMatch port on the power stand. -
Page 13: Connecting The T4S/T8S Via Analog Connection
System Setup Connecting the T4S/T8S via Analog Connection Make sure the device you are connecting to and the T4S/T8S are powered off and the T4S/T8S Master volume control is set to minimum. Using XLR balanced cables, connect one or two devices to the XLR Stereo Outputs of your T8S (see Figure 10). -
Page 14: Connecting The Tonematch® Power Supply
System Setup Connecting the ToneMatch® Power Supply The ToneMatch power supply provides power for the T4S/T8S mixer. Plug the power supply cable into the T4S/T8S Power port. Plug one end of the AC power cord into the power supply. Plug the other end of the power cord into a live AC power outlet. Switch the T4S/T8S power switch to the ON position. -
Page 15: Connecting The T4S/T8S To Your Computer
Connecting the T4S/T8S to Your Computer The T4S/T8S provides a USB port for connecting it to a computer. This allows you to download performance scenes to a computer or install system updates. Visit www.Bose.com/livesound for details on updating your system. -
Page 16: Operation
Rotary/pushbutton controls Asterisk indicates that All Channels Scenes the loaded scene was modified *Bose Scene 01 Indicates that pressing Load Shared Save the control activates the function 16 - English... -
Page 17: Optimizing Input Gain And Output Volume
Operation Optimizing Input Gain and Output Volume Getting a quality volume level from your system relies on the combined adjustments of input channel gain, master volume, and channel volume. Do the following for each channel used. Make sure the Master volume, Trim, and channel volume controls are set to minimum. Adjust input channel Trim. -
Page 18: Using The Master Volume Control
Operation Using the Master Volume Control The Master volume control adjusts the overall output level of the T4S/T8S ToneMatch® output and analog Master output. During normal operation, it is recommended to keep the Master control set at the 12 o’clock position. -
Page 19: Using The Rotary Selector
Operation Using the Rotary Selector The rotary selector provides access to the functions of the ToneMatch® mixer output. Figure 15 provides a summary of the nine channel-related functions and the three global functions. The following pages describe how to adjust each function. Figure 15. -
Page 20: Editing The Sound Of A Channel
Operation Editing the Sound of a Channel The CH Edit functions allow access to settings that affect selected channels. The CH Edit functions are Pan/ Aux, Tuner, ToneMatch®, zEQ, Para EQ, Comp/Gate, Mod, Delay, and Reverb. To edit a channel: Press the CH Edit 1, 2, 3, 4, (T4S and T8S) 5, 6, 7, or 8 (T8S only) button. - Page 21 Operation Routing Input Signals to the Aux Outputs The Aux function allows you to route signals to two Aux outputs (T4S only) or four Aux outputs (T8S only) for various signal processing, recording, and sound reinforcement applications. The signal level is adjustable for each of the available Aux outputs: Note: To mute the Aux output, press the Level control.
-
Page 22: Selecting A Tonematch® Preset
Operation Selecting a ToneMatch® Preset The ToneMatch function allows you to select a ToneMatch preset for your instrument or microphone. This proprietary technology optimizes system equalization to preserve the natural sound of your specific instrument or microphone. They are organized into categories and independently selected for each channel. Rotate the Category control to access the list of categories and highlight your choice. -
Page 23: Adjusting Para Eq
Operation Adjusting Para EQ The Para EQ function provides three parametric equalizations centered on a user-specified frequency within the range of 50 Hz to 16 kHz. Note: To bypass the Para EQ settings, press the Select control. Press it again to activate. Press or rotate the Select control and select Para EQ band 1-3. - Page 24 (fastest). Using the KickGate The KickGate is a Bose® proprietary technology that allows you to raise the level of a kick drum channel while eliminating the risk of feedback from the microphone. Two KickGate settings are available in the Comp/Gate menu.
-
Page 25: Using Modulation Effects
Operation Using Modulation Effects The Mod function allows you to apply modulation effects. Note: To bypass the Mod settings, press the Type control. Press it again to activate. Ch 1 Modulator Speed Type Depth Chorus1 Rotate the Type control to access the list of modulator types and highlight your choice: Chorus 1: Brite –... -
Page 26: Adding Delays
Operation Adding Delays The Delay function allows you to apply a digital-, analog-, or tape-style delay. Note: To bypass the Delay settings, press the Type control. Press it again to activate. Ch 1 Delay Fdbk. Type Time Digital 250ms Rotate the Type control to access the list of Delay types and highlight your choice. Digital Delay –... -
Page 27: Using Global Functions
Operation Using Global Functions The Global functions allow access to settings that affect the overall operation of the mixer and all of its channels. Selecting a Reverb Type The Reverb Type function allows you to select the type of reverb that is applied to all input channels. The decay time (Time) and balance (Bal) are adjustable. -
Page 28: Using The Prefs Utilities
Operation Using the Prefs Utilities The Prefs function allows access to several system utilities. Select Prefs with the rotary selector. Rotate the Menu control to scroll through the list and highlight the desired utility. Press the Select control to display the utility: •... - Page 29 Operation • Master Out EQ – The Master Out EQ is a 6-band graphic equalizer put on the master mix output. With the middle control, select the frequency range you want to boost or attenuate and use the Level control to adjust the level +/–18 dB.
-
Page 30: Loading And Saving Scenes
Firmware. Versions Preferences T4S v1.0.0 Menu • ToneMatch – Displays the list of ToneMatch preset banks stored in the T4S/T8S. Refer to www.Bose.com/livesound for the latest preset banks. ToneMatch Preferences A: Taylor Guitars B: Audix Mics. C: Ovation Guitars Menu •... - Page 31 Operation The T4S/T8S includes three types of scenes: • (5) Bose scenes: Read-only factory-preset scenes. You cannot edit and overwrite them. • (10) User Scenes: User-definable scenes for saving and recalling all your favorite settings. You can update these scenes by overwriting them as many times as you want.
- Page 32 Operation If you pressed Select, use the Rename screen to edit the scene name, or press Save to use the name as displayed and go to Step 4. Rename Scenes S c e n e Save Cursor Select To change the scene name before saving: You can use the following editing options to change the scene name.
-
Page 33: Sharing A Scene
Shared Scene to your computer and then transfer the file to the computer of another T4S/T8S user. The other T4S/T8S user can download the scene to their T4S/T8S using the L1 updater. The L1 updater is available at www.Bose.com/livesound. To save a Shared Scene: Load the scene that you want to share (see “To load a scene”... - Page 34 Note: The T4S/T8S provides only one storage location for a Shared Scene. Saving a scene as a Shared Scene always overwrites the previously saved Shared Scene. Please visit www.Bose.com/livesound for details on using the L1® updater application for downloading and uploading scenes to and from your computer.
-
Page 35: Bose Scenes
Bose Scenes The five Bose scenes are provided as examples for you to use as a starting point. After loading a Bose scene, you can modify the settings and then save the settings as a My Scene or Shared Scene. -
Page 36: Singer/Songwriter
Operation Singer/Songwriter This scene is designed for a singer/songwriter playing keyboard or guitar and sometimes accompanied by an MP3 track. Figure 16. Example setup for Singer/Songwriter 36 - English... - Page 37 Operation English - 37...
-
Page 38: Dj/Playback
Operation DJ/Playback The DJ/Playback scene is designed for a DJ event or any audio playback need. This setup uses two microphones and either a mobile device, mixer, or laptop computer. Figure 17. Example setup for stereo DJ/Playback 38 - English... - Page 39 Operation English - 39...
-
Page 40: Full Band
Operation Full Band This scene is set up for a drum kit, bass guitar, electric guitar, vocals, and MP3 player. Figure 18. Example setup for Drums and Bass INPUT 1 INPUT 2 SYSTEM SIGNAL/CLIP SIGNAL/CLIP POWER/FAULT LIMIT VOLUME VOLUME FRONT POWER LIMIT SIGNAL INPUT... - Page 41 Operation English - 41...
-
Page 42: Factory Settings
Factory Settings Factory Settings This section describes the settings in the T4S/T8S mixer when it left the factory. To restore your T4S/T8S at any time to these factory settings, load the Bose Factory Settings scene. Comp/Gate Factory Settings Delay Factory Settings... -
Page 43: Care & Maintenance
1/4" phone plug cable. Turn up the power stand Trim control, and verify that you hear sound. • Make sure power LED on power stand is blue. If LED is red, please call the Bose Product and Technical Support Team directly at (877) 335-2673. -
Page 44: Care And Maintenance
Care and Maintenance Problem What to do Poor quality sound from a • Make sure there is no unwanted zEQ or Para EQ equalization applied. microphone or instrument • Verify that you have selected an appropriate ToneMatch® mixer preset connected to the T4S/T8S. for your microphone/instrument. - Page 45 Care and Maintenance Problem What to do Microphone is encountering • Orient the microphone so that it is not pointing directly at its respective feedback. loudspeaker. • Try a different microphone. • Try a different position for the L1 system and/or vocalist on stage. •...
-
Page 46: Cleaning
Care and Maintenance Problem What to do Unable to send audio from a • Check that the USB cable is properly connected to the mixer and computer to the T4S/T8S via computer. USB connection. • Try a different USB cable. •... -
Page 47: Contact Information
06172-7104-0 0870-741-4500 Additional Information Refer to the owner’s guide (online at www.Bose.com) for more information about your product (including accessories and replacement parts). To request a printed copy, use the phone numbers provided. Limited Warranty Your product is covered by a limited warranty. Visit www.pro.Bose.com for warranty details. - Page 48 ©2017 Bose Corporation, All rights reserved. Framingham, MA 01701-9168 USA www.Bose.com All trademarks are the property of their respective owners AM801203 Rev. 00 November 2017...
Need help?
Do you have a question about the T4S ToneMatch and is the answer not in the manual?
Questions and answers