Advertisement
Quick Links
Nextiva
S1800e Series
Version 2.0
This installation guide provides instructions for installing and performing the initial configuration. All users
should read the user manuals for complete details on installation, usage and functionality.
Contents of the Package
One S1801e, S1801e-POE or S1802e video encoder or One S1801e-R or S1801e-R-HD video decoder
One Nextiva S1800e Series Quick Installation Guide
PS121: ENERGY STAR
except the S1801e-POE.
Optional Accessories
VRM8: 19-inch rack mount panel for eight Nextiva S1800e series single and dual port devices.
PSPOE: 802.3af compliant Power over Ethernet injector.
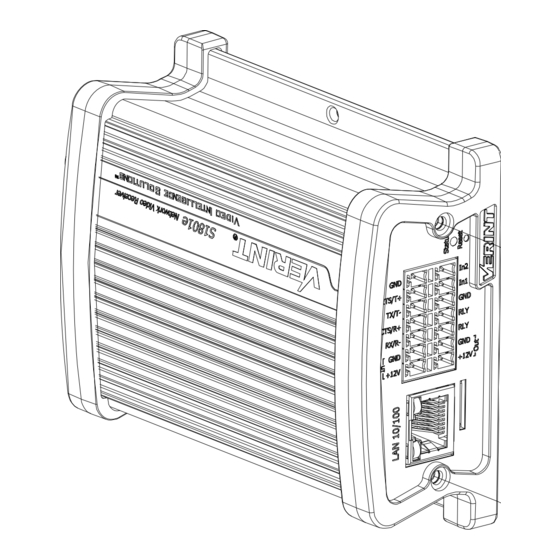
Hardware Overview
The Nextiva S1800e series single/dual-port devices are available in five models: S1801e, S1801e-POE,
S1801e-R, S1801e-R-HD or S1802e.
Nextiva S1800e Series Single/Dual-Port Front View
Video In
S1801e or S1801e-POE
Video Out
S1801e-R
Video Output
®
qualified power supply for Nextiva S1800e series single and dual port devices
Video Input
Audio
In
Out
Audio
In
Out
Quick Installation Guide
Video In 1
HD Video Out
S1801e-R-HD
HDMI Output
1
for Single/Dual-Port Devices
Audio
Video In 2
Out
In
S1802e
Audio
In
Out
Advertisement

Related Manuals for Verint S1801e


Summary of Contents for Verint S1801e
-
Page 1: Contents Of The Package
This installation guide provides instructions for installing and performing the initial configuration. All users should read the user manuals for complete details on installation, usage and functionality. Contents of the Package One S1801e, S1801e-POE or S1802e video encoder or One S1801e-R or S1801e-R-HD video decoder One Nextiva S1800e Series Quick Installation Guide ... - Page 2 1 Relay 12V DC Inputs Output * Only available on the S1801e-POE Output* Installing the Nextiva S1800e Series Device This section explains how to install a Nextiva S1800e series device on a desktop or flat surface and mount the device in a rack.
- Page 3 2. Screw the Nextiva S1800e series device to the VRM8 rack mount panel using 5 in-lb (0.56 N-m) force with the provided screws. 3. Slide the VRM8 rack mount panel into the 3U mounting space in the rack cabinet. 4. Secure the VRM8 rack mount panel to the rack cabinet using four screws that are supplied with the rack. Connecting the Nextiva S1800e Series Device This section explains how to connect the video, network and power cables to the Nextiva S1800e series device.
- Page 4 4. Connect the terminal block plug to the on the rear 2. Plug an ethernet cable into the LAN 10/100 of the device. (RJ-45) network connector on the back of the device. For the S1801e-POE, the ethernet cable is NOTE: already connected. To connect the cables for video output on the decoders: 1.
- Page 5 To connect the audio cable: 1. Plug the audio cable from the audio source to the audio input connectors on the rear of the device. S1801e or S1801e-POE or S1801e-R or S1801e-R-HD 5. Check Detect All Units on LAN. 6. Ensure that the VSIP Port is 5510; otherwise, click Default.
-
Page 6: Configuring Audio
APAC: Hong Kong: +852 2797 5678 Singapore: +65-68266099 Email: APAC_VIS_Services@verint.com © 2010 Verint Video Intelligence Solutions. All Rights Reserved Worldwide. All other trademarks and product names are the property of their respective owners. Part Number: 23-500-0075 rev A01...
Need help?
Do you have a question about the S1801e and is the answer not in the manual?
Questions and answers