Table of Contents
Advertisement
Available languages
Available languages
Advertisement
Chapters
Table of Contents

Related Manuals for Sanyo DMP-M400SD


Summary of Contents for Sanyo DMP-M400SD
- Page 1 INSTRUCTION MANUAL DMP-M400SD Digital Music Player English Español...
-
Page 2: Table Of Contents
The symbols ® are not shown in this manual. SANYO takes no responsibility for recording failure due to power cuts or damage to the unit. To avoid potential risk of data loss caused by accidental operation or malfunction of the unit, we recommend that you save a backup copy of your recorded messages on a PC, etc.. -
Page 3: Safety Precautions
Keep this manual in a safe place where you can find easily after reading this manual. SANYO will bear no responsibility over the loss caused by memory erasure due to product breakdown, repair or other reasons. Warning and Caution symbols... - Page 4 There is a risk of the car accident if you use this product while you’re driving or walking on the street. Do not disassemble the product. Your SANYO product is designed and manufactured with high quality materials and components which can be recycled and reused. This symbol means that electrical and electronic equipment, at their end-of-life, should be disposed of separately from your household waste.
- Page 5 Safety Precautions Battery Usage Precautions Make sure to use the battery specified in this manual. (AAA alkaline battery) Frictional heat can set the fire. Keep away from the metallic objects such as battery, coin or key. Remove the battery from the product if you do not use the product for a long time. Check the proper polarities (+/-).
-
Page 6: Features
Features SD Card Slot MP3, WMA Portable USB Mass Storage Device Music Mode - Normal, Pop, Rock, Classic, Jazz Easy to USB Navigation Function FM Stereo Note: This handling description is printed prior to product development. When a part of the product specification must be changed to improve operability or other functions, priority is given to the product specification itself. -
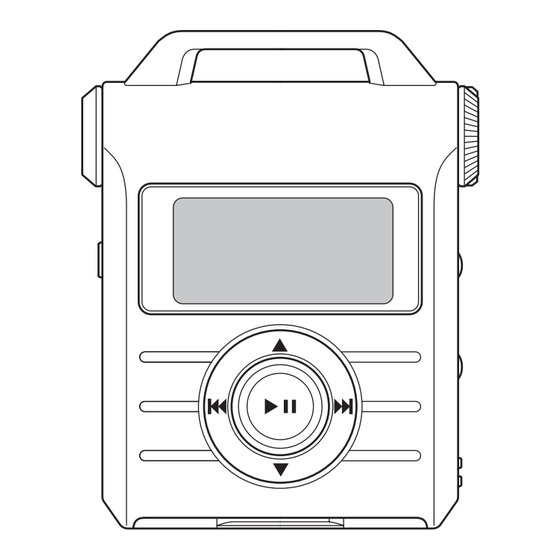
Page 7: Controls
Controls 1. l (Power/Operation) button 6. HOLD Switch 2. LCD Display 7. SD Card Slot Lid 3. Stereo Headphone Terminal 8. USB Terminal 4. Battery Compartment Lid 9. SD Card Slot 5. Volume +, - buttons GB-6 [ENGLISH]... -
Page 8: Description On Lcd
Description on LCD Music (WMA/MP3) Music Mode A-B Repeat Repeat Hold Icon Battery File Type MP3 POP MUSIC Folder File name Setlon01.MP3 /Song Information Volume 0000:05 001/002 096 Status Bit Rate/VBR Elapsed playing time Current File/Whole File Preset Number Store Frequency PRESET Battery 98.00MHz... -
Page 9: Operating Environment
Operating Environment Supported PCs IBM PC/AT compatible Supported OS Windows XP Professional Windows XP Home Edition Windows Millennium Edition(Me) Windows 2000 Professional Windows 98 Second Edition USB port One required for connection Sound board 16-bit Windows-compatible sound board supported Other Speakers or headphones required Note: Operation is not guaranteed for Macintosh PCs. -
Page 10: Usb Driver Program
This driver shall not be copied and reprinted. SANYO shall not be liable for any damages arising out of the use of this driver. 1. Turn on your PC and Windows is started. Do not connect the unit to the PC yet. - Page 11 3. Click [Install]. [Install] screen appears. 4. Click [Yes]. 5. Click [OK]. The PC will restart. GB-10 [ENGLISH]...
-
Page 12: Connect The Unit To Your Pc
Connect the unit to your PC Insert SD Card into SD Card slot before connecting to a PC. CONNECT Note: Do not use an USB hub or USB extension cable (Operation is not guaranteed). Use only the supplied USB connection cable for connection. When you connect the unit to the PC for the first time, it sometimes may not be recognized as a Removable Disk. -
Page 13: Disconnecting The Unit From Your Pc
Disconnecting the unit from your PC Before disconnecting, make sure no data is being transferred. For Windows 98SE Disconnect the unit from your PC. For Windows XP/2000/ME Follow the steps below to disconnect. (The screen shots are of Windows XP.) The screen might be different for a different OS. -
Page 14: Before Using
Before Using 1) Battery Installing Battery One AAA/LR03/HP16 Alkaline battery OPEN LOCK MARK MARK Adjust the “ m ” marks when opening or closing. Battery indicator Full Level 2 Level 1 Exhausted (Time to replace) Battery Lifetime Battery WMA/MP3 Playback FM Listening AAA Alkaline Approx, 12Hours... - Page 15 2) Headphones (supplied) Connect the headphones to the terminal. Note Be sure to reduce the volume before connecting or disconnecting the headphones. 3) SD Card Inserting the SD Card 1. Open the SD Card compartment lid. 2. Check the edge of the card and insert the card as shown.
- Page 16 4) Power On/Off Power On Press and hold l button for at least 2 seconds, “HELLO!” appears briefly on the display and the power turns on. Power Off Press and hold l button for at least 2 seconds, “SEE YOU!” appears and power turns off.
- Page 17 7) Switching Mode Slide and hold l button to 4 for at least 2 seconds to enter Switching Mode. Slide and hold to 4 for at least 2 seconds MUSIC MUSIC MUSIC SETUP SETUP SETUP <MUSIC> <FM> <SETUP> 1) MUSIC : Music Files Playback such as MP3, WMA 2) FM : FM radio 3) SETUP : Function adjustment 1) MUSIC...
-
Page 18: Music Mode
Music Mode 1) Playback/Stop (Pause) Press l button shortly Playback : Press l button shortly once. Stop (Pause) : Press l button shortly once in the playback mode. MP3 NOR MP3 NOR MUSIC MUSIC Setlon01.MP3 Setlon01.MP3 0000:05 0000:05 001/002 096 001/002 096 <Playback>... - Page 19 3) Section Repetition (A-B) Slide l button to 5 shortly. On : Slide l button to 5 shortly once to select the point A during playback. Slide l button to 5 shortly once again to select the point B. Then the section from A to B is played repeatedly. Off : Slide l button to 5 shortly once.
- Page 20 m m m m m Repeat Repeat MUSIC Slide l button to 4 / 5 and slide l button to e Sound shortly once. Repeat Select desirable Repeat mode sliding l button to 4 / Control 5 and slide l button to e shortly once. All Dir One Dir Repeat...
- Page 21 m m m m m Control Control MUSIC Slide l button to 4 / 5 and slide l button to e Sound shortly once. Repeat Select desirable Song Inf mode and Resume mode Control sliding l button to e . 1) Song Inf Song Inf : Display Song Title, Artist and Album name.
-
Page 22: Fm Mode
FM Mode In the stop(pause) mode, slide and hold l button to 4 for at least 2 seconds, then select “FM” sliding l button to 4 / 5 and slide l button to e to enter FM Mode. MUSIC Slide and hold to 4 for at least 2 seconds SETUP 1) Selecting FM Mode... - Page 23 2) Searching FM Frequency Slide l button to f / e shortly. Normal Mode : Slide l button to f / e shortly, then Frequency level changes as 0.05MHz(50kHz) every click. Slide l button to f / e longer, then through automatic scanning, Frequency will be selected at an good reception.
- Page 24 6) Entering MENU mode In FM Mode, slide and hold l button to 4 for at least 2 seconds, then select “FM” and press l button shortly once to enter. MUSIC Slide and hold to 4 for at least 2 seconds SETUP Slide l button to f shortly to return to higher menu.
-
Page 25: Setup Mode
Setup Mode Slide and hold l button to 4 for at least 2 seconds, then select “SETUP” sliding l button to 4 / 5 and press l button shortly once. Slide l button to f shortly to return to higher menu. MUSIC Slide and hold to 4 for at least 2 seconds... - Page 26 2) Backlight Backlight Display Adjust the period of time sliding l button to 4 / 5 (Off, Contrast 01~08, On) and press l button shortly once. Backlight Power Display Backlight 02 sec 3) Power Power Display Set the lead time to auto power off in stop(pause) mode Contrast sliding l button to 4 / 5 and press l button shortly Backlight...
- Page 27 2) Del File Del File System MP3/WMA files playbacking possible are to be able to Reset delete. Del File Select a file that you want to delete sliding l button to Format 4 / 5 / f / e , then slide and hold l button to e for at least 2 seconds.
- Page 28 3) Format Format System After SD card formatted, all data is deleted. Reset Select [Yes] sliding l button to 4 / 5 . Del File Press l button shortly once. Format Format Note Before format, make sure that battery indicator is “Level 2” or “Full”. Unlock the protect of SD card before Format.
-
Page 29: Troubleshooting Guide
Troubleshooting guide Symptom Possible cause Corrective action The unit does not start. Battery is not inserted properly or is dead. Reinsert the battery correctly or replace with new alkaline battery. SD card error. Remove a battery after turning off the unit. After wait a moment, insert a battery and turn on the unit again. - Page 30 Symptom Possible cause Corrective action The Removable Disk is not displayed when the unit is connected to the PC. The PC and the unit are not connected correctly. Make sure the connect is corrected. Disconnect the unit from the PC and reconnect it again. Sufficient power is not being supplied from the PC.
-
Page 31: Cleaning The Cabinet
Cleaning the cabinet Clean the outside of the unit with a clean soft cloth, moistened with lukewarm water. Do not use benzene, thinner or alcohol since they will mar the finish of the surfaces. GB-30 [ENGLISH]... - Page 32 ® no se muestran en este manual. SANYO no se responsabiliza de ningún daño de grabación derivado de interrupciones en el suministro eléctrico o daños en la unidad. Para evitar posibles pérdidas de datos provocadas por un uso accidental o erróneo de la unidad, se recomienda guardar una copia de seguridad de los...
-
Page 33: Precauciones
Guarde este manual en un lugar seguro, donde lo pueda encontrar fácilmente para futura referencia. SANYO no se responsabiliza de las pérdidas causadas por el borrado de la memoria del dispositivo si éste se avería, debe repararse o por otras razones. - Page 34 Hay riesgo de que sufra un accidente de tráfico si utiliza este producto mientras conduce o anda por la calle. No desarme el producto. Los productos SANYO están diseñados y fabricados con materiales y componentes de alta calidad, que pueden ser reciclados y reutilizados.
- Page 35 Precauciones de seguridad Precauciones relacionadas con el uso de las pilas Asegúrese de utilizar pilas del tipo especificado en este manual (pilas alcalinas AAA). El calor por fricción podría incendiar las pilas. Mantenga las pilas alejadas de objetos metálicos, tales como monedas o candados. . Extraiga la pila del interior de la unidad si no va a utilizarla durante un período largo de tiempo.
-
Page 36: Características
Características Ranura de la tarjeta SD MP3, WMA Dispositivo portátil de almacenamiento en masa USB Modo de música – Normal, popular, rock, clásica y jazz Función de navegación USB fácil de utilizar FM estéreo Nota: Este manual de instrucciones se ha impreso antes del desarrollo final del producto. -
Page 37: Controles
Controles 1. Botón l (Alimentación/Operación) 6. Conmutador de bloqueo (HOLD) 2. Pantalla LCD 7. Tapa de la ranura de la tarjeta SD 3. Terminal de auriculares estéreo 8. Terminal USB 4. Tapa del compartimiento de la pila 9. Ranura de la tarjeta SD 5. -
Page 38: Descripción En La Lcd
Descripción en la LCD Música (WMA/MP3) Repetición Repetición A-B Modo de música Icono de bloqueo Estado de las pilas Tipo de archivo MP3 POP MUSIC Carpeta Nombre del archivo Setlon01.MP3 Volumen 0000:05 /Información de canciones 001/002 096 Estado Velocidad de bits/VBR Tiempo de reproducción transcurrido Archivo actual/Archivo completo Número de presintonización... -
Page 39: Entorno De Pc Recomendado
Entorno de PC recomendado PC soportados Ordenadores compatibles IBM PC/AT Sistemas operativos soportados Windows XP Professional Windows XP Home Edition Windows 2000 Professional Windows Millennium Edition(Me) Windows 98 Second Edition Puerto USB Se requiere uno para la conexión Tarjeta de sonido Tarjeta de sonido de 16 bits compatible con Windows Otros Se requieren unos altavoces o unos auriculares... -
Page 40: Programa De Controlador Usb
Se prohíbe la reproducción de este controlador. No se puede copiar ni reproducir este controlador. SANYO no se responsabiliza de ningún daño derivado del uso de este controlador. 1. Encienda su PC y arranque Windows. No conecte todavía la unidad al PC. - Page 41 3. Haga clic en [Install]. Aparecerá la pantalla del asistente de instalación [Install]. 4. Haga clic en [Yes]. 4. Haga clic en [OK]. El ordenador se reiniciará. E-10 [ESPAÑOL]...
-
Page 42: Conecte La Unidad A Su Pc
Conecte la unidad a su PC Inserte la tarjeta SD en la ranura de tarjeta SD antes de hacer la conexión a un PC. CONNECT Nota: No utilice un concentrador USB o un cable de extensión USB, ya que no podemos garantizar el correcto funcionamiento de la unidad. -
Page 43: Desconectar El Grabador De Voz Del
Desconectar el grabador de voz del PC Antes de desconectar la unidad del PC, asegúrese de que no se estén transfiriendo datos. Para Windows 98SE Desconecte la unidad del PC. Para Windows XP/2000/ME Siga los pasos siguientes para desconectar la unidad. Las pantallas siguientes son de Windows XP. -
Page 44: Antes De Utilizar El Dispositivo
Antes de utilizar el dispositivo 1) Pila Instalación de la pila Una pila alcalina AAA/LR03/HP16 OPEN LOCK MARK MARK Ajuste las marcas “ m ” cuando abra o cierre. Icono del estado de la pila Llena Nivel 2 Nivel 1 Agotada (Tiempo hasta reemplazarla) Duración de la pila... - Page 45 2) Auriculares (suministrados) Conecte los auriculares al terminal Nota Asegúrese de reducir el volumen antes de conectar o desconectar los auriculares. 3) Tarjeta SD Inserción de la tarjeta SD 1. Abra la tapa del compartimiento de la tarjeta SD. 2. Compruebe el borde de la tarjeta e insértela como se muestra.
- Page 46 4) Conexión/desconexión de la alimentación Conexión de la alimentación Pulse y mantenga pulsado el botón l durante un mínimo de 2 segundos, “HELLO!” aparece brevemente en la pantalla y se conecta la alimentación. Desconexión de la alimentación Pulse y mantenga pulsado el botón l durante un mínimo de 2 segundos, “SEE YOU!”...
- Page 47 7) Modo de conmutación Deslice y mantenga pulsado el botón l en 4 durante un mínimo de 2 segundos para entrar en el modo de conmutación. Deslícelo y manténgalo en 4 durante un mínimo de 2 segundos. MUSIC MUSIC MUSIC SETUP SETUP SETUP...
-
Page 48: Modo De Música
Modo de música 1) Reproducción/Parada (Pausa) Pulse brevemente el botón l Reproducción : Pulse brevemente una vez el botón l . Parada (Pausa) : Pulse brevemente una vez el botón l en el modo de reproducción. MP3 NOR MP3 NOR MUSIC MUSIC Setlon01.MP3... - Page 49 3) Repetición de sección (A-B) Deslice brevemente el botón l hacia 4 . Activación : Deslice brevemente una vez el botón l a 5 para seleccionar el punto A durante la reproducción. Vuelva a deslizar brevemente una vez el botón l a 5 para seleccionar el punto B.
- Page 50 m m m m m Repetición Repetición MUSIC Deslice brevemente una vez el botón l a 4 / 5 y el Sound botón l a e . Repeat Selección el modo de repetición deseado deslizando Control brevemente una vez el botón l a 4 / 5 y el botón l a e .
- Page 51 m m m m m Control Control MUSIC Deslice brevemente una vez el botón l a 4 / 5 y el Sound botón l a e . Repeat Seleccione el modo de información de canciones y el Control modo de reanudación deseados deslizando el botón l a e .
-
Page 52: Modo De Fm
Modo de FM En el modo de parada (pausa), deslice y mantenga el botón l en 4 durante un mínimo de 2 segundos, y luego seleccione “FM” deslizando el botón l a 4 / 5 y el botón l a e para entrar en el modo de FM. MUSIC Deslícelo y manténgalo en 4 durante un mínimo de 2 segundos. - Page 53 2) Búsqueda de frecuencias de FM Deslice brevemente el botón l hacia f / e . Modo normal : Deslice brevemente el botón l a f / e y el nivel de la frecuencia cambiará 0.05 MHz (50 kHz) con cada clic. Deslice más tiempo el botón l a f / e y, mediante la exploración automática, la frecuencia se seleccionará...
- Page 54 6) Entrada en el modo MENU En el modo de FM, deslice y mantenga el botón l en 4 durante un mínimo de 2 segundos, y luego seleccione “FM” y pulse brevemente una vez el botón l para entrar en el modo. MUSIC Deslícelo y manténgalo en 4 durante un mínimo de 2 segundos.
-
Page 55: Modo De Configuración
Modo de configuración Deslice y mantenga el botón l en 4 durante un mínimo de 2 segundos, y luego seleccione “SETUP” deslizando el botón l a 4 / 5 y pulse brevemente una vez el botón l . Deslice brevemente el botón l a f para volver a un menú anterior. MUSIC Deslícelo y manténgalo en 4 durante un mínimo de 2 segundos. - Page 56 2) Luz de fondo Luz de fondo Display Ajuste el periodo de tiempo deslizando el botón l a 4 Contrast / 5 (desactivación, 01~08, activación) y pulse brevemente Backlight una vez el botón l . Power Display Backlight 02 sec 3) Alimentación Alimentación Establezca el tiempo que va a pasar hasta la desconexión...
- Page 57 2) Eliminar archivo Eliminar archivo System Los archivos MP3/WMA de reproducción se pueden Reset borrar. Del File Seleccione un archivo que quiera eliminar y deslizando Format el botón l a 4 / 5 / f / e , y luego deslice y mantenga el botón l en e durante un mínimo de 2 segundos.
- Page 58 3) Formatear Formatear System Después de formatear la tarjeta SD se eliminarán todos Reset los datos. Del File Seleccione [Yes] deslizando el botón l a 4 / 5 . Format Pulse brevemente una vez el botón l . Format Nota Antes de formatear, asegúrese de que el indicador de la pila esté...
-
Page 59: Guía De Solución De Problemas
Guía de solución de problemas Síntoma Posible causa Acción correctora La unidad no se pone en funcionamiento. Las pilas no están colocadas correctamente o están gastadas. Coloque la pila correctamente o cámbiela por una pila nueva. Error de tarjeta SD. Retire la pila después de apagar la unidad. - Page 60 Síntoma Posible causa Acción correctora La unidad está conectada al PC y el Disco extraíble no aparece. El PC y la unidad no están conectadas correctamente. Compruebe que la conexión es correcta. Desconecte la unidad del PC y vuelva a conectarla. El PC no suministra energía suficiente a la unidad.
-
Page 61: Limpieza De La Carcasa
Limpieza de la carcasa Limpie el exterior de la unidad con un paño suave humedecido en agua templada. No utilice benceno, diluyentes ni alcohol, ya que podrían dañar la capa protectora de la superficie. E-30 [ESPAÑOL]... - Page 62 MEMO...
- Page 63 MEMO...
-
Page 64: Specifications
Dimensions (W x H x D): Approx. 55 x 69 x 15 mm Weight : Approx. 29g (without battery) IMPORTANT INFORMATION Because its products are subject to continuous improvement, SANYO reserves the right to modify product designs and specifications without notice and without incurring any obligation.
Need help?
Do you have a question about the DMP-M400SD and is the answer not in the manual?
Questions and answers