
Related Manuals for Easy@Home 1764


Summary of Contents for Easy@Home 1764
-
Page 1: Fan Heater
User Manual Manual del usuario ® ® FAN HEATER CALOVENTOR English..3 Español..13... -
Page 2: Table Of Contents
Contents Parts ....................3 General Information ................4 Use and Storage of the User Manual ...........4 Intended Use ..................4 Safety....................5 Explanation of Symbols ...............5 Electric Power ..................5 Polarized Plug ..................5 Important Safety Instructions ..............6 Safety Warnings ..................7 Before Use ..................8 Use .................... -
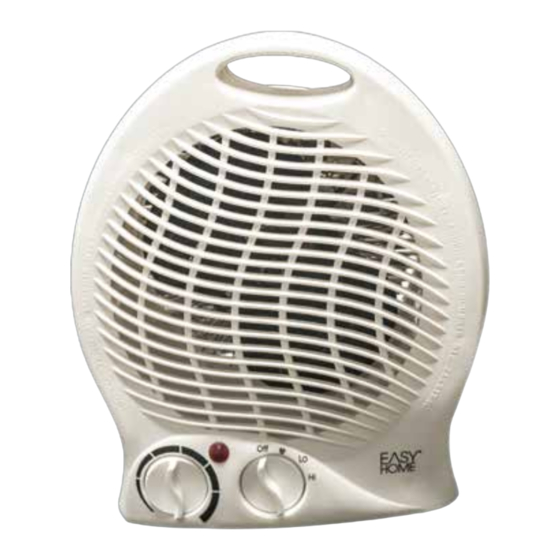
Page 3: Parts
Parts Parts Handle Air Outlet Thermostat Control Power Indicator Light Fan Control Polarized Plug Tip-Over Safety Switch... -
Page 4: General Information
General information General Information Use and Storage of the User Manual Inside this user manual you will find information on how to use and maintain your Fan Heater properly, including but not limited to, safety instructions and precautions, use instructions, and warranty conditions. -
Page 5: Safety
Safety Safety Explanation of Symbols Recognize these symbols: Hazards or unsafe practices which COULD result in severe personal injury or death. Hazards or unsafe practices which COULD result in minor personal injury. THIS PRODUCT IS INTENDED FOR HOUSEHOLD USE ONLY Before using the Fan Heater be sure to read and understand all of the safety precautions. -
Page 6: Important Safety Instructions
Safety Important Safety Instructions When using any electric appliance, some basic safety precautions should always be followed to reduce the risk of fire, electric shock and/or any injury to people, including the following: Read all instructions before using the heater. The heater is hot when in use. -
Page 7: Safety Warnings
Safety SAVE THESE INSTRUCTIONS FOR FUTURE REFERENCE Safety Warnings • The power indicator light will be lit when the Fan Control is turned to " ", "Lo" or "Hi" mode. • The heater is equipped with an "Automatic Overheat Safety Device" that will turn off the power to the heating element should the internal temperature of the heater exceed normal levels. -
Page 8: Before Use
Before use Before Use Carefully remove your heater from the box. (Save the box for off-season storage). Make sure the heater is switched to "Off" before plugging the heater into the outlet. Connect to properly grounded outlets only. Place the heater on a firm level surface, free from obstructions and at least 3 feet (0.9 m) away from any wall or other objects such as curtains, plants, etc. -
Page 9: Use
Control Panel Power Indicator Light: Will be lit when the unit is powered on in "Fan Only: ", "Lo", or “Hi" mode. Thermostat Control: Use to increase or decrease desired temperature. Fan Control: Use to select between "Off", "Fan Only: ", "Lo"... -
Page 10: Care And Cleaning
Care and cleaning Care and Cleaning Cleaning Dust, dirt, etc. can diminish your heater's performance, can lead to unwanted odors and can also be a safety hazard. For best performance, clean your heater at least once per season. NOTE: ALWAYS turn the heater OFF and unplug it before cleaning. •... -
Page 11: Specifications
Specifications Specifications Technical Data Voltage Rating 120V AC, 60Hz Power Rating 1500 Watts Coverage 160 Sq. Ft. (14.8645 Sq. Meters) 8.5 in. (21.59cm) x 10.5 in. (26.67 cm) x 4.7 Product Dimensions in. (11.93 cm) Net Weight 2.87 lbs. (1.3 Kg) NOTE: Due to continuing product development, specifications and design may be subject to change without prior notice. -
Page 12: Troubleshooting
Troubleshooting Troubleshooting If your heater fails to operate, please do the following: • Review these instructions to ensure you understand the basic operations and features of your heater. • Check for obstructions. Unplug the heater for 30 minutes, clear any obstructions and restart the heater. - Page 13 Contenido Piezas ....................14 Información general ................15 Uso y guardado del Manual del usuario ..........15 Uso indicado ..................15 Seguridad ..................16 Significado de los símbolos ..............16 Alimentación eléctrica .................16 Enchufe polarizado ................17 Instrucciones importantes de seguridad ..........18 Advertencias de seguridad ..............18 Antes de usar ...................
-
Page 14: Piezas
Piezas Piezas Mango Salida de aire Control del termostato Luz indicadora de alimentación Control del ventilador Enchufe polarizado Interruptor de seguridad ante inclinación... -
Page 15: Información General
Información general Información general Uso y guardado del Manual del usuario Dentro de este manual del usuario encontrará información sobre el uso y mantenimiento correcto de su caloventor, incluidos entre otros, las instrucciones y advertencias de seguridad, las instrucciones de uso y las condiciones de la garantía. Por favor, guarde este manual del usuario en una ubicación de fácil acceso para referencia futura. -
Page 16: Seguridad
Seguridad Seguridad Significado de los símbolos Se utilizan estos símbolos: ADVERTENCIA Peligros o prácticas inseguras que PODRÍAN provocar lesiones graves o la muerte. PRECAUCIÓN Peligros o prácticas inseguras que PODRÍAN provocar lesiones menores. ESTE PRODUCTO ESTÁ DESTINADO EXCLUSIVAMENTE PARA USO DOMÉSTICO ADVERTENCIA Antes de usar el caloventor asegúrese de leer con atención todas las advertencias de seguridad. - Page 17 Instrucciones importantes de seguridad Instrucciones importantes de seguridad Al utilizar cualquier aparato eléctrico, se deben seguir siempre ciertas precauciones de segu- ridad para reducir el riesgo de incendio o descarga eléctrica y/o lesiones a personas, incluidas las siguientes: Lea todas las instrucciones antes de usar el caloventor. El caloventor se calienta cuando se lo usa.
-
Page 18: Instrucciones Importantes De Seguridad
Advertencias de seguridad GUARDE ESTAS INSTRUCCIONES PARA REFERENCIA FUTURA Advertencias de seguridad • La luz indicadora de alimentación se encenderá cuando el Control del ventilador se coloque en los modos “ ”, “Lo” o “Hi”. • El caloventor posee un “dispositivo de seguridad automático contra sobrecalentamiento” que interrumpirá... -
Page 19: Antes De Usar
Antes de usar Antes de usar Quite con cuidado el caloventor de la caja. Guarde la caja para guardarlo fuera de temporada. Asegúrese de que el caloventor esté apagado (en la posición "OFF") antes de conectarlo al tomacorriente. Conéctelo solo a tomacorriente con conexión a tierra. Coloque el caloventor sobre una superficie nivelada y firme, libre de obstrucciones y al menos a 3 pies (0.9 m) de cualquier pared u otros objetos como cortinas, plantas, etc. -
Page 20: Uso
Panel de control Luz indicadora de alimentación: Se encenderá cuando la unidad esté en los modos "Ventilador solamente: ”, "Lo" (Bajo) o "High" (Alto). Control del termostato: Se usa para aumentar o disminuir la temperatura deseada. Control del ventilador: Se usa para seleccionar entre los modos de calor “Off" (Apagado), “Solo ventilador: ”, “Low”... -
Page 21: Cuidado Y Limpieza
Cuidado y limpieza Cuidado y limpieza Limpieza El polvo, la suciedad, etc., pueden disminuir el rendimiento del caloventor, pueden generar olores indeseados y pueden constituir también un riesgo para la seguridad. Para un ren- dimiento óptimo, limpie el caloventor cada estación. NOTA: SIEMPRE apague el caloventor (posición OFF) y desconéctelo antes de limpiarlo. -
Page 22: Especificaciones
Especificaciones Especificaciones Datos técnicos Tensión nominal 120V AC, 60Hz Potencia nominal 1500 vatios Cobertura 160 pies cuadrados (14.8645 metros cuadrados) 8.5 x 10.5 x 4.7 pulgadas (21.59 x 11.93 x Dimensiones del producto 26.67 cm) Peso neto 2.87 libras (1.3 kg) NOTA: Debido al desarrollo continuo del producto, es posible que las especificaciones y el diseño cambien sin previo aviso. -
Page 23: Solución De Problemas
Solución de problemas Solución de problemas Si el caloventor deja de funcionar, haga lo siguiente:z • Revise estas instrucciones para asegurarse de que entiende las funciones y el funcionamiento básicos de su caloventor. • Verifique el disyuntor eléctrico o fusible del hogar. •... -
Page 24: Warranty Conditions
ALDI INC. FULL WARRANTY CONDITIONS Dear Customer, The ALDI warranty is a full warranty offering you the following benefits: Warranty period: 2 year from date of purchase with original, dated proof of purchase receipt. Costs: Free replacement product or refund at EuroCentra’s discretion. ADVICE: Please contact our service hotline by phone or e-mail should you need to make a claim or if you have a question... -
Page 25: Condiciones De La Garantía
CONDICIONES DE LA GARANTÍA COMPLETA DE ALDI INC. Estimado cliente: La garantía de Aldi es una garantía completa que le ofrece los siguientes beneficios: Período de 2 años a partir de la fecha de compra con recibo original garantía: fechado de prueba de la compra. Reemplazo gratis del producto o reembolso a discreción Costo: de EuroCentra. -
Page 26: Warranty Card
* We recommend you keep your receipt with this warranty card Location of purchase* Description of malfunction: AFTER SALES SUPPORT • If you have a malfunction please SERVICIO POSVENTA PRODUCT CODE: 1764 contact our Customer Service 866 558 8096 department and send this service@801service.net completed warranty card with... -
Page 27: Tarjeta De Garantía
Lugar de la compra: Descripción de la avería: AFTER SALES SUPPORT • Si el producto tiene una avería SERVICIO POSVENTA PRODUCT CODE: 1764 póngase en contacto con el servicio 866 558 8096 de atención al cliente y envíe esta service@801service.net tarjeta de garantía completada con... - Page 28 DISTRIBUTED BY • DISTRIBUIDO POR: ALDI INC., BATAVIA, IL 60510 WWW.ALDI.US AFTER SALES SUPPORT • SERVICIO POSVENTA PRODUCT CODE: 1764 866 558 8096 service@801service.net YEAR WARRANTY 12/2016 AŇOS DE GARANTĺA...
Need help?
Do you have a question about the 1764 and is the answer not in the manual?
Questions and answers