Table of Contents
Advertisement
Advertisement
Table of Contents

Related Manuals for Universal Space DUCKY SPLASH


Summary of Contents for Universal Space DUCKY SPLASH
- Page 1 Be Sure to Read this Manual Before Use Operation Manual www.universal-space.com...
-
Page 2: Table Of Contents
CONTENT Important Safety Instructions ..............2 1. SPECIFICATIONS..................4 2. PACKAGE CONTENTS ................5 3. PART NAMES .................... 6 4. SET UP & INSTALLATION ................7 5. HOW TO PLAY..................11 6. GAME OPTIONS ..................12 7. MAINTENANCE, INSPECTION..............19 8. -
Page 3: Important Safety Instructions
Thank you for purchasing DUCKY SPLASH from UNIVERSAL SPACE. We hope you enjoy the product. This manual contains valuable information about how to operate and maintain your game machine properly and safely. It is intended for the owner and/or personnel in charge of product operation. - Page 4 No Touching Hazard: This part may be hot or can cause electric shock. Do not touch. Use the following safety guidelines to help ensure your own personal safety and to help protect your equipment and surrounding environment from potential damage. This product is an indoor game machine.
-
Page 5: Specifications
1. SPECIFICATIONS Rated power supply: 220V 50/60Hz Min. Power consumption: 120W Max. Power consumption: 6300W Dimensions: W1930×D1000×H2090.3 (mm) Weight: About 215Kg NOTICE: After turning off the game, please wait at least 1 minute before restarting again. Note: Game parameters are subject to change without notice. -
Page 6: Package Contents
2. PACKAGE CONTENTS Open the package and make sure all the items are included: 1 x Body Assembly Following accessories Part No. Name Spec. Qty. Illustration Note AC power 10A/250V 1.8m D108-806-000 T5A/250V(T10A/125V) D108-453-000 Φ5-20 Choose by Fuse T5A/250V(T10A/125V) area D108-461-000... -
Page 7: Part Names
3. PART NAMES 2D VIEW 3D VIEW... -
Page 8: Set Up & Installation
4. SET UP & INSTALLATION This product is an indoor game machine. Do not install outdoors. Refer to IMPORTANT SAFETY INSTRUCTIONS for places to avoid Place the unit on a dry level surface Ventilation openings in the back of the unit must not be obstructed by objects or by wall. 4.1 Play Zone This machine requires space for playing and for maintenance as shown below. - Page 9 4.2 Level Adjustment Install this machine on a flat surface. Adjust levers to lift casters off the ground to level the game If the game is installed on an unsuitable floor, it could cause a malfunction. To fix the game, adjust the Leveler down until it touches the floor, lifting the casters off the ground by 5mm.
- Page 10 4.3 Transporting the Game If you need to move the game, adjust the levelers back to an “up” position so the casters touch the ground. Leveler Caster Move NOTICE Be careful not to damage the machine during transport. The machine should be handled with care when bringing it down from a higher level.
- Page 11 4.4 Connecting Power WARNING: Check the voltage rating before you connect the equipment to an electrical outlet to ensure that the required voltage and frequency match the available power source. Please refer the label of the machine. Do not plug the equipment power cables into an electrical outlet if the power cable is damaged.
-
Page 12: How To Play
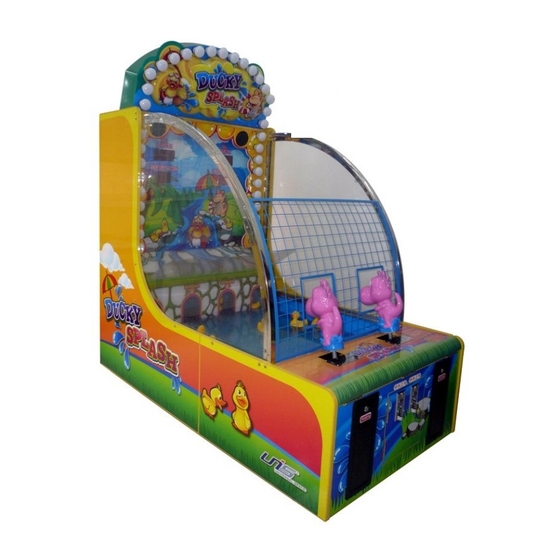
5. HOW TO PLAY Ducky Splash is a 1- 2 player water shooting game for children and the whole family! The object of the game is to use the Dino water guns to shoot rubber ducks into the 2 tunnel entrances. Players... -
Page 13: Game Options
6. GAME OPTIONS 6.1 Switching Control Signals Please refer to the I/O chart and schematics included with the game. To adjust DIP settings, please refer to the I/O chart. The initial settings are in CAPITAL LETTERS. Main Board :... -
Page 14: Test Mode
Test Mode: Press and hold the TEST button on the main board to enter Test Mode. LED Display Left score LED<1>3-1/Left time LED<1>6-5 Right score LED<2>3-1/Right time LED<2>6-5 (Flashing): Left credit LED<1>6-5 Right credit LED<2>6-5 Testing - Options LED displays segment scan, digit scan and shows <1, 2, 3, 4, 5, 6, 7, 8> and <87654321> - To check LED display. - Page 15 6.2 DIP adjust(Default Setting) Note: Game parameters are subject to change without notice.
- Page 16 6.3 Parameter Settings DIP Adjust 1(SW1) (1)Coin(s) per game DIP Adjust(SW1) Item Content Note Coin(s) per game (2)Game play time DIP Adjust(SW1) Item Content Note Game play time (3)Mercy Tickets DIP Adjust(SW1) Item Content Note Mercy tickets...
- Page 17 (4)Score memory DIP Adjust(SW1) Item Content Note Score memory DIP Adjust 2(SW2) (5)Payout (Score per ticket) DIP Adjust(SW2) Item Content Note off off Payout (Score per ticket) (6)Score DIP Adjust(SW2) Item Content Note Score...
- Page 18 (7)Match DIP Adjust(SW2) Item Content Note No Match Match Match DIP Adjust 3(SW3) (8)Max ticket payout DIP Adjust(SW3) Item Content Note No ticket Max ticket payout (9)No use SW...
- Page 19 6.4 Input & Output Parts: Input part: INPUT CONTENT INPUT CONTENT INPUT CONTENT INPUT CONTENT J9-1 Ticket reset J9-11 J9-21 J9-31 J9-2 J9-12 J9-22 J9-32 J9-3 J9-13 J9-23 J9-33 J9-4 Left sensor J9-14 J9-24 J9-34 J9-5 J9-15 J9-25 J9-35 J9-6 J9-16 J9-26 J9-36...
-
Page 20: Maintenance, Inspection
7. MAINTENANCE & INSPECTION 7.1 Safety Check Check the points listed before operating the machine. These checks are necessary for safe machine operation: 1. Try to run the game before operation each day. 2. Conduct monthly routine checks of game components ensure good working condition 3. - Page 21 7.3 Regular Cleaning: It is recommended that the water filter be cleaned once a month and changed every 6 months. The water in the tank should be changed monthly. The drainage should be cleaned every 6 months. Note: If the game is placed in an area exposed to high level of dust, increase cleaning frequency.
- Page 22 IMPORTANT: When adding water to the game, the amount of water needs to be exactly at the Waterline (as indicated in the playfield). Keep adding water until the water surface reaches the water line. Be careful not to go over because too much water affects floatation of the ducks and can affect the overall game play.
- Page 23 EMPTYING WATER FROM THE PUMP: Unscrew the Nut under the pump to empty the water inside the pump. NOTE: Always empty water in the tank and in the pump before transporting. 7.6 Left & Right Gun Assembly Maintenance: The gun assembly mechanisms are located inside the front control panel. Step 1: To open the control panel, grip the two Dino water guns at the base then pull them towards you.
-
Page 24: Overall Construction
8. OVERALL CONSTRUCTION 8.1 Main Assembly 1:... - Page 25 Part No. Code Name Qty. Spec. Note D108-101-000 KLXY-00-16 Tank holder B δ1.2 D108-102-000 KLXY-00-06 L_holder δ1.2 D108-103-000 TY-JX-010 Leveler bracket Q235 δ3 D108-401-000 25501000056 2.5” Castor 3-2689-52 D108-402-000 TY-JX-008 Leveler Q235 M16X100 D108-104-000 KLXY-00-14 Pump install board Q235 δ2 D108-105-000 TY-JX-007 Ticket box...
- Page 26 KLXY-00-23 D108-616-000 Division pipe Clarity PVC Φ12*2 KLXY-00-07 L_ syphon D108-119-000 Stainless steel Squarepipeδ1.2 KLXY-00-08 D108-604-000 Side board Clarity PVC δ5 8.2 Main Assembly 2:...
- Page 27 Part No. Code Name Qty. Spec. Note KLXY-05-00 Header Assy. D108-002-000 Assembly DZPPL-00-09M D108-502-000 LED board (Upper) Plywood δ9 D108-801-000 LED (3) D108-802-000 LED (2) 20106090137 D108-465-000 Sleeve bearing KLXY-00-20 D108-150-000 Protect net KLXY-04-00 D108-003-000 R_gun Assy. Assembly KLXY-00-12 D108-605-000 Gun covering Black PP δ1 KLXY-00-13...
- Page 28 8.3 Lamp Assembly: Part No. Code Name Qty. Spec. Note DZPPL-02-02 Lamp box cover D108-126-000 Q235 δ1.5 Green 22006013003 T5 Fluorescent lamp D108-407-000 T5-13W 220V/blue DZPPL-02-01 D108-127-000 Lamp box body Q235 δ1.5 Green D108-608-000 KLXY-HM-02 Lamp box Clarity PVC 3MM D108-411-000 22003000021 DC12V White...
- Page 29 8.4 Pump Assembly: (2D)...
- Page 30 (3D)...
- Page 31 Part No. Code Name Qty. Spec. Note 25101020049 Square bent D108-415-000 DN15 1/2” D108-416-000 25101120047 Valve DN15 1/2” D108-417-000 25101030078 Three_head connect DN15 1/2” D108-418-000 25101100057 Air hole DN15 1/2” D108-128-000 klxy-02-03 Tube connection Brass D108-129-000 klxy-02-06 Brass D108-419-000 20116000103 O type hermetical ring Φ18×4 D108-130-000...
- Page 32 8.5 Left gun Assembly:...
- Page 33 Part No. Code Name Qty. Spec. Note KLXY-03-02 Gun mouth D108-134-000 Brass Φ15 KLXY-03-01 D108-135-000 KLXY-03-03 D108-609-000 Gun shell Glass fibre δ3 D108-136-000 KLXY-03-07 cushion Brass Φ30 D108-137-000 KLXY-03-05 Pin (U&D) Q235 Φ12 D108-610-000 KLXY-03-06 Pin sleeve (U&D) D108-138-000 KLXY-03-10 Spring 65Mn Φ0.8 D108-139-000...
- Page 34 8.6 Right gun Assembly:...
- Page 35 Part No. Code Name Qty. Spec. Note KLXY-03-02 Gun mouth D108-134-000 Brass Φ15 KLXY-03-01 D108-135-000 KLXY-03-03 D108-609-000 Gun shell Glass fibre δ3 D108-136-000 KLXY-03-07 cushion Brass Φ30 D108-137-000 KLXY-03-05 Pin (U&D) Q235 Φ12 D108-610-000 KLXY-03-06 Pin sleeve (U&D) D108-138-000 KLXY-03-10 Spring 65Mn Φ0.8 D108-139-000...
- Page 36 8.7 Sensor Assembly: Part No. Code Name Qty. Spec. Note klxy-06-01 Sensor holder D108-147-000 Stainless steel δ1.2 22006000020 D108-443-000 T5 fluorescent lamp T5-21W 220V D108-612-000 klxy-06-04 Inner track Clarity PVC δ1 D108-613-000 klxy-06-05 Outer track Clarity PVC δ1 21503000033 Emission sensor D108-444-000 HPJ-E21 klxy-06-02...
- Page 37 8.11 Coin Counter & Electrical Box: Ticket counter Coin counter - Volume + Ticket Reset Fuse T5A...
- Page 38 Part No. Code Name Qty. Spec. Note 23000000005 Counter D108-446-000 C-012 DC12V 22403000001 D108-447-000 Pot. knob Black 22501000017 D108-448-000 Potentiometer RB1K 21709000002 D108-449-000 Pot. Connect board VR.PCB D108-450-000 22402010002 Button PB:11C02R(Red) D108-451-000 22601000005 SW Fuse T125/55 D108-452-000 23200000001 Noise filter 10SS1-PB 115/250V10A D108-453-000 21901000012...
- Page 39 8.10 Electrical Part:...
- Page 40 Part No. Code Name Qty. Spec. Note 21706000037 3 LED PCB D108-801-000 LED23B3.PCB 21706000047 D108-802-000 2 LED PCB LED07A23.PCB 21704000214 D108-803-000 Lamp control board LED CON-DDL.PCB(V1.1 D108-804-000 21701000014 Main board PLAYV9 Leakage protection D108-455-000 22601000071 30mA Vigi DPN ELE switch D108-456-000 22006000003 T5 fluorescent lamp...
- Page 41 9.11 Game Decals: Front :...
- Page 42 Back :...
- Page 43 Part No. Code Name Spec. Qty. Note D108-701-000 KLXY-HM-04 U_board menu 976×136 (PVC100u) D108-702-000 KLXY-HM-06 L_board menu 126×676 (PVC100u) D108-703-000 KLXY-HM-05 R_board menu 126×676 (PVC100u) D108-704-000 KLXY-HM-02 Header menu D108-705-000 KLXY-HM-01 Main menu D108-706-000 KLXY-HM-03 Hole menu 960×620 3MM D108-707-000 KLXY-HM-20 Warning menu 300×174 (PVC100u)
- Page 44 Have Questions? Contact us! www.zs-shiyu.com www.universal-space.com Canada Office Parts & Service +1-905-477-2823 Email: service@universal-space.com...
Need help?
Do you have a question about the DUCKY SPLASH and is the answer not in the manual?
Questions and answers