Advertisement
Quick Links
Requirements
• Wired Network Connection
• A Wired Network Device (Mac or
Windows Computer)
• Power Outlet
Package Contents
• 1x Wireless-1750AC Managed AP Pro
• 1x Power Adapter 12V/4A
• 3x 2dBi Omnidirectional Dual Band
Antennas
• 1x Magnetic Wall Mount Kit
• 1x RJ-45 Ethernet Cord
• 1x Setup CD-ROM
• 1x Quick Installation Guide (QIG)
Start Here
1
Hardware Setup
Connect the power adapter to the HW17ACM port labeled
"12V DC in" and then plug the power adapter into an available
wall socket.
Connect the HW17ACM to a computer via ethernet cable.
2
Computer Configuration
Configure the HW17ACM with a Mac computer
a. Connect your computer to the network using
an ethernet cable. If your computer is Wi-Fi
enabled, you'll need to turn off the Wi-Fi
connection from your computer until you are
done configuring the HW17ACM.
b. Open your System
Preferences and select the
'Network' option.
c. Select the 'Ethernet'
option. Find the
'Configure IPv4' drop
down menu and select
'Manually'. In the IP
address, enter
'192.168.1.10'. In the
Subnet Mask, enter
'255.255.255.0'
and
select 'Apply'.
3
Accessing the Setup via Web Browser
a. Open any web browser from the computer that is plugged into the
HW17ACM. In the address field, type in '192.168.1.230'. Press enter.
Technical Support
Tel: 1.888.202.3344
HW17ACM- QIG 2016-11-16
Q
I
G
uick
nstallation
uide
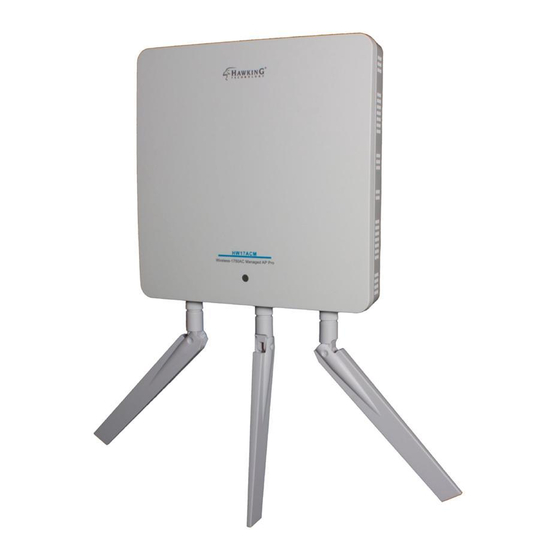
Product Description
LED
Blue LED: The Access Point is On
Amber: The Access Point is Starting Up
Off: The Access Point is Off
Power (12V/4A)
Power Adapter Plug
USB Port
USB port for system log
10/100/1000M LAN Ports
LAN1 supports PoE
HawkTech
WLAN
E-mail: techsupport@hawkingtech.com
HW17ACM Hawking Wireless-1750AC Managed AP Pro
Configure the HW17ACM with a Windows computer
a. Connect your computer to the network
using an ethernet cable. If your computer
is Wi-Fi enabled, you'll need to turn off the
Wi-Fi connection from your computer until
you are done configuring the HW17ACM.
b. Go to your control panel and select
'Network and Sharing Center'. On the left
hand column, choose 'Change Adapter
Settings'. Right click on 'Ethernet' and
choose properties.
c. Select 'Internet Protocol (TCP/IPv4)' and
click on properties.
d. Select 'Use the following IP
address'. In the IP address, enter
'192.168.1.10'. In the Subnet
Mask, enter '255.255.255.0' and
click 'OK'. Select 'OK' again to
close the properties and save.
b. A security prompt will appear asking for a username/password.
Username:
admin
Password:
1234
© 2017 Hawking Technologies, Inc. All rights reserved. All trademarks herin are the property of their respective owners. Apple, Mac, iPad, and iPhone are registered trademarks of Apple Computer, Inc. No Affiliation implied or expressed.
Antenna Port
3x SMA Female ports for
Omnidirectional Dual Band Antennas
Reset Switch
Use a pin or similar small object and press
and hold for 30 seconds to factory reset
WPS
Wi-Fi Protected Setup button
Power On/Off
Console
Connect to management console
www.hawkingtech.com
Advertisement

Related Manuals for Hawking HW17ACM


Summary of Contents for Hawking HW17ACM
- Page 1 E-mail: techsupport@hawkingtech.com HW17ACM- QIG 2016-11-16 © 2017 Hawking Technologies, Inc. All rights reserved. All trademarks herin are the property of their respective owners. Apple, Mac, iPad, and iPhone are registered trademarks of Apple Computer, Inc. No Affiliation implied or expressed.
- Page 2 Technical Support HW17ACM- QIG 2016.11.16 © 2017 Hawking Technologies, Inc. All rights reserved. All trademarks herin are the property of their respective owners. Apple, Mac, iPad, and iPhone are registered trademarks of Apple Computer, Inc. No Affiliation implied or expressed.
Need help?
Do you have a question about the HW17ACM and is the answer not in the manual?
Questions and answers