Table of Contents
Advertisement
Advertisement
Table of Contents

Related Manuals for LG LNXS30996 Series


Summary of Contents for LG LNXS30996 Series
- Page 1 OWNER'S MANUAL FRENCH DOOR REFRIGERATOR Read this owner's manual thoroughly before operating the appliance and keep it handy for reference at all times. LNXS30996* www.lg.com MFL70407901 Copyright © 2017 LG Electronics Inc. All Rights Reserved. Rev.02_120517...
-
Page 2: Table Of Contents
Adjusting the Refrigerator Shelves PRODUCT OVERVIEW Door Mullion Exterior 50 SMART FUNCTIONS Interior Appliance Registration 12 INSTALLATION LG SmartThinQ Application Smart Grid Function Installation Overview Smart Diagnosis™ Function Unpacking the Refrigerator Choosing the Proper Location 56 MAINTENANCE Removing/Assembling the Doors... -
Page 3: Product Features
Every time the refrigerator door is opened and closed, an image of the refrigerator compartment is created. View the images by selecting each part of the fridge in the diagram. LG ALEXA LG Alexa is capable of voice interaction, music playback, making to-do lists, setting alarms, and providing weather and other real time information. -
Page 4: Safety Instructions
SAFETY INSTRUCTIONS SAFETY INSTRUCTIONS READ ALL INSTRUCTIONS BEFORE USE Your safety and the safety of others are very important. We have provided many important safety messages in this manual and on your appliance. Always read and follow all safety messages. This is the safety alert symbol. - Page 5 SAFETY INSTRUCTIONS • Keep packing materials out of the reach of children. Packaging material can be dangerous for children. There is a risk of suffocation. • Do not install the refrigerator in a damp or dusty place where insulation on electrical parts may deteriorate. •...
-
Page 6: Grounding Instructions
SAFETY INSTRUCTIONS MAINTENANCE • Do not use a hair dryer to dry the inside of the refrigerator. • Do not light a candle to remove odors in the refrigerator. • In the event of a refrigerant leak, move flammable objects away from the refrigerator. Ensure the area is adequately ventilated and contact an authorized service center. - Page 7 SAFETY INSTRUCTIONS CAUTION To reduce the risk of minor or moderate injury to persons, malfunction, or damage to the product or property when using this product, follow basic precautions, including the following: INSTALLATION • Do not install the refrigerator where there may be a danger of the unit falling. •...
-
Page 8: Product Specifications
PRODUCT SPECIFICATIONS PRODUCT SPECIFICATIONS The appearance and specifications listed in this manual may vary due to constant product improvements. Electrical requirements: 115 V, 60 Hz Min. / Max. water pressure: 20 - 120 psi (138 - 827 kPa) Model LNXS30996* Description French door refrigerator Net weight... -
Page 9: Product Overview
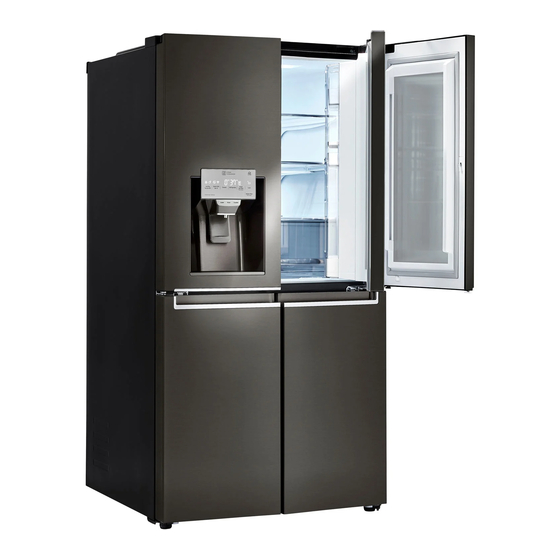
PRODUCT OVERVIEW PRODUCT OVERVIEW The images in this guide may be different from the actual components and accessories, which are subject to change by the manufacturer without prior notice for product improvement purposes. Exterior LED Display Refrigerator Displays the refrigerator and freezer temperature, Preserves food. -
Page 10: Interior
10 PRODUCT OVERVIEW Interior... - Page 11 PRODUCT OVERVIEW Bluetooth Speaker Big Fresh Zone Refer to the speaker manual packed with the Preserve vegetables and fruits. refrigerator. Freezer Bin Panorama View Camera Preserve small packaged frozen food or Every time the refrigerator door is opened and frequently used foods. closed, an image of the refrigerator compartment is created.
-
Page 12: Installation
12 INSTALLATION INSTALLATION Installation Overview Please read the following installation instructions first after purchasing this product or transporting it to another location. Unpacking the Choosing the Proper Disassembling/ Refrigerator Location Assembling Connecting the Water Leveling and Door Line Alignment CAUTION •... -
Page 13: Unpacking The Refrigerator
INSTALLATION Unpacking the Refrigerator Choosing the Proper Location WARNING Water Water supply must be easily connected for the • Use two or more people to move and install the automatic icemaker. refrigerator. Failure to do so can result in back injury or other injury. -
Page 14: Dimensions And Clearances
• If an opening is too narrow to fit the refrigerator through, the doors must be removed. The right door can only be removed by authorized LG service personnel. Call an LG Customer Information Center and arrange for service personnel to be present at the time of installation, if necessary. -
Page 15: Removing/Assembling The Doors
The right refrigerator door must only be removed by authorized LG service personnel. Call an LG Customer Information Center and arrange for service personnel to be present at the time of installation, if necessary. - Page 16 Lift the door from the middle hinge pin and Door remove the door. The right refrigerator door must be removed by authorized LG service personnel only. Call an LG Customer Information Center and arrange for service, if necessary. CAUTION • Place the door, inside facing up, on a nonscratching surface.
- Page 17 INSTALLATION Removing the Freezer Doors Assembling the Freezer Doors Remove the two hinge bolts. Lower the door onto the lower hinge pin. Lower hinge Rotate the hinge out of the way so that the door Position the middle hinge pin in place to hold the can be lifted off.
-
Page 18: Assembling Left Refrigerator Door
18 INSTALLATION Assembling the Left Refrigerator Hold the water supply connection and gently Door push in the collet to connect the water supply line as shown in (1). Insert the tube at least 5/8 inch Install the left refrigerator door after the right door is (15 mm) into the connector. -
Page 19: Connecting The Water Line
INSTALLATION Connecting the Water Line If the water pressure from the reverse osmosis system is less than 20 psi or 138 kPa or 1.4 kgf/ cm (takes more than 4 seconds to fill a cup of 7 oz or Before Beginning 198 cc capacity): This water line installation is not covered by the •... -
Page 20: Water Line Installation Instructions
20 INSTALLATION • Shutoff valve to connect to the cold water line. Drill the hole for the valve. The shutoff valve should have a water inlet with a • Drill a ¼ in. hole in the water pipe using a sharp minimum inside diameter of 5/32 in. - Page 21 INSTALLATION Route the tubing. Tubing Clamp ¼ in. Tubing Route the tubing between the cold water line and the refrigerator. Route the tubing through a hole drilled in the wall ¼ in. Compression Nut or floor (behind the refrigerator or adjacent base cabinet) as close to the wall as possible.
-
Page 22: Turning On The Power
22 INSTALLATION Turning on the Power Leveling and Door Alignment • After installing, plug the refrigerator’s power cord Leveling into a 3-prong grounded outlet and push the refrigerator into the final position. The refrigerator has two front leveling legs. Adjust the legs to alter the tilt from front-to-back or side-to side. -
Page 23: Door Alignment
INSTALLATION Door Alignment Freezer Door Alignment • Method 1 is recommended. Leveling the doors may not be possible when the floor is not level, or is of weak or poor construction. • For freezer doors, use wrench (2). The refrigerator is heavy and should be installed on a rigid and solid surface. - Page 24 24 INSTALLATION Method 2 • Only allows a maximum of 3mm of adjustment. Use the wider side of the number (2) wrench to unscrew the locking nut. Unscrew nut Use the narrower side of the wrench to turn the adjustment hinge pin clockwise or counterclockwise, and adjust the gap difference between the refrigerator and the freezer door.
-
Page 25: Operation
OPERATION OPERATION Before Use Clean the refrigerator. Clean the refrigerator thoroughly and wipe off all dust that accumulated during shipping. CAUTION • Do not scratch the refrigerator with a sharp object or use a detergent that contains alcohol, a flammable liquid or an abrasive when removing any tape or adhesive from the refrigerator. -
Page 26: Control Panel
26 OPERATION Control Panel Depending on the model, some of the following functions may not be available. Control Panel Features NOTE • When the refrigerator is in the Power Saving Mode, the display remains off until a door is opened or a button is pressed. - Page 27 OPERATION NOTE * Lock • To change the temperature mode from °F The Lock function disables every other button on to °C (or vice versa) press and hold the the display. Refrigerator and Freezer Temperature • When power is initially connected to the buttons simultaneously for approximately five refrigerator, the Lock function is off.
-
Page 28: Smart Instaview Display
28 OPERATION Smart InstaView Display Turning Smart InstaView Display On/Off Touch the Smart InstaView display once to wake it up and display weather information. The Smart InstaView display power can be turned on Touch the Smart InstaView display again to display or off by pressing the switch on the back of the top left the last application used. -
Page 29: Applications
Search the internet for recipes or other door. Create labels and expiration dates for food information. items. LG Alexa Weather Ask LG Alexa questions. (“Alexa, how is the Check weather information. weather today?”) Panorama View Gallery Check the shelves and door bins without opening Upload and manage photos through the the fridge. -
Page 30: Smart Instaview
30 OPERATION Smart InstaView Select the Smart InstaView application and touch the screen to bring up the smart label menu. The smart label menu includes features that are useful for food management. Use these features to set a kitchen timer, label food items, or input the expiration date for each item so the refrigerator can remind you when foods are near expiration. -
Page 31: Refrigerator Manager
OPERATION Refrigerator Manager Refrigerator Temperature Indicates the set temperature of the refrigerator compartment in Celsius (°C) or Fahrenheit (°F). The default refrigerator temperature is 37 °F (3 °C). Press the – or + button to select a new set temperature from 33 °F to 46 °F (1 °C to 8 °C). - Page 32 32 OPERATION Door Alarm A chime sounds if the refrigerator door is left open. Press the Door Alarm button to turn the chime on or off. Unit Press the Unit button to change the temperature mode from °F to °C (or vice versa) .
-
Page 33: Panorama View
OPERATION Panorama View Every time the refrigerator door is opened and closed, NOTE an image of the refrigerator compartment is created. • When viewing the inside of the refrigerator View the images by selecting each part of the fridge in compartment remotely on your smartphone, the the diagram. -
Page 34: Lg Alexa
• Launch the LG Alexa app and speak your request clearly. • If you are running an application other than LG Alexa, or if the screen is in sleep mode, say "Alexa“ to wake it up. -
Page 35: Settings
Alerts Set timer notifications and food expiration date notifications. My Account Register the product to an LG account to use the LG SmartThinQ application. If you don’t have an LG account, follow the onscreen instructions to create one. Smart Diagnosis™... -
Page 36: Ice And Water Dispenser
• If discolored ice is dispensed, check the water filter • If ice or water dispenses unexpectedly, turn off and water supply. If the problem continues, contact the water supply and contact an LG Electronics an LG Electronics Customer Information Center. Customer Information Center. -
Page 37: Locking The Dispenser
OPERATION Locking the Dispenser Press the Lock button on the control panel for 3 seconds to lock or unlock the dispenser and all of the control panel functions. The control panel functions are disabled on both the control panel and the Smart InstaView display. Cleaning the Dispenser Drip Tray Pull the tray forward until it stops. -
Page 38: Ice Compartment
38 OPERATION Ice Compartment Detaching the In-Door Ice Bin Keep the ice compartment door closed tightly. If the Gently pull the handle to open the ice ice compartment door is not closed tightly, the cold compartment. air in the ice bin will freeze food in the refrigerator compartment. -
Page 39: Automatic Icemaker
OPERATION Automatic Icemaker Turning the Automatic Icemaker On or Off Depending on the model, some of the following functions may not be available. To turn the automatic icemaker On/Off, press and hold the Ice On/Off button on the control panel for three seconds. -
Page 40: Storing Food
40 OPERATION Storing Food Where to Store Food Depending on the model, some of the following functions may not be available. Each compartment inside the refrigerator is designed to store different types of food. Store food in the optimal space to enjoy the freshest taste. Adjustable Refrigerator Shelf Adjustable shelves to meet individual storage needs. -
Page 41: Food Storage Tips
OPERATION Food Storage Tips CAUTION Wrap or store food in the refrigerator in airtight and moisture-proof material unless otherwise noted. This • Do not overfill or pack items too tightly into door prevents food odor and taste transfer throughout the bins. -
Page 42: Big Fresh Zone
42 OPERATION Storing Frozen Food Do not use • Bread wrappers Check a freezer guide or a reliable cookbook for further information about preparing food for freezing • Non-polyethylene plastic containers or food storage times. • Containers without tight lids •... -
Page 43: Removing/Assembling The Fresh Zone Compartment
OPERATION Removing/Assembling the Assembling the Big Fresh Zone Fresh Zone Compartment Drawer Removing the Fresh Zone Slightly tilt up the front of the drawer and insert the rollers on the sides into the guides. Compartment Open both refrigerator doors completely and empty and remove the Door-in-Door case and bins. -
Page 44: Easyreach
44 OPERATION EasyReach™ Assembling the Fresh Zone Compartment The EasyReach™ compartments are slightly cooler than the shelf or door bin areas. They are a Hold the cover at a 45-degree angle and insert it convenient place to store dairy snacks or other small into the refrigerator. -
Page 45: Door-In-Door
OPERATION Door-in-Door Removing the Door-in-Door Compartment Depending on the model, some of the following functions may not be available. Depending on the model, some of the following functions may not be available. The Door-in-Door compartment allows for easy access to commonly used food items. CAUTION To access the Door-in-Door compartment, lift the lever under the right side door. -
Page 46: Easylift Bin
46 OPERATION EasyLift Bin Move the EasyLift bin up to remove it. Lift the lower door bin from the bottom to remove it. Depending on the model, some of the following functions may not be available. Move the EasyLift bin up and down easily and conveniently as necessary. -
Page 47: Freezer Drawer
OPERATION Freezer Drawer Assembling the Freezer Drawer The sliding freezer drawers allow easy access and Open both freezer doors completely. Raise the convenience of use. front of the drawer slightly and insert the rollers on Use the upper compartments to store packaged the drawer's sides into the guides in the freezer frozen foods and frequently-used foods. -
Page 48: Door Bins
48 OPERATION Door Bins Adjusting the Refrigerator Shelves Store small packaged frozen food in the freezer door bins, or small packaged refrigerated food or The shelves in the refrigerator are adjustable to meet beverages in the refrigerator door bins, such as milk, individual storage needs. -
Page 49: Door Mullion
OPERATION Door Mullion CAUTION • Make sure that shelves are level from one side to the other. Failure to do so may result in the shelf falling or spilled food. • Do not clean glass shelves with warm water while they are cold. Shelves may break if exposed to sudden temperature changes or impact. -
Page 50: Smart Functions
If you have • If the firewall on your wireless router is enabled, an LG account, sign in by entering your email ID disable the firewall or add an exception to it. and password. -
Page 51: Lg Smartthinq Application
Control the Refrigerator Temperature, Fresh Air Filter NOTE and Ice Plus from the smart phone app. • If you choose the simple login to access the LG Push Messages SmartThinQ application, you must go through the appliance registration process each time you If the door remains open for more than ten minutes, change your smartphone or reinstall the application. - Page 52 52 SMART FUNCTIONS Wireless LAN Module Specifications FCC RF Radiation Exposure Statement This equipment complies with FCC radiation Model LGSBWAC61 exposure limits set forth for an uncontrolled environment. This transmitter must not be co-located Frequency Range 2412 MHz – 2462 MHz or operating in conjunction with any other antenna or IEEE 802.11b: 19.57 dBm transmitter.
-
Page 53: Smart Grid Function
• You can override the Smart Grid function any time available for download. (using the Smart Grid button or application). LG Electronics will also provide open source code • To use the Smart Grid function, you need to register to you on CD-ROM for a charge covering the cost your appliance with your electric utility company. - Page 54 54 SMART FUNCTIONS Temporary Appliance Load Reduction LG Open API (TALR) You can manage Smart Grid features for the LG Smart Refrigerator. The refrigerator responds to a TALR signal by aggressively reducing the load for a short time Please check the detailed specifications on the notice period, typically 10 minutes.
-
Page 55: Smart Diagnosis™ Function
LG Customer Information Center. NFC or Wi-Fi equipped models can also transmit data to a smartphone using the LG Smart ThinQ application. Smart Diagnosis™ through the Customer Information Center After you hear three beeps, release the Freezer •... -
Page 56: Maintenance
56 MAINTENANCE MAINTENANCE For products with black stainless steel exterior, spray glass cleaner on a clean, microfiber cloth and rub in direction of grain. Do not spray glass cleaner directly Cleaning at the display panel. Do not use harsh or abrasive cleaners. -
Page 57: Replacing The Fresh Air Filter
MAINTENANCE Replacing the Fresh Air Filter Replacing the Water Filter Replace the Fresh Air Filter: Replace the Water Filter : • Approximately every six months. • Approximately every six months. • When the Replace Filter icon turns on. • When the Replace Filter icon turns on. - Page 58 58 MAINTENANCE Performance Data Sheet Model: LG ADQ36006101-S Use Replacement Cartridge: ADQ73613401 The concentration of the indicated substances in water entering the system was reduced to a concentration less than or equal to the permissible limit for water leaving the system as specified in NSF/ANSI Standard 42 and Standard 53.
- Page 59 Replacement Cartridge: ADQ73613401 check for this condition. For replacement filters, visit your local dealer or distributor or search under "water filters" on lg.com • Do not install on hot water supply lines. The maximum operating water temperature of this website.
- Page 60 60 MAINTENANCE...
-
Page 61: Troubleshooting
TROUBLESHOOTING TROUBLESHOOTING FAQs: Frequently Asked Questions What are the best temperature settings for my refrigerator and freezer? The default setting for the refrigerator is 37° Fahrenheit (3° Celsius). The default setting for the freezer is 0° Fahrenheit (-18° Celsius). Adjust these settings as necessary to keep food at desired temperatures. -
Page 62: Before Calling For Service
62 TROUBLESHOOTING Before Calling for Service Review this section before calling for service; doing so will save you both time and money. Cooling Problem Possible Cause Solutions The refrigerator control is set • Turn the control ON. Refer to the Setting the Controls to OFF (some models). - Page 63 TROUBLESHOOTING Cooling Problem Possible Cause Solutions • When the doors are opened often or for long periods of time, warm, humid air enters the compartment. Doors are opened often or for This raises the temperature and moisture level within long periods of time. the compartment.
- Page 64 64 TROUBLESHOOTING Cooling/Ice & Water Problem Possible Cause Solutions • When the doors are opened often or for long periods of time, warm, humid air enters the compartment. Doors are opened often or for This raises the temperature and moisture level within long periods of time.
- Page 65 TROUBLESHOOTING Ice & Water Problem Possible Cause Solutions Demand exceeds ice storage • The icemaker will produce approximately 70-184 cubes capacity. in a 24 hour period. • Connect the refrigerator to a cold water supply with House water supply is not adequate pressure and turn the water shutoff valve fully connected, valve is not turned on open.
- Page 66 66 TROUBLESHOOTING Ice & Water Problem Possible Cause Solutions • Foreign substances or frost on the ice-detecting sensor The ice detecting sensor is can interrupt ice production. Make sure that the sensor obstructed. area is clean at all times for proper operation. The refrigerator is not connected to a water supply or •...
- Page 67 TROUBLESHOOTING Ice & Water Problem Possible Cause Solutions • Infrequent use of the ice dispenser will cause the cubes to stick together over time, which will prevent them from Infrequent use of the properly dispensing. Check the ice bin for ice cubes dispenser.
- Page 68 68 TROUBLESHOOTING Ice & Water Problem Possible Cause Solutions Refrigerator or freezer doors • Water will not dispense if any of the refrigerator doors are not closed properly. are left open. • After the water filter is replaced, dispense 2.5 gallons of water (flush for approximately five minutes) to remove Water filter has been recently trapped air and contaminants from the system.
- Page 69 TROUBLESHOOTING Parts & Features Problem Possible Cause Solutions Food packages are blocking the • Rearrange food containers to clear door open. the door and door shelves. • Push bins all the way in and put Ice bin, crisper cover, pans, crisper cover, pans, shelves and shelves, door bins, or baskets are baskets into their correct positions.
- Page 70 70 TROUBLESHOOTING Noises Problem Possible Cause Solutions The defrost control will click when the automatic defrost cycle begins and ends. Clicking The thermostat control (or refrigerator • Normal Operation control on some models) will also click when cycling on and off. Rattling noises may come from the flow of refrigerant, the water line on the back •...
-
Page 71: Limited Warranty
Should your LG Refrigerator ("Product") fail due to a defect in materials or workmanship under normal and proper use, during the warranty period set forth below, LG Electronics (“LG”) will, at its option, repair or replace the Product. This limited warranty is valid only to the original retail purchaser of the Product and applies only when purchased and used within the United States including U.S. - Page 72 If you and LG are unable to resolve the dispute within 30 days, either party...
- Page 73 Opt Out. You may opt out of this dispute resolution procedure. If you opt out, neither you nor LG can require the other to participate in an arbitration proceeding. To opt out, you must send notice to LG no later than 30 calendar days from the date of the first consumer purchaser’s purchase of the product by either: (i) sending an e-mail to...
-
Page 74: For Canada
Should your LG Refrigerator ("Product") fail due to a defect in materials or workmanship under normal and proper use, during the warranty period set forth below, LG Electronics Canada, Inc. (“LGECI”) will, at its option, repair or replace the Product upon receipt of proof of the original retail purchase. - Page 75 The notice must provide your name, address, and telephone number; identify the product that is the subject of the claim; and describe the nature of the claim and the relief being sought. If you and LG are unable to resolve the dispute within 30 days, either party may proceed to file a claim for arbitration.
- Page 76 LG intends to waive or has waived any provision or part of this Limited Warranty. Opt Out. You may opt out of this dispute resolution procedure. If you opt out, neither you nor LG can require the other to participate in an arbitration proceeding.
- Page 77 LG Customer Information Center For inquiries or comments, visit www.lg.com or call: 1-800-243-0000 U.S.A. 1-888-542-2623 CANADA Register your product Online! www.lg.com...
Need help?
Do you have a question about the LNXS30996 Series and is the answer not in the manual?
Questions and answers