Table of Contents
Advertisement
Advertisement
Table of Contents

Related Manuals for Trilithic Seeker D


Summary of Contents for Trilithic Seeker D
- Page 1 Seeker D Digital Leakage Detection System User’s Guide...
- Page 2 Specifications, terms, and conditions are subject to change without notice. The provision of hardware, services, and/or software are subject to VIAVI standard terms and conditions, available at www.viavisolutions.com/en/terms-and-conditions. Seeker D User’s Guide Page 2 Document Num., Rev. 4 May 2018...
-
Page 3: Table Of Contents
Low Battery Protection Feature .................17 Equipment Supplied with Your Seeker D ................18 Replacement Parts for Your Seeker D .................19 Accessories for Your Seeker D ....................20 A Guided Tour of Your Seeker D ..................21 Front View ........................21 Back View ........................22 Right Side View ......................23 Bottom View ........................23... - Page 4 Installation of the Seeker D System ..................29 About the Battery of Your Seeker D ..................33 USB Charging .........................33 Mobile Mount Charging....................34 With the Optional Seeker MCA III................34 Chapter 3 ......................35 Seeker D Operation .........................35 Available Configuration Settings ..................35 Basic Operation........................36 Power On/Off ........................36...
- Page 5 Chapter 5 ......................59 Appendix ..........................59 Specifications ........................59 Display Messages & Error Codes ..................60 Seeker D Error Codes ....................60 Seeker MCA III Error Codes (Optional) ................62 Seeker MCA III Communication Messages (Optional) ...........65 Memory Full Messages....................66 Bootloader Error Codes ....................67 Bootloader Messages .....................68...
- Page 6 Seeker D User’s Guide Page 6 Document Num., Rev. 4 May 2018...
-
Page 7: Chapter 1
For additional information about our products and services, contact your local Viavi representative or visit https://www.viavisolutions.com/en-us/how-buy. Where to Get Technical Support Phone US: +1-844-GO-VIAVI or +1-844-468-4284 Outside US: +1-855-275-5378 Email: Trilithic.support@viavisolutions.com Website: https://support.viavisolutions.com/welcome Seeker D User’s Guide May 2018 Document Num., Rev. 4 Page 7... -
Page 8: How This Manual Is Organized
Chapter 2, “Seeker D Introduction” introduces what the Seeker D is and what it does. This chapter discusses the practical application, connections and controls of the Seeker D. Finally, this chapter discusses the battery of the Seeker D and how to update your firmware. -
Page 9: Conventions Used In This Manual
A WARNING alerts you to any condition that could cause personal injury. Precautions Do not use the Seeker D in any manner not recommended by the manufacturer. A strong electromagnetic field may affect the measurement accuracy of the Seeker D. - Page 10 Seeker D User’s Guide Page 10 Document Num., Rev. 4 May 2018...
-
Page 11: Chapter 2
Gives a feature overview of the Seeker D • Lists the equipment supplied with the Seeker D and optional accessories • Gives a guided tour of the Seeker D and Mobile Mount and explains the display screen • Discusses the battery of the Seeker D •... -
Page 12: Multiple Frequency Presets
Channel tag values are configured using the Seeker Setup software. Squelch Operation Squelch level is the RF signal threshold that the Seeker D uses to determine the validity of the signal. The signal “breaks squelch” when the RF leakage is greater than the squelch level and tag qualifiers are met as well. -
Page 13: Vehicle Battery Protection
• Seeker MCA (see note) • Seeker BB-2 (see note) • Seeker D Mobile Mount • Seeker MCA III Some early Seeker Mobile Mounts, MCA & BB-2 MCA units did not include this feature, look for the “Green Engineering” logo on the device. -
Page 14: Vehicle Power Switch & Shutdown Timer (Vps-1)
15 Volts. Any voltage greater than 15 V could cause damage to the Vehicle Power Switch. 4. Route the cable included with the Vehicle Power Switch from the switch to the Mobile Mount or Seeker BB-2. Seeker D User’s Guide Page 14 Document Num., Rev. 4 May 2018... - Page 15 Mobile Mount or Seeker BB-2) will power up when the vehicle is running and will power down only after the vehicle’s ignition is turned off and the countdown timer has expired. Seeker D User’s Guide May 2018 Document Num., Rev. 4 Page 15...
- Page 16 (1 to 7) to remain powered on, after the vehicle’s ignition is turned off. Refer to the following illustrations to set the Vehicle Power Switch’s countdown timer: Seeker D User’s Guide Page 16 Document Num., Rev. 4...
-
Page 17: Led Power Status Indicator
Vehicle Power Switch will briefly flash, once per second, for 15 seconds. After 15 seconds, the Vehicle Power Switch and Mobile Mount or Seeker BB-2 will power down. Seeker D User’s Guide May 2018 Document Num., Rev. 4 Page 17... -
Page 18: Equipment Supplied With Your Seeker D
Equipment Supplied with Your Seeker D The Seeker D comes with the following: The Seeker D requires a low and high band vehicle mounted antenna (not included) for use with the mobile mount. Seeker D User’s Guide Page 18 Document Num., Rev. 4... -
Page 19: Replacement Parts For Your Seeker D
Replacement Parts for Your Seeker D The following replacement parts are available for the Seeker D: Part Number Description 2071679000 Low Band Rubber Duck Antenna 2071679001 High Band Rubber Duck Antenna 2072237001 Seeker D Mobile Mount & Power Cable 2071688000... -
Page 20: Accessories For Your Seeker D
Accessories for Your Seeker D The following accessories are available for the Seeker D: Part Number Description 0610169007 Vehicle Power Adapter (12 VDC Cigarette Lighter) 0610169012 Euro Power Adapter 0610169013 UK Power Adapter 0610169014 Australian Power Adapter 2010477000 NFP-1 Near Field Probe... -
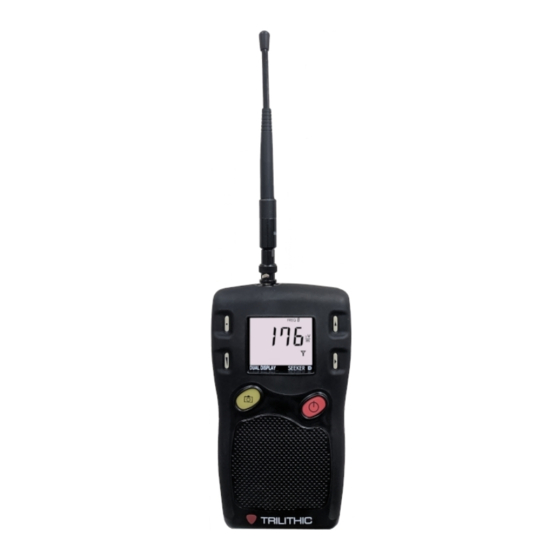
Page 21: A Guided Tour Of Your Seeker D
Press this button to activate the Snapshot mode or pres and hold this button to synchronize data with the option Seeker MCA III when the Seeker D is in the mobile mount. ON/OFF button Press and hold this button to turn the Seeker D on or off. -
Page 22: Back View
Back View Antenna connection The antenna connection is used to connect the Seeker D to the Mobile Mount antenna connection. Seeker D User’s Guide Page 22 Document Num., Rev. 4 May 2018... -
Page 23: Right Side View
Seeker D using the mini-USB charge / data cable. Bottom View Mobile Mount interface When the Seeker D is in the mobile mount, this is used to charge the Seeker D and allow communication between with the Seeker MCA III and the Seeker D. -
Page 24: Display Screen
Display Screen 1. GPS – Shown when the Seeker D is placed in the Mobile Mount and a GPS connection is established with an optional Seeker MCA III. When the icon is not shown, the Seeker D is not in the Mobile Mount or the GPS connection cannot be established with the optional Seeker MCA III. - Page 25 8. Antenna – Flashes when the signal mode is selected. This is the normal mode for leakage detection. 9. Bar graph – Shows the level of various Seeker D and Seeker GPS parameters, and its function depends on the current display mode selection.
-
Page 26: A Guided Tour Of Your Mobile Mount
Spring loaded cradle The cradle is spring loaded to ensure that the Seeker D is held securely in the Mobile Mount. To place the Seeker D into the Mobile Mount, place the bottom of the Seeker... -
Page 27: Rear View
Mobile Mount in order to share a single Seeker MCA III. MCA III serial connection This is used to connect the Seeker D Mobile Mount to the Seeker MCA III. DC power cable input This is used to connect the included mobile mount power cable. -
Page 28: Assembly Of Seeker Mobile Mount & Mca Iii (Optional)
If you are using the optional Seeker MCA III, the following steps provide detailed instructions on how to install the Seeker MCA III onto the bottom of the Seeker D Mobile Mount. Note that the Seeker Mobile mount is shown for display purposes only, this procedure will also work with the Seeker D Mobile Mount in the same way. -
Page 29: Installation Of The Seeker D System
Seeker D & Seeker MCA III display. • Install the Seeker D Mobile Mount & Seeker MCA III in a location that prevents damage to the attached data, GPS, or antenna cables. Before installation, see the previous section for instructions on how to assemble the Seeker D Mobile Mount and the Seeker MCA III. - Page 30 3. Connect the Seeker D Mobile Mount antenna connection to the right angle connector of the antenna diplexer cable. Connect the other end of the antenna diplexer cable to the output of the antenna diplexer. Finally, connect the low and high band antennas to the corresponding inputs of the antenna diplexer.
- Page 31 4. Wire the DC power cables to the vehicle battery and an ignition-switched power source, and then connect the cable to the back of the Seeker D Mobile Mount. The DC power cable should be wired as follows: • Red wire MUST be wired to the positive (+) battery terminal.
- Page 32 The following steps only apply when using the Seeker D Mobile Mount with the Seeker MCA III. 5. Connect the GPS Receiver, Ethernet Cable, and FMI Cable to the Seeker MCA III. • Connect the GPS Receiver, Ethernet Cable, and FMI Cable directly to the Seeker MCA III.
-
Page 33: About The Battery Of Your Seeker D
When the Seeker D is off and it is charging, the device will go into background charging and nothing will be shown on the display screen. • If the Seeker D is on when it is connected to a to a PC, laptop computer, or working power outlet, the device will automatically turn off. •... -
Page 34: Mobile Mount Charging
Mobile Mount charging can begin. • When the Seeker D is off and it is placed in the mobile mount, the device will go into a background charging and nothing will be shown on the display screen. -
Page 35: Chapter 3
Provides information on operation and display modes of the Seeker D Available Configuration Settings You must configure the settings of the Seeker D using the Seeker Setup software. The Seeker D comes from the factory with default settings, but it is likely they will need to be customized. -
Page 36: Basic Operation
Seeker D will startup into the RF Signal Measurement Mode. Low Battery Warning A very low battery may cause the Seeker D not to turn on. When the battery is too low for your Seeker D to function, the screen shown to the right will appear. -
Page 37: Pc Communications Mode
/ data cable and then open the Seeker Setup software to communicate with the Seeker D. The screen shown to the right will be displayed while your Seeker D is in this mode. PC Communication Mode... -
Page 38: No Signal Detected
3. The audible tone will sound proportional to signal strength. 4. The Tag icon will appear in the upper right corner of the screen. Tagged Signal Detected (Primary Frequency) Seeker D User’s Guide Page 38 Document Num., Rev. 4 May 2018... -
Page 39: Tagged Signal Detected On Secondary Frequency
Tagged Signal Detected (Secondary Frequency) Secondary Frequency Numerical Display When the Seeker D is in the Mobile Mount, press the SNAPSHOT button to numerically display the RF signal level of the secondary frequency. The screen shown to the right will be displayed before showing the RF signal level of the secondary frequency. -
Page 40: Device Information & Settings
Viewing the Battery Charge Level To check the battery level, turn your Seeker D on and press the SELECT button once. • When the Battery Charge Level display is selected, the Battery icon flashes as indicated by the red circle in the following image. -
Page 41: Low Battery Alert
FPGA firmware is version 3.26. FPGA Firmware After a few seconds in the Firmware Version display without any action by the user, the display will revert to the Battery Charge Level display. Seeker D User’s Guide May 2018 Document Num., Rev. 4 Page 41... -
Page 42: Viewing The Battery Charging Status
If the Seeker D is not completely seated in the Mobile Mount, the charge screen will not be available. Viewing the Battery Charging Status To view the charging status of the battery, turn your Seeker D on and press the SELECT button twice. •... -
Page 43: Enable/Disable Peak Hold
Enable/Disable Peak Hold To enable/disable the Peak Hold function, turn your Seeker D on and press the SELECT button repeatedly until the arrow appears under the PK icon, as indicated by the red circle in the image below. • When the Peak Hold display is selected, pressing the... - Page 44 Seeker D User’s Guide Page 44 Document Num., Rev. 4 May 2018...
-
Page 45: Selecting A Preset Frequency
Selecting a Preset Frequency The Preset Frequencies display is used to select the RF signal level measurement frequency presets used by the Seeker D. The preset frequencies are numbered from 0 to 9 and can be configured using the Seeker Setup software. - Page 46 In this example, the frequency preset is 138.000 MHz, Tag 1. After a few seconds in the Preset Frequencies display without any action by the user, the display will revert to the Signal Level display. Seeker D User’s Guide Page 46 Document Num., Rev. 4 May 2018...
-
Page 47: Antenna Selection Alert
Antenna Selection Alert When the Seeker D is either removed from the Mobile Mount, turned on, or the selected preset frequency is changed to another frequency band (High to Low, Low to High), the following will occur: • An alert is displayed that tells you which antenna should be used based on the selected preset frequency as shown in the following images. - Page 48 2. The RF signal level of the ambient noise will be displayed numerically. Signal Level Display After approximately 1 minute, the display will revert to the normal Signal Level display. Seeker D User’s Guide Page 48 Document Num., Rev. 4 May 2018...
-
Page 49: Distance Correction Adjustment
While testing for leaks, you may need to adjust the distance correction value to account for differences in distance between the Seeker D and the cable plant. Use the DISTANCE button to display the Distance Correction mode. -
Page 50: Selecting A Distance Correction Preset
The Distance Correction display is used to select the distance correction preset used by the Seeker D. The preset distances are numbered from 1 to 8 and can be configured using the Seeker Setup software. The Seeker D is programmed at the factory with the following... -
Page 51: Speaker Volume Level
Adjusting the Speaker Volume To check the volume level, turn your Seeker D on and press the VOLUME button once. • When the Speaker Volume Level display is selected, the Speaker icon is continuously displayed as indicated by the red circle in the following image. -
Page 52: Saving Measurement Snapshots
SNAPSHOT button when the following screen is displayed: Pre-Fix Snapshot Post-Fix To record the post-fix leakage information recorded by the Seeker, press the SNAPSHOT button when the following screen is displayed: Post-Fix Snapshot Seeker D User’s Guide Page 52 Document Num., Rev. 4 May 2018... -
Page 53: No Snapshot
In Snapshot Mode, the display will cycle through the screens displayed above until you make a selection. This enables you many opportunities to take a snapshot of the leakage signal. Seeker D User’s Guide May 2018 Document Num., Rev. 4... -
Page 54: Data Synchronization With Seeker Mca Iii (Optional)
Data Synchronization with Seeker MCA III (Optional) If you do not have a network connection for LAW uploads when using the Seeker D with the Seeker MCA III, the data recorded in the Seeker MCA III can be synchronized with the internal memory of the Seeker D for later upload through a PC. -
Page 55: Seeker Mca Iii Display Screens (Optional)
When the Mobile Mount is not connected to a Seeker MCA III, the GPS icon is not shown on the display. When the Seeker D is placed in the Mobile Mount, the GPS icon is used to display the status of the GPS Signal as follows: •... - Page 56 Seeker D User’s Guide Page 56 Document Num., Rev. 4 May 2018...
-
Page 57: Chapter 4
Before You Begin Leakage Testing • A low battery may cause the Seeker D to NOT turn on. Try charging your battery for 3 hours to see if that fixes the problem, or use the Seeker D while in the mobile mount. - Page 58 5. Turn OFF the Seeker D When testing is complete, turn off the Seeker D by holding down the red ON/OFF button until you hear 3 descending tones. This step is not required if you leave the Seeker D in the Mobile Mount.
-
Page 59: Chapter 5
USB connection from Leakage Detector to local PC running Seeker Setup Software Configuration Method Ethernet or Wi-Fi connection from Seeker MCA III to the LAW Server while the Leakage Detector is located in the Mobile Mount Seeker D User’s Guide May 2018 Document Num., Rev. 4 Page 59... -
Page 60: Display Messages & Error Codes
Display Messages & Error Codes Seeker D Error Codes The codes shown below are displayed on the Seeker D display screen as “E##” to indicate an error with the Seeker D. “E##” Error Description Solution Code The checksum is not valid for this area... - Page 61 The flash ID read did not correspond If a power cycle does not fix this, to approved devices. return to the factory for repair. An error occurred during the Seeker D If a power cycle does not fix this, 10, 11 to MCA III auto-pairing process.
-
Page 62: Seeker Mca Iii Error Codes (Optional)
Seeker MCA III Error Codes (Optional) The codes shown below are displayed on the Seeker D display screen as “CE##” to indicate an error with the optional Seeker MCA III “CE##” Error Description Solution Code Return the device to the factory for Factory Calibration is not valid repair. - Page 63 DCHP server. Check the IP information and ensure that the DNS servers are correct Wi-Fi DNS request failed and reconfigure the device using the correct Wi-Fi settings. Seeker D User’s Guide May 2018 Document Num., Rev. 4 Page 63...
- Page 64 Unit serial number Cycle power on the unit, if the error persists return invalid the device to the factory for repair. Seeker D User’s Guide Page 64 Document Num., Rev. 4 May 2018...
-
Page 65: Seeker Mca Iii Communication Messages (Optional)
“CA##” Error Description Code The Seeker D meter has successfully established a connection to an MCA. The Seeker D meter is in the process of “syncing” snapshots to the MCA memory. Seeker D User’s Guide May 2018 Document Num., Rev. 4... -
Page 66: Memory Full Messages
1 hour “snooze” until the FL0 message is displayed again. Seeker D internal memory is full. Shows at power-on if there is not enough room for at least an 8-hour day’s worth of data (30,000 records). Shows at sync time if there is not enough room to store the MCA III contents in the meter memory. -
Page 67: Bootloader Error Codes
Bootloader Error Codes The codes shown below are displayed on the Seeker D display screen as “bE##” to indicate an error with the Seeker D bootloader software. “bE##” Error Description Solution Code Continue by pressing the SELECT Loading factory backup button. -
Page 68: Bootloader Messages
Bootloader Messages The codes shown below are displayed on the Seeker D display screen as “bL#” to indicate the bootloader status of the Seeker D. “bL##” Error Description Code Erasing the application area. Loading factory “backup” application. Loading downloaded application. -
Page 69: Limited Warranty
Limited Warranty For the latest warranty information, visit https://www.viavisolutions.com/literature/viavi-solutions-inc-general-terms-en.pdf Seeker D User’s Guide May 2018 Document Num., Rev. 4 Page 69... - Page 70 Rev. 4, May 2018 English VIAVI Solutions North America: 1.844.GO VIAVI / 1.844.468.4284 Latin America +52 55 5543 6644 EMEA +49 7121 862273 APAC +1 512 201 6534 All Other Regions: viavisolutions.com/contacts email TAC@viavisolutions.com...
Need help?
Do you have a question about the Seeker D and is the answer not in the manual?
Questions and answers