Table of Contents
Advertisement
Quick Links
Advertisement
Table of Contents

Related Manuals for Raiscube R10


Summary of Contents for Raiscube R10
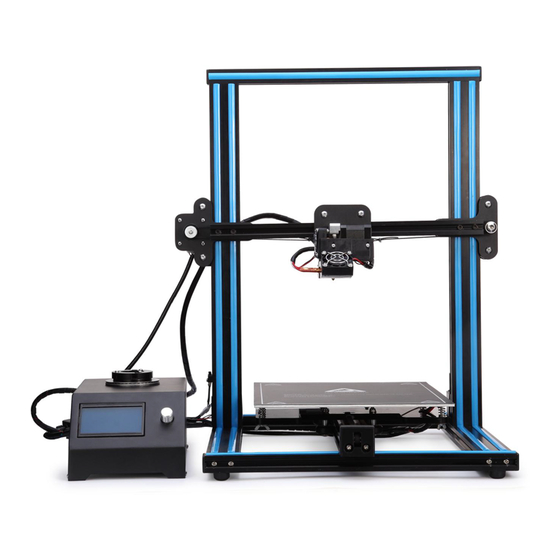
- Page 1 RAISCUBE R10 3D PRINTER MANUAL RAISCUBE R10 USER MANUAL...
- Page 2 RAISCUBE R10 3D PRINTER MANUAL R10 Packing List Items Name Picture Bottom Part Frame Part Control Box M5*30 Philips cap screw...
- Page 3 RAISCUBE R10 3D PRINTER MANUAL 0.25KG Filament USB Cable Power Line Tool Set SD Card Card Reader...
-
Page 4: Step 2 Install Printer
RAISCUBE R10 3D PRINTER MANUAL 1. Installation of R10 This manual will offer your assemble instruction including wire connection, operation instruction, and support resources. Unlike Acrylic kit required to be built piece by piece for over 10 hours to complete, you will find it done to be ready for first print in minutes! Step 1 Preparation prior to install. - Page 5 RAISCUBE R10 3D PRINTER MANUAL Please refer to Fig.02. Fig.02 And Fig.03 is what is to be end of this step.
-
Page 6: Step 3 Wire Connection
RAISCUBE R10 3D PRINTER MANUAL Fig.03 (Build Frame) Step 3 Wire connection. Items needed: Control box and Build Frame. Make “Control Box” circuits and “Build Frame” (Fig.03) circuits connected well. Please note that there are labels of each wire, please refer to Fig.04, and connector at end of each wire. - Page 7 RAISCUBE R10 3D PRINTER MANUAL Fig.04 Plug a connector to the other matching connector, please refer to Fig.05. Fig.05 After done this, we get what in Fig.06.
- Page 8 RAISCUBE R10 3D PRINTER MANUAL Fig.06 Also please refer to Fig.07 when connecting...
- Page 9 RAISCUBE R10 3D PRINTER MANUAL Fig.07 (Overall Details)
- Page 10 RAISCUBE R10 3D PRINTER MANUAL Remark: Tension of X and Y axis belt. A proper tension of belt is required ahead of printing. Tension is well adjusted in factory, so generally speaking, it shall be ok. But may loose, check tension check is required. If too loose, need to fix it.
- Page 11 RAISCUBE R10 3D PRINTER MANUAL 2. User Manual Screen Information.
- Page 12 RAISCUBE R10 3D PRINTER MANUAL Select “Control ” → “ Temperature ” → “ Bed ”. Turn the bed temperature to 55°C. Then navigate back to the Info Screen. This will heat the bed to actual printing conditions, making the leveling more accurate.
- Page 13 RAISCUBE R10 3D PRINTER MANUAL Step 1 Leveling the X Axis. Get a regular rectangle object, to keep a same distance between top surface of Z-Axis Motor Fixed Plate and bottom face of Z-Axis Link Block (Left&Right). If not, turn a side of “Flexible Coupling” to keep two sides same to make it level.
-
Page 14: Step 2 Hotbed Leveling
RAISCUBE R10 3D PRINTER MANUAL Step 2 Hotbed Leveling. Panel Control, press control button, “Prepare” → “Auto Home”, to move nozzle to origin point. Check if nozzle top almost touches hotbed surface. If not, find the long screw behind Left Z-Axis Link Block, and adjust it to be. - Page 15 RAISCUBE R10 3D PRINTER MANUAL Step 5 Feeding Filament. When the temperature of Extruder reaches about 180℃, feed the end of the filament into the extruder with one hand as you squeeze the squeeze head release lever with your other hand, to put the filament into the inlet port.
- Page 16 RAISCUBE R10 3D PRINTER MANUAL Remark: When the printer is fully heated, check to make sure the filament is fully loaded. This also removes all of the previous material left in the printer from other prints. To do this, manually push filament through the heated nozzle until the new color begins coming out of the nozzle.
-
Page 17: Step 7 Removing Filament
RAISCUBE R10 3D PRINTER MANUAL Remark: You may need to make fine adjustments to the bed level when you start printing.The first layer of the print will show whether the distance between the nozzle and build plate is correct. Refer to the following graphic. -
Page 18: Operation: The Four Steps Of 3D Printing
RAISCUBE R10 3D PRINTER MANUAL 3. Operation: The Four Steps of 3D Printing 3D printing involves four steps: Step 1 Create or find a 3D file Step 2 Slice the file for 3D printing Step 3 Send the file to the printer... - Page 19 RAISCUBE R10 3D PRINTER MANUAL...
- Page 20 RAISCUBE R10 3D PRINTER MANUAL Once you add the new machine, click Machine > Machine settings and change the machine settings to: Max width 240, Max depth 300, Max height 300, Extruder count 1, and check Heated bed. Click “OK.”...
-
Page 21: Troubleshooting
RAISCUBE R10 3D PRINTER MANUAL 4. Troubleshooting This section covers the most common printing problems and how to fix them. Because 3D printing is still an emerging technology, a small level of tinkering and troubleshooting is needed. But if this section doesn’t solve your printing problems, then contact our admin on FB Group. -
Page 22: Mechanical Problem: Leveling The Build Plate
RAISCUBE R10 3D PRINTER MANUAL Your part may need supports. If it’s rounded you may need to select “Everywhere” for the support type. If it’s intricate, it may need to select “Raft” for the Platform adhesion type. A raft is a hatch pattern on the build plate that the model will print on. - Page 23 RAISCUBE R10 3D PRINTER MANUAL the extruder with your other hand. ●Alternate “flossing” with the nozzle cleaner and pushing the filament through the extruder until a consistent bead of filament is extruded through the nozzle. ●Reload the filament and move on to Try to push the clog through the nozzle.
Need help?
Do you have a question about the R10 and is the answer not in the manual?
Questions and answers