Advertisement
Quick Links
Advertisement

Related Manuals for Uconnect 4.3


Summary of Contents for Uconnect 4.3
- Page 1 Uconnect 4.3/4.3S ® Owner’s Manual Supplement...
-
Page 2: Introduction 5
TABLE OF CONTENTS SECTION PAGE SAFETY GUIDELINES ............3 INTRODUCTION . -
Page 3: Safety Guidelines 3
SAFETY GUIDELINES CONTENTS Safety Guidelines......4... - Page 4 Uconnect® features and applications in this ve- setting for your new state. Currently all states prohibit hicle. Only use Uconnect® when it is safe to do so. front seat video viewers except for: Arkansas, Dela- Failure to do so may result in an accident involv- ware, Georgia, Hawaii, Idaho, Iowa, Kentucky, Missis- ing serious injury or death.
-
Page 6: Introduction
CONTENTS ▫ Uconnect® 4.3 System ....6 INTRODUCTION ......6... - Page 7 Uconnect® features and applications in this ve- hicle. Only use Uconnect® when it is safe to do so. Failure to do so may result in an accident involv- ing serious injury or death.
- Page 8 INTRODUCTION 7...
- Page 9 Options available such as: Push the PLAYER button, located on the faceplate, to Uconnect® Phone (if equipped) and Compass can be access media sources such as: Disc, USB Device and AUX accessed by pushing the corresponding buttons in the as long as the requested media is present.
- Page 10 INTRODUCTION 9 8 — SCREEN OFF Push the SCREEN OFF button, located on the faceplate, to turn the touchscreen OFF. To turn the screen back ON, just press the touchscreen. 9 — ENTER/BROWSE & TUNE/SCROLL Push the ENTER/BROWSE button to accept a high- lighted selection on the screen.
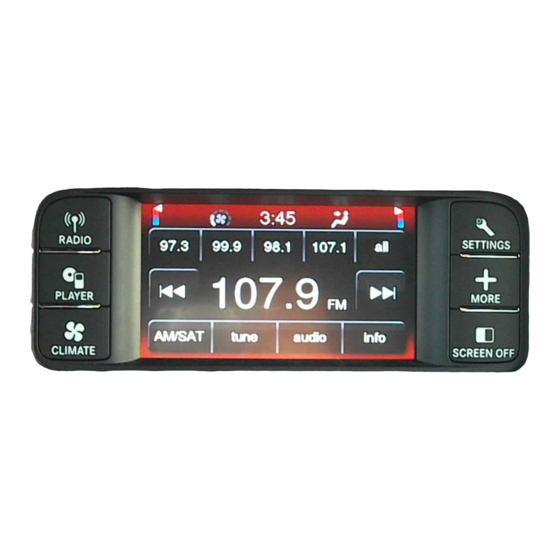
- Page 11 RADIO MODE CONTENTS ▫ Setting Presets......15 RADIO MODE......12 ▫...
-
Page 12: Radio Mode
12 RADIO MODE RADIO MODE ON/OFF & Volume Control Overview Push the ON/OFF Volume Control knob to The radio is equipped with the following modes: turn on the radio. Push the ON/OFF Volume • FM Control knob a second time to turn off the radio. -
Page 13: Seek And Direct Tune Functions
RADIO MODE 13 decrease the radio station frequency. Push the ENTER/ Seek And Direct Tune Functions BROWSE button to choose a selection. The Seek Up and Down functions are activated by pressing the Double Arrow buttons to the right and left of Info the radio station display, or by pushing the left Steering Press the “Info”... - Page 14 14 RADIO MODE channels at a faster rate, the radio stops at the next Direct Tune available station or channel when the button on the touchscreen is released. Seek Down Press and release the Seek Down button on the touchscreen to tune the radio to the next listenable station or channel.
-
Page 15: Audio
RADIO MODE 15 Press the available numbered button to begin selecting a When you are receiving a station that you wish to desired station. Once a number has been entered, any commit into memory press and hold the desired num- numbers that are no longer possible (stations that cannot bered button for more that two seconds or until you hear be reached) will become deactivated/grayed out. -
Page 16: Siriusxm Satellite Radio Mode — If Equipped
16 RADIO MODE • Equalizer SiriusXM Satellite Radio Mode — If Equipped Press the “Equalizer” button to adjust the Bass, Mid SiriusXM services require a subscription, sold separately and Treble. Use the “+” or “–” buttons to adjust the after the 12-month trial period included with the new equalizer to your desired settings. - Page 17 RADIO MODE 17 This functionality is only available for radios equipped The satellite mode is activated by pressing the AM/SAT with a Satellite receiver. To receive satellite radio, the button on the touchscreen located at the bottom of the vehicle needs to be outside with a clear view to the sky. radio screen.
- Page 18 18 RADIO MODE level stays for 10 seconds and then returns to the main when either the favorite song, or works by the favorite top level of the bottom bar. The second level displays artist are being played at any time by any of the SiriusXM audio, fav, gamezone and replay buttons.
- Page 19 RADIO MODE 19 You can exit by pressing the “Replay” button any time Forward during the Replay mode. Each press of the “FW” button forwards the content in Play/Pause steps of five seconds. Forwarding of the content can only be done when the content is previously rewound, and Press the “Pause”...
- Page 20 DISC MODE CONTENTS OVERVIEW ......22 BROWSE ......23 ▫...
- Page 21 Gently insert one Disc into the Disc player with the Disc • Uconnect® is a single CD player. Do not attempt to label facing up. The CD will automatically be pulled into insert a second CD if one is already loaded.
- Page 22 DISC MODE 23 EJECT Button — Ejecting A Disc Fast Seek Up Press and hold the Seek Up button and the Disc Push the EJECT button to eject the Disc. player will begin to fast forward through the current track until the button is released. Fast Seek Down If the Disc is not removed, the radio will reinsert the Disc Press and hold the Seek Down...
- Page 23 24 DISC MODE SOURCE SHUFFLE Press the source button to select the desired audio source: Press the “more...” button on the touchscreen then the “CD,” “AUX” or “USB.” This screen will time out after a “shuffle” button on the touchscreen to play the selections few seconds and return to the main radio screen if no on the compact disc in random order to provide an selection is made.
- Page 24 USB/iPod® MODE CONTENTS OVERVIEW ......26 SOURCE ......27 ▫...
- Page 25 26 USB/iPod® MODE OVERVIEW current selection, or return to the beginning of the previous selection if the USB/iPod® device is within the USB/iPod® Mode is entered by either inserting a USB first eight seconds of the current selection. Jump Drive or an iPod® cable into the USB port, or by pushing the PLAYER button located left of the display.
- Page 26 USB/iPod® MODE 27 made you can chose from the available media by pressing SHUFFLE the button on the touchscreen. Press the exit button on Press the “More...” button then the “Shuffle” button to the touchscreen if you wish to cancel the browse func- play the selections on the USB/iPod®...
- Page 27 AUX MODE CONTENTS OVERVIEW ......30 SOURCE ......30 ▫...
- Page 28 30 AUX MODE OVERVIEW radio; use the device controls instead. Adjust the volume with the ON/OFF VOLUME rotary knob, or with the AUX Mode is entered by inserting a AUX device using a volume of the attached device. cable with a 3.5 mm audio jack into the AUX port or by pushing the PLAYER button located left of the display.
- Page 30 Bluetooth® MODE CONTENTS OVERVIEW ......32 SOURCE ......33 SEEK UP/DOWN .
- Page 31 DVD for more details. Press and hold the Seek Up button and the Once the Bluetooth® device is paired to the Uconnect® Bluetooth® device will begin to fast forward through the System, push the PLAYER button located on the left side current track until the button is released.
- Page 32 Bluetooth® MODE 33 SOURCE Press the Source button on the touchscreen to select the desired audio source; CD, USB/iPod®, AUX or Bluetooth®. This screen will time out after a few seconds and return to the main radio screen if no selection is made.
- Page 33 MORE & SETTINGS CONTENTS ▫ Settings Main Menu ....38 MORE & SETTINGS..... .36 ▫...
- Page 34 Refer to “Understanding Your Instrument Panel/ Phone Uconnect® System” section in your vehicle Owner’s Manual on the DVD for details. Refer to “Understanding The Features Of Your Vehicle/ Uconnect® 4.3” section in your vehicle Owner’s Manual on the DVD for details.
- Page 35 MORE & SETTINGS 37 Clock Setting 1. Push the MORE button on the right side of the display, then press the “Time” button. Next, press the “Set” button. Push the SETTINGS button on the right side of the display, then press the “Clock” button. The Time setting screen is displayed and the clock can be adjusted as described in the following procedure.
- Page 36 Lights Push the SETTINGS button to display the Settings Main Refer to “Understanding Your Instrument Panel”, Menu. The Settings Main Menu contains the following “Uconnect® System” section in your vehicle Owner’s options: Manual on the DVD for details. Display Doors & Locks Refer to this section for details.
- Page 37 Refer to the Operating Instructions – Radio section in this manual for details. Phone/Bluetooth® Refer to “Understanding The Features Of Your Vehicle”, “Uconnect® 4.3” section in your vehicle Owner’s Manual on the DVD for details. SiriusXM Setup Refer to the Operating Instructions – Radio section in this...
- Page 38 40 MORE & SETTINGS • Units 2. Then press the “Display” button. Press the “Units” button to select between U.S. and The Display Menu shows the following options for Metric units of measure. Press the “Back Arrow” you to customize your display: button when done.
- Page 39 15UC43-526-AB Second Edition Uconnect 4.3/4.3S ® Chrysler Group LLC Printed in the USA...
Need help?
Do you have a question about the 4.3 and is the answer not in the manual?
Questions and answers