Kenwood TK-290 Instruction Manual
Vhf / uhf fm transceivers
Hide thumbs
Also See for TK-290:
- Service manual (65 pages) ,
- Quick manual (4 pages) ,
- Brochure & specs (2 pages)

Related Manuals for Kenwood TK-290


Summary of Contents for Kenwood TK-290
-
Page 1: Instruction Manual
INSTRUCTION MANUAL VHF FM TRANSCEIVER TK-290 UHF FM TRANSCEIVER TK-390 KENWOOD CORPORATION © B62-0816-30 (K)(MC) 09 08 07 06 05 04 03... - Page 2 THANK YOU! NOTICES TO THE USER We are grateful you chose KENWOOD WARNING: for your land mobile radio applications. ◆ GOVERNMENT LAW PROHIBITS THE We believe this easy-to-use transceiver OPERATION OF UNLICENSED RADIO TRANSMITTERS WITHIN THE will provide dependable TERRITORIES UNDER GOVERNMENT communications to keep personnel CONTROL.
- Page 3 ATTENTION (U.S.A. Only): INFORMATION TO THE DIGITAL DEVICE USER REQUIRED BY THE FCC The RBRC Recycle seal found on nickel- KENWOOD cadmium (Ni-Cd) battery packs indicates ’s KENWOOD This equipment has been tested and found to voluntary participation in an industry program to collect...
-
Page 4: Table Of Contents
CONTENTS Adjusting the Volume....10 UNPACKING AND CHECKING EQUIPMENT ........ 1 Selecting a Group ....10 Supplied Accessories ....1 Selecting a Channel ....11 Adjusting the Squelch ....11 INSTALLING THE NiCd BATTERY PACK (OPTIONAL) ........ 2 Making a Call ......11 INSTALLING THE ANTENNA (OPTIONAL) ... -
Page 5: Unpacking And Checking Equipment
The following unpacking instructions are for Note: use by your dealer, an authorized KENWOOD service facility, or the factory. KENWOOD Carefully unpack the transceiver. We recommend that you identify the items listed in the following table before discarding the packing material. -
Page 6: Installing The Nicd Battery Pack (Optional)
3 To remove the battery pack, push INSTALLING THE NiCd BATTERY down on the release latch and slide PACK (OPTIONAL) the pack away from the transceiver. The battery pack is not charged at the factory. Charge the pack before use. Repeat the charge/discharge cycles two or three times after purchase or extended storage (greater than... -
Page 7: Installing The Antenna (Optional)
INSTALLING THE BELT HOOK INSTALLING THE ANTENNA (OPTIONAL) Screw the antenna into the connector If necessary, attach the belt hook using on the top of the transceiver by holding the two binding screws (3 x 6 mm) the antenna at its base and turning it which are supplied in the screw set. -
Page 8: Installing The Speaker/ Microphone (Optional)
2 Secure the connector in place using INSTALLING THE SPEAKER/ the attached screw. MICROPHONE (OPTIONAL) The speaker/microphone PF keys can be Note: 1 Insert the guide of the speaker/ programmed with the functions listed in the table on microphone connector into the page 8. -
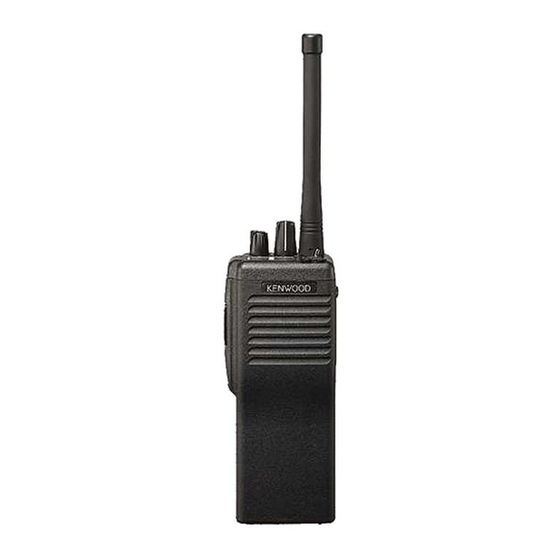
Page 9: Getting Acquainted
GETTING ACQUAINTED Microphone SMA male type antenna connector Speaker Display Battery pack release latch... -
Page 10: Key Descriptions
■ r r r r r Toggle switch Key Descriptions Switch the toggle position to q q q q q TX/Busy/Battery low indicator activate its programmable Lights red while transmitting. function {page 8}. Lights green while receiving. t t t t t Top 1 Press these PF Flashes red when the battery y y y y y Top 2... -
Page 11: Display
■ e e e e e A (Add) indicator Display Appears when a channel is added to the scanning sequence. r r r r r SCN (Scan) indicator Appears when Scan mode is active. t t t t t MON (Monitor) indicator Appears when the monitor function is active. -
Page 12: Programmable Functions
PROGRAMMABLE FUNCTIONS t t t t t , y y y y y , i t c (e e e e e ) r r r r r ) u u u u u , i i i i i , o o o o o ) l l a... - Page 13 t t t t t , y y y y y , i t c (e e e e e ) r r r r r ) u u u u u , i i i i i , o o o o o ) y t i y t i t f i...
-
Page 14: Basic Operations
■ BASIC OPERATIONS Adjusting the Volume Turn the Power switch/Volume ■ Switching Power ON/OFF control to adjust the volume. To switch ON the transceiver, turn Clockwise increases the volume, the Power switch/Volume control and counterclockwise decreases it. clockwise until it clicks. ■... -
Page 15: Selecting A Channel
■ ■ Selecting a Channel Making a Call Turn the Selector or press the 1 Select the desired group and Channel Up and Channel Down channel {page 10}. keys to select a channel. 2 Use the key or switch • Use the Selector or PF keys, programmed as Monitor to check depending on which one is whether or not the channel is... -
Page 16: Key Lock
KEY LOCK SCANNING Use the key or switch programmed as The Scan function can be used with a Note: minimum of two channels. Key Lock to activate the Key Lock function. When activated, only the PTT Scan is used to monitor signals on the and toggle switch, the Selector, and transceiver channels. -
Page 17: Priority Scan
■ Priority Scan DTMF CALLING For Priority Scan to function, the This function can only be used by Note: transceivers with DTMF keypads. Priority1 or Priority2 channel must be programmed. ■ Manual Dialing • If only one of the priority channels are programmed, the transceiver will To dial a number manually: automatically change to that priority... -
Page 18: Redialing
■ ■ Redialing Auto Dialing A maximum of 16 digits can be Auto dialing is either enabled or disabled Note: by your dealer {page 16}. redialed. The last number dialed, either manually or automatically, will Store: be redialed. To store a number in memory: To redial a number: 1 Press the # key. - Page 19 Confirm: 2 Press the memory channel key (1 ~ 9) with the stored number To confirm a stored number: you want to send. 1 Press the # key. • The transceiver will begin the • A “D” will appear on the display. transmission, and the digits will appear on the display.
-
Page 20: Dealer Programmable Options
DEALER PROGRAMMABLE OPTIONS The following list of functions can be enabled or disabled by your dealer: CHANNEL Priority1 Channel Group Name Priority2 Channel Receive Frequency Home Channel Transmit Frequency Emergency Channel QT/DQT Decode EDIT QT/DQT Encode Scan Information Channel Name Priority1 Option Signaling Priority2... - Page 21 Battery Warning Priority Channel Quick Scan Busy LED Priority1 Temp. D/A TX LED Priority2 Temp. D/A 7 Segment LCD Display Temp. D/A Key Hold Time Invert Display Revert Channel Display Emergency Channel Display Optional Features Clear to Transpond Channel Text Size External Speaker Group Text Size Noise Cancel Mic...
- Page 22 TOT Rekey Time and # Tone (Encode) TOT Reset Time DTMF Side Tone (Encode) Group Delete/Add DTMF Hold Time (Encode) Battery Save Keypad Auto PTT (Encode) Signaling Manual Dial (Encode) 2-Tone (1, 2, and 3) Auto Dial (Encode) Decoder Call Format (1 and 2) Auto Dial Programming (Encode) Decoder Call Type (1 and 2) Auto Dial Memory (Encode)
-
Page 23: Audible User Feedback Tones
AUDIBLE USER FEEDBACK TONES The transceiver outputs various tones to indicate the transceiver operating status. • Power ON Tone • Key Operation Tone • End of Operation Tone • Operation Error Tone • Sequence Error Tone • Transmission Inhibit Tone •... -
Page 24: Terminal Descriptions
Terminal Descriptions Universal connector Name Description EXT/INT SP switch input BTL output + for external speaker BTL output - for external speaker EXT/INT MIC switch input External microphone input External microphone earth PTT input Programmable function key input Non connect 10 EMC Earth 11 5M... - Page 25 Use only KENWOOD authorized accessories (antennas, battery packs, belt clips, Speaker/ Mics or headsets etc.): When worn on the body, always place the radio in a KENWOOD recommended clip or carrying case meant for this product. The use of other than recommended or approved body- worn accessories may result in RF exposure levels which exceed the FCC’s occupational/...
Need help?
Do you have a question about the TK-290 and is the answer not in the manual?
Questions and answers