
Related Manuals for MITECH MR200


Summary of Contents for MITECH MR200
- Page 1 MITECH SURFACE ROUGHNESS TESTER MR200 User’s Manual MITECH CO.,LTD. www.mitech-ndt.com...
-
Page 2: Table Of Contents
CONTENTS 1 Overview .................................. 2 1.1 Technical Parameters..........................2 1.2 Functions &Features...........................2 1.3 Working Principle............................3 1.4 Instrument Configuration..........................3 1.5 Working Conditions............................. 4 2 Structure and Outline ............................4 2.1 Main Body Structure........................... 4 2.2 Probe Structure............................4 2.3 Display................................5 2.4 Keypad Definitions............................5 3. -
Page 3: Overview
1 Overview The Portable surface roughness tester MR200 could give a fast, accurate test of the roughness, applied on work site and mobile measurement. It is portable to carry, easy to operate, reliable to test and full functional advantages. Adopted 2.7 inch OLED Screen, equipped with wireless communication module, Micro-USB port, standard Bluetooth module and SD card, it can not only achieve wireless remote control and measure but also can connect with PC, wireless Bluetooth printer and memorize more data. -
Page 4: Working Principle
1.3 Working Principle This instrument adopts needle scanning method to test the surface roughness of the work piece. When measuring roughness of part surface, the probe is placed on the surface of the part and then tracing the surface at constant rate. The probe acquires the surface roughness by the sharp stylus in probe. -
Page 5: Working Conditions
1.5 Working Conditions Ambient temperature: -20℃~+50℃; Storage temperature: -30℃~+70℃; Relative humidity: ≤90%; The surrounding environment should avoid of vibration, strong magnetic field, corrosive medium and heavy dust. 2 Structure and Outline 2.1 Main Body Structure... -
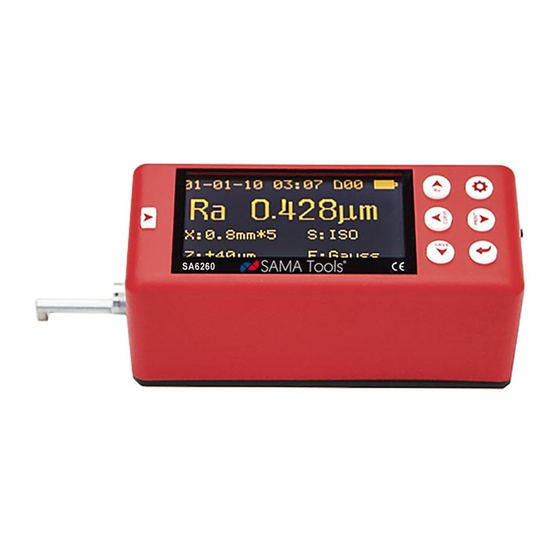
Page 6: Display
2.3 Display 2.4 Keypad Definitions Sheet2-1 Start key Used to start measuring. Press this key to enter the parameter item, press the set key Up arrow/Parameter key to exit. Down arrow/Storage key Press this key to enter saving record interface. -
Page 7: Battery Charging
3.3 Battery Charging When MR200 appears the low voltage tips or could not boot, it should be charging to the promptly. When charging, put the charger into the micro-USB port, then put the charger into the socket. This instrument adopts Li-poly battery, without memory effect, could be charged at any time. -
Page 8: Preparation Before Measurement
Enter the main menu Under the main interface, long press Set / Menu button to enter the main menu, press the enter key to enter the clock calibration interface (diagram below) Time Calibration In accordance with uniform provisions of arrow keys, use the up/down key to select figure to be set. -
Page 9: Start Measurement
3.5.1 Stylus Position First, check the stylus position. When measuring in surface, usually don’t need adjust stylus position. When using the Height Lifting Pillar to measure the work-piece surface, you need to adjust the vertical height of the instrument to determine the pointer near zero. After the pickup is exposed to the measured surface, the measurement can begin. -
Page 10: Display Readings
Digital filter sampling ends, it begins digital filter. Calculating After the filtering, all parameters are under calculating. Notes: If you press the power button accidentally and cause the shutdown when measuring. Then turn on, the probe will be reset at this time, please do not have any interference until the reset is completed. -
Page 11: Save/Read Measurement Results
PC to print Match printer before printing Install the matched printer and place near the MR200; In the sub-menu of printer result, select "Printer Pair", press the "Enter key" to enter the Printer Pair status and it will display "Pairing Successful” in 3 seconds. Press setting key to return the main... -
Page 12: Communication With Pc
Print results formats could be customized Enter the menu setting, and enter the sub-menu of print results. You can choose Print Ra, R... or Print R & PROF, Print Self R..or Self R..Set. Print Set Interface Start printing Under the status of the main interface, press right-arrow to output measured parameters and profile to the printer. -
Page 13: Remote Control And Measurement
3.11 Remote Control and Measurement This instrument provides remote control to start the measurement, in some cases, that can improve the stability of the measurement. Before using the remote control, pair the remote control. In the main interface, press "Settings Button" to enter the menu setting mode, select "System settings", press "Enter key"... -
Page 14: Troubleshooting
Please do not disassemble or adjust any fixed assembly parts, you should entrust to the company's after-sales service department for maintenance and disposal. Notes: The company will only accept repair business under the standard process. If not, failure loss will be at your own risk. -
Page 15: Standard Probe
Height Lifting Pillar 7.3 Standard Probe The standard probe is the most frequently used probe. It can meet most of the surface roughness measurement, such as plane, slope, conical surface, the inner hole, the groove and other. It can do convenient hand-held measurement. -
Page 16: Deep Groove Probe
7.4.1 Picture and Measurement of Curved Surface Probe Curved Surface Probe Measurement 7.4.2 Operation Instruction Plugging the probe carefully into the instrument, install it on the connecting part of the pillar; Using the curved surface probe, we should try to use a shorter range, such as 0.25um sampling length especially when the arc is small;... -
Page 17: Small Hole Probe
7.5.1 Picture and Measurement of Deep Groove Probe Deep Groove Probe Measurement 7.5.2 Operation Instruction Plugging standard probe carefully into the instrument, install it on the connecting part of the pillar, then check if locked tightening; Raise the slide adjustment rack of pillar slightly above the work-piece, fall the probe till contact with the work-piece. -
Page 18: Extension Bar
7.6.2 Operation Instruction Adjustment before measuring: Plugging the probe carefully into the instrument, then check if locked the tightening; Raise the slide adjustment rack of pillar slightly above the work-piece’s surface, fall the probe till contact with the work-piece. In the process, you should be careful especially when the probe is about to touch the work-piece;... -
Page 19: Parameters Definitions
● GAUSS Filter ● PCRC Filter 8.3 Parameters Definitions 8.3.1 Arithmetical Mean Deviation of Profile Ra Ra is arithmetic mean of the absolute values of profile deviation Z(x) from mean within sampling length. 8.3.2 Root-mean-square Deviation of Profile Rq Rq is the square root of the arithmetic mean of the squares of profile deviation Z(x) from mean within sampling length. - Page 20 8.3.6 Maximum Depth of Profile Valley Rv Rv is the depth from the deepest profile valley line to mean line within sampling length. 8.3.7 Mean Spacing of Local Peaks of Profile RS RS is the mean spacing of adjacent local peaks of the profile within sampling length.
-
Page 21: Recommended Table Of Sampling Length
8.3.13 Rmax The same to 8.3.4 Rt. 8.3.14 Peak count Rpc C value is the distance of two parallel lines centered with middle line. There are two ways. One is absolute value method. The other is relative percentage method. -
Page 22: Appendix
Appendix Appendix I: Standard Code and Name Table Standard Code Standard Name ISO 4287 International Standard DIN 4768 German Standards JIS B601 Japanese Industrial Standards ANSI B46.1 American Standard Appendix II: Roughness Parameters Display Range Parameters Display Range Ra Rq 0.005μm... -
Page 23: User Notes
Warranty : The product is guaranteed for one year since purchased. Log www.mitech-ndt.com or follow our company official public platform to register for maintenance. Please fill the blanks as required, if the product is not registered for maintenance, it will follow the date of manufacturer.
Need help?
Do you have a question about the MR200 and is the answer not in the manual?
Questions and answers