Table of Contents
Advertisement
Quick Links
Advertisement
Table of Contents

Related Manuals for Blomberg FTM 1531


Summary of Contents for Blomberg FTM 1531
- Page 1 Upright Freezer FTM 1531 FTM 1531 P Bedienungsanleitung Operating instructions...
- Page 2 Please read this manual first! Dear Customer, We hope that your product, which has been produced in modern plants and checked under the most meticulous quality control procedures, will provide you with many years of good service. For this, we recommend you to carefully read the entire manual of your product before using it and keep it at hand for future reference.
-
Page 3: Table Of Contents
5 Using your refrigerator 13 1 Your refrigerator TEMPERATURE CONTROL AND ADJUSTMENT ......... 13 2 Warnings INDICATOR LIGHTS ....... 13 ELECTRICAL REQUIREMENTS ..5 STORING FROZEN FOOD ....14 WARNING! THIS APPLIANCE MUST FREEZING FRESH FOOD ....14 BE EARTHED ........5 MAKING ICE CUBES ....... -
Page 4: Your Refrigerator
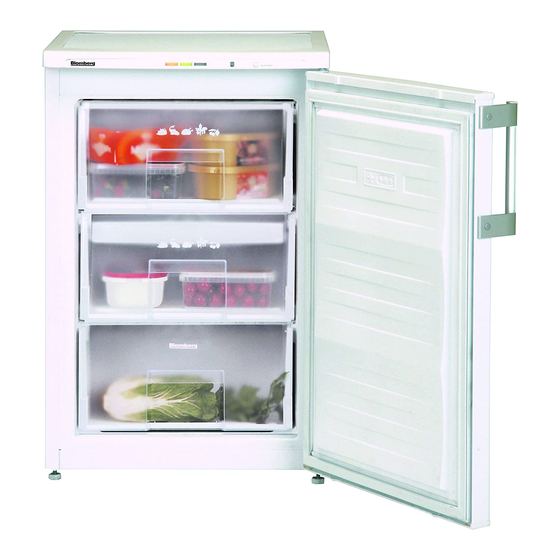
Your refrigerator Congratulations on your choice of a BLOMBERG quality Appliance which has been designed to give you service for many years. Top trim Icebank Fast-Freeze switch Fast-freeze compartment Indıcator lights Frozen-food compartments Thermostat knob Adjustable front feet C Figures that take place in this instruction manual are schematic and may not correspond exactly with your product. -
Page 5: Warnings
• Do not dispose of the appliance on • Do not use mechanical devices a fire. At BLOMBERG, the care and or other means to accelerate the protection of our environment is an defrosting process, other than those ongoing commitment. -
Page 6: Electrical Requirements
3. Connect the brown (Live) wire to from a BLOMBERG Authorised Service the terminal in the plug marked ‘L’ or Agent. coloured red. WARNING! THIS APPLIANCE... -
Page 7: Energy Saving Tips
With alternative plugs a 13 A fuse must be fitted either in the plug or adaptor or in the main fuse box. If in doubt contact a qualified electrician. ENERGY SAVING TIPS 1- Ensure your appliance is installed in a well ventilated area. 2- Ensure the time between buying chilled/frozen food and placing them in your appliance is kept at minimum,... -
Page 8: Installation
After bringing appliance or tamper with the controls. it to upright position,it must not be BLOMBERG plc declines to accept any operated for at least 4 hours to allow liability should the instructions not be the system to settle. - Page 9 5. The appliance should be located on a smooth surface. The two front feet 9.Depending on the model of your can be adjusted as required. To ensure product, two plastic wall spacers or that, your appliance is standing upright a back air grille is supplied with your adjust the two front feet by turning appliance.
-
Page 10: Reversing The Doors
REVERSING THE DOORS Switch off the appliance at the socket outlet and pull out the We recommend that you reverse doors mains plug. before switching on for the first time. 2. Remove all food, loose items and fittings from inside the appliance and Tools required: Small and medium size door shelves. - Page 11 11. Fit the other front feet (10). 12. Carefully stand your appliance. (You may need somebody to help you.) Adjust the front feet (See Installation Instructions) 13. Put back all, loose items and fittings. 14. Wait for at least 4 hours to allow the system to settle before switching Spare plastic parts supplied with the appliance are for your future use...
- Page 12 60° 60°...
-
Page 13: Before Operating
Before operating manufacturing process used, so do Final Check not worry, it is not a defect. Before you start using the fridge/ 9. Front edges of the cabinet may feel freezer check that: warm. This is normal. These areas are designed to be warm to avoid 1. -
Page 14: Using Your Refrigerator
Using your refrigerator TEMPERATURE CONTROL AND ADJUSTMENT INDICATOR LIGHTS Temperature is controlled by the thermostat which is located on the rear There are three coloured indicator wall of the cabinet (see the diagram on lights located on the front of the page 5). -
Page 15: Storing Frozen Food
c. If the appliance door is left open Do not freeze too large a quantity at accidentally. any one time. The quality of the food Thermostat knob (5) is best preserved when it is frozen right through to the centre as quickly Thermostat knob is located on the as possible. - Page 16 Remove all freezer drawers.The special defrost collection basin collects the defrost water. Therefore defrosting can be conducted without mess. Containers full of warm water may be placed carefully in the freezer to speed up the defrosting. Do not use pointed or sharp edged objects such as knives, forks to remove the frost.
-
Page 17: Maintenance And Cleaning
Maintenance and cleaning ** We recommend that you switch off the appliance at the socket outlet ** Any dust that gathers on the and pull out the mains plug before condenser, which is located at cleaning. the back of the freezer, should be removed once a year with a vacuum cleaner. -
Page 18: Do's And Don'ts
Do's and Don'ts Do- Wrap all food in aluminium foil or Do- Clean your appliance regularly freezer quality polythene bags and (See “Cleaning and Care”) make sure any air is excluded. Do- Keep raw meat and poultry below Do- Wrap frozen food when you buy it cooked food and dairy products. -
Page 19: Problem Solving
PROBLEM SOLVING Don’t- Exceed the maximum freezing loads (6 kg in any 24 hours) when If the appliance does not operate when freezing fresh food. switched on, check whether: Don’t- Give children ice-cream and • The plug is inserted properly in the water ices direct from the freezer. -
Page 20: How To Obtain Service
How To Obtain Service Please keep your purchase receipt or other proof of purchase in a safe place; you will need to have it should the product require attention under guarantee. You should also complete the details below; it will help us assist you when requesting service. -
Page 21: Guarantee Details
• The cost of functional replacement parts, but excluding consumable items. • The labour costs of a BLOMBERG approved repairer to carry out the repair. What is not covered? • Transit, delivery or accidental damage or misuse and abuse. - Page 22 Blomberg, 36-38 Caxton Way, Watford, Hertfordshire, WD18 8UF Tel: 0845 6048340 Fax: 0845 6004922 email: service@blomberguk.com www.blomberguk.
- Page 23 WARNING ! * DO NOT USE ANY COPPER POT, DISH INSIDE THE CABINET! * DO NOT LOAD ANY FOOD WITHOUT PACKAGE! WARNUNG ! * BENUTZEN SIE KEINERLEI KUPFERGESCHIRR IM GERÄT! * GEBEN SIE KEINE UNVERPACKTEN LEBENSMITTEL IN DAS GERÄT! AVERTISSEMENT ! * N'UTILISEZ PAS DE RECIPIENTS OU DE PLATS EN CUIVRE A L'INTERIEUR DES COMPARTIMENTS ! * N'INTRODUISEZ PAS DE DENREES NON EMBALLEES...