Table of Contents
Advertisement
INNOVATIVE
MONITORING
SOLUTIONS
FAC TO R IE S
Monitoring product
quality throughout the
entire manufacturing
cycle
TESTING
STANDARDS
Ensuring quality control
and compliance with
safety standards
R E S E AR C H &
DE V E LO PME NT
Academic and industrial
laboratory research
measuring multiple
parameters
MIL ITARY
Storage, equipment
maintenance,
machinery and
production testing
AUTO M OT IVE
Compatibility tests,
electronics, control
panels and engine
operating temperatures
User Guide
www.esis.com.au
Ph 02 9481 7420
Fax 02 9481 7267
including DaqLab
esis.enq@esis.com.au
Advertisement
Table of Contents

Related Manuals for Fourtec DaqPRO 5300


Summary of Contents for Fourtec DaqPRO 5300
- Page 1 INNOVATIVE User Guide www.esis.com.au MONITORING Ph 02 9481 7420 SOLUTIONS Fax 02 9481 7267 including DaqLab esis.enq@esis.com.au FAC TO R IE S Monitoring product quality throughout the entire manufacturing cycle TESTING STANDARDS Ensuring quality control and compliance with safety standards R E S E AR C H &...
- Page 2 DaqPRO User Guide Tenth Edition First Print April 2010 © fourtec – Fourier Technologies Ltd. www.esis.com.au Ph 02 9481 7420 Fax 02 9481 7267 esis.enq@esis.com.au...
-
Page 3: Table Of Contents
Contents Introduction ........................... 1 Chapter 1 DaqPRO........................... 3 1.1. General ........................... 3 1.1.1. DaqPRO: System Contents..................... 3 1.1.2. External Connections ...................... 4 1.1.3. Sensor Types and Connections ..................5 1.1.4. User Defined Sensors ..................... 7 1.1.5. Alarms..........................8 1.1.6. Alarm Output ........................8 1.1.7. - Page 4 Chapter 2 Working with DaqLab ..................... 26 2.1. Installing the Software ......................26 2.1.1. System Requirements ....................26 2.1.2. Installation ........................26 2.2. Overview ..........................28 2.2.1. DaqLab On-screen Layout .................... 28 2.2.2. Working with Projects....................28 2.2.3. DaqLab Window Layout ....................29 2.3.
- Page 5 1. Formatting the Table ..................42 2.4.4. Meters ........................... 43 2.4.5. Data Map ........................43 1. Control the Display with the Data Map............... 44 2. Understanding Data Map Icons ................. 44 2.4.6. Exporting Data to Excel....................45 1. Export all Open Data Sets .................45 2.
- Page 6 2.6.4. Smoothing ........................67 2.6.5. Statistics........................68 2.6.6. Most Common Analysis Functions ................68 1. Linear Fit......................68 2. Derivative......................69 3. Integral ......................69 2.6.7. The Analysis Wizard .....................69 1. Using the Analysis Wizard ................. 69 2. Curve Fit ......................70 3.
-
Page 7: Introduction
Every DaqPRO unit is embedded with a unique serial number and can be loaded with a descriptive comment for safe identification. DaqPRO 5300 includes eight input channels for measuring voltage, current, temperature and pulses. Selectable ranges for each input are 0-24 mA, 0-50 mV, 0-10 V, a large variety of NTC, PT-100 and thermocouple temperature sensors including internal temperature, pulse counter, frequency meter and up to 20 user defined sensors. - Page 8 www.esis.com.au Ph 02 9481 7420 Fax 02 9481 7267 esis.enq@esis.com.au This manual is divided into three sections: • The first section is dedicated to the data logger itself. Topics include: Connecting sensors, configuration through the data logger keypad, and using the LCD graphic display to take measurements when working offline.
-
Page 9: Chapter 1 Daqpro
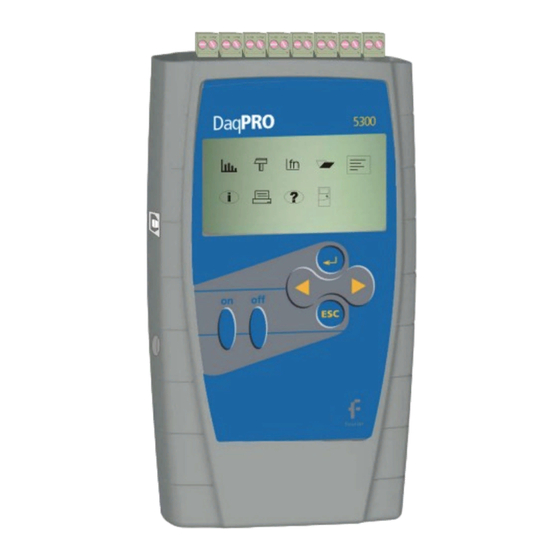
www.esis.com.au Ph 02 9481 7420 Fax 02 9481 7267 esis.enq@esis.com.au Chapter 1 DaqPRO This section will focus on the DaqPRO’s data collection device – the data logger; and includes: • Operating the DaqPRO keypad • Setting up DaqPRO • Connecting sensors to DaqPRO •... -
Page 10: External Connections
www.esis.com.au Ph 02 9481 7420 Fax 02 9481 7267 esis.enq@esis.com.au 1.1.2. External Connections Sensor Inputs/Alarm output input/output input PC USB connection socket Power input (DC 9 – 12V) Figure 1: DaqPRO external connections Chapter 1 DaqPRO... -
Page 11: Sensor Types And Connections
Sensor inputs/alarm output – Pluggable screw terminal block (marked Input -1 to Input -8 from right to left). All eight inputs can be used simultaneously. If you are using one sensor, connect it to input 1. If you are using two sensors connect them to inputs 1 and 2, and so on. - Page 12 www.esis.com.au Ph 02 9481 7420 Fax 02 9481 7267 esis.enq@esis.com.au Connect the sensor to the terminal block at the top of DaqPRO: Figure 2: DaqPRO’s inputs block terminal Sensors must be added successively, starting with input–1. If a single sensor is used it must be connected to Input–1.
-
Page 13: User Defined Sensors
www.esis.com.au Ph 02 9481 7420 Fax 02 9481 7267 esis.enq@esis.com.au See Figure 3 for the wiring configuration of a 3-wire PT 100 connected to input–1 and input–5: Figure 3: Connecting 3-wire PT 100 When working with a 3-wire PT 100, inputs 5 to 8 are not available and you can connect up to 4 sensors. Sensor Mismatch After logging begins, DaqPRO checks if the sensor type assigned to each channel matches the attached sensor. -
Page 14: Alarms
www.esis.com.au Ph 02 9481 7420 Fax 02 9481 7267 esis.enq@esis.com.au 1.1.5. Alarms Users can define minimum and maximum alarm levels for each input individually. DaqPRO places a small alarm icon next to the corresponding input readings and can switch alarm output if either level is breached. -
Page 15: Sensor Calibration
www.esis.com.au Ph 02 9481 7420 Fax 02 9481 7267 esis.enq@esis.com.au 1.1.7. Sensor Calibration DaqPRO ships fully calibrated. However, further calibration can be applied via DaqLab. The calibration parameters are sent to DaqPRO and stored in its memory. Refer to page 55 for calibration instructions. 1.1.8. -
Page 16: Standalone Operation
www.esis.com.au Ph 02 9481 7420 Fax 02 9481 7267 esis.enq@esis.com.au 1.2. Standalone Operation One way to program the DaqPRO is to use its keypad and screen (the other way is to use the DaqLab software – refer to page 47). The keypad allows us to set all the parameters for data collection, while the LCD screen displays the setting values. -
Page 17: Quick-Start
www.esis.com.au Ph 02 9481 7420 Fax 02 9481 7267 esis.enq@esis.com.au 1.2.2. Quick-Start Before you first use DaqPRO, charge the unit for 10 to 12 hours while it is turned off. 1. Turn on DaqPRO Press the On button. You will see the initialization screen. DaqPRO performs a brief self-check and displays its status, including operating mode. - Page 18 www.esis.com.au Ph 02 9481 7420 Fax 02 9481 7267 esis.enq@esis.com.au Press the Enter button to enter the setup menu: → In – 1 Voltage 0–10V In – 2 Empty In – 3 Empty In – 4 Empty RATE = Every sec SAMPLES = 500 DISPLAY = numeric Use the Forward...
- Page 19 www.esis.com.au Ph 02 9481 7420 Fax 02 9481 7267 esis.enq@esis.com.au 4. Select Rate Use the Forward and Backward arrow buttons to select the desired rate, then press the Enter button In – 1 Current 0–24mA In – 2 NTC 10K In –...
- Page 20 www.esis.com.au Ph 02 9481 7420 Fax 02 9481 7267 esis.enq@esis.com.au 6. Choose Display Use the Forward and Backward arrow buttons to select the type of display, then press the Enter button In – 1 Current 0-240 mA In – 2 Thermocouple T In –...
-
Page 21: Working With The Daqpro Menus
www.esis.com.au Ph 02 9481 7420 Fax 02 9481 7267 esis.enq@esis.com.au 1.2.3. Working with the DaqPRO Menus 1. Turning DaqPRO On and Off Turn DaqPRO on Turn DaqPRO off Note: Pressing OFF will not erase the sample memory. The data stored in the memory will be kept for up to 5 years. -
Page 22: Menu Buttons
www.esis.com.au Ph 02 9481 7420 Fax 02 9481 7267 esis.enq@esis.com.au 3. Menu Buttons Move to the next menu or to the next menu options Forward Backward Move to the previous menu or menu options Enter the selected menu or select the current menu option and Enter (Start) move to the next menu command or start recording Return to the main menu or stop recording... - Page 23 www.esis.com.au Ph 02 9481 7420 Fax 02 9481 7267 esis.enq@esis.com.au Display – Select the way DaqPRO will display the data (at a rate of up to 1 sample per second): 1. Numeric – Displays the sensor values and the sample number 2.
-
Page 24: Graphic Display
www.esis.com.au Ph 02 9481 7420 Fax 02 9481 7267 esis.enq@esis.com.au System Display system information: Information 1. Comment (use DaqLab to enter a comment) 2. Number of files stored in DaqPRO’s internal memory 3. Memory usage 4. Ambient temperature (the readings of the internal temperature sensor) 5. -
Page 25: The Cursor
www.esis.com.au Ph 02 9481 7420 Fax 02 9481 7267 esis.enq@esis.com.au • When opening a stored recording. The graphic display is available for recordings with up to 4 sensors simultaneously. 1. The Cursor Use the Cursor in Graphic Display mode to read data values or to zoom in to the area around a selected point. -
Page 26: Load The Last Setup
www.esis.com.au Ph 02 9481 7420 Fax 02 9481 7267 esis.enq@esis.com.au 1.2.5. Load the Last Setup When you turn DaqPRO on, once the self-testing has been completed, the following will be displayed: _ _ _ I N I T I A L I Z A T I O N _ _ _ D a q P R O v e r 3 . -
Page 27: Temperature Compensation
www.esis.com.au Ph 02 9481 7420 Fax 02 9481 7267 esis.enq@esis.com.au 1. Temperature Compensation Use the Forward and Backward arrow buttons to select a temperature compensation mode for thermocouple measurements. Select Int Compensation to use the internal temperature sensor or select Ext Compensation if you use an external temperature probe. -
Page 28: Internal Clock And Calendar
www.esis.com.au Ph 02 9481 7420 Fax 02 9481 7267 esis.enq@esis.com.au 1.2.7. Internal Clock and Calendar The internal clock is set the first time you use the Setup command from the DaqLab software to program the DaqPRO, and is automatically updated to the PC's time and date each time you connect your DaqPRO to a PC. - Page 29 www.esis.com.au Ph 02 9481 7420 Fax 02 9481 7267 esis.enq@esis.com.au Note: Sampling at a rate slower than the expected rate can cause frequency aliasing. In such a case, the graph will show a frequency much lower than expected. In Figure 6 below, the higher frequency sine wave was sampled at 1/3 of its frequency.
-
Page 30: Programming Rules And Limitations
www.esis.com.au Ph 02 9481 7420 Fax 02 9481 7267 esis.enq@esis.com.au 3. Continuous Mode In the Continuous mode, DaqPRO must be connected to the PC and the DaqLab software must be running. In this mode DaqPRO can continue logging indefinitely. The data is automatically downloaded to the computer, displayed in a real-time graph and saved every 10 minutes. -
Page 31: Www.esis.com.au
www.esis.com.au Ph 02 9481 7420 Fax 02 9481 7267 esis.enq@esis.com.au 2. Sampling Points Increasing the number of active inputs limits the number of sampling points one can choose. The following condition must be always satisfied: Number of samples × Active Inputs ≤ Memory DaqPRO’s memory is sufficient for 512,000 samples. -
Page 32: Chapter 2 Working With Daqlab
www.esis.com.au Ph 02 9481 7420 Fax 02 9481 7267 esis.enq@esis.com.au Chapter 2 Working with DaqLab 2.1. Installing the Software 2.1.1. System Requirements To work with DaqLab, your system should be configured with the following: 1. Software • Windows 98 or later •... -
Page 33: Www.esis.com.au
www.esis.com.au Ph 02 9481 7420 Fax 02 9481 7267 esis.enq@esis.com.au If auto run is not working, open My Computer and click on the CD drive folder (d: drive in most cases) and double-click on the setup icon, then follow the on-screen instructions. To uninstall the software: From the Start menu select Settings and click on Control Panel, then use the Add/Remove Programs feature to remove the DaqLab application. -
Page 34: Overview
www.esis.com.au Ph 02 9481 7420 Fax 02 9481 7267 esis.enq@esis.com.au 2.2. Overview 2.2.1. DaqLab On-screen Layout DaqLab is a comprehensive program that provides you with everything you need in order to collect data from the DaqPRO display the data in graphs, meters and tables and analyze it with sophisticated analysis tools. -
Page 35: Daqlab Window Layout
www.esis.com.au Ph 02 9481 7420 Fax 02 9481 7267 esis.enq@esis.com.au 2.2.3. DaqLab Window Layout Main toolbar Data map Table window Graph window Information bar Graph toolbar Figure 7: DaqLab window layout Chapter 2 Working with DaqLab... -
Page 36: Getting Started
www.esis.com.au Ph 02 9481 7420 Fax 02 9481 7267 esis.enq@esis.com.au 2.3. Getting Started 2.3.1. Setting up a Recording Session Prepare DaqPRO Connect DaqPRO to the PC (refer to page 4) Turn on DaqPRO Plug in any external sensors Open the DaqLab software You can open DaqLab by double clicking its icon on the desktop or from the start menu Setup the DaqPRO... -
Page 37: Data Recording Options
www.esis.com.au Ph 02 9481 7420 Fax 02 9481 7267 esis.enq@esis.com.au 2.3.2. Data Recording Options To set the behavior of the data display when you start a new recording session, click on the down arrow next to the Run button , and select one of the following: 1. -
Page 38: Saving Data
www.esis.com.au Ph 02 9481 7420 Fax 02 9481 7267 esis.enq@esis.com.au on the main toolbar. This will initiate the Post-Recording Data Transfer communication mode. Once the transfer is complete, the data will be displayed automatically in the graph window and in the table window. If there are several files stored in the DaqPRO, the first download will bring up the most recent file;... -
Page 39: Opening A File
www.esis.com.au Ph 02 9481 7420 Fax 02 9481 7267 esis.enq@esis.com.au 2.3.5. Opening a File Click Open on the main toolbar. Navigate to the folder where the project is stored. Double click the file name to open the project. DaqLab opens the project and displays the first graph on the graph list. If the project does not include saved graphs, the file opens with an empty graph window. -
Page 40: Date Format Settings
www.esis.com.au Ph 02 9481 7420 Fax 02 9481 7267 esis.enq@esis.com.au The first column should be the time. The time interval between successive rows must match the time intervals accepted by DaqLab. You can export DaqLab files to Excel to learn about these time formats. For example, refer to the table below: On the File menu, click Save As. -
Page 41: Print
www.esis.com.au Ph 02 9481 7420 Fax 02 9481 7267 esis.enq@esis.com.au 2.3.9. Print 1. Print a Graph Click Print on the main toolbar. Select the Graph 1 option (when in split graph mode you can choose between Graph 1 and Graph 2). Click Print to open the print dialog box. -
Page 42: Viewing The Data
www.esis.com.au Ph 02 9481 7420 Fax 02 9481 7267 esis.enq@esis.com.au 2.4. Viewing the Data 2.4.1. Display Options The DaqLab program’s screen consists of three parts: the graph window, table window and Data Map window. You can display all three parts simultaneously (the default view) or any combination of the three. -
Page 43: The Cursor
www.esis.com.au Ph 02 9481 7420 Fax 02 9481 7267 esis.enq@esis.com.au To return to the single graph display, click Split graph a second time. 2. The Cursor You can display up to two cursors on the graph simultaneously. Use the first cursor to display individual data recording values, to select a curve or to reveal the hidden Y-axis. -
Page 44: Zooming
www.esis.com.au Ph 02 9481 7420 Fax 02 9481 7267 esis.enq@esis.com.au 3. Zooming To zoom in to the center of the graph Click Zoom in on the graph toolbar To reverse the operation, click Zoom out on the graph toolbar To zoom in to a specific data point Select the point with the cursor (see above) Click Zoom in on the graph toolbar... -
Page 45: Panning
www.esis.com.au Ph 02 9481 7420 Fax 02 9481 7267 esis.enq@esis.com.au Manual scaling Click Graph properties on the graph toolbar to open the Graph properties dialog. Select the Scale tab, and choose the axis you want to scale in the Select axis drop-down menu. -
Page 46: Display Alarm Levels
www.esis.com.au Ph 02 9481 7420 Fax 02 9481 7267 esis.enq@esis.com.au Click Edit graph on the graph toolbar to open the Edit graph dialog box: Figure 9: Edit graph dialog box To select a data set to display on the Y-axis, click on the data set’s name in the Y-axis list. -
Page 47: Format The Graph
www.esis.com.au Ph 02 9481 7420 Fax 02 9481 7267 esis.enq@esis.com.au 7. Format the Graph You can change the data line’s color, style and width. You can also add markers that represent the data points on the graph and format their style and color. The color of the Y-axis matches the corresponding plot’s color and will automatically change with any change made to the color of the corresponding plot. -
Page 48: The Table Display
www.esis.com.au Ph 02 9481 7420 Fax 02 9481 7267 esis.enq@esis.com.au Map. If you want to save a graph that you created to your project, or to update a saved graph with changes you made, use the Add to project tool: Click Add to project on the graph toolbar. -
Page 49: Meters
www.esis.com.au Ph 02 9481 7420 Fax 02 9481 7267 esis.enq@esis.com.au To display numbers in scientific format, check the Scientific check box. Click OK. 2.4.4. Meters DaqLab enables you to view data in meters format on the screen (one meter for each sensor), with up to four meters showing at once. -
Page 50: Control The Display With The Data Map
www.esis.com.au Ph 02 9481 7420 Fax 02 9481 7267 esis.enq@esis.com.au 1. Control the Display with the Data Map The items in the Data Map are sorted into two main categories: • Data sets (including analysis functions) • Saved graphs Double click on a category to bring up the full list. Double click a second time to collapse the list. You can also use the plus (+) and minus (-) signs next to the icons to expand or collapse the categories. -
Page 51: Exporting Data To Excel
www.esis.com.au Ph 02 9481 7420 Fax 02 9481 7267 esis.enq@esis.com.au Individual data set – Currently displayed both on graphs 1 and 2 Raw data List of saved graphs Saved graph – Data sets vs. time Saved graph – Data sets vs. data set Graph currently not on display Graph currently displayed on graph 1 Graph currently displayed on graph 2... -
Page 52: Export File Settings
www.esis.com.au Ph 02 9481 7420 Fax 02 9481 7267 esis.enq@esis.com.au 3. Export File Settings If DaqLab fails to export the data properly, try to change the export file settings: Click File on the menu bar, then click Export file settings. Check the Ignore regional settings check box and click OK. -
Page 53: Programming Daqpro
www.esis.com.au Ph 02 9481 7420 Fax 02 9481 7267 esis.enq@esis.com.au 2.5. Programming DaqPRO 2.5.1. Setup 1. Quick Setup Use the Setup wizard to guide you through the Setup process. Click Setup Wizard on the main toolbar to open the setup wizard: Figure 10: Setup wizard step 1 of 3 The first step is to assign sensors to each input. -
Page 54: Www.esis.com.au
www.esis.com.au Ph 02 9481 7420 Fax 02 9481 7267 esis.enq@esis.com.au Figure 11: Setup wizard step 2 of 3 Select the desired recording rate in the Select rate drop-down menu. Select the Scroll option if you want the graph window to scroll as the data recording progresses. -
Page 55: Alarm Setup
www.esis.com.au Ph 02 9481 7420 Fax 02 9481 7267 esis.enq@esis.com.au Select the desired length of the recording period in the Select recording time drop-down menu. The recording period is displayed as a unit of time by default. To display the recording period as the number of recording samples, select the By samples option. -
Page 56: Temperature Compensation
www.esis.com.au Ph 02 9481 7420 Fax 02 9481 7267 esis.enq@esis.com.au Type in Low and/or High alarm levels. If you want a sensor or sensors to activate the alarm output check the corresponding Output checkbox or checkboxes. Click Next to proceed to step 2 of the Setup wizard or click Finish to complete the alarm setup. -
Page 57: Preset The Graph's X-Axis
www.esis.com.au Ph 02 9481 7420 Fax 02 9481 7267 esis.enq@esis.com.au Click Setup Wizard on the main toolbar to open the Setup wizard. Click Properties next to the input you want to set. Click the Display properties tab. Select a measurement from the Select measurement drop-down menu. Select the graph or graphs in which you would like to display the data, from the Display on graph drop-down menu. -
Page 58: Triggering
www.esis.com.au Ph 02 9481 7420 Fax 02 9481 7267 esis.enq@esis.com.au Select the graph you wish to modify. Select the measurement you wish to display on the X-axis. If you want a specific scale, uncheck the Auto scale check box and enter the minimum and maximum values of the axis. -
Page 59: Starting Recording
www.esis.com.au Ph 02 9481 7420 Fax 02 9481 7267 esis.enq@esis.com.au option is actually a threshold setting. Each time the threshold is crossed, DaqPRO will record the exact time and date of the occurrence, and will continue to do so until the desired number of samples has been obtained. When logging has ended download the data to the PC (if DaqPRO is already connected to the PC it will be done automatically). -
Page 60: Edit Daqpro's Notes
www.esis.com.au Ph 02 9481 7420 Fax 02 9481 7267 esis.enq@esis.com.au Data Map. To display the comment on DaqPRO's LCD select the System information menu (refer to page 16). The comment and the serial number will also be displayed in prints and exported files. Note: the comment can include up to 32 characters. -
Page 61: Temperature Units
www.esis.com.au Ph 02 9481 7420 Fax 02 9481 7267 esis.enq@esis.com.au 2.5.7. Temperature Units To select between Fahrenheit (°F) and Celsius (°C) temperature units: Click Logger on the menu bar, point to Temperature units and then select the desired units. 2.5.8. Calibrating the Sensors Note: This section reflects software updates made in DaqLab v1.30.09 and higher. -
Page 62: Saving The Calibration Settings Manually
www.esis.com.au Ph 02 9481 7420 Fax 02 9481 7267 esis.enq@esis.com.au Note: This error message will also appear if for any reason the factorydefaults.daq file is not found. Do not delete the factorydefaults.daq file! Click Yes to restore the calibration parameters and to display the following dialog box: Figure 18: Loading factory calibration defaults Enter your DaqPRO serial number in the S/N text box (you will find the serial number on the manufacturer’s sticker on the back of your logger). -
Page 63: Calibration Options
www.esis.com.au Ph 02 9481 7420 Fax 02 9481 7267 esis.enq@esis.com.au Saving the calibration settings To save the DaqPRO’s present calibration settings: Go to Logger > Calibration > Save Calibration Settings. Select the save location and click Save. The file will be saved according to the logger’s S/N e.g. 123456.cal. Loading the calibration settings To load the DaqPRO’s calibration settings: Go to Logger >... -
Page 64: Calibration Password
www.esis.com.au Ph 02 9481 7420 Fax 02 9481 7267 esis.enq@esis.com.au DaqLab employs three different calibration methods: Two-point calibration, Offset calibration and Zero calibration. When selecting a sensor type to calibrate, DaqLab prompts you to the appropriate calibration procedure: Sensor Type Calibration Method Current 0 - 24mA... -
Page 65: Calibration Procedure
www.esis.com.au Ph 02 9481 7420 Fax 02 9481 7267 esis.enq@esis.com.au To change the password: Click Logger on the menu toolbar, and then click Calibration > Calibrate Sensors. Click Change Password to open the Change Password dialog box. Enter the current password in the Current Password text box. Enter the new password in the New Password text box. -
Page 66: Www.esis.com.au
www.esis.com.au Ph 02 9481 7420 Fax 02 9481 7267 esis.enq@esis.com.au Figure 19: Two-point calibration dialog box Note: We strongly recommend calibrating using the values that appear in the two Reference value text boxes If not selected, click the Calibration tab. Click Restore defaults, then click OK. -
Page 67: Www.esis.com.au
www.esis.com.au Ph 02 9481 7420 Fax 02 9481 7267 esis.enq@esis.com.au Fine Offset Calibration If, after the calibration procedure, DaqPRO still exhibits some offset value use the Fine offset tuning tool to correct it. The offset value is the difference between the value displayed by DaqPRO and the reference value. For example if the calibrator is set to 0 °C and DaqPRO reads 1 °C the offset value is +1, but if DaqPRO reads −1 °C then the offset value is −1. -
Page 68: Www.esis.com.au
www.esis.com.au Ph 02 9481 7420 Fax 02 9481 7267 esis.enq@esis.com.au Measure two reference values Before taking measurements you need to disable the temperature compensation both in DaqPRO and in the calibrator. To disable the temperature compensation in DaqPRO: Click Logger on the menu bar, point to Thermocouple Compensation, and then click Disable. Note: Don’t forget to enable the temperature compensation prior to normal operation of DaqPRO. -
Page 69: Www.esis.com.au
www.esis.com.au Ph 02 9481 7420 Fax 02 9481 7267 esis.enq@esis.com.au If not selected, click the Set Offset tab. Ensure that All is selected in the Input drop-down menu. Enter the offset value in the Offset text box (if the two offset values are not identical enter the average of the two values). -
Page 70: Www.esis.com.au
www.esis.com.au Ph 02 9481 7420 Fax 02 9481 7267 esis.enq@esis.com.au Figure 21: Zero calibration dialog box Click Restore defaults, then click OK. Repeat steps a to d above. Short circuit input 1. Click Start. Wait until DaqPRO begins recording. Click Get zero. Click OK. -
Page 71: Defining A Custom Sensor
www.esis.com.au Ph 02 9481 7420 Fax 02 9481 7267 esis.enq@esis.com.au 2.5.9. Defining a Custom Sensor DaqLab enables the user to define custom sensors. This is a useful tool for when DaqPRO is communicating with many sensors from different vendors. Any additional sensor that you would like to connect to DaqPRO must comply with the following restrictions: •... -
Page 72: Communication Setup
www.esis.com.au Ph 02 9481 7420 Fax 02 9481 7267 esis.enq@esis.com.au Click OK. DaqPRO will send the definition to DaqPRO and will add the new sensor to the sensor list. To use the custom sensor: Plug the custom sensor into DaqPRO. Set up DaqPRO using the Setup Wizard (refer to page 47) and select the sensor from the sensor list next to the corresponding input. -
Page 73: Analyzing The Data
www.esis.com.au Ph 02 9481 7420 Fax 02 9481 7267 esis.enq@esis.com.au 2.6. Analyzing the Data 2.6.1. Reading Data Point Coordinates Position the cursor (refer to page 37) on a point to display its coordinates on the information bar at the bottom of the graph window. If more than one curve is displayed, and you want to read the Y coordinates of all of the curves simultaneously, bring up digital meters (refer to page 43) for each of the curves. -
Page 74: Statistics
www.esis.com.au Ph 02 9481 7420 Fax 02 9481 7267 esis.enq@esis.com.au 2.6.5. Statistics Use the statistics tool to display statistics of a selected data set or a range of data. The statistics include: Average – The average of all the numbers in the range StDev. -
Page 75: Derivative
www.esis.com.au Ph 02 9481 7420 Fax 02 9481 7267 esis.enq@esis.com.au 2. Derivative Click Derivative on the main toolbar to construct a graph in which each point is the slope of the 3 consecutive points on the source graph. 3. Integral Choose Integral from the Analysis menu to construct a graph in which each point is the integral of all the preceding points on the source graph. -
Page 76: Curve Fit
www.esis.com.au Ph 02 9481 7420 Fax 02 9481 7267 esis.enq@esis.com.au 2. Curve Fit Figure 24: Analysis wizard – Curve fit Select a fit Type by clicking its icon (if you choose polynomial fit, select the order you want). If you use the cursor to select a data set, it will be highlighted in the Based on data set list, but you have the option of selecting a different data set. -
Page 77: Averaging
www.esis.com.au Ph 02 9481 7420 Fax 02 9481 7267 esis.enq@esis.com.au Note: If you want the automatic curve fit equation to start at t = 0, apply the crop tool before any type of curve fitting (refer to page 78). 3. Averaging Figure 25: Analysis wizard –... -
Page 78: Functions
www.esis.com.au Ph 02 9481 7420 Fax 02 9481 7267 esis.enq@esis.com.au 4. Functions Figure 26: Analysis wizard – functions Select a function from the Functions list. DaqLab displays the function’s formula at the bottom of the dialog. If you use the cursor to select a data set, it will be highlighted in the G1 drop list, but you have the option of selecting a different data set. -
Page 79: Available Analysis Tools
www.esis.com.au Ph 02 9481 7420 Fax 02 9481 7267 esis.enq@esis.com.au Click OK. 2.6.8. Available Analysis Tools This section includes a brief description of each of DaqLab’s analysis functions. 1. Curve Fit Linear Draws a line of linear least square fit −... -
Page 80: Functions
www.esis.com.au Ph 02 9481 7420 Fax 02 9481 7267 esis.enq@esis.com.au 3. Functions In the formulas below, G and G represent selected data sets, and C and C are constants that you can enter. The constant’s default value is 1. Absolute Draws a line of the absolute values of a data set Draws a line of the addition of two data sets arccos(... -
Page 81: Www.esis.com.au
www.esis.com.au Ph 02 9481 7420 Fax 02 9481 7267 esis.enq@esis.com.au − Delta Y Draws a line of the difference between the Y-coordinate of every point and Y- coordinate of the first point. Use this function to move the data set along the Y-axis so that the point will intersect the Y- axis at the origin. -
Page 82: Www.esis.com.au
www.esis.com.au Ph 02 9481 7420 Fax 02 9481 7267 esis.enq@esis.com.au Exp. Draws a line of raised to the power of a data set Fourier Discrete Fourier transform of G transform Draws a line of the amplitudes of the harmonics of Fourier transform vs. frequency Frequency The frequency of G1 (minimum of C points in one cycle). -
Page 83: Www.esis.com.au
www.esis.com.au Ph 02 9481 7420 Fax 02 9481 7267 esis.enq@esis.com.au ⋅ Multiply Draws a line of the multiplication of two data sets Reciprocal (1/X) Draws a line of the reciprocal values of a data set sin( Sine Draws a line of the sine values of a data set. The argument must be expressed in radians. -
Page 84: Special Tools
www.esis.com.au Ph 02 9481 7420 Fax 02 9481 7267 esis.enq@esis.com.au 2.7. Special Tools 2.7.1. Crop Tool The Crop tool enables you to trim the edges of a data set. Use it to remove unwanted data. The time scale of the trimmed data is shifted so that it will start at If you want the automatic curve fit equation to start at , apply the crop tool before any type of curve fitting... -
Page 85: Toolbar Buttons
www.esis.com.au Ph 02 9481 7420 Fax 02 9481 7267 esis.enq@esis.com.au 2.8. Toolbar Buttons 2.8.1. Main (Upper) Toolbar Start new project Open Open saved project Save Save project Print Select print options Start a data recording session. Click on the down-arrow to select recording mode. -
Page 86: Graph Toolbar
www.esis.com.au Ph 02 9481 7420 Fax 02 9481 7267 esis.enq@esis.com.au Graph Display the graph window Table Display the table window Analysis Open the Analysis wizard Linear Fit Draw a line of linear fit of the selected data set Derivative Draw a line of the derivative of the selected curve Display Alarm Displays or removes alarm levels from the graph 2.8.2. -
Page 87: Www.esis.com.au
www.esis.com.au Ph 02 9481 7420 Fax 02 9481 7267 esis.enq@esis.com.au Reverse the most recent smoothing operation Less Smoothing Cursor Display or remove the first cursor Cursor Display or remove the second cursor Split Graph Switch to a split graph display Select the data to display on the axes Edit Graph Graph Properties... -
Page 88: Chapter 3 Troubleshooting Guide
www.esis.com.au Ph 02 9481 7420 Fax 02 9481 7267 esis.enq@esis.com.au Chapter 3 Troubleshooting Guide Symptom Cause of Problem • I pressed the ON key on DaqPRO and it Try charging the battery, it may be weak. did not turn on. •... -
Page 89: Www.esis.com.au
www.esis.com.au Ph 02 9481 7420 Fax 02 9481 7267 esis.enq@esis.com.au Symptom Cause of Problem I downloaded unexpected data. • There may be up to 100 files stored in the DaqPRO. Performing a Download means loading one of them in sequential order. You have probably loaded an old file accidentally. -
Page 90: Chapter 4 Specifications
www.esis.com.au Ph 02 9481 7420 Fax 02 9481 7267 esis.enq@esis.com.au Chapter 4 Specifications DaqPRO Inputs Temperature NTC-2 • 8 channel differential inputs NTC – 100 KΩ resistor • Selectable type for each Range -25 to 150 ºC input: 0-24 mA, 0-50 mV, Resolution 0.05 ºC 0-10 V, NTC, PT-100,... -
Page 91: Www.esis.com.au
www.esis.com.au Ph 02 9481 7420 Fax 02 9481 7267 esis.enq@esis.com.au Pulse counter (input 1 only) Communication Zero crossing detector USB 1.1 compliant • Opto coupler interface Sampling Range 0 to 65,000 counts • Capacity: 512 KB Resolution 1 count • Analog sampling rate: Frequency range 0 to 25 Hz... -
Page 92: Www.esis.com.au
www.esis.com.au Ph 02 9481 7420 Fax 02 9481 7267 esis.enq@esis.com.au DaqLab Software Main Features • Graphical, analysis WINDOWS™ based software for the DaqPRO • Fast data download from the DaqPRO • Data displayed in numeric or graphical display forms Graphical display of all inputs •... -
Page 93: Www.esis.com.au
DaqLab Windows analysis software, communication cable 11460 Weather box AC029 12V Solar cell and battery DT245 220V AC/DC adapter DT282 220V AC/DC adapter (UK) DT246 110V AC/DC adapter DT180 USB communication cable To order DaqPRO products and accessories: Visit www.fourtec.com Chapter 4 Specifications... -
Page 94: Appendix: Figures
www.esis.com.au Ph 02 9481 7420 Fax 02 9481 7267 esis.enq@esis.com.au Appendix: Figures Figure 1: DaqPRO external connections ....................4 Figure 2: DaqPRO’s inputs block terminal ....................6 Figure 3: Connecting 3-wire PT 100 ......................7 Figure 4: Connecting external alarm device ....................8 Figure 5: DaqPRO front panel ......................... -
Page 95: Appendix: Simplified Measurement Circuits
www.esis.com.au Ph 02 9481 7420 Fax 02 9481 7267 esis.enq@esis.com.au Appendix: Simplified Measurement Circuits 0 to 10V 0 to 24mA 100K 100K 0-24mA 0-10V 100K 100K VREF VREF 100R 100R 2 wire PT 100 3 wire PT 100 100uA 100uA 100K PT100 100K... -
Page 96: Www.esis.com.au
www.esis.com.au Ph 02 9481 7420 Fax 02 9481 7267 esis.enq@esis.com.au Internal NTC 20uA 20uA 100K 100K NTC 10K NTC 10K 100K 100K Internal NTC Thermocouple 100K Thermocouple 100K VREF 100R Appendix... -
Page 97: Index
www.esis.com.au Ph 02 9481 7420 Fax 02 9481 7267 esis.enq@esis.com.au Index clock options · 36 internal · 22 properties · 51 COM port · 66 select · 14 comment · 9, 54 table · 42 communication · 66 download · 31 AC/DC adaptor ·... -
Page 98: Www.esis.com.au
www.esis.com.au Ph 02 9481 7420 Fax 02 9481 7267 esis.enq@esis.com.au of samples · 13, 16, 49 options · 31 rate · See rate start · 54 icon · 16 stop · 54 Illegal sensor · 7 time · 13, 16, 49 import ·... -
Page 99: Www.esis.com.au
www.esis.com.au Ph 02 9481 7420 Fax 02 9481 7267 esis.enq@esis.com.au graph · 80 main · 79 triggering · 52 value · 19, 37 X-axis · 40, 51 trim · See crop view · 36 troubleshooting · 82 Y-axis · 36, 40 wizard units analysis ·...
Need help?
Do you have a question about the DaqPRO 5300 and is the answer not in the manual?
Questions and answers