
Related Manuals for Rennsteig PEW 12


Summary of Contents for Rennsteig PEW 12
- Page 1 Operating Manual Crimp system tool PEW 12 Operating Manual Crimp system tool PEW 12 Read this Operating Manual prior to beginning any work! Rev.: 2011-07-22 1 / 6...
-
Page 2: Table Of Contents
Operating Manual Crimp system tool PEW 12 Table of contents General Intended use Description Changing die sets/crimping procedure 4.1. Changing the die set/installing the locator and wire stop 4.2. Crimping procedure Emergency release of force lock Setting the crimp height... -
Page 3: General
Operating Manual Crimp system tool PEW 12 1. General Keep the Operating Instructions with the crimp system tool at all times. This crimp system tool features state-of-the-art technology and complies with recognised safety regulations. The Crimping tool may be used only in a technally fault-free condition, in a safety-conscious manner with consideration given to potential hazards, and may be used only for the purpose described in the Operating Instructions. -
Page 4: Changing Die Sets/Crimping Procedure
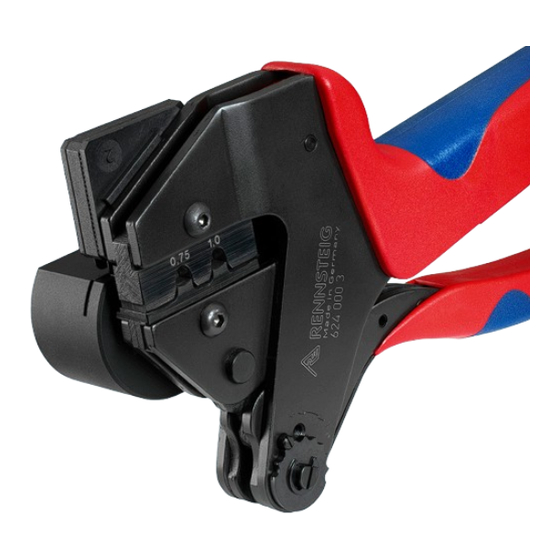
Operating Manual Crimp system tool PEW 12 4. Changing die sets/crimping procedure 4.1. Changing the die set/installing the locator and wire stop • A die set consists of an upper (3) and lower (4) die • Remove bolts • Remove the upper (3) and lower (4) die M 4x11 • Insert new upper (3) and lower (4) die... -
Page 5: Emergency Release Of Force Lock
Operating Manual Crimp system tool PEW 12 5. Emergency release of force lock The force lock opens automatically if the crimp procedure completes in full. In case the crimp procedure needs to be interrupted, the force lock can be released by pressing the shanks together slightly, then unlocking the emergency release by using the included allen key with handle. -
Page 6: Guarantee
Operating Manual Crimp system tool PEW 12 The crimp height should be checked regularly by qualified personnel from quality control and recalibrated as required using the method described below. 1. Using a screwdriver, remove the slotted headless screw. 2. If the setting dial (2) is rotated counter-clockwise (+), this configures a stronger crimp force and a smaller crimp height.
Need help?
Do you have a question about the PEW 12 and is the answer not in the manual?
Questions and answers