Advertisement
Quick Links
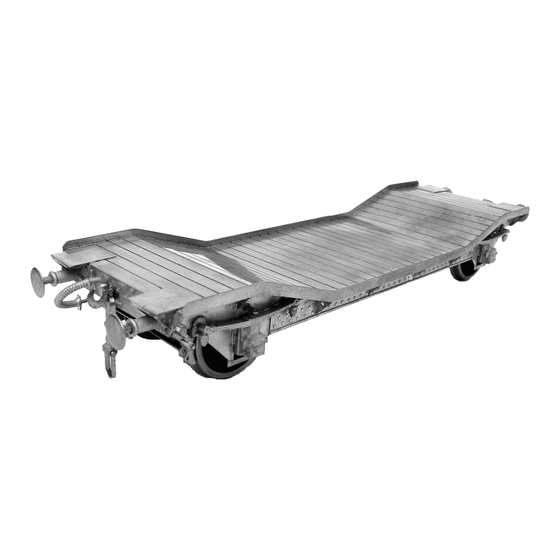
GWR HYDRA Diagram G19
Fitted Wagon for Carrying Road Vehicles
PROTOTYPE. The Great Western Railways designation HYDRA, covered a range
of low floored wagons designed to carry road vehicles such as horse drawn
carriages and motor cars and lorries.
They were designed with a gently sloping floor so that a vehicle could be driven
onto the wagon from an end loading dock and then sit within the well of the wagon.
This enabled tall road vehicles to remain within the loading gauge. They were brake
fitted and classified as 'brown' vehicles and were intended to be marshalled in
passenger trains.
The Hydra's to diagram G19 were built in 1908 and ran into BR days. They carried
running numbers 42279-42288.
KIT. This is a very straightforward kit. Some push out rivet detail, a few parts
requiring simple folding and a selection of small detail parts make this an interesting
project.
Wheels are required to complete, 3'7", Mansell Disc (Slater's Catalogue Number
7124). Available From Slater's Plastikard, Temple Rd, Matlock Bath, Matlock,
Derbyshire, DE4 3PG, Telephone 01629 583993.
Connoisseur Models, 33 Grampian Road, Penfields, Stourbridge,
- 0 Gauge -
DY8 4UE, Telephone 01384 371418
Advertisement

Related Manuals for Connoisseur Models GWR HYDRA Diagram G19


Summary of Contents for Connoisseur Models GWR HYDRA Diagram G19
- Page 1 Wheels are required to complete, 3’7”, Mansell Disc (Slater's Catalogue Number 7124). Available From Slater's Plastikard, Temple Rd, Matlock Bath, Matlock, Derbyshire, DE4 3PG, Telephone 01629 583993. Connoisseur Models, 33 Grampian Road, Penfields, Stourbridge, DY8 4UE, Telephone 01384 371418...
- Page 2 GENERAL INSTRUCTIONS Please read this section carefully, especially if this is your first etched brass kit. Many modellers fight shy of working in this medium, but the basic skills are relatively easy to acquire. Once you’ve learned how to form and solder brass, you’ll find all kinds of modelling possibilities will open up for you.
- Page 3 the joint with the iron tip. Don’t load the iron tip with a lot of extra solder, but work the joint in 1” lengths, bringing in small quantities of solder. Brass is a very forgiving material and if you get something out of alignment, use heat from the iron to desolder the joint before starting again.
- Page 4 Page 4...
- Page 5 Page 5...
- Page 6 Screw Coupling GWR HYDRA Etched Parts Identification GWR HYDRA Suggested Assembly Order Solder together the two sections of floor, parts 1. The kit was originally designed to fit on to spare brass on a loco kit and this is why it is in effect two sets of identical components. Place the two floor halves face down (plank detail) on to a flat surface and push one side up against the edge of a steel rule to ensure that they are aligned properly.
- Page 7 Place the floor face down on top of one block, with the buffer beam top fold line level with the edge of the block. Place the second block on to the floor, again with its edge level with the fold line. Then pressing down on to the wooden blocks with my thumbs, I pulled the buffer beam upwards with my fingers to form a 90°...
- Page 8 Fit the triangular bracing plates, parts 6. These are a bit fiddly but it is worth taking your time to get them on clean and square. I fitted the four plates along the rivet detail overlay by holding them with a miniature crocodile clip (the trick with small components is to attach a big handle to them, self locking tweezers are also useful) and trying to keep the plate as square as possible pass the tab through the slot in the side frame and spot solder at the back.
- Page 9 Solder the brake blocks, parts 13, to the brake hangers, parts 14. Then fold the bottom of the brake hanger 90°. Holding the brake block with a crocodile clip, position it so that it is just clear of the wheel tread and solder the bottom of the hanger to the floor. There are etched grooves on the inside face of the side frames that the bottom of the brake hanger will fit into.
- Page 10 11. Painting is a vast subject that cannot be covered fully here. The important thing with a metal model is to get a good base coat of primer. Hopefully you have been cleaning up and washing the model at the end of each modelling session, but it will still need thoroughly cleaning before painting. I give my models a good scrub with a stiff-bristled paint brush in a sink full of hot (as hot as your hands can bear) water and cheap washing up liquid (the expensive stuff that’s kind to your hands has an oil in it that will stop the paint keying to the metal).
- Page 11 Page 11...
Need help?
Do you have a question about the GWR HYDRA Diagram G19 and is the answer not in the manual?
Questions and answers