Advertisement
Quick Links
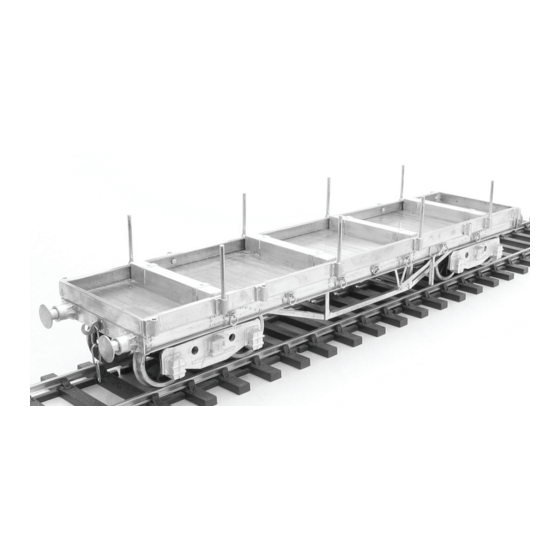
GWR MACAW H Bogie Bolster Diagram J30
Twenty of these 25 ton, 35 foot long bogie bolsters
were built in 1941 by the Great Western Railway to
diagram J30. They were a continuation of the 285
virtually identical wagons built to diagram J25 from
1927 onwards.
The wagons continued in service with British
Railways into the 1970's and were designated
Bogie Bolster A.
Wheels are required to complete the model.
When first built 3'1" 8 spoke were fitted (Slater's No
7121) many wagons were later fitted with three hole
disc wheels (Slater's No 7122). Available from
Slater's, Temple Road, Matlock Bath, Derbyshire,
DE4 3PG, Tel 01629 583993.
Connoisseur Models, 33 Grampian Road, Penfields, Stourbridge, DY8 4UE, Tel 01384 371418
British Railways Bogie Bolster A
Advertisement

Related Manuals for Connoisseur Models GWR MACAW H


Summary of Contents for Connoisseur Models GWR MACAW H
- Page 1 When first built 3’1” 8 spoke were fitted (Slater’s No 7121) many wagons were later fitted with three hole disc wheels (Slater’s No 7122). Available from Slater’s, Temple Road, Matlock Bath, Derbyshire, DE4 3PG, Tel 01629 583993. Connoisseur Models, 33 Grampian Road, Penfields, Stourbridge, DY8 4UE, Tel 01384 371418...
-
Page 2: General Instructions
General Instructions A smaller Antex 25 Watt iron with a 3.2mm screwdriver bit is very useful for small assemblies and detail work such as handrails, but will Please read this section carefully, especially if this is your first etched have insufficient heat reserve for main assembly work. The Antex has brass kit. - Page 3 Don’t load the iron tip with a lot of extra solder, but work the joint in 1” Three-dimensional parts are formed by folding. On an etched brass lengths, bringing in small quantities of solder. Brass is a very forgiving kit, the fold lines are normally half-etched on the inside of the fold. material and if you get something out of alignment, use heat from the You’ll be able to fold most parts using smooth-jawed pliers.
- Page 4 GWR MACAW H BRITISH RAILWAYS BOGIE BOLSTER A 32728 BOGIE BOLSTER A BR LETTERING 14-3 GWR Livery. All over GWR wagon grey (Railmatch enamel spray N0 1604). BR Livery. Bodywork, BR early freight stock grey Planked Floor, dirty wood (Humbrol enamel N0 110). White end to brake lever.
- Page 5 Slots For the long folds on the body and solebars you will find a set of folding bars very useful and here are details of the set that I have made for myself, in fact I have made three sets of different sizes.
- Page 6 GWR MACAW H Cast stanchions and empty pockets. BRITISH RAILWAYS If desired you can replace the cast stanchions with brass rod fitted into BOGIE BOLSTER A empty pockets. On the prototype wagon the stanchion’s were movable so positions varied. Cast Bolsters...
- Page 7 Fold the top and bottom of the solebars (parts 2) through 90°. GWR MACAW H BOGIE BOLSTER Again us bending bars and work the bend in sections. Suggested Assembly Order Take the solebar overlays (parts 3) and check that they will be a Take the main body (part 1) and emboss the bolt heads at each snug fit into the solebar channel.
- Page 8 Thread each ring onto a split pin and then gently squeeze each head Take the truss rod queen posts (parts 6) and fold into an L closed again. Thread each split pin through the hole in the solebar and section. Then solder top ends into slots in underside of floor. Take the then splay out each leg of the split pin through 90°.
- Page 9 Take the bogie mounting blocks (parts 12) and solder 6BA nuts If your wagon is to receive rough handling you may wish to replace over the holes. This is best done by first polishing the six sides of each the cast stanchions with brass rod. If this is the case fit eight empty nut with a flat file.
- Page 10 I close up the links by holding the curved end in the jaws of a pair of BUFFER ASSEMBLY round-nosed pliers in one hand and squeeze the flat parts of the link Retaining Collar parallel with long-nosed pliers (angled long-nosed pliers with serrated jaws are even better) held in the other hand.
- Page 11 Assemble the bogies. Drill out the holes in the side frames 2.6mm to accept the brass bearing cups. You may find that the holes are slightly out of square so put a little sideways pressure on the drill to square them up. Keep checking the depth of the hole with a bearing as you don’t want to drill to deep Cut outs for flanges and come through the front of the axle box.
- Page 12 Fit a lengths of 0.7mm brass wire to wrap around the copper brake cross shaft and run down to just underneath the inboard axle of each bogie to represent the brake linkage. That should now be all the physical construction completed. 10.
- Page 13 The second thing is to mix the paint in the tin and then transfer it to a Can You Help Me? palette (a sheet of clean plasticard) with blobs of lighter and darker If you have enjoyed building this kit and have been satisfied with the shades of paint surrounding the main colour.
- Page 14 GWR MACAW H BR Bogie Bolster A Page 14...
Need help?
Do you have a question about the GWR MACAW H and is the answer not in the manual?
Questions and answers