Table of Contents
Advertisement
Quick Links
Advertisement
Table of Contents

Subscribe to Our Youtube Channel
Related Manuals for biodex 950-192


Summary of Contents for biodex 950-192
- Page 1 OPERATION MANUAL 950-192 950-194 950-193 FN: 16-181 Rev B 1/17...
-
Page 2: Medbike
This manual covers installation and operation procedures for the following products: 950-192 medBike, Lower Body 950-194 medBike, Whole Body 950-193 medBike, Calf Support Biodex Medical Systems, Inc. © 2018... -
Page 3: Table Of Contents
Continuous Watt Mode (Program B) ................... 25 Passive Modes ........................29 Passive Manual Mode ......................29 Passive User Profile Mode ....................31 Passive Pedal/Arm Crank Assisted Mode ................33 Specifications ......................... 37 Biodex Medical Systems, Inc. © 2018... -
Page 4: Definition Of Symbols
Earth (ground) Alternating Current Fuse USB Connector/Cable Waste in Electrical Equipment Date of Manufacture Manufactured By Type B Applied Part CE Mark CE Mark for products with EC Certificate Certified for Safety by ETL Intertek Biodex Medical Systems, Inc. © 2018... -
Page 5: Product Certifications And Classifications
Biodex Customer Service (see Contact information). Note: Complete information on the Electromagnetic Compatibility for the medBike can be located in the Compliance Supplement located on the Biodex website (www.biodex.com) or can be obtained by contacting Biodex Customer Service (see Contact information). Before Proceeding NOTE: The warnings, cautions and instructions provided in this manual must be read, followed and kept available for consultation at all times. -
Page 6: Important Safety Information
This product is intended to remain in one location during operation. It is provided with wheels for relocation which should be used when moving. Biodex Warranty Refer to the warranty card included with the product or contact Biodex Support Services. Biodex Medical Systems, Inc. © 2018... - Page 7 Contact information Manufactured by: Biodex Medical Systems, Inc. 20 Ramsey Road, Shirley, New York, 11967-4704 Tel: 800-224-6339 (Int’l 631-924-9000) Fax: 631-924-8355 email: supportservices@biodex.com www.biodex.com http://www.biodex.com/ Biodex Medical Systems, Inc. © 2018...
-
Page 8: Introduction
2. Keep pedal/arm crank and wheel assemblies free of foreign materials and dirt accumulation. 3. Periodically inspect all welds. 4. Periodically check bolts, tighten if necessary. Periodically i nspect p edal/arm c rank s trap h olders. Biodex Medical Systems, Inc. © 2018... -
Page 9: Parts And Adjustments
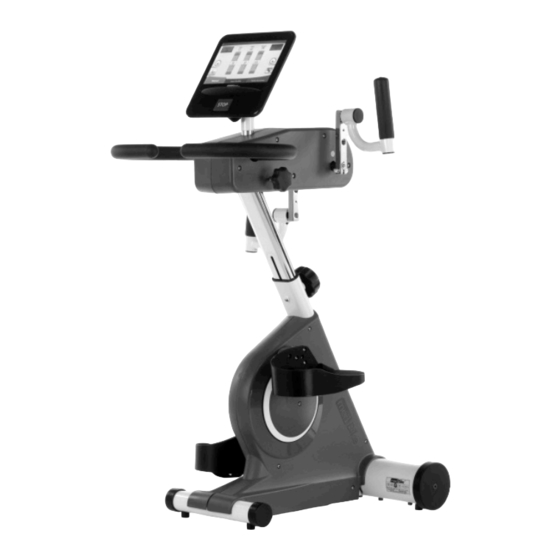
2. Parts and Adjustments Figure 2.1. The Biodex medBike Parts and Adjustments Standard Parts and Adjustments: 1. 10" display 2. Non-allergic, high-density grip 3. Telescopic handlebar post, adjustable knob 4. Full metal frame enamel powder, electrostatic spraying 5. Safety pedal with straps 6. -
Page 10: Set-Up And Operation
Using the guide wire attached to the cable, move the cable up through the handlebars stem tube (Figure 3.2), place the tube into the pedal/arm crank/motor assembly opening, and affix the handlebars stem tube with a bolt using the Allen wrench (Figure 3.3). Biodex Medical Systems, Inc. © 2018... - Page 11 Figure 3.2. Use the guide wire to move the display cable up through the handlebars stem tube. Figure 3.3. Use the Allen wrench to affix the handlebars stem tube to the pedal/arm crank/motor assembly. Biodex Medical Systems, Inc. © 2018...
- Page 12 Line up the holes in the back of the display with the four holes on the top of the handlebars stem tube and affix the two pieces with the four bolts. Use the Allen wrench to tighten. Biodex Medical Systems, Inc. © 2018...
- Page 13 Connect the display. The last step is to affix the handlebars to the handlebars stem tube. Line up the holes for the four bolts and tighten with the Allen wrench. Figure 3.7. Connect the handlebars. Biodex Medical Systems, Inc. © 2018...
-
Page 14: Adjusting Pedals On The Medbike
Or, using the slim wrench included with the medBike, move the pedal to another hole on the crank by inserting the wrench between the pedal and the crank as illustrated in the diagrams below and unscrewing the pedal crank: Biodex Medical Systems, Inc. © 2018... -
Page 15: Positioning Or Relocating The Medbike
The height of the monitor display and handlebars is conveniently adjusted with the hand-turned knob on the front of the device. To raise or lower the display and handlebars, loosen the knob, pull up or down on the handlebars, and re-tighten the knob. Biodex Medical Systems, Inc. © 2018... -
Page 16: Positioning For Upper Body Exercise
Retighten when in place. Figure 3.11 Positioning medBike for Upper Body Exercise On / Off To turn the device on, press the black switch on the base. Figure 3.12. The ON / OFF switch. Biodex Medical Systems, Inc. © 2018... -
Page 17: Settings
Figure 3.14. Settings screen. NOTE: Although there is a Bluetooth Connection tab on the Settings screen, this feature is not covered in this document. Changing Pedal/Arm Cranking Directions While Exercising Biodex Medical Systems, Inc. © 2018... -
Page 18: Spasm Control
START / STOP screen. Spasm Control For user safety, the medBike is equipped with a Spasm Control sensor. medBike spasm control detects sudden twitching and/or rapid pedal/arm crank movement in opposite directions. If this Biodex Medical Systems, Inc. © 2018... -
Page 19: Emergency Stop
<STOP>. To continue exercising, <STOP> must be pressed a second time. There is an option to resume the session or finish the session and starting a new one. Figure 3.18. Location of Emergency Stop button. Biodex Medical Systems, Inc. © 2018... - Page 20 Figure 3.19. Emergency Stop warning screen. Biodex Medical Systems, Inc. © 2018...
-
Page 21: Active Modes
Select <Manual> and set the exercise parameters. When the Upper Body is present, the option to select Upper or Lower Body is displayed. Select the desired exercise and set the total exercise time followed by user weight. When finished, press the <Green Arrow>. Figure 4.2. Active Manual Settings. Biodex Medical Systems, Inc. © 2018... - Page 22 Active Manual Settings—resistance levels. If the<Red Square> is pressed to stop the exercise, the results data from the workout is displayed. Figure 4.4. Active Manual Mode Results. Press <Home> to return to the Home screen. Biodex Medical Systems, Inc. © 2018...
-
Page 23: Active Resistance Mode (Program A)
Touch the orange <+> /- <->buttons to adjust the resistance for a particular segment as well as the pedal/arm cranking direction. (The segments in Figure 4.7 illustrate the pedal/arm cranking in the forward direction.) Press the <Green Arrow>. Biodex Medical Systems, Inc. © 2018... - Page 24 The pedal/arm cranking direction can be changed by pressing <Reverse> or <Forward>. Figure 4.8. Active Resistance Mode (Program A)—resistance level setting screen (individual segments). If the<Red Square> is pressed to stop the exercise, the results data from the workout is displayed. Biodex Medical Systems, Inc. © 2018...
-
Page 25: Continuous Watt Mode (Program B)
Therefore, if the user is pedal/arm cranking quickly and generating a high number of rpms, the resistance level will drop. If the user is producing a small number of rpms, the resistance level will raise proportionately to maintain the designated Watt output. Biodex Medical Systems, Inc. © 2018... - Page 26 Continuous Watt Mode (Program B)—Watt level setting screen (individual segments). Press <+> or <-> to adjust Watt level during the exercise session. The Watt level can remain constant, as illustrated below or change from segment-to-segment. Biodex Medical Systems, Inc. © 2018...
- Page 27 Continuous Watt Mode (Program B)—in-session screen. If the<Red Square> is pressed to stop the exercise, the results data from the workout is displayed. Figure 4.14. Continuous Watt Mode (Program B) Results. Press <Home> to return to the Home screen. Biodex Medical Systems, Inc. © 2018...
- Page 28 Figure 4.15. Home screen. Biodex Medical Systems, Inc. © 2018...
-
Page 29: Passive Modes
Note: Calorie burn rate will probably not be significant, as the user is seated and the device is assisting with limb movements. Press the <Green Arrow> to begin exercising. Figure 5.2. Passive Manual Mode— settings screen. Biodex Medical Systems, Inc. © 2018... - Page 30 Passive Manual Mode—rpm level setting screen (individual segments). If the<Red Square> is pressed to stop the exercise, the results data from the workout is displayed. Figure 5.4. Passive Manual Mode Results. Press <Home> to return to the Home screen. Biodex Medical Systems, Inc. © 2018...
-
Page 31: Passive User Profile Mode
To start a Passive User Profile session, press <User Profile> from the Passive Modes menu. Figure 5.6. Passive User Profile Mode— settings screen. Biodex Medical Systems, Inc. © 2018... - Page 32 As the user moves through each segment, the completed segments will turn gray. Figure 5.8. Passive User Profile Mode—in-progress exercise screen. If the<Red Square> is pressed to stop the exercise, the results data from the workout is displayed. Biodex Medical Systems, Inc. © 2018...
-
Page 33: Passive Pedal/Arm Crank Assisted Mode
Pedal/Arm Crank Assisted mode is different from the other two passive modes. The Pedal/Arm Crank Assisted mode is designed for users who have some lower extremity capacity, but still have too many strength and endurance deficits to use one of the active modes. Biodex Medical Systems, Inc. © 2018... - Page 34 Set desired rpm and pedal/arm cranking direction for each segment. Press the <Green Arrow>. Figure 5.12. Passive Pedal/Arm Crank Assisted Mode— rpm settings screen (individual segments). Start pedal/arm cranking. After 30 seconds, the warmed-up medBike will start sensing and compare actual rpm to set rpm. Biodex Medical Systems, Inc. © 2018...
- Page 35 Passive Pedal/Arm Crank Assisted Mode—in-progress exercise screen. If the<Red Square> is pressed to stop the exercise, the results data from the workout is displayed. Figure 5.14. Passive Manual Mode Results. Press <Home> to return to the Home screen. Biodex Medical Systems, Inc. © 2018...
- Page 36 Figure 5.15. Home screen. Biodex Medical Systems, Inc. © 2018...
-
Page 37: Specifications
Speed Control: 10-90 rpm in passive mode Work Rate Range: 1-120 Watts (100 Watts at 90 rpm in Active mode) Warranty: Two year parts; one year labor. Assembly drawings and parts list are available from Biodex customer service. Biodex Medical Systems, Inc. © 2018... -
Page 38: Biodex Medical Systems, Inc
Calf Support Assembly Biodex Medical Systems, Inc. © 2018... - Page 39 Biodex Medical Systems, Inc. © 2018...
- Page 40 Biodex Medical Systems, Inc. © 2018...
Need help?
Do you have a question about the 950-192 and is the answer not in the manual?
Questions and answers