Table of Contents
Advertisement
Advertisement
Table of Contents

Related Manuals for Eargo Max


Summary of Contents for Eargo Max
- Page 1 Eargo Plus | User Guide...
- Page 2 Get ready to start hearing life to the fullest. A companion video of this user guide can be found at eargo.com/showme...
-
Page 3: Table Of Contents
Indications for Use Preparing Your Ears Getting to Know Your Eargo Waking Up Your Eargo Let’s Get All Charged Up Inserting and Removing Your Eargo Devices Finding the Perfect Fit Adjusting Sound Profile Your First Month and Beyond Eargo Care... - Page 4 Welcome to Eargo!! If the two exclamation points above didn’t communicate to you that we’re super-excited to have you as a part of the Eargo family, hopefully this will: we’re super-excited to have you as a part of the Eargo family, and we know you’re going to enjoy your new Eargo Max hearing devices.
- Page 5 2 Large Size USB Plug Flexi Fibers Eargo Max 2 Regular Size Care Kit Flexi Domes 3 Refer a Friend Cards Cleaning Brush Quick Microfiber Cloth Start Guide *Each pair of Eargo devices comes pre-loaded with Regular size Flexi Fibers...
-
Page 6: Indications For Use
Indications for Use The hearing instrument is intended to amplify and transmit sound to the ear and thereby compensate for mild to moderate impaired hearing. Warning to Hearing Aid Dispensers A hearing aid dispenser should advise a prospective hearing aid user to consult promptly with a licensed physician (preferably an ear specialist) before dispensing a hearing aid if the hearing aid dispenser determines through inquiry, actual observation, or review of any... - Page 7 Important Notice for Prospective Hearing Aid Users Good health practice requires that a person with a hearing loss have a medical evaluation by a licensed physician (preferably a physician who specializes in diseases of the ear) before purchasing a hearing aid. Licensed physicians who specialize in diseases of the ear are often referred to as otolaryngologists, otologists or otorhinolaryngologists.
- Page 8 Federal law restricts the sale of hearing aids to those individuals who have obtained a medical evaluation from a licensed physician. Federal law permits a fully informed adult to sign a waiver statement declining the medical evaluation for religious or personal beliefs that preclude consultation with a physician.
- Page 9 Caution Always wear an Eargo device with a Flexi Fiber. Make sure that the Flexi Fiber is correctly attached. In rare cases, the Flexi Fiber could remain in your ear when removing the Eargo device. If this happens, do not attempt to remove the Flexi Fiber yourself.
-
Page 10: Preparing Your Ears
Preparing Your Ears CLEAN UP IN EAR 2 We know it’s exciting getting your Eargo devices. Heck, we’re so excited for you we can barely sit still. But before you go running off half-cocked, slamming your devices into place, please take a minute to remove any excess wax that may have accumulated in the ear canal. -
Page 12: Getting To Know Your Eargo
Getting To Know Your Eargo Replaceable Flexi Fibers Speaker Microphone Gold Contact Removal Thread Left is L Right is... - Page 13 Before you insert your Eargo devices, we want to familiarize you with their various parts. Just like in the theater, there are no small parts. FLEXI FIBERS • Flexi Fibers allow Eargo devices to be comfortably suspended inside the ear canal. Which is totally where you want ‘em.
-
Page 14: Waking Up Your Eargo
They’d get so lonely. The Eargo charger is portable, which means it can charge your Eargo devices on the go. The charger also needs to get charged from time to time. - Page 15 Checking the Charge Open the lid of the charger and the indicator lights will come on after about 3 seconds. Full Charge When charger is fully charged, all battery lights glow white. Low Charge When charger is at low charge, one battery light glows red.
-
Page 16: Let's Get All Charged Up
Let’s Get All Charged Up CHARGING YOUR CHARGER Let’s make sure your charger and Eargo devices are fully charged before using them. Sometimes the batteries drain while in shipment from our factory. It’s a long trip and they get bored and lonesome. - Page 17 On the charger itself, all indicator lights will briefly glow. When this happens, the charger (and the Eargo devices inside) will begin to charge. But don’t worry if those lights turn off, that’s just the charger trying not to show off..your devices are still being charged.
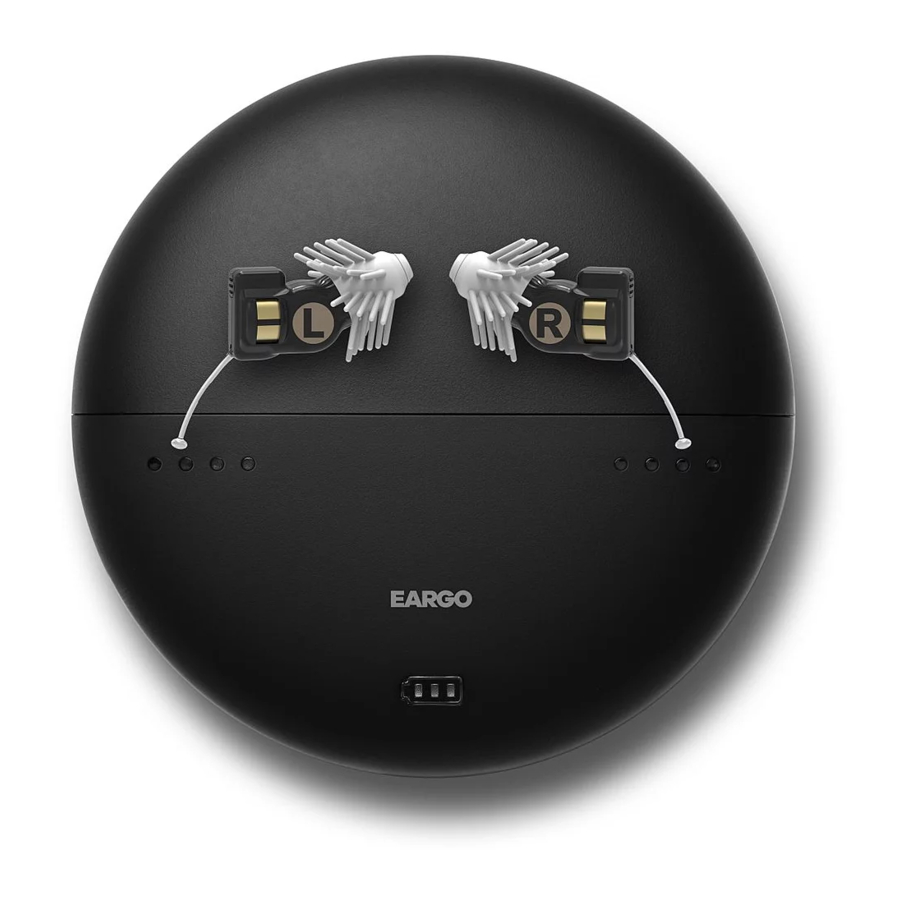
- Page 18 When it comes time to recharge your Eargo devices, there are FIVE SIMPLE STEPS to follow. FLIP • When you remove the Eargo device from your ear, the removal thread will be facing down. Before inserting your Eargo device into the charger, flip the device so that the removal thread is facing up.
- Page 19 Flip the device before insertion so removal thread is facing up. CORRECT CHARGING POSITION Position the device directly over the charging cradle. Push down INCORRECT into cradle with CHARGING a gentle wiggle. POSITION Charging Cradle...
- Page 20 CRADLE INDICATOR LIGHTS CHECK CRADLE INDICATOR LIGHTS • When the cradle lights under the Eargo device change from solid blue to solid white, charging will begin. The charging lights may flash blue for a few seconds before turning solid white when you first insert the Eargo devices into the cradle.
- Page 21 Charging lights inside cradle change from blue to white. CONTINUOUS FLASHING Eargo device only partially inserted. Cradle SOLID BLUE LIGHT Indicator Eargo device Lights inserted incorrectly. SOLID WHITE LIGHT Eargo device inserted correctly.
- Page 22 Clever little charger, eh? After this assessment period, the lights will show how much juice you have in each Eargo device (1 to 4 lights) and will dim after approximately 10 seconds. It takes approximately 6 hours to fully charge your Eargo...
- Page 23 10 second assessment period. JUICE LEVEL 1-4 lights illuminate. FULL CHARGE 4 white lights on — device is fully charged. Eargo Device Indicator Lights LOW CHARGE 1 red light on — device has extremely low charge.
- Page 25 Please do not drop your Eargo devices or your charger onto any hard surfaces. Maximizing Battery Life To maximize the battery life of your Eargo devices, it is best to charge them once a day, overnight. Turning Off Your Eargo Devices Placing your Eargo devices in the charger automatically turns them off.
-
Page 26: Inserting And Removing Your Eargo Devices
Simply pop the top off the charger, verify indicator lights illuminate. If not, recharge your Eargo devices (refer to page 13) otherwise remove one of the Eargo devices from the charging cradle. To keep things super simple, Eargo devices have no switches. They just turn on automatically 10 seconds after they are removed from the charger. - Page 27 *CAUTION: Do not use if device is damaged or removal thread is missing. Please contact Eargo immediately. ** Do not insert the Eargo device too deep into the ear canal. The removal thread needs to remain accessible. Do not proceed if there is any...
- Page 28 ACTIVE CALIBRATION PROCESS The Eargo devices turn on 10 seconds after removing them from the charger. When first inserting your devices, they undergo an active calibration process for 30-60 seconds. During this time they may ring a bit. Don’t be alarmed - this is normal. It’s just the devices adjusting their tuning to your specific ear canal.
- Page 29 If you feel light resistance when you first insert the Eargo device, and it doesn’t feel like it has gone in all the way, the Eargo device might just need a little help.
- Page 30 The main part of the device that may be visible is the very back. In fact, this is why we make Eargo devices black (and not various skin colors). You see, the ear canal appears quite dark since it receives...
- Page 31 CAUTION: In rare cases, the Flexi Fiber could remain in your ear when removing the Eargo device. If this happens or you cannot locate the Flexi Fiber, have a healthcare professional remove it or verify it is not still in your ear.
-
Page 32: Finding The Perfect Fit
While every human being is unique like a snowflake or a...uh...well, snowflake is the only example we can think of... it turns out the size of our ear canals are not. So Eargo Flexi Fibers come in 2 sizes: Regular and Large. Regular is going REGULAR to be the right fit for most people. - Page 33 Finding the Perfect Fit PEEK UNDER THE HOOD Replaceable Flexi Fibers Nose Gray Markings Base of Nose Body of Device...
- Page 34 CHANGING SIZES REMOVE THE REGULAR SIZE Grasp the body of the Eargo device between your thumb and index finger. With your other hand, grasp the Regular size Flexi Fiber on one side at the bottom and peel it up and away from the body of the device.
- Page 35 *Caution: Make sure that the Flexi Fiber is correctly attached. In rare cases, the Flexi Fiber could remain in your ear when removing the Eargo device. If this happens, have the Flexi Fiber removed by a healthcare professional.
- Page 36 Quick double tap LOW/PHONE HIGH PROGRAM 1 PROGRAM 2 PROGRAM 3 PROGRAM 4...
-
Page 37: Adjusting Sound Profile
Your Eargo device will let you know when you’ve changed SPs. With every double tap your ear Eargo will say, “Program 1”, “ Program 2”, “Program 3”, and “Program 4”. It will progress through all 4 levels and then repeat from the beginning (SP 1-2-3-4, then back to SP 1-2- 3-4 etc.). - Page 39 Turning up the volume to 11 AMPLIFICATION SATISFACTION If by chance the amplification is not sufficient at the maximum sound profile (SP4), keep calm and pop the Flexi Domes on. Flexi Domes were specifically designed for people who need a little more amplification than the Flexi Fibers provide. Flexi Domes are made with the same patented Flexi Fibers but with an added soft dome tip.
-
Page 41: Your First Month And Beyond
GETTING DOWN WITH EARGO A couple of things to know as you adjust to your new life with your Eargo devices. One, there will be quite a few new sounds coming at you – at your ear-region, to be exact. So... - Page 42 And why shouldn’t they? Thanks to Flexi Fibers, Eargo devices exert minimal force on the ear. We love your ears— why would we be exerting a lot of force on them? And the Flexi Fibers’...
- Page 43 Whose Voice is That? HEARING YOUR OWN VOICE Autophony is a fancy term for hearing your own voice. We like fancy words around here. We have one of those vocabulary calendars with a new word every day. Today’s word was “fritter” which means to squander or disperse. But amazing vocabulary aside, autophony is one of the most common things people notice when they begin wearing an in-ear hearing device.
- Page 44 Your brain needs a little time to get used to hearing these high frequency sounds again. It probably hasn’t heard them for a long time. Give it a little while. The first weeks with your Eargo devices will be a time of adjustment. These sounds will begin to fade into the background as your brain relearns which ones are important and which can be ignored.
- Page 47 And remember you can select different SPs for each ear. One final word on volume; Eargo devices should sound crisp and not loud. If something sounds loud, you probably have the...
- Page 48 Pretty Conversational SPEECH DISCRIMINATION Within the first couple of weeks of acclimating to your Eargo devices – and to sounds you may not have heard for a while – your ability to understand speech should start to improve. So if you’ve been hanging around with a bunch of boring people or...
-
Page 50: Using The Phone
Using the Phone Sometimes people experience feedback when talking on the phone and wearing a hearing device. This can happen when the phone is too close to the ear. The proximity can create a feedback loop between the phone’s speaker and the device’s microphone. If this happens, move the phone back from your ear a bit or try holding it at an angle. - Page 51 Many people note that they can watch TV at a much lower volume after they start wearing their Eargo devices. Usually the same volume that’s comfortable for their spouse or family. One of the many ways in which the Eargo devices benefit the people who AREN’T wearing...
-
Page 52: Eargo Care
Eargo Care Keeping your Eargo devices in good shape is very important. DAILY CARE LONG-TERM CARE LONGER-TERM CARE Wipe and brush Replace Flexi Fibers Replace interior off excess if clogged with wax. wax guard if clogged wax daily. with wax. - Page 53 Daily Care KEEPING YOUR EARGO DEVICES CLEAN Eargo devices are designed to help keep your ears clean. The Flexi Fibers may sweep out excess wax with each removal. There’s often a sizable amount of wax that may come out during the initial days of using your devices. That amount should lessen over time.
- Page 54 If you notice wax or other debris on your Flexi Fibers, simply let them dry (refer to page 51) and gently clean them with the cleaning brush and/or micrfiber cloth provided in the Eargo box. The body of the Eargo device, especially the nose, may also need cleaning.
- Page 55 FLEXI FIBER • Have a look at the tip of the Flexi Fiber, you should be able to see the white tip with small holes. Brush out the nose of the Flexi Fiber, brushing with the tip facing downward to let gravity help pull it away. Wipe the tip of the Flexi Fiber with the microfiber cloth provided.
- Page 56 Long-term exposure to moisture can harm your devices. Let your devices air dry or dry them with a dry cloth. Don’t use hot air or a hair dryer to dry your Eargo devices. It might give them that stylish, carefree, wind-blown look, but...
- Page 57 EARGO DEVICES ARE NOT WATERPROOF Last but certainly not least, Eargo devices are not waterproof. Please do not immerse or submerge your devices in water, alcohol or any liquid. Also, do not wear them while swimming or in the shower, hot tub or steam room.
- Page 58 Replaceable Flexi Fibers Replaceable Wax Guard...
- Page 59 Long-Term Care Keeping your Eargo devices in good shape is very important. In this section, we will discuss the long term care of the Eargo devices. Long term care is necessary when the Flexi Fibers get filled with wax. OK, we know we keep talking about ear wax, but it just keeps coming up.
- Page 60 Many people find it is easier to visualize how to do this by following along with the video found at eargo.com/showme. STEP 1 Grasp the body of the Eargo device between your thumb and index finger. STEP 2 With your other hand, grasp the Flexi Fiber on one side at the...
- Page 61 Don’t pull it straight back. Flexi Fibers are designed to stay put and won’t release if you pull them straight back. You need to gently pull the bottom of the Flexi Fiber away from the nose of the body of the device, and then just peel it up.
- Page 62 Flexi Fiber towards the nose. *Caution: Make sure that the Flexi Fiber is correctly attached. In rare cases, the Flexi Fiber could remain in your ear when removing the Eargo device. If this happens, have the Flexi Fiber removed by a healthcare professional.
- Page 63 Flexi Fiber is not on properly. Continue twisting the Flexi Fiber down the nose until the markings are covered. INCORRECT CORRECT Push on and twist further To have a clearer look at how this is done, watch our video at eargo.com/showme.
- Page 64 Longer-Term Care In this section, we will discuss Longer-Term Care of the Eargo devices, that is replacing the internal wax guard. You shouldn’t need to do this every time you change the Flexi Fibers, since the Flexi Fibers are the first line of defense against wax. When changing the Flexi Fibers, give a look at the internal wax guard and make sure it’s clean.
- Page 65 Dispenser Wax Guard Storage Wheel Depository Wax Guard Chamber Guard Changing Tool Threaded Side Smooth Side For removing For inserting used wax guards. new wax guards. *Only use tool and wax guards provided by Eargo.
- Page 66 As with Flexi Fiber replacement, many people find it is easier to visualize how to do this by following along with the video which can be found at eargo.com/showme. STEP 1 Remove the Changing Tool from its clip at the bottom of the Wax...
- Page 67 Take the Eargo device between your thumb and index finger. With your other hand, use the threaded side to gently twist the tool into the nose of the Eargo device to grab onto the used wax guard. The key word is gently. You don’t need to apply too much force.
- Page 68 STEP 4 We now get the old wax guard off of the tool. Push the threaded end of the Changing Tool (with used wax guard engaged) into the middle of the dispenser as shown. STEP 5 Slide the Changing Tool sideways across the dispenser slot. Pull the tool vertically to release the used wax guard into the depository.
-
Page 69: Replacing The Wax Guard
Don’t worry if you run out, you can always buy more by going online to eargo.com/reorder or giving us a call. For more clarity, we suggest you follow along with the video, which is ready to be enjoyed at your leisure at eargo.com/showme. - Page 70 Push the Changing Tool’s smooth end firmly into the center of the blue wax guard to grab onto it. Once the wax guard feels engaged, pull it out. STEP 4 Grasp the body of the Eargo device between your thumb and...
- Page 71 index finger. With your other hand gently insert the Changing Tool (with the clean wax guard engaged) as straight as you can into the open nose of the device. Once again, the key word here is gently. Don’t push too hard or you might risk damaging the nose of the device and that’s the business end.
-
Page 72: Share The Love
Share the Love! SAMPLE PACKS ARE FOR FRIENDS Don’t keep the ease and comfort of Eargo devices all to yourself. We’ll gladly send your friends a free fit and feel sample. Eargo samples aren’t packed with our powerful sound (that is... -
Page 74: Troubleshooting Guide
• Wax or debris buildup • Incorrect insertion in the ear • Change in hearing loss • Not set to correct program Eargo devices • Eargo devices not placed don’t charge correctly in charger • Charger discharged No LEDs showing •... - Page 75 • Adjust the device in the ear or remove and re-insert the device • Remove and reposition Eargo devices correctly in charger signaled by the lights changing from blue to white • Charge charger using USB cord and USB plug •...
- Page 76 • Flexi Fibers not attached securely your ear when removing the Eargo device Can’t get Flexi Fibers • Pulling Flexi Fibers straight back off of Eargo device for replacement Device is uncomfortable • Flexi Fibers are too large - too tight or loose...
- Page 77 SOLUTIONS • Place devices in charger to automatically turn them off • Have the Flexi Fibers removed from your ear by a healthcare professional • Grab at the bottom of the Flexi Fibers and pull it out and up (see page 52) •...
-
Page 78: Support
Support HAVE QUESTIONS? If your Eargo devices begin to have any issues, please consult the troubleshooting guide on the previous pages. Have questions? We have answers and are ready to help. Just give us a call at 1-800-261-0702. Guarantee HAPPINESS GUARANTEED If you’re not happy with your Eargo devices, return them within... - Page 79 WELL, THAT’S IT! You’ve made it to the end. Bravo! Now get out there and start hearing life to the fullest...
-
Page 80: Appendix
Keep out of reach of pets and children. Temperature Limits: Eargo devices are designed for use from 5°C to 45°C (41°F to 113°F). Eargo devices can be stored from -20°C to 50°C (-4°F to 122°F). Do not use or store your devices outside of these ranges respectively. - Page 81 If you suspect you have touched any battery fluid or residue, wash your hands thoroughly. Waste Disposal: Waste from electronic equipment must be handled according to local regulations. Power Supply Specification: - Input: 100-240V ~ 50/60 Hz, 200mA max current - Output: 5.0V … 1100mA...
- Page 82 Technical Data ANSI S3.22-2003 ANSI/IEC 2cc Coupler Output saturation dB SPL (90 dB SPL input) Full-on gain (50 dB SPL input) Reference test gain (60 dB SPL input) Frequency range <200~7550 500Hz Total Harmonic 800Hz Distortion 1600Hz Equivalent Input Noise dB SPL (Noise Reduction OFF) Current drain (battery)
- Page 83 Attack and release times BASIC BASIC FAST FAST REACH attack release attack release release 400 msec 15,000 msec 3 msec 100 msec 600 msec...
-
Page 84: Compliance Information
Compliance Information This device complies with FCC Part 15 and 18 of the FCC Rules This equipment has been tested and found to comply with the limits for a Class B digital device, pursuant to part 15 of the FCC Rules. These limits are designed to provide reasonable protection against harmful interference in a residential installation. - Page 85 NOTES...
- Page 86 Atmospheric pressure should be 600 hPa to 1000 hPa. Product adheres to requirements of Type B applied part. Consult instructions for use. Contains electronics, dispose according to local regulations or return to Eargo. Do not use if package is damaged. Single use only.
- Page 87 Keep away from sunlight. Keep dry. Manufacturer. Date of manufacture. Catalogue number. Serial number.
- Page 88 General Warnings - Only use medical grade (IEC 60601-1) or ITE approved (UL 60950) power supply. - Hearing aid and accessories contain small parts which can be swallowed. Keep small parts out of reach of children due to choking hazard. - Electrical equipment are an ignition source.
- Page 89 - Do not wear the hearing aids in mines or other explosive areas, unless those areas are certified for hearing aid use. - Check for electronic or wireless restrictions prior to using hearing aid, or charger to prevent electrical interference to nearby equipment.
- Page 90 Eargo devices for a full refund. Devices Guarantee need to be postmarked for return to Eargo within 45 days after the date of delivery. Eargo offers you a one (1) year limited warranty valid starting Warranty period from the date of delivery.
- Page 91 Number of repairs warranty terms. LOSS AND DAMAGE Eargo offers a one time (1x) replacement for each device that is lost or damaged during the warranty period, for a fee (stated Loss & Damage and updated at eargo.com/warranty). Devices damaged from improper use or care will not be replaced.
- Page 92 How to submit request for repair: Call 1-800-261-0702 and we will be happy to assist. Eargo, Inc. 295 North Bernardo Ave., Suite 100 Mountain View, CA 94043 Serial Number...
- Page 93 We hope you love your Eargo devices, but if you’re not satisfied and you’re within the 45 day trial period, you can return your Eargo system for a full refund. To ensure your return is processed quickly, please follow the instructions below.
- Page 94 This is a new product, not used or refurbished. “Eargo” and “Eargo Max” are registered trademarks of Eargo, Inc. The Eargo and Eargo Max wordmarks as well as the Eargo Logo are trademark of Eargo, Inc. ©2017 Eargo, Inc.
Need help?
Do you have a question about the Max and is the answer not in the manual?
Questions and answers