Table of Contents
Advertisement
Quick Links
Advertisement
Table of Contents

Related Manuals for CME VIP 2000


Summary of Contents for CME VIP 2000
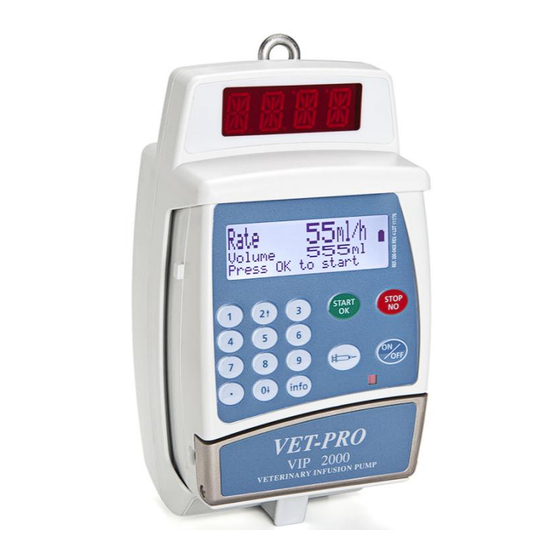
- Page 1 VET-PRO VIP 2000 Veterinary Infusion Pump Operator's Manual Manufacturer: Caesarea Medical Electronics Ltd. 23 Staufenburg st. 72805 Lichtenstein, Germany T: +800-323-575-00 E: sales@cme-infusion.com www.cme-infusion.com EDITION March 2013 Ref.: 100-090XV...
-
Page 2: Limited Warranty
This Limited Warranty is the sole and entire warranty pertaining to CME’s products and is in lieu of and excludes all other warranties of any nature whatsoever, whether stated, or implied or arising by operation of law, trade, usage or course of dealing, including but not limited to, warranties of merchantability and warranties of fitness for a particular purpose. -
Page 3: Table Of Contents
Contents LIMITED WARRANTY .................... 2 INTRODUCTION ....................... 5 GLOSSARY ......................... 6 SAFETY PRECAUTIONS ..................7 SPECIFICATIONS ..................... 9 TECHNICAL DESCRIPTION ................11 VET-PRO –WITH DOOR OPEN ................16 THE CHARGER ....................... 17 UNPACKING ......................18 LOADING THE ADMINISTRATION SET ............18 FLUSH OPERATION .................... - Page 4 LOW BATTERY ....................... 55 END BATTERY ....................... 55 CLEANING AND STORAGE ................. 56 ALARMS CONDITIONS ..................57 ALARMS ........................57 TROUBLESHOOTING .................... 58 SHOW SETTING ...................... 60 ADJUST SETTING ....................62 VET-PRO operator’s manual...
-
Page 5: Introduction
Introduction This Manual Provides directions for the setup and operation of the VET-PRO Pump VET-PRO Features Small, light and compact pump. Multi Programs: CONTINUOUS Continuous program. Infusion Rate 0.1 to 1200 ml/hr. Volume: 0.1 to 9999 ml. User can design a specific protocol, for drug 25 STEPS delivery, which contains up to 25 steps. -
Page 6: Glossary
Glossary Terms used in manual: Essential operating procedure or condition. Note: A precaution which, if not followed, could result in extensive Caution: damage to the equipment. A precaution, which, if not followed, can result in personal Warning injury or loss of life. -
Page 7: Safety Precautions
Safety Precautions Warning To avoid possible personal injury or loss of life, observe the following: Note: Read the entire Operation Manual before using the pump, since the text includes important precautions. Disconnect the Charger from the mains, prior to opening the casing. Voltage present on internal components may cause severe shock or death on contact. - Page 8 This pump should be operated only with the IV set that the pump is calibrated for. Use of incorrect administration sets may impair the operation of the pump and the accuracy of the infusion. The BodySet is not suitable to use with Taxol. ...
-
Page 9: Specifications
Specifications Pumping Mechanism: Piston Mechanism Flow Rate: PCA: 0 to 100 ml/hr in 0.1ml increments All other programs: 0.1 to 1200 ml/hr in 0.1ml or 1 ml increments. Total Infused Volume: PCA: 0.1 to 1,000 ml. Continuous, TPN, Intermittent: 0.1-9999 25 Steps: 0.1 to 9999 ml. - Page 10 Classification Type CF Equipment (degree of protection against electrical shock) Housing: ABS (fire retardant) Weight 280 gr. without battery 390 gr. with battery Electrical Safety Complies with: (Medical Electrical Equipment EN 60601-1 Safety), (Infusion pumps and IEC 60601-2-24 controllers), (Programmable Electrical Medical IEC 60601-1-4 System), UL 2601- 1...
-
Page 11: Technical Description
Technical Description The following details outline the safety checks designed into the VET-PRO infusion pump, to minimize the possibility of under / over infusions. Anti-Bolus Function The anti-bolus function is designed to reduce the bolus that may occur upon the release of an occlusion following a downstream occlusion alarm. - Page 12 Trumpet and Flow Rate In VET-PRO, as with all infusion systems, the action of the pumping mechanism and variations cause short – term fluctuations in rate accuracy. The following curves show typical performance of the system in two ways: 1. The accuracy of fluid delivery over various time periods is measured (Trumpet curves).
- Page 13 Start-Up Graph at 1.0 ml/h (Initial Period) Using BodySet Time (minutes) Trumpet Graph at 1.0 ml/h (Initial Period) Using BodySet Overall Mean Error = -0.1% Max Rate Error = 8% Trumpet Graph at 1.0 ml/h (After 4 Hours) Using BodySet VET-PRO operator’s manual...
- Page 14 Overall Mean Error = -1.1% Max Rate Error = 6% VET-PRO Front View Description Function Displays: Selected Infusion Rate, Total Time, Display Time Delay, Volume To Be Infused and Volume Infused. Rate: ml /h Press OK for Volume Starts pump operation and delivery. START/ OK Key Confirms selection and setting.
- Page 15 Enable scrolling through options. Arrow keys 2 0 Pressing Syringe key during data setting: Syringe key Enable Flushing procedure. Flushing default volume: 4 ml. FLUSH 2 ml Pressing Syringe key during PCA program operation: Enable bolus procedure. Volume, ml. Turns the pump on and off. On / Off key ...
-
Page 16: Vet-Pro -With Door Open
VET-PRO –with door open Description Function Holds the door closed when latch is in vertical Latch holder position. Detects downstream tubing restriction Pressure sensor occlusion. Alarm level can be adjusted to suit patient needs. Guide the administration set Tubing Guide Connected to the door by 2 springs. -
Page 17: The Charger
The Charger . Description Function Display Display infusion data Push to release the pump from the Charger. Release Handle The pump is protected against overcharging. In order to keep Note: your battery fully charged, connect the pump to the mains via the Charger whenever it is used at home. -
Page 18: Unpacking
Unpacking Carefully remove the pump and Charger from the box. Make sure no items were damaged during shipment Make sure you have the following items: VET-PRO Infusion Pump Charger Battery Pack Operator’s Manual If any items are missing or damaged, contact your VET-PRO supplier. Loading the Administration Set ... -
Page 19: Flush Operation
Flush Function (Priming) Flush Function is used: Before starting a program (see instruction below); After the air in line alarm, as follows: Press STOP/NO key to mute the alarm. Disconnect IV tubing from patient; press the SYRINGE key to push air bubbles through. When flushing is completed press START/OK key to resume program. -
Page 20: Vet-Pro - Operation
VET-PRO - Operation Before attaching the VET-PRO to a patient, run the following tests to verify that all indicators and alarms work properly. When an alarm is activated the following will occur: An alarm message will appear on the display. An audible alarm will be sounded. -
Page 21: Air In Line - Alarm Test
Air in Line - Alarm Test Lift the door latch to open the pump door. Insert the proper IV tubing into the guide of the pump (as described in page 21). Make sure direction of flow is correct. Close the door. Press the door until a click is heard. Set the infusion rate at 500ml/hr, using the Rate 500 ml/h... -
Page 22: Door Open - Alarm Test
Door Open - Alarm Test Insert an administration set into the pump (as described in page 21) and flush Set the infusion rate at 500ml/hr, using the Rate 500 ml/h numeric keyboard. Press OK for Volume Set Volume at 20 ml. Volume 20 ml Press OK to start... -
Page 23: Down Occlusion - Alarm Test
Down Occlusion - Alarm Test Insert an administration set into the pump and flush it. Set the infusion rate at 500ml/hr. Rate 500 ml/h Press OK for Volume Set Volume at 20 ml using the numeric Volume 20 ml keyboard. Press OK to start Occlude the administration set (between the pump and the patient). -
Page 24: Programs
Programs The VET-PRO infusion pump features 5 different programs. Following are the specifications for each program: program CONTINUOUS Rate: 0.1 to 1200 ml/hr Total volume to be infused: 0.1 to 9999 ml. program 25 STEPS User can design a specific protocol, for drug delivery, which contains up to 25 steps. -
Page 25: Changing Current Program
Changing Current Program Switch the pump on by pressing ON/OFF key. When the screen of Rate appears, press info key twice. Use ARROW keys to scroll to "Adjust Setting" Volume Infused Show Setting option. => Adjust Setting Choose "Adjust Setting" with START/OK key. 2↑, 0↓) Buzzer level Use ARROW keys (... - Page 26 User may change programs using the Short Cut: Note: 1. When switching the pump on, after a short Self CONTINUOUS Test, the pump will display the last selected program for 5 seconds. During this time, press PROGRAM Press NO to change the STOP/NO key for 2 sec.
-
Page 27: Pressure Setting
Down Occlusion Setting: Switch the pump on, by pressing ON/OFF key 2. When the screen of Rate appears, press info key twice. 2↑, 0↓) 3. Use ARROW keys ( to scroll to "Adjust Volume Infused Show Setting Setting" option. => Adjust Setting 4. -
Page 28: Basic Operation
Basic Operation The VET-PRO pump was designed for the Veterinary market. Connection of Pump to IV Pole Connect the IV set to the medication bag. Mount the bag on an IV pole. Click the pump into the Charger. Mount the Charger on an IV pole. Connect the Charger via a standard power cord to a grounded AC outlet. -
Page 29: Continuous Program
Continuous Program Switch the pump ON using the ON/OFF key. Pump displays program name and status. The CONTINUOUS status is either "Lock out" or "program" . PROGRAM Press NO to change CONTINUOUS LOCK OUT Program Setting Whenever you decide to set a new program, follow Note: instructions at the bottom of screen. - Page 30 From the STOP mode, the user may return to the Rate screen Note: by pressing twice on one of the numeric keys. During stop or data setting mode, use the STOP/NO key to Note: return one step backwards: First press will erase the last digit displayed, once all the digits are erased, pressing the STOP/NO key will display the previous screen .
- Page 31 Volume over Time If time option is on (adjust setting – Volume 456 ml see p. 71) after displaying program name and status, pump will display last set volume, set or confirm the Press OK key displayed number by pressing the START/OK key.
-
Page 32: 25 Steps Protocol
25 Steps Protocol In the 25 steps program, the user can set up to twenty-five different steps.Each step has its own rate and volume.The steps accumulation is limited to a Volume of 10 liters. Protocol steps are delivered one after another, sequentially, until all steps are completed. - Page 33 Step 11 Rate After last required step, set rate to zero. This ml/h indicates that all data required for the protocol has been set. All protocols following the last Press OK for Volume set protocol, will be automatically zeroed .Press START/OK to confirm. Total Steps After last step rate was set to zero or after 25 Total Volume 5000ml...
-
Page 34: Tpn Program
TPN Program Total Parenteral Nutrition - This mode delivers an infusion while automatically tapering up and down. The pattern of the program is a trapezoid. Rate Max Rate T1 = Time UP T2= Time FLAT T3= Time DOWN Time On a TPN Program the user may set the total volume which corresponds to the size of the bag to be infused, the total time, and the up and down time. - Page 35 In the event a TPN program was interrupted Resume Press OK and was not completed, the pump will display Repeat Press NO the Resume/Repeat screen. To continue the interrupted program, press the START/OK key. To repeat the previous program or start a new program, press the STOP/NO key.
- Page 36 Set the time for the rate to taper up Up Time: 0:30 (up to 4:15 h). Press OK key Set the time for the rate to taper down Down Time: 0:30 (up to 4:15 h). Press OK key Volume 1256 ml The pump will calculate all the set data and Max Rate: 108 ml/h display the Maximal rate for the program (to...
-
Page 37: Intermittent Program
Intermittent Program This is a special program, which enables the design of a Dose delivery protocol at set intervals. Each Dose will be given at a set time. Between Doses the pump will Keep the Vein Open. The infusion program continues until the total infusion bag is infused. - Page 38 Program Setting Whenever you decide to set a new program, follow the Note: instructions at the bottom of the screen. -If one of the values is changed during the programing mode, Note the pump will not store the new value, unless the change is confirmed by pressing the START/OK key.
- Page 39 During operation the pump allows Note: Rate: 500 ml/h rate titration, pressing numeric or digital point key. Adjust & press OK The rate on the display will change during titration, however the operation rate will change only if the START/OK key is pressed within 10 seconds confirming the rate change.
-
Page 40: Pca Program - With Protocols
PCA Program – With protocols Patient Control Analgesia is a program used in subcutaneous, IV or epidural pain relief. Pain management is undertaken by delivering a continuous basal rate, in combination with pre-programmed Boluses. The pump will deliver only the boluses corresponding to the preset time intervals. - Page 41 Program Setting Whenever you decide to set a new program, follow Note: instructions at the bottom of the screen. To enter PCA menu, pump will require a code. Enter Code Use numeric keys to set code 007 and confirm with START/OK key.
- Page 42 Press the START/OK key to start new bag and Clear History & clear previous program data. Pump will display Start New Bag bag volume screen - continue to step 7. Pressing the STOP/NO key will display program accumulation screen. Press START/OK key from accumulation screen to the VTBI left from previous program as total vtbi for the new program.
- Page 43 11. Pump will display the Bolus screen. Use the BOLUS 5 ml numeric keys to set a new value or approve the previous value, using the START/OK key. Adjust & press OK 12. Lock time is the minimal time between LockTime 60 boluses.
- Page 44 18. After a program has been locked, whenever the Resume:Press OK pump will be turn on, resume-menu screen will Menu:Press NO be displayed. Pressing START/OK key will display accumulation screen, with Volume to be infused, as volume left from previous program.
- Page 45 Selecting a Program Selecting “Select Program”, from the PCA Start New Bag menu, will display 2 options – to start new bag => Select Program or to continue with previous bag. Modify Program Pressing the START/OK key will clear the Clear History &...
-
Page 46: History
History Selecting “History“ will display the PCA MD Bolus operation history for the last 24 hours or last => History program, if started within the last 24 hours. Select Program Pump will display: Volume Infused, Bolus Given Bolus attempted. From 12.01.02 11:10 ARROW keys to scroll through data. -
Page 47: Info Mode
Info Mode Infused Pressing on the info key during operation will display the total Volume To Be Infused and the Infused Volume. The screen will be displayed 0111 for 7 seconds. Pressing twice on the info key during operation Battery Level will display the battery status.The screen will be displayed for 7 seconds. - Page 48 Pressing 5 times on the info key during PCA Time 8:30 operation will display the time and date. Date 24.03.02 Infused To clear the volume infused (VI): press the info key to display the volume infused (from stop or setting mode) and then the STOP/NO key. The 0111 screen will change to show volume infused zero.
-
Page 49: Program Delay
Program Delay Delay of the program before the start is enabled in the Continuous program (both in rate over volume and in volume over time), TPN and the 25 steps program. To enable delay before start option, set delay Volume 250ml before start to on, as described on page 66 (Adjust Setting). -
Page 50: Program Completed
Program Completed When the program is completed, the following End PROGRAM message will appear on the display: press the Press STOP to mute STOP/NO key to mute the alarm. The pump will automatically turn to a KVO 5 ml/h mode when the program is completed. Press Press STOP to renew key to reset the pump and set a STOP/NO... -
Page 51: Changing The Fluid Container
Changing The Fluid Container 1. Ensure that the pump is not infusing by placing the pump in STOP mode or turning the pump OFF. 2. Remove the bag spike on the IV set from the empty / used container. Discard the empty/used container/bag. -
Page 52: Locking
Locking The VET-PRO enables the user to lock the programs, on three different levels. Level 1 (keys locking) Level 2 (lock out program) Level 3 (presetting maximal rates) Level 1 – key locking The VET-PRO keys locking function disables all but the info key, START/OK (during setting mode) and STOP/NO (during operation mode) keys. -
Page 53: How To Lock
How to Lock Level 1 – key locking LOCK Mode Pressing continuously on the info key, untill the graph is all black and a beep is sounded will lock the program. “1” will be shown on the right side of the display, indicating that the program is first level locked. - Page 54 Level 3 – maximal rate locking The home-care company can adjust the Maximal rate acceptable according to patient needs: Press info key twice. Volume Infused Use ARROW keys to scroll to "Adjust Setting" Show Setting option. => Adjust Setting Enter "Adjust Setting" pressing START/OK key. Buzzer level Use ARROW keys to scroll to "More".
-
Page 55: Battery Operation
Battery Operation The VET-PRO can operate on battery power, enabling operation when the patient is being moved or during electrical power failure. When the pump runs on the battery power, the AC icon is off. At full charge, the battery provides 15 hours of operation at an infusion rate of 125ml/hr. -
Page 56: Cleaning And Storage
Cleaning and Storage Before the transfer of a pump to a new patient and periodically during use, clean the pump by wiping over with a lint-free cloth lightly dampened with warm water and a standard disinfectant / detergent solution. Before cleaning always switch off and disconnect from the AC ... -
Page 57: Alarms Conditions
Alarms Conditions At any time, when the pump detects a problem, an alarm is activated and the following will occur: An alarm message appears on the display, stating the cause of the alarm and indicates instructions for continued use. ... -
Page 58: Troubleshooting
Troubleshooting Description Result Possible Cause Remedy Air is present in Disconnect patient, Air in Line Infusion administration set press the STOP/NO ceases Air in Line key and remove the air from Administration set, as described on Clean air page 23. After flushing, press the START/OK resume program. - Page 59 Troubleshooting Description Result Possible Cause Remedy Message displayed If pump Connect to Mains Message will be displayed as won’t be showing 30 minutes long as the internal battery connected left of battery operation voltage is less than 7.1v. to mains, Low Battery battery will be depleted...
-
Page 60: Show Setting
Troubleshooting Description Result Possible Cause Remedy Pump The program was completed Press the STOP/NO Program completed will turn key to restart End PROGRAM to KVO mode Press STOP to mute KVO (Keep Vein Open) 5 ml/h program starts. Press STOP to renew Show Setting The program was designed to disable unauthourised user access to technician settings. - Page 61 Show Setting Options Screen no. Setting Screen Battery Level (Empty ↔ Full) Battery Level Lock Out Option (ON/OFF) Lock Out Time & Date display Time, Date Tube Temperature Tube Temperature Buzzer Level Buzzer Level Pressure level Pressure level (High/Normal/Low) Pressure Default Pressure Default Select Program Select Program...
-
Page 62: Adjust Setting
Adjust Setting Press info key twice. Volume Infused Choose "Adjust Setting" to display all software Show Setting adjustable parameters. =>Adjust Setting Confirm with START/OK key. Adjust Setting: See list of parameters that can be set on "Adjust Setting" selection on the next page. =>... - Page 63 Adjust Setting Options Screen no. Adjust Screen Lock Out Option (Code 902 ) Lock Out Buzzer Level (no code required) Buzzer Level (1 to 7) Pressure level (no code required) Pressure level (high, normal, low) Use code 901 to enter Restart Pump Restart Pump Pressure Default...
Need help?
Do you have a question about the VIP 2000 and is the answer not in the manual?
Questions and answers