Mutsy NEXO Instruction Manual
Hide thumbs
Also See for NEXO:
- Instruction manual (145 pages) ,
- Instruction manual (29 pages) ,
- Instruction manual (66 pages)
Table of Contents
Advertisement
Advertisement
Table of Contents

Subscribe to Our Youtube Channel
Related Manuals for Mutsy NEXO


Summary of Contents for Mutsy NEXO
- Page 1 NEXO instruction manual...
- Page 5 click!
- Page 6 Instruction manual Mutsy Nexo...
-
Page 7: Table Of Contents
· If you want to know what accessories are available for this product or if you want to stay informed of new Mutsy products then go to www.mutsy.com. WARNINGS · IMPORTANT: Keep these instructions for future reference ·... - Page 8 · WARNING: Bags, accessories or both, other than recommended by the manufac- turer, can, when placed on the product, result in an unstable pram. Exclusively use original Mutsy accessories. · WARNING: Shopping bags or other heavy objects must not be hung on the push bar due to the risk of toppling.
-
Page 9: Guarantee
Guarantee All Mutsy products come with a two-year guarantee, which starts on the day of purchase. In the event of a manufacturing fault, Mutsy will work with its retailers to provide a solution. Manufacturing faults will be repaired under the guarantee. The guarantee does cover exchanges or returns of Mutsy products. -
Page 10: Maintenance And Points For Attention
Do not iron and do not dry-clean. Close all zips, velcro parts and pressing studs before washing. · All Mutsy fabrics have been tested on water resistance however if the pram gets really wet, the water can penetrate the inner and outer fab- rics and leave circles behind. -
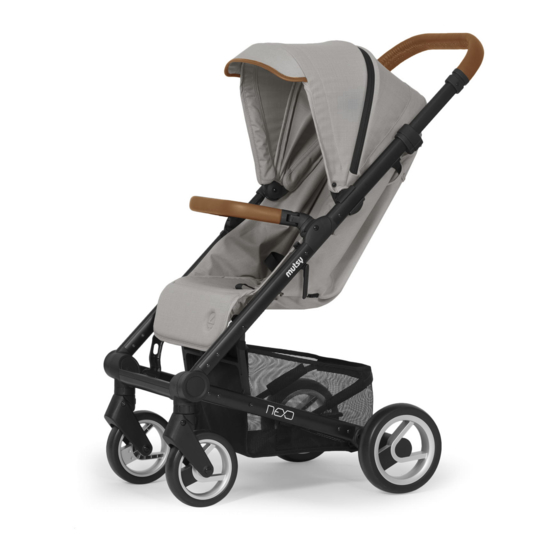
Page 11: Contents Of The Box
Mutsy shall not be liable for any possible discolouration. Contents of the box · 1 frame with pushchair seat and basket · 2 front wheels · 2 rear wheels · 1 hood ·... -
Page 12: The Wheels
Fold the frame (c, d) · Stand behind the frame and put the frame on the brake. Put the height adjustment buttons (c1) of the push bar in the lowest position. Pull the release buttons of the upper frame (c2) towards you on both sides and turn the push bar forwards until the push bar is on the lower support. -
Page 13: The Pushchair Seat
keeping the buttons depressed. · Release the button when the push bar is in the desired position. The pushchair seat (0 months up to 25 kg) · The pushchair seat is suitable for children from 0 months and upwards, up to 25 kg. The back support and leg support are adjustable. Make sure that the frame has been fully unfolded and the brake is blocked during all actions indicated below. - Page 14 · Undo the press studs in order to store the leg rest barrier. Open the zip on the pocket. · First fold the two sides with the press studs inwards and then fold in the centre section. Put the 2 fabric parts under the centre section when folding and make sure that there are no sharp corners in the ribbing.
- Page 15 · Pull the flap on the front side of the hood outwards to additionally enlarge the hood. Push the flap inwards to again reduce the hood. Remove the hood (r) · Release the studs at the top of the seat (r1). Then press the lip (r2) at the bottom of the clips of the hood inwards and remove the hood.
-
Page 16: The Maxi-Cosi Car Seat
· Regularly check the length and position of the belts and adjust, where necessary. Maxi-Cosi car seat · The Maxi-Cosi car seat adapters are suitable for use with the following Maxi-Cosi group 0+ car seats: Maxi-Cosi citi , Maxi-Cosi Mico ·... - Page 17 Nieuwkerksedijk 14 5051 HT Goirle the Netherlands T + 31 (0)135345152 F + 31 (0)135341163 E info@mutsy.nl...
Need help?
Do you have a question about the NEXO and is the answer not in the manual?
Questions and answers