Beko SIM7124B User Manual
Hide thumbs
Also See for SIM7124B:
- User manual (19 pages) ,
- User manual (21 pages) ,
- User manual (112 pages)
Table of Contents
Advertisement
Available languages
Available languages
Quick Links
Download this manual
See also:
User Manual
Advertisement
Table of Contents

Related Manuals for Beko SIM7124B


Summary of Contents for Beko SIM7124B
- Page 1 Steam Iron User Manual SIM7124B EN DE FR TR ES PL HR RO IT TH 01M-8832733200-2717-05...
-
Page 2: Meanings Of The Symbols
Please read this user manual first! Dear Customers, Thank you for selecting a Beko product. We hope that you get the best results from your product which has been manufactured with high quality and state-of-the-art technology. Therefore, please read this entire user manual and all other accompanying documents carefully before using the product and keep it as a reference for future use. - Page 3 CONTENTS ENGLISH 4-15 DEUTSCH 16-32 FRANÇAIS 33-47 TÜRKÇE 48-60 ESPAÑOL 61-75 POLSKI 76-94 HRVATSKI 95-108 ROMANIAN 109-126 ITALIANO 127-144 THAI 145-157 3 / EN Steam Iron / User Manual...
-
Page 4: General Safety
Important instructions for safety and environment This section contains safety instructions that will help protect from risk of personal injury or property damage. Failure to follow these instructions invalidates the granted warranty. 1.1 General safety • This appliance complies with the international safety standards. - Page 5 Important instructions for safety and environment • Do not leave the product unattended while it is plugged in. • Unplug the product before filling the water reservoir with water. • Operate and store the appliance on a stable surface. • When the appliance is placed on its base plate, ensure that the surface beneath the plate is level.
- Page 6 Important instructions for safety and environment • Do not attempt to dismantle the appliance. • Your mains power supply should comply with the information supplied on the rating plate of the appliance. • The mains supply of the appliance must be secured with a minimum 16 A fuse.
-
Page 7: Compliance With Weee Directive And Disposing Of The Waste Product
Important instructions for safety and environment • Never use the appliance in or near to combustible or inflammable places and materials. • If you keep the packaging materials, store them out of the reach of children. 1.2 Compliance with WEEE Directive and Disposing of the Waste Product This product complies with EU WEEE Directive (2012/19/EU). -
Page 8: Technical Data
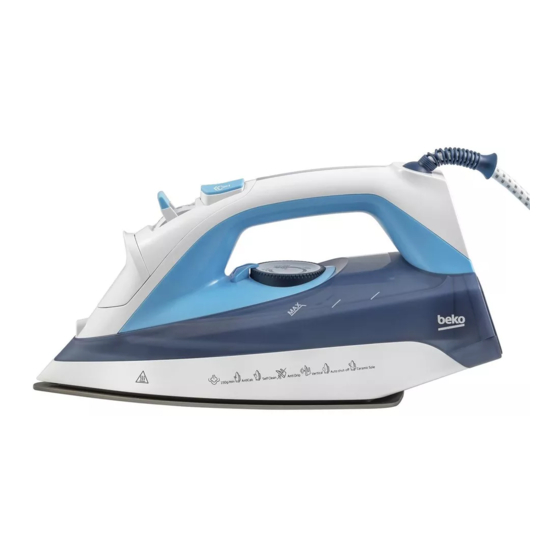
Your iron 2.1 Overview 2.2 Technical data 1. Power cable 2. Iron base plate Voltage : 220-240V~ 3. Temperature adjustment knob 50-60Hz 4. Soleplate Power : 2020-2400 W 5. Water spray nozzle consumption 6. Water refill lid Insulation class : I 7. -
Page 9: Intended Use
Operation 3.1 Intended use 3.3 Refilling the water reservoir This appliance is intended only for 1. Unplug the appliance. household use and ironing; it is not 2. Steam setting button (7) off Set suitable for professional use. to “ ” position. 3.2 Initial use 3. -
Page 10: Operation
Operation 2. When the appliance reaches the If you don’t know set temperature, thermostat the fabric of your indicator light (10) will turn off garment, first iron and the appliance is ready to use. an invisible part of your garment and 3.5 Temperature and determine a correct steam settings table... -
Page 11: Shock Steam
Operation 3.7 Shock steam WARNING: this process When you start to maintained for a iron, shock steam prolonged time water may not emit in may come through your first couple of the soleplate (4) presses. In order to together with steam. obtain shock steam, temperature In order to maintain... -
Page 12: Spraying Water
Operation WARNING: During Having water in the appliance would be the ironing if the advantageous; you thermostat indicator may use the water light (10) turns on, spraying button (8) before proceeding when necessary. with the shock steam process wait for the 3.11 Automatic light to turn off. -
Page 13: Cleaning And Maintenance
Cleaning and maintenance 4.1 Cleaning 4.2 Lime removal (Self-Clean) WARNING: When finished Lime removal function cleans the with ironing, unplug lime particles accumulated in the the appliance. You steam generator reservoir of the can drain the water appliance. in the reservoir by Use this function once in every opening the refill lid 2 to 3 weeks. - Page 14 Cleaning and maintenance 4.3 Storage It may take some time for the water to If you do not intend to use the drip from the holes of appliance for a long time, store it the soleplate. carefully. 7. After the reservoir becomes •...
-
Page 15: Troubleshooting
Troubleshooting Although the appliance is plugged in, soleplate (4) does not heat up. The appliance may be connected improperly. >>> Check the plug and power cable (1) of the appliance. Temperature setting knob (3) may be at the Min. position. >>> Turn the temperature setting knob in the clockwise direction up to the steam sign. - Page 16 Bitte lesen Sie zuerst diese Anleitung! Sehr geehrte Kundin, sehr geehrter Kunde, Vielen Dank, dass Sie sich für ein Beko-Produkt entschieden haben. Wir hoffen, dass Sie mit diesem Produkt, das mit den höchsten Qualitätsanforderungen modernsten Technologie hergestellt wurde, beste Ergebnisse erzielen. Bitte lesen Sie die gesamte Bedienungsanleitung und alle anderen Begleitdokumente aufmerksam, bevor Sie das Produkt verwenden;...
-
Page 17: Allgemeine Sicherheit
Wichtige Anweisungen zu Sicherheit und Umwelt Dieser Abschnitt enthält Sicherheitsanweisungen, die beim Schutz vor Personen- und Sachschäden helfen. Bei Nichtbeachtung dieser Anweisungen erlischt die gewährte Garantie. 1.1 Allgemeine Sicherheit • Dieses Gerät stimmt mit internationalen Sicherheitsstandards überein. • Dieses Gerät kann von Kindern im Alter von mindestens 8 Jahren und Personen mit eingeschränkten physischen und psychischen Fähigkeiten oder einem Mangel an Erfahrung... - Page 18 Wichtige Anweisungen zu Sicherheit und Umwelt • Lassen Sie das Gerät niemals unbeaufsichtigt, während es angeschlossen ist. • Ziehen Sie den Netzstecker, bevor Sie den Wasserbehälter auffüllen. • Verwenden und lagern Sie das Gerät auf einem flachen und stabilen Untergrund. •...
- Page 19 Wichtige Anweisungen zu Sicherheit und Umwelt • Das Gerät ist nicht zur Benutzung im Freien geeignet. • Nur Originalteile und vom Hersteller empfohlene Teile verwenden. • Nicht versuchen, das Gerät zu demontieren. • Ihre Stromversorgung muss mit den Angaben am Typenschild des Gerätes übereinstimmen. •...
-
Page 20: Wichtige Anweisungen Zu Sicherheit Und Umwelt
Wichtige Anweisungen zu Sicherheit und Umwelt • Die Sohle und der umliegende Bereich können extrem heiß werden. Bei Berührung heißer Flächen drohen Verbrennungen. Achten Sie daher während und unmittelbar nach der Benutzung darauf, keine heißen Flächen zu berühren. • Gerät niemals an oder in der Nähe von Stellen benutzen, an denen sich leicht brennbare oder gar explosive Materialien befinden. -
Page 21: Erfüllung Von Weee-Vorgaben Zur Entsorgung Von Altgeräten
Wichtige Anweisungen zu Sicherheit und Umwelt 1.2 Erfüllung von WEEE-Vorgaben zur Entsorgung von Altgeräten Dieses Produkt erfüllt die Vorgaben der EU-WEEE-Direktive (2012/19/EU). Produkt wurde einem Klassifizierungssymbol für elektrische und elektronische Altgeräte (WEEE) gekennzeichnet. Dieses Gerät wurde aus hochwertigen Materialien hergestellt, die wiederverwendet und recycelt werden können. -
Page 22: Technische Daten
Ihr Bügeleisen 2.1 Übersicht 2.2 Technische Daten 1. Netzkabel 2. Bügeleisenbasisplatte Spannung : 220 – 240 V ~ 3. Temperatureinstellknopf Wechselspannung, 4. Sohle 50-60 Hz 5. Wassersprühdüse Stromverbrauch : 2020 – 2400 W 6. Wasserauffülldeckel Isolationsklasse 7. Dampfeinstell- und Dampfstoßmenge : bis 150 g/min Entkalkungsknopf 8. -
Page 23: Bedienung
Bedienung Sie können einen Bestimmungsgemäße leichten Geruch bemerken oder se- Verwendung hen, weiße Dieses Gerät ist nur für den Einsatz Ablagerungen den Löchern an der in Privathaushalten und für das Sohle (4) heraus- Bügeln vorgesehen; es eignet kommen. Nach zwei- sich nicht für den professionellen maliger Benutzung Einsatz. -
Page 24: Temperatur Einstellen
Bedienung 3.5 Tabelle zu Gerät dient Temperatur- und der Benutzung mit Leitungswasser. Falls Dampfeinstellungen das Leitungswasser übermäßig hart ist, Beim Einstellen der Temperatur des sollte ein Gemisch Gerätes sollte die nachstehende aus Leitungswasser Tabelle beachtet werden. und aufbereitetem Tempera- Dampf- Wasser verwendet Textiltyp... - Page 25 Bedienung 3.7 Dampfstoß E n t s p r e c h e n d e Textilien Möglicherweise wird Vermeidung heller zu Beginn des Bügelns Flecken, die sich bei Betätigung Synthetikfasern oder Taste zunächst kein Seide bilden können, Dampfstoß ausgegeben. immer auf links bügeln.
-
Page 26: Vertikaler Dampf
Bedienung 3.8 Vertikaler Dampf WARNUNG: Wird dieser Vorgang Sie können den Dampfstoß auch längere Zeit in aufrechter Position verwenden fortgesetzt, können (siehe 3.7). Durch Betätigung der Wasser und Dampf Dampfstoßtaste (9) können Sie an der Sohle (4) Ihre Vorhänge und aufgehängten austreten. -
Page 27: Automatische Abschaltung
Bedienung 3.9 Sprühwasser 3.11 Automatische Abschaltung 1. Füllen Sie den Wasserbehälter (siehe 3.3). • Falls das Gerät 30 Sekunden 2. Stellen Sie die Temperatur ein ruhig gehalten wird, während (siehe 3.5). es sich in horizontaler Position 3. Drücken Sie zum Ausgeben befindet, schaltet es sich eines Sprühstrahls... -
Page 28: Entkalkung (Selbstreinigung)
Reinigung und Wartung 4.1 Reinigung WARNUNG: Reinigen Sie das WARNUNG: Gerät niemals Trennen Sie das mit Benzin, Gerät nach dem Lösungsmitteln Bügeln von der und scheuernden Stromversorgung. Reinigungsmitteln Sie können das oder harten Bürsten. Wasser im Behälter ablassen, indem Sie 4.2 Entkalkung den Auffülldeckel (Selbstreinigung) -
Page 29: Handhabung Und Transport
Reinigung und Wartung 4.3 Aufbewahrung 4. Schließen Gerät stellen Verstauen Sie das Gerät sorgfältig, Temperatureinstellknopf (2) durch falls Sie es längere Zeit nicht Drehen im Uhrzeigersinn auf die benutzen sollten. maximale Position ein. • Ziehen Sie den Netzstecker und 5. Ziehen Sie den Netzstecker, wenn lassen Sie das Gerät vollständig die Thermostatanzeigeleuchte (10) abkühlen, bevor Sie es anheben. -
Page 30: Fehlerbehebung
Fehlerbehebung Obwohl das Gerät an die Stromversorgung angeschlossen ist, erhitzt sich die Sohle (4) nicht. Möglicherweise ist das Gerät nicht richtig angeschlossen. >>> Prüfen Sie Stecker und Netzkabel (1) des Gerätes. Möglicherweise ist der Temperatureinstellknopf (3) auf die minimale Position eingestellt. - Page 31 Fehlerbehebung Das Gerät verliert nach dem Abkühlen und Wegstellen Wasser. Möglicherweise haben Sie das Gerät horizontal aufgestellt, während sich noch Wasser im Behälter befand. >>> Leeren Sie den Wasserbehälter. Flecken an der Sohle (4). Möglicherweise wurden feuchte Wäschestücke gebügelt und bei den Flecken an der Sohle (4) handelt es sich um Kalkablagerungen.
- Page 32 A-1230, Wien http://at.beko.com/ Sehr geehrter Kunde! Vielen Dank, dass Sie sich für ein Qualitätsprodukt von Beko entschieden haben! Unsere Geräte werden nach den neuesten technischen Erkenntnissen entwickelt, produziert und geprüft. Sollte trotzdem eine Störung auftreten, so bitten wir Sie, sich mit Ihrem Fachhändler bzw. mit der Verkaufsstelle in Verbindung zu setzen.
-
Page 33: Signification Des Symboles
Avant toute chose, veuillez lire ce manuel d'utilisation ! Chers clients, Merci d' a voir choisi les produits Beko. Nous espérons que ce produit, fabriqué dans des installations modernes et soumis à un processus de contrôle qualité rigoureux, vous offre les meilleures performances possibles. -
Page 34: Consignes Générales De Sécurité
Instructions importantes pour la sécurité et l'environnement Cette section contient les consignes de sécurité qui aident à se prémunir contre les risques de dommages corporels ou de dégâts matériels. Le non-respect de ces consignes annule la garantie. 1.1 Consignes générales de sécurité •... - Page 35 Instructions importantes pour la sécurité et l'environnement • Ne laissez pas l'appareil sans surveillance lorsqu' i l est branché. • Débranchez l'appareil avant d'en remplir le réservoir d' e au. • Utilisez et entreposez l' a ppareil sur une surface stable.
- Page 36 Instructions importantes pour la sécurité et l'environnement • L' a ppareil n' e st pas adapté pour une utilisation extérieure. • Utilisez uniquement des pièces d’origine ou pièces recommandées par le fabricant. • N’ e ssayez pas de démonter l’ a ppareil. •...
- Page 37 Instructions importantes pour la sécurité et l'environnement • Évitez de toucher l' a ppareil ou sa fiche avec des mains humides ou mouillées lorsqu'il est branché. • La semelle et ses parties environnantes peuvent être extrêmement chaudes. Tout contact avec les surfaces chaudes peut entraîner des brûlures.
-
Page 38: Emballage Du Produit
Instructions importantes pour la sécurité et l'environnement 1.2 Conformité avec la directive DEEE et mise au rebut des produits usagés Ce produit est conforme à la directive DEEE (19/2012/UE) de l’Union européenne). Ce produit porte un symbole de classification pour la mise au rebut des équipements électriques et électroniques (DEEE). -
Page 39: Vue D'ensemble
Votre fer 2.1 Vue d'ensemble 2.2 Données 1. Câble d' a limentation 2. Plaque de base du fer techniques 3. Bouton de réglage de la Tension : 220 - 240 V ~ 50- température 60 Hz 4. Semelle Consommation : 2 020 - 2 400 W 5. -
Page 40: Utilisation Prévue
Fonctionnement 3.1 Utilisation prévue 3.3 Remplissage du réservoir d'eau appareil été conçu 1. Débranchez l' a ppareil. uniquement pour une utilisation 2. Bouton de réglage de la vapeur domestique et pour le repassage ; (7) éteint Réglé sur la position il ne convient pas à... - Page 41 Fonctionnement 3.4 Réglage de la 3.5 Tableau des température réglages de température et de 1. Une fois l' a ppareil branché, vapeur réglez la température selon le type de tissu à repasser en Lorsque vous réglez la température tournant le bouton de réglage de de votre appareil, nous vous la température (3) dans le sens recommandons de tenir compte...
-
Page 42: Jet De Vapeur
Fonctionnement 4. Après l’ e xtinction du voyant du Si vous n' a rrivez pas thermostat (10), vous pouvez à définir la matière commencer le repassage à la de votre vêtement, vapeur. repassez d' a bord une partie non visible 3.7 Jet de vapeur du vêtement, afin de déterminer la... -
Page 43: Vapeur Verticale
Fonctionnement 3.8 Vapeur verticale 4. Après l' e xtinction du voyant du thermostat (10), repassez les Vous pouvez également utiliser le vêtements avec une vapeur jet vapeur à la position verticale puissante en appuyant sur le (voir 3.7). Si vous appuyez sur bouton du jet vapeur (9). -
Page 44: Repassage À Sec
Fonctionnement 3.9 Pulvérisation de 3.11 Arrêt l'eau automatique (Auto-Off) 1. Remplissez le réservoir d' e au (voir 3.3). • Si vous laissez l'appareil 2. Réglez la température (voir 3.5). pendant 30 secondes en 3. Appuyez sur le bouton de position horizontale, il s' é teint pulvérisation d' e au (8) effectuer automatiquement. -
Page 45: Nettoyage Et Entretien
Nettoyage et entretien 4.1 Nettoyage AVERTISSEMENT : N'utilisez jamais AVERTISSEMENT : d' e ssence, de Lorsque vous solvant, d' a gent avez terminé nettoyant abrasif de repasser, ou de brosse dure débranchez pour nettoyer votre l' a ppareil. Vous fer. pouvez vider l' e au du le réservoir 4.2 Détartrage... -
Page 46: Manipulation Et Transport
Nettoyage et entretien 4.3 Rangement 4. Branchez l' a ppareil et réglez le bouton de réglage de la Si vous ne comptez pas utiliser votre température (2) sur la position appareil pendant un certain temps, max. en le tournant dans le sens veuillez le ranger soigneusement. -
Page 47: Dépannage
Dépannage La semelle (4) ne chauffe plus, alors que le fer est branché. L' a ppareil n' e st pas correctement branché. >>> Vérifiez la fiche et le câble d' a limentation (1) de l' a ppareil. Le bouton de réglage de la température (3) est à la position Min. >>> Tournez le bouton de réglage de la température dans le sens horaire jusqu' a u symbole de la vapeur. - Page 48 Lütfen önce bu kılavuzu okuyun! Değerli Müşterimiz, Beko ürününü tercih ettiğiniz için teşekkür ederiz. Yüksek kalite ve teknoloji ile üretilmiş olan ürününüzün size en iyi verimi sunmasını istiyoruz. Bunun için, bu kılavuzun tamamını ve verilen diğer belgeleri ürünü kullanmadan önce dikkatle okuyun ve bir başvuru kaynağı...
-
Page 49: Genel Güvenlik
Önemli güvenlik ve çevre talimatları Bu bölümde, yaralanma ya da maddi hasar tehlikelerini önlemeye yardımcı olacak güvenlik talimatları yer almaktadır. Bu talimatlara uyulmaması halinde her türlü garanti geçersiz hale gelir. 1.1 Genel güvenlik • Bu cihaz, uluslararası güvenlik standartlarına uygundur. •... -
Page 50: Önemli Güvenlik Ve Çevre Talimatları
Önemli güvenlik ve çevre talimatları • Cihazın su haznesine su doldurmadan önce fişini prizden çekin. • Cihazı sabit bir yüzeyde kullanın ve muhafaza edin. • Cihaz altlığı üzerine yerleştirildiğinde, altlığın üzerine konulduğu yüzeyin dengeli olmasını sağlayın. • Elektrik kablosu veya cihaz hasarlıysa cihazı kullanmayın. - Page 51 Önemli güvenlik ve çevre talimatları • Şebeke güç kaynağınız cihazın tip etiketinde belirtilen bilgilere uygun olmalıdır. • Cihazı kullanacağınız şebeke en az 16 A’lik bir sigorta ile emniyete alınmış olmalıdır. • Cihazı topraklı prizde kullanın. • Cihazı uzatma kablosuyla kullanmayın. •...
-
Page 52: Aeee Yönetmeliğine Uyum Ve Atık Ürünün Elden Çıkarılması
Önemli güvenlik ve çevre talimatları • Ambalaj malzemelerini saklıyorsanız çocukların ulaşamayacağı bir yerde muhafaza edin. 1.2 AEEE yönetmeliğine uyum ve atık ürünün elden çıkarılması Bu ürün T.C. Çevre ve Şehircilik Bakanlığı tarafından yayımlanan “Atık elektrikli ve Elektronik eşyaların Kontrolü Yönetmeliği’nde belirtilen zararlı... -
Page 53: Genel Bakış
Ütünüz 2.1 Genel bakış 2.2 Teknik veriler 1. Elektrik kablosu 2. Ütü altlığı Gerilim 3. Sıcaklık ayar düğmesi 220-240V~ 50-60 Hz 4. Taban Güç tüketimi : 2020-2400 W 5. Su püskürtme deliği İzolasyon sınıfı 6. Su doldurma kapağı Şok buhar miktarı : 7. -
Page 54: Kullanım Amacı
Kullanım 3.1 Kullanım amacı 3.3 Su haznesinin doldurulması Cihaz sadece evde kullanılmak ve 1. Cihazın fişini prizden çekin. ütü yapmak üzere tasarlanmıştır, 2. Buhar ayar düğmesini (7) kapalı profesyonel kullanım için uygun “ ” konuma getirin. değildir. 3. Cihazınızla birlikte verilen su 3.2 İlk kullanım kabına su doldurun. -
Page 55: Buharlı Ütüleme
Kullanım 2. Cihaz ayarladığınız sıcaklığa Giysinizin ne tür ku- ulaştığında, termostat gösterge maştan yapıldığını ışığı (10) söner ve kullanıma bilmiyorsanız, giysi- hazırdır. nizin görünmeyen bir bölümünü ütüle- 3.5 Sıcaklık ve buhar yerek doğru ütüleme ayarları tablosu sıcaklığını belirleyin. İpek gibi sentetik Cihazınızda sıcaklık ayarını... -
Page 56: Şok Buhar
Kullanım 3.7 Şok buhar İdeal şok buhar kalitesi için, buhar Ütülemeye yeni ayar düğmesini (7) başlandığında kapalı “ ” konuma birkaç basışta şok getirin. buhar gelmeyebilir. Sıcaklık ayar düğmesi UYARI: Şok buharı (3) şok buhar elde kullanmak için etmek için “•••” veya termostat gösterge daha üst kademede ışığı... -
Page 57: Kuru Ütüleme
Kullanım 3.11 Otomatik UYARI: Buharı hiç- kapanma (Auto-Off) bir zaman insanların ve hayvanların üzeri- • Cihaz yatay konumdayken ne yöneltmeyin. yaklaşık 30 saniye süre hareket ettirilmezse otomatik olarak 3.9 Su püskürtme kapanır. • Cihaz dik konumda 7-10 1. Su haznesini doldurun (bkz. 3.3). dakika arası... -
Page 58: Kireç Temizleme Özelliği (Self-Clean)
Temizlik ve bakım 4.1 Temizlik 4.2 Kireç temizleme özelliği (Self-Clean) UYARI: Ütüleme işlemi bittiğinde Cihazın buhar üretme haznesinde fişi prizden çekin. biriken kireç parçalarını temizler. Cihazdaki suyu, su Kireç temizleme özelliğini doldurma kapağını 2-3 haftada bir kullanın. Eğer açıp, ütüyü bulunduğunuz bölgedeki su çok öne doğru eğerek kireçli ise (ütüleme sırasında... -
Page 59: Temizlik Ve Bakım
Temizlik ve bakım 4.3 Saklama Taban deliklerinden su gelmesi belirli bir Cihazı uzun süre kullanmayı süre alabilir. düşünmüyorsanız, dikkatli 7. Su haznesindeki su tamamen şekilde saklayın. boşaldığında kireç temizleme • Cihazı kaldırmadan önce fişini düğmesini (7) bırakın. çekin ve tamamen soğumasını 8. -
Page 60: Sorun Giderme
Sorun giderme Cihaz prize takılı olduğu halde taban (4) ısınmıyor. Bağlantı sorunu olabilir. >>> Cihazın fişini ve elektrik kablosunu (1) kontrol edin. Sıcaklık ayar düğmesi (3) Min. konumunda olabilir. >>> Sıcaklık ayar düğmesini saat yönünde buhar işareti bulunan bölüme çevirin. Cihaz buhar üretmiyor. -
Page 61: Significado De Los Símbolos
Por favor, ¡lea este manual de usuario primero! Estimados clientes, Gracias por escoger un producto Beko. Esperamos que obtenga los mejores resultados de nuestro producto, que ha sido fabricado con gran calidad y con tecnología de vanguardia. Por tanto, le aconsejamos que lea este manual de usuario con atención y todos... -
Page 62: Seguridad General
Instrucciones importantes para la seguridad y el medio ambiente Esta sección contiene instrucciones de seguridad que ayudarán a la protección contra los riesgos de lesiones personales o daño a la propiedad. El incumplimiento de estas instrucciones causará la pérdida de la garantía. 1.1 Seguridad general •... - Page 63 Instrucciones importantes para la seguridad y el medio ambiente • Desenchufe el aparato antes de cargar el depósito de agua con agua. • Utilice el aparato sobre una superficie de trabajo estable. • Cuando el electrodoméstico esté colocado en su placa de base, asegúrese de que la superficie debajo de la placa esté...
- Page 64 Instrucciones importantes para la seguridad y el medio ambiente • No trate de desmontar el aparato. • Su fuente de alimentación debe ser conforme a la información que se indica en la placa de datos del aparato. • La fuente de alimentación del aparato debe protegerse con un fusible de 16 A como mínimo.
-
Page 65: Conformidad Con La Normativa Weee Y Eliminación Del Aparato Al Final De Su Vida Útil
Instrucciones importantes para la seguridad y el medio ambiente • No utilice el aparato en lugares con materiales u objetos combustibles o inflamables, o cerca de ellos. • Si guarda el material de embalaje, manténgalo fuera del alcance de los niños. 1.2 Conformidad con la normativa WEEE y eliminación del aparato al final de su vida útil Este producto es conforme con la directiva de la UE sobre residuos... -
Page 66: Datos Técnicos
Su plancha 2.1 Información general 2.2 Datos técnicos 1. Cable de alimentación 2. Placa de base de la plancha Voltaje : 220-240V~ 50-60Hz 3. Botón de ajuste de la Consumo de : 2020-2400 W temperatura potencia 4. Suela Clase de 5. -
Page 67: Uso Previsto
Funcionamiento 3.1 Uso previsto 3.3 Recargar el depósito de agua Este electrodoméstico está 1. Desenchufe el aparato. pensado para un planchado y un 2. Botón de ajuste de vapor (7) uso doméstico no es apto para uso apagado Ajustar a la posición profesional. - Page 68 Funcionamiento 3.4 Ajuste de la ADVERTENCIA: temperatura Antes de planchar, compruebe la 1. Después de enchufar el aparato, etiqueta de la ajuste la temperatura según el prenda. tipo de tejido girando hacia la desconoce derecha el botón de ajuste de material de la prenda, temperatura (3) (ver 3.5).
-
Page 69: Descarga De Vapor
Funcionamiento 3. Configure el botón de ajuste de 4. Después de que la luz indicadora vapor (7) en la posición “ ”. del termostato (10) se apague, 4. Puede empezar el planchado podrá planchar las prendas con el a vapor después de que la luz vapor potente pulsando el botón indicadora del termostato (10) de descarga de vapor (9). -
Page 70: Vapor Vertical
Funcionamiento 3.8 Vapor vertical 3. Pulse el botón de pulverización de agua (8) para pulverizar agua. También puede usar la descarga de Puede eliminar vapor en posición vertical (ver. 3.7). fácilmente arrugas Puede aplicar vapor a las cortinas con la función de y sus prendas en el colgador con pulverización el vapor que obtendrá... - Page 71 Funcionamiento 3.11 Apagado automático (Auto- Off) • El aparato apagará automáticamente si lo mantiene fijo durante 30 segundos en posición horizontal. • El aparato apagará automáticamente si lo mantiene fijo durante 7-10 minutos en posición vertical. • El aparato apagará automáticamente si lo mantiene fijo durante 30 segundos en posición inclinada, tanto hacia la...
-
Page 72: Limpieza Y Mantenimiento
Limpieza y mantenimiento 4.1 Limpieza 4.2 Eliminación de ADVERTENCIA: cal (Autolimpieza) Desenchufe plancha cuando La función de eliminación de cal termine de planchar. limpia la acumulación de partículas Puede drenar de cal en el depósito de vapor del agua en el depósito aparato. - Page 73 Limpieza y mantenimiento 4.3 Almacenamiento 6. Mantenga el aparato en una posición horizontal encima del Si no va a utilizar el aparato durante fregadero y pulse y mantenga un periodo prolongado de tiempo, pulsado el botón de eliminación guárdelo cuidadosamente. de cal (7) “...
-
Page 74: Resolución De Problemas
Resolución de problemas Aunque el aparato esté enchufado, la suela (4) no se calienta. Puede que el aparato no esté conectado correctamente. >>> Compruebe el enchufe y el cable de alimentación (1) del aparato. El botón de ajuste de temperatura (3) puede estar en la posición mínima. >>> Gire el botón de ajuste de temperatura a la derecha hasta el signo de vapor. - Page 75 ...
-
Page 76: Znaczenie Symboli
Proszę najpierw przeczytać instrukcję obsługi. Szanowni Klienci! Dziękujemy za wybranie produktu firmy Beko. Mamy nadzieję, że wyrób ten, wyprodukowany przy użyciu najnowszych technologii wysokiej jakości, okaże się w najwyższym stopniu zadowalający. Przed użyciem urządzenia należy uważnie przeczytać całą instrukcję obsługi oraz towarzyszące jej dokumenty i zachować ją do wglądu na przyszłość. - Page 77 Ważne instrukcje zachowania bezpieczeństwa i ochrony środowiska naturalnego Rozdział ten zawiera instrukcje zachowania bezpieczeństwa, które ułatwią zabezpieczenie się przed obrażeniami ciała lub uszkodzeniem mienia. Nieprzestrzeganie tych instrukcji powoduje unieważnienie udzielonej gwarancji. 1.1 Ogólne zasady zachowania bez- pieczeństwa • Urządzenie jest zgodne z międzynarodowymi normami bezpieczeństwa.
- Page 78 Ważne instrukcje zachowania bezpieczeństwa i ochrony środowiska naturalnego • Nie wolno pozostawiać urządzenia bez dozoru, jeśli jest podłączone do zasilania. • Przed napełnieniem zbiornika wodą należy odłączyć urządzenie od zasilania. • Urządzenie powinno być używane i przechowywane na stabilnej powierzchni. •...
- Page 79 Ważne instrukcje zachowania bezpieczeństwa i ochrony środowiska naturalnego • Wyrób nie nadaje się do stosowania na zewnątrz budynków. • Należy stosować wyłącznie oryginalne lub zalecane przez producenta części zamienne. • Nie należy próbować rozkładać tego urządzenia na części. • Zasilanie z domowej sieci elektrycznej powinno być...
- Page 80 Ważne instrukcje zachowania bezpieczeństwa i ochrony środowiska naturalnego • Nie wolno owijać przewodu wokół urządzenia. • Nie wolno dotykać tego urządzenia ani jego wtyczki mokrymi ani wilgotnymi dłońmi, jeśli jest ono podłączone do gniazdka. • Stopa żelazka i obszar wokół niej mogą być...
-
Page 81: Zgodność Z Dyrektywą Rohs
Ważne instrukcje zachowania bezpieczeństwa i ochrony środowiska naturalnego 1.2 Zgodność z dyrektywą WEEE i utylizacja zużytych wyrobów Niniejszy wyrób jest zgodny z dyrektywą Parlamentu Europejskiego i Rady (19/2012/WE). Wyrób ten oznaczony jest symbolem klasyfikacji zużytych urządzeń elektrycznych i elektronicznych (WEEE). Wyrób ten wykonano z części i materiałów wysokiej jakości, które mogą... -
Page 82: Opis Ogólny
Żelazko 2.1 Opis ogólny 2.2 Dane techniczne 1. Przewód zasilający 2. Podstawa żelazka Napięcie : 220–240 V~ 50- 3. Przycisk regulacji temperatury 60 Hz 4. Stopa żelazka Zużycie energii : 2020-2400 W 5. Dysza spryskiwacza Klasa izolacji 6. Pokrywka zbiornika wody Siła uderzenia : do 150 g/min 7. -
Page 83: Pierwsze Użycie
Obsługa 3.1 Przeznaczenie 3.3 Uzupełnianie wody w zbiorniku Urządzenie przeznaczone 1. Wyjmij z gniazdka wtyczkę jest do użytku i prasowania przewodu zasilającego gospodarstwie domowym. urządzenia. Nie nadaje się do zastosowań 2. Przycisk ustawiania pary ( 7 ) profesjonalnych. wył. Ustaw w położeniu “ ”. 3.2 Pierwsze użycie 3. - Page 84 Obsługa 3.4 Ustawianie OSTRZEŻENIE: temperatury Przed rozpoczęciem prasowania należy 1. Po podłączeniu urządzenia sprawdzić metkę do gniazdka ściennego ustaw odzieży. temperaturę odpowiednią dla Jeśli znasz danej tkaniny, obracając przycisk rodzaju materiału, z nastawiania temperatury (3) w której uszyto odzież, prawo (patrz punkt 3.5). wyprasuj najpierw - Zapali się...
-
Page 85: Uderzenie Parą
Obsługa 3.6 Prasowanie 3.7 Uderzenie parą parowe Po rozpoczęciu pra- 1. Napełnij zbiornik na wodę (patrz sowania uderzenie punkt 3.3). parą może nie dzia- 2. Ustaw odpowiednią temperaturę łać po kilku pierw- szych naciśnięciach przyciskiem nastawiania przycisku. Aby uzy- temperatury (patrz punkt 3.5). skać... - Page 86 Obsługa 3.8 Pionowe OSTRZEŻENIE: uderzenie parą Jeśli ta czynność jest wykonywana przez Funkcji uderzenia parą można dłuższy czas, woda również używać, gdy urządzenie może wydobywać się jest w położeniu pionowym (patrz ze stopy żelazka (4) punkt 3.7). Po naciśnięciu przycisku wraz z parą.
-
Page 87: Prasowanie Na Sucho
Obsługa 3.9 Spryskiwanie 3.11 Automatyczne wodą wyłączanie 1. Napełnij zbiornik na wodę (patrz • Jeśli urządzenie będzie punkt 3.3). stało przez 30 sekund w 2. Ustaw temperaturę (patrz punkt położeniu poziomym, zostanie 3.5). automatycznie wyłączone. 3. Naciśnij przycisk spryskiwania • Jeśli urządzenie będzie wodą... - Page 88 Czyszczenie i konserwacja 4.1 Czyszczenie OSTRZEŻENIE: czyszczenia OSTRZEŻENIE: urządzenia nie wolno zakończeniu używać benzyny, prasowania wyjmij ro z p u s zc z a l n i k a , z gniazdka wtyczkę ściernych środków przewodu zasilania czyszczących żelazka. Zbiornik twardych szczotek.
-
Page 89: Czyszczenie I Konserwacja
Czyszczenie i konserwacja 4.3 Przechowywanie 4. Podłącz urządzenie do gniazdka i ustaw przycisk nastawiania Jeśli urządzenie nie będzie używane temperatury (2) w położeniu przez dłuższy czas, należy je prze- maksymalnym, obracając go w chowywać w bezpiecznym miejscu. prawo. • Przed podniesieniem urządzenia 5. -
Page 90: Rozwiązywanie Problemów
Rozwiązywanie problemów Urządzenie jest podłączone do gniazdka, ale stopa żelazka (4) nie nagrzewa się. Urządzenie może być nieprawidłowo podłączone. >>> Sprawdź wtyczkę i przewód zasilający (1) urządzenia. Przycisk nastawiania temperatury (3) może znajdować się w położeniu Min. >>> Obróć przycisk nastawiania temperatury w prawo i ustaw go na symbolu pary. Urządzenie nie wytwarza pary. - Page 91 Warunki gwarancji Beko S.A- (małe urządzenia AGD) BEKO spółka akcyjna z siedzibą w Warszawie (02-819), przy ulicy Puławskiej 366, wpisana do rejestru przedsiębiorców prowadzonego przez Sąd Rejonowy dla m.st. Warszawy w Warszawie, XIII Wydział Gospodarczy Krajowego Rejestru Sądowego, pod numerem: 0000078147 (dalej: „BEKO”) udziela gwarancji jakości (dalej: „Gwarancja”)
- Page 92 2. Uprawnienia wynikające z niniejszych Warunków Gwarancji mogą być zrealizowane przez Użytkownika wyłącznie w Autoryzowanych Punktach Serwisowych BEKO (dalej: „Serwis”) po uprzednim dokonaniu zgłoszenia na Infolinii BEKO pod numerem telefonu: 62 766 77 70. Lista wszystkich lokalizacji Serwisu dostępna jest na stronie internetowej BEKO www.beko.pl 3.
- Page 93 Urządzenia. 2. Udzielona przez Beko Gwarancja nie obejmuje: a. wad powstałych z przyczyn innych niż tkwiące w Urządzeniu; b. czynności przewidzianych w Instrukcji Obsługi, do wykonania których zobowiązany jest Użytkownik Urządzenia we własnym zakresie i na swój koszt, w tym: instruktażu dotyczącego obsługi Urządzenia, instalacji oraz regulacji urządzenia.
- Page 94 usterek powstałych skutek przechowywania użytkowania Urządzenia w warunkach, które są niezgodne z normalnymi warunkami domowymi określonymi wymaganiami powszechnie obowiązujących przepisów prawa i odpowiednich Polskich Norm. V. POZOSTAŁE POSTANOWIENIA. Niniejsze warunki gwarancji mają zastosowanie do Urządzeń zakupionych od dnia 25.12.2014 r. Gwarant oświadcza, że niniejsza Gwarancja jest udzielana Użytkownikowi dodatkowo i nie wyłącza, nie ogranicza ani nie zawiesza uprawnień...
-
Page 95: Značenje Simbola
Najprije pročitajte ovaj korisnički priručnik! Poštovani kupci, hvala što ste odabrali proizvod tvrtke Beko. Nadamo se da ćete dobiti najbolje rezultate od vašeg proizvoda koji je proizveden s pomoću kvalitetne i moderne tehnologije. Zbog toga prije uporabe proizvoda pažljivo pročitajte korisnički priručnik i druge popratne dokumente i čuvajte ih kao referencu za buduću uporabu. -
Page 96: Općenita Sigurnost
Važne upute o sigurnosti i zaštiti okoliša Ovaj dio sadrži upute o sigurnosti koje će vam pomoći u zaštiti od tjelesnih ozljeda ili materijalne štete. Nepoštivanje ovih uputa poništava odobreno jamstvo. 1.1 Općenita sigurnost • Ovaj uređaj u skladu je s međunarodnim sigurnosnim standardima. - Page 97 Važne upute o sigurnosti i zaštiti okoliša • Odspojite proizvod iz napajanja prije nadolijevanja vode u spremnik za vodu. • Uređaj upotrebljavajte i pohranjujte na stabilnim površinama. • Kad uređaj stavljate na osnovnu ploču, provjerite je li površina ispod ploče ravna. •...
- Page 98 Važne upute o sigurnosti i zaštiti okoliša • Ne pokušavajte rastavljati uređaj. • Vaša električna mreža treba biti u skladu s podacima na tipskoj pločici uređaja. • Napajanje uređaja mora se zaštititi osiguračem od minimalno 16 A. • Upotrebljavajte uređaj samo s uzemljenom utičnicom.
-
Page 99: Ambalaža Proizvoda
Važne upute o sigurnosti i zaštiti okoliša • Nikada nemojte koristiti uređaj na zapaljivim ili eksplozivnim mjestima ili blizu zapaljivih ili eksplozivnih mjesta, materijala i namještaja. • Ako ste zadržali materijale pakiranja, držite ih dalje od dosega djece. 1.2 Usklađenost s Direktivom o električnom i elek- troničkom opremom (WEEE) i zbrinjavanju otpada Ovaj proizvod usklađen je s EU Direktivom WEEE (19/2012/EU). -
Page 100: Tehnički Podaci
Glačalo 2.1 Pregled 2.2 Tehnički podaci 1. Naponski kabel 2. Osnovna ploča glačala Napon : 220 - 240 V ~ 3. Gumb podešavanje 50-60 Hz temperature Potrošnja : 2020 - 2400 W 4. Grijaća ploča energije 5. Mlaznica za raspršivanje vode Klasa izolacije : I 6. -
Page 101: Prva Uporaba
3.1 Namjena 3.3 Nadolijevanje vode u spremnik za Ovaj je uređaj namijenjen samo vodu za uporabu u kućanstvu za potrebe glačanja i nije podesan za 1. Isključite uređaj iz struje. profesionalnu uporabu. 2. Gumb za postavku pare (7) isključen Postavite u položaj “ ”. 3.2 Prva uporaba 3. -
Page 102: Glačanje Na Paru
- Zasvijetlit će svjetlo oznake Ako ne znate od koje termostata (10). je tkanine načinjena 2. Kada uređaj postigne zadanu vaša odjeća, glačanje temperaturu, gasi se svjetlo započnite na nekom oznake termostata (10) i uređaj sakrivenom dijelu je spreman za uporabu. kako biste odredili is- pravnu temperaturu 3.5 Tablica postavki... -
Page 103: Naglo Ispuštanje Pare
3.7 Naglo ispuštanje UPOZORENJE: pare Ako se ovaj postupak održava dulje Kada počnete glačati, vrijeme, voda može naglo ispuštanje procuriti iz grijaće pare možda se neće ploče (4) zajedno s ispuštati pri prvih parom. nekoliko pritiskanja. biste održali Da bi došlo do naglog idealnu kvalitetu ispuštanja... -
Page 104: Okomito Glačanje Na Paru
3.8 Okomito glačanje 3.9 Raspršivanje na paru vode 1. Napunite spremnik za vodu Naglo ispuštanje pare možete (pogledajte 3.3). upotrijebiti i u okomitom položaju 2. Postavite temperaturu (pogledajte 3.7). Paru možete (pogledajte 3.5). primijeniti na zastore i odjevne 3. Pritisnite gumb za raspršivanje predmete obješene na vješalici s vode (8) kako biste raspršili vodu. - Page 105 3.11.Automatsko isključivanje (Auto isključivanje) • Uređaj će se automatski isključiti ako se nalazi mirno u vodoravnom položaju u trajanju od 30 sekundi. • Uređaj će se automatski isključiti ako se nalazi mirno u uspravnom položaju u trajanju od 7 do 10 minuta.
-
Page 106: Uklanjanje Kamenca (Samočišćenje)
Čišćenje i održavanje 4.1 Čišćenje 4.2 Uklanjanje kamenca UPOZORENJE: (Samočišćenje) Kada završite glačanjem, isključite Funkcija uklanjanja kamenca čisti uređaj s napajanja. čestice kamenca iz spremnika Vodu iz spremnika generatora pare u uređaju. možete ispustiti Funkciju samočišćenja otvaranjem poklopca upotrebljavajte jednom u 2 do za dopunu vode (6) i naginjanjem glačala 3 tjedna. - Page 107 Čišćenje i održavanje 4.3 Pohrana 6. Držite glačalo u vodoravnom položaju iznad sudopera i držite Ako ne planirate upotrebljavati gumb za uklanjanje kamenca uređaj dulje vrijeme, pažljivo ga (7) u položaju za samočišćenje pohranite. “ ” tresite glačalo. • Prije podizanja uređaja isključite Ponavljajte postupak dok ne ga iz napajanja i pričekajte da se iscuri sva voda iz spremnika.
-
Page 108: Rješavanje Problema
Rješavanje problema Grijaća ploča (4) se ne zagrijava iako je uređaj uključen u napajanje. Uređaj je možda neispravno spojen. >>> Provjerite utikač i naponski kabel (1) uređaja. Gumb za postavljanje temperature (3) je u položaju "Min.". >>> Okrenite gumb za postavljanje temperature u smjeru kazaljke na satu, prema znaku za paru. -
Page 109: Semnificaţia Simbolurilor
Vă rugăm să citiţi mai întâi acest manual de utilizare! Stimați clienți, Vă mulțumim pentru selectarea unui produs Beko. Sperăm să obţineţi cele mai bune rezultate de la produsul dumneavoastră, care a fost fabricat la o calitate înaltă şi cu tehnologii performante. În acest scop, vă... -
Page 110: Siguranţă Generală
Instrucțiuni importante referitoare la siguranță și mediu înconjurător Această secţiune conţine instrucţiuni de siguranță care vă vor ajuta să vă protejați de riscul vătămărilor personale sau pagubelor materiale. Nerespectarea acestor instrucţiuni invalidează garanţia furnizată. 1.1 Siguranţă generală • Acest produs este conform cu standardele internaţionale de siguranţă. -
Page 111: Instrucțiuni Importante Referitoare La Siguranță Și Mediu Înconjurător
Instrucțiuni importante referitoare la siguranță și mediu înconjurător • Nu lăsați produsul nesupravegheat atunci când acesta este conectat la priză. • Înaintea umplerii rezervorului cu apă, deconectați produsul de la priză. • Utilizați și depozitați produsul pe o suprafață stabilă. •... - Page 112 Instrucțiuni importante referitoare la siguranță și mediu înconjurător • Produsul nu este potrivit pentru a fi utilizat în exterior. • Utilizați doar componentele originale sau componentele recomandate de către producător. • Nu încercaţi să demontaţi produsul. • Tensiunea de alimentare a prizelor trebuie să corespundă...
- Page 113 Instrucțiuni importante referitoare la siguranță și mediu înconjurător • În momentul când produsul este conectat la priză, nu atingeți produsul sau ștecherul acestuia cu mâinile umede. • Talpa și zona din jurul acesteia pot deveni foarte fierbinți. Contactul cu suprafețele fierbinți poate cauza arsuri.
-
Page 114: Conformitate Cu Directiva Weee Şi Depozitarea La Deşeuri A Produsului Uzat
Instrucțiuni importante referitoare la siguranță și mediu înconjurător 1.2 Conformitate cu Directiva WEEE şi depozitarea la deşeuri a produsului uzat Acest produs respectă Directiva UE WEEE (2012/19/UE). Produsul este marcat cu un simbol de clasificare pentru deșeuri electrice și electronice (WEEE). Acest produs a fost fabricat folosind piese și materiale de înal- tă... -
Page 115: Prezentare Generală
Fierul dumneavoastră 2.1 Prezentare generală 2.2 Date tehnice 1. Cablu de alimentare 2. Placă de bază din fier Tensiune : 220-240V~ 3. Buton de reglare a temperaturii 50-60 Hz 4. Talpă Consum de : 2020-2400 W 5. Duză de pulverizare a apei electricitate 6. -
Page 116: Utilizare Destinată
Utilizarea 3.1 Utilizare D u m n e a v o a s t r ă destinată puteți sesiza un mi- ros ușor sau vedea Acest produs este destinat doar sedimente de cu- uzului casnic și pentru călcare; loare albă ce cad din nu este potrivit pentru uzul găurile de pe talpă. -
Page 117: Setarea Temperaturii
Utilizarea 3.5 Tabel de setări Produsul dumnea- al temperaturii și voastră este proiec- tat de a utiliza apă de aburului robinet. Dacă apa de la robinet este foarte În momentul când setați dură, noi recoman- temperatura produsului, luați în dăm să utilizați un considerare următorul tabel. -
Page 118: Călcarea Cu Abur
Utilizarea 3.7 Jet de abur Pentru a preveni for- marea petelor des- În momentul când chise pe materialele d u m n e a v o a s t r ă sintetice cum ar fi începeți să călcați, mătasea, călcați pe jetul de abur poate partea reversibilă... -
Page 119: Abur Vertical
Utilizarea 3.8 Abur vertical Dacă dumneavoastră nu cunoașteți mate- De asemenea, dumneavoastră rialul din articolul de puteți utiliza jetul de abur într-o îmbrăcăminte, poziție verticală (consultați 3.7). întâi călcați o parte Dumneavoastră puteți aplica invizibilă a acestuia și abur perdelelor și articolelor de stabiliți o temperatu- îmbrăcăminte aflate pe umeraș... -
Page 120: Pulverizarea Apei
Utilizarea 3.9 Pulverizarea apei 3.11 Oprire automată (Oprire auto) 1. Umpleți rezervorul de apă (consultați 3.3). • Dacă produsul este menținut 2. Setați temperatura (consultați staționar timp de 30 de secunde 3.5). în timp ce acesta se află într-o 3. Apăsați butonul poziție orizontală, acesta se va pulverizare a apei (8) pentru a... -
Page 121: Eliminarea Calcarului (Autocurățare)
Curățarea și întreținerea 4.1 Curăţarea AVERTISMENT: Nu utilizați benzină, AVERTISMENT: solvent și agenți de În momentul când curățare abrazivi sau ați finalizat călcarea, raclete dure pentru deconectați produ- curățarea produsului. sul. Dumneavoastră puteți goli apa afla- 4.2 Eliminarea tă în rezervor prin calcarului deschiderea capa-... - Page 122 Curățarea și întreținerea 4.3 Depozitarea 5. În momentul când lumina indicatorului termostatului Dacă nu doriţi să utilizaţi produsul (10) se oprește, deconectați pentru o perioadă lungă de timp, produsul. depozitaţi-l cu grijă. 6. Mențineți fierul deasupra • Înainte de ridicarea produsului, chiuvetei într-o poziție...
- Page 123 Depanarea Deși produsul este conectat, talpa acestuia (4) nu se încălzește. Produsul poate fi conectat necorespunzător. >>> Verificați ștecherul și cablul de alimentare (1) al produsului. Butonul de setare al temperaturii (3) poate fi în poziția Min. >>> Rotiți butonul de setare al temperaturii în direcția acelor de ceasornic până...
- Page 124 Depanarea În timpul călcării stropii de apă cad pe material. Dumneavoastră nu ați închis în mod securizat capacul de reumplere al rezervorului (6). >>> Închideți capacul de reumplere al rezervorului în mod securizat. Dumneavoastră puteți să utilizați jetul de abur la nivelul de temperatură • sau ••. >>>...
- Page 125 - să păstra i cu grijă acest certi cat pentru a-l putea prezenta (împreună cu factura sau chitan a scală), personalului SERVICE ARCTIC, la orice sesizare efectuată în perioada de garan ie. Vă mul umim că a i optat pentru cumpărarea unui aparat Beko! Durata medie de utilizare a produselor BEKO este de 5 ani! Perioada de garanţie legală...
-
Page 127: Significato Dei Simboli
Si prega di leggere questo manuale prima dell’uso! Gentile Cliente, Grazie per aver scelto un prodotto Beko. Ci auguriamo che riesca ad ottenere i risultati migliori da questo prodotto, realizzato con tecnologia all’ a vanguardia e di alta qualità. Pertanto, prima di utilizzare... -
Page 128: Sicurezza Generale
Istruzioni importanti per la sicurezza e l'ambiente Questa sezione contiene istruzioni di sicurezza che consentono di prevenire il pericolo di lesioni personali o di danni materiali. L’inosservanza di queste istruzioni invalida la garanzia accordata. 1.1 Sicurezza generale • Questo dispositivo risulta conforme agli standard di sicurezza internazionali. - Page 129 Istruzioni importanti per la sicurezza e l'ambiente • Non lasciare il dispositivo privo di supervisione quando è collegato alla rete. • Scollegare il cavo di alimentazione prima di versare l’ a cqua nel serbatoio. • Utilizzare e riporre il dispositivo su una superficie stabile.
- Page 130 Istruzioni importanti per la sicurezza e l'ambiente • Il dispositivo non risulta adatto all’uso in ambienti esterni. • Usare solo parti originali o quelle consigliate dal produttore. • Non tentare di smontare il dispositivo. • L’ a limentazione elettrica deve essere conforme alle informazioni fornite sulla targhetta di classificazione dell’...
- Page 131 Istruzioni importanti per la sicurezza e l'ambiente • La piastra e l' a rea circostante possono diventare molto calde. Toccare la superficie calda può causare ustioni. Pertanto, durante l'uso o subito dopo aver utilizzato l' a pparecchio, fare attenzione a non toccare le superfici calde. •...
-
Page 132: Conformità Alla Direttiva Rohs
Istruzioni importanti per la sicurezza e l'ambiente 1.2 Conformità con la direttiva RAEE e smaltimento dei rifiuti Questo prodotto è conforme alla direttiva UE RAEE (2012/19/UE). Questo prodotto reca il simbolo di classificazione per lo smaltimento di apparecchiature elettriche ed elettroniche (RAEE). Questo prodotto è... -
Page 133: Dati Tecnici
Il ferro 2.1 Panoramica 1. Cavo di alimentazione 9. Pulsante per il getto di vapore 2. Base d' a ppoggio 10. Spia del termostato e di auto- 3. Manopola per la regolazione spegnimento della temperatura 2.2 Dati tecnici 4. Piastra 5. -
Page 134: Funzionamento
Funzionamento 3.1 Uso previsto 3.3 Riempimento del serbatoio d'acqua Questo apparecchio è concepito 1. Scollegare l' e lettrodomestico. solo per uso domestico e stiraggio 2. Spegnere il pulsante per la e non è adatto a scopi professionali. regolazione del vapore (7) 3.2 Uso iniziale impostandolo nella posizione “... -
Page 135: Stiratura A Vapore
Funzionamento base al tessuto ruotando la AVVERTENZA: manopola di impostazione della Prima di stirare temperatura (3) in senso orario controllare l' e tichetta (vedere 3.5). dell' i ndumento. - La spia del termostato (10) si Se non si conosce accenderà. il tessuto del capo, 2. -
Page 136: Getto Di Vapore
Funzionamento impostazione della temperatura del termostato (10) si spegne. (vedere 3.5). 4. Quando la spia del termostato 3. 3. Impostare il pulsante per la (10) si spegne, è possibile stirare regolazione del vapore (7) nella i capi con il vapore premendo il posizione “... - Page 137 Funzionamento getto di vapore (9), è possibile Utilizzando stirare le tende e gli indumenti sulla la funzione di gruccia con il vapore premendo il nebulizzazione pulsante getto di vapore. Tenere dell' a cqua è possibile l' a pparecchio a 15-30 cm di distanza rimuovere le pieghe dall' i ndumento e dalle tende.
-
Page 138: Auto-Spegnimento
Funzionamento • Se l' a pparecchio resta fermo per 30 secondi in posizione inclinata (a destra o a sinistra), si spegne automaticamente. caso s p e g n i m e n t o automatico la spia di auto-spegnimento (10) lampeggia. •... - Page 139 Pulizia e manutenzione 4.1 Pulizia 4.2 Rimozione del calcare (auto- AVVERTENZA: pulitura) Scollegare sempre l ’ a p p a r e c c h i o , La funzione di rimozione del termine della calcare rimuove le particelle di stiratura.
-
Page 140: Pulizia E Manutenzione
Pulizia e manutenzione tenere premuto il pulsante di • Svuotare il serbatoio dell' a cqua. rimozione del calcare (7) nella • Conservare l'apparecchio e posizione di auto-pulitura “ gli accessori nella confezione ” e scuotere il ferro. Continuare originale. finché non termina l' a cqua nel •... -
Page 141: Risoluzione Dei Problemi
Risoluzione dei problemi Anche se l' a pparecchio è collegato, la piastra (4) non si riscalda. È possibile che l' a pparecchio sia stato collegato in modo non corretto. >>> Controllare la presa e il cavo di alimentazione (1) dell' a pparecchio. La manopola di impostazione della temperatura (3) potrebbe essere al minimo. - Page 142 Risoluzione dei problemi Macchie sulla piastra (4). È possibile che siano stati stirati indumenti bagnati, pertanto la piastra (4) presenta macchie di calcare. >>> Quando l' a pparecchio è sufficientemente freddo, pulire la piastra con un panno di microfibra o di cotone imbevuto di aceto. 142 / IT Ferro a vapore/Manuale utente...
- Page 143 Condizioni di Garanzia 1. BEKO Italy S.r.l. garantisce l’ a pparecchio per un periodo di 2 anni dalla data di acquisto (12 mesi se acquistato con fattura di vendita e non con scontrino fiscale).
- Page 144 Si intendono a pagamento anche tutti gli eventuali trasporti necessari per lo svolgimento degli interventi legati ai casi citati. Il Servizio Assistenza di BEKO Italy S.r.l. è l’ u nico autorizzato a riparare i prodotti a marchio BEKO. Per ogni controversia è competente il foro di Milano.
- Page 145 เรี ย น ท่ า นลู ก ค้ า ขอบคุ ณ ส� า หรั บ การเลื อ กผลิ ต ภั ณ ฑ์ ข อง Beko เราหวั ง ว่ า คุ ณ จะ ได้ ร ั บ ประสิ ท ธิ ภ าพการใข้ ง านที ่ ด ี ท ี ่ ส ุ ด จากผลิ ต ภั ณ ฑ์ ซ ึ ่ ง ได้ ร ั บ การ...
-
Page 146: ความปลอดภั ย ทั ่ ว ไป
ค� า แนะน� า ที ่ ส � า คั ญ ส� า หรั บ ความปลอดภั ย และสิ ่ ง แวดล้ อ ม ใ น บ ท นี ้ ป ร ะ ก อ บ ด ้ ว ย ค� า แ น ะ น� า ด ้ า น ค ว า ม ปลอดภ... - Page 147 ค� า แนะน� า ที ่ ส � า คั ญ ส� า หรั บ ความปลอดภั ย และสิ ่ ง แวดล้ อ ม •ห ้ า มท ิ ้ ง เคร ื ่ อ งใช ้ ไ ว ้ โ ดยไม ่ ส นใจในขณะท ี ่ เ ส ี ย บ ปลั...
- Page 148 ค� า แนะน� า ที ่ ส � า คั ญ ส� า หรั บ ความปลอดภั ย และสิ ่ ง แวดล้ อ ม •ห้ า มพยายามถอดแยกชิ ้ น ส่ ว นเครื ่ อ งใช้ •แหล ่ ง จ ่ า ยไฟหล ั ก ของค ุ ณ จะต ้ อ งสอดคล ้ อ ง ก...
- Page 149 ค� า แนะน� า ที ่ ส � า คั ญ ส� า หรั บ ความปลอดภั ย และสิ ่ ง แวดล้ อ ม •ห้ า มใช้ ง านเครื ่ อ งใช้ ใ นพื ้ น ที ่ ห รื อ ใกล้ ก ั บ สถาน ที...
-
Page 150: เตารี ด ของคุ ณ
เตารี ด ของคุ ณ 2.1 ภาพรวม 2.2 ข้ อ มู ล ทางเทคนิ ค 1. สายไฟ 2. แผ่ น ฐานของเตารี ด แรงดั น ไฟฟ้ า : 220-240 3. ปุ ่ ม ปรั บ อุ ณ หภู ม ิ โวลต์ ~ 50-60 4. - Page 151 การใช้ ง าน 3.1 การใช้ ง านที ่ ก � า หนดไว้ 2. ปุ ่ ม ตั ้ ง ค่ า ไอน� ้ า (7) ถู ก ปิ ด ตั ้ ง ค่ า ไปที ่ ต � า แหน่ ง “ ” เครื...
- Page 152 การใช้ ง าน 3.5 ตารางการตั ้ ง ค่ า ส� า หรั บ การป้ อ งกั น อุ ณ หภู ม ิ แ ละไอน� ้ า คราบติ ด แน่ น แบบ ส ว ่ า ง ที ่ อ า จ ก ่ อ เมื...
- Page 153 การใช้ ง าน 3.7 ไอน� ้ า แบบทั น ที ค� า เตื อ น: หาก ก ร ะ บ ว น ก า ร นี ้ เมื ่ อ คุ ณ เริ ่ ม ต้ น รี ด ผ้ ำ ด�...
- Page 154 การใช้ ง าน ค� า เตื อ น: ในระหว่ า ง การม ี น � ้ า ในเตาร ี ด จะม ี การรี ด ผ้ า หาก ประโยชน ์ ค ุ ณ สามารถ ไ ฟ ส ถ า น ะ ข อ ง เ ท ใช...
- Page 155 การท� า ความสะอาดและการบ� า รุ ง รั ก ษา 4.1 การท� า ความสะอาด ค� า เตื อ น: อย่ า ใช้ น� ้ า มั น เบนซิ น ตั ว ค� า เตื อ น: เมื ่ อ คุ ณ ท�...
- Page 156 การท� า ความสะอาดและการบ� า รุ ง รั ก ษา 5. เ ม ื ่ อ ไ ฟ ส ถ า น ะ ข อ ง เ ท อ ร ์ โ ม • ก่ อ นการยกเตารี ด ให้ ถ อดปลั ๊ ก สแตท...
- Page 157 การแก้ ไ ขปั ญ หาเบื ้ อ งต้ น แม้ ว ่ า เตารี ด ถู ก เสี ย บปลั ๊ ก เข้ า ไปแล้ ว แต่ แ ผ่ น รี ด (4) ยั ง ไม่ ร ้ อ น อาจจะเชื...
- Page 160 حل المشكالت .بالرغم من أن قابس المكواه متصل بالطاقة، إال أن لوح القاعدة (4) ال يسخن .قد يكون توصيل الجهاز بصورة غير صحيحة. >>>تفحص القابس وكابل الطاقة (1) للجهاز قد يكون زر ضبط درجة الحرارة (3) على الوضع األدنى. >>> عليك تدوير زر ضبط درجة الحرارة حتى عالمة .البخار...
- Page 161 الصيانة والتنظيف 3.4 التخزين قد يستغرق خروج الماء عبر فتحات اللوح القاعدي بع ض ً ا إذا لم تخطط الستخدام الجهاز لفترة طويلة من .من الوقت .الوقت، يرجى تخزينه بعناية قبل رفع الجهاز انزع القابس واتركه ليبرد • بعد أن يصبح الخزان فار غ َ ا تما م ً ا، اترك زر .تما...
- Page 162 الصيانة والتنظيف 2.4 إزالة الكلس (التنظيف 1.4 التنظيف )الذاتي تحذير: عندما تنتهي من تعمل خاصية إزالة الكلس على تنظيف جسيمات .الكي، انزع قابس الجهاز .الكلس المتراكمة في خزان البخار بالجهاز يمكنك تفريغ المياه من الخزان استخدم هذه الخاصية مرة كل 2 إلى 3 أسابيع. إذا بفتح...
- Page 163 التشغيل يمكنك إزالة كافة التجاعيد من لتتمكن :تحذير بكل سهولة عبر خاصية بخاخ استخدام ميزة صدمة البخار .المياه ينبغي إطفاء ضوء مؤشر .)10( الثرموستات 01.3 الكي الجاف للكي الجاف، عليك ضبط مقبض ضبط البخار 8.3 البخار الرأسي ” “اإليقاف وضع إلى...
- Page 164 التشغيل 7.3 صدمة البخار تحذير: ننصحك بالتحقق من ملصق التعليمات على عندما تبدأ في الكي، قد ال .المالبس قبل كيها يعمل زر صدمة البخار .ضغطتين أول عند إذا لم تكن تعلم نوع أقمشة للحصول على صدمة مالبس، عليك كي جز غير البخار،...
- Page 165 التشغيل 1.3 االستخدام المرغوب جهازك مصمم لالستخدام مع مياه الصنبور. إن كان صمم هذا الجهاز لالستخدام المنزلي أو وللكي فقط؛ ،ماء الصنبور شديد العسورة .وال يصلح لالستخدامات المهنية فننصحك باستخدام خليط من .ماء الصنبور وماء الشرب 2.3 االستخدام المبدئي 4.3 ضبط درجة الحرارة قبل...
- Page 166 مكواتك 1.2 نظرة عامة 2.2 البيانات الفنية كابل الطاقة لوح قاعدة المكواة ~ : 042-022 فولت الجهد زر ضبط درجة الحرارة 06-05 هيرتز لوح قاعدي : 0042-0202 وات استهالك الطاقة فوهة رش المياه :فئة العزل غطاء تعبئة المياه /: تصل حتى 051 جم مقدار...
- Page 167 تعليمات هامة للسالمة والبيئة . ً قد يكون السطح السفلي للجهاز أو المنطقة المحيطة به ساخنة جد ا • قد يتسبب االتصال باألسطح في حدوث حروق. ولذلك، فأثناء أو بعد .استخدام الجهاز، عليك االنتباه لعدم لمس األجزاء الساخنة ،ال تستخدم الجهاز في أو بالقرب من األماكن والمواد القابلة لالحتراق •...
- Page 168 تعليمات هامة للسالمة والبيئة ،إذا سقط الجهاز أو حدث به تسرب للماء أو حدث به عطل آخر • اتصل بقطاع الخدمة المعتمد. ال تستخدم الجهاز ما لم يكن ذلك . ً مطلوب ا عند عدم استخدام الجهاز أو تركه ليبرد، حافظ على الجهاز وكابل •...
- Page 169 تعليمات هامة للسالمة والبيئة يحتوي هذا القسم على تعليمات السالمة التي ستساعدك على تجنب خطر .إصابة األفراد أو اإلضرار بالممتلكات .عدم اتباع هذه التعليمات يؤدي إلى إبطال الضمان الممنوح 1.1 السالمة العامة .يخضع هذا الجهاز مع المعايير الدولية للسالمة • يجوز...
- Page 170 المحتويات 1 تعليمات هامة للسالمة والبيئة 4 ..... . 1.1 السالمة العامة وتشريعات التخلصWEEE 2.1 متوافق مع تشريعات 6 .....من المنتجات الفاسدة 6 .
- Page 171 !يرجى قراءة هذا الدليل أوال ،عزيزي العميل . نأمل أن تحصل على افضل النتائج من جهازكBeko شكر ا ً لك على تفضيل منتجات والذي قد تم تصنيعه بأعلى جودة وبأحدث التقنيات. وعلى ذلك، يرجى قراءة كامل دليل المستخدم هذا وجميع المستندات المصاحبة له بعناية قبل استخدام المنتج واالحتفاظ...
- Page 172 هاوكم مدختسملا ليلد SIM7124B 01M-8832733200-2717-05...
Need help?
Do you have a question about the SIM7124B and is the answer not in the manual?
Questions and answers