
Related Manuals for Kodak SCANZA


Summary of Contents for Kodak SCANZA
- Page 1 KODAK SCANZA DIGITAL FILM SCANNER User Manual 4.7"W | 4.7"H | 5"D (120 x 120 x 127mm) Please read all directions before using the product and retain this guide for reference.
- Page 3 CONTENTS INTRODUCTION FEATURES BOX CONTENTS SAFETY PRECAUTIONS TIPS OPERATING INSTRUCTIONS 8-12 A. CONTROLS B. PREPARING MEDIA TO SCAN 9-11 C. OPERATION CAPTURE MODE 13-15 14-15 A. COLOR & BRIGHTNESS ADJUSTMENT GALLERY MODE A. ROTATE IMAGE B. FLIP IMAGE C. DELETE IMAGE D.
- Page 4 SPECIFICATIONS CUSTOMER SERVICE CONTACT INFORMATION WARRANTY 27-30...
-
Page 5: Introduction
1. INTRODUCTION Thank you for purchasing the KODAK SCANZA Digital Film Scanner. This User Guide is intended to provide you with guidelines to ensure that operation of this product is safe and does not pose risks to the user. Any use that does not conform to the guidelines described in this User Guide may void the limited warranty. -
Page 6: Box Contents
• Do not block any ventilation openings. • Do not operate this device near heat sources such as radiators or stoves. • When connecting the KODAK SCANZA Scanner directly to your computer, be careful to not over load the USB connections. If you have too many... - Page 7 5. TIPS • Place the scanner on a flat, stable surface with the LCD display facing you. • Use the included cleaning brush to clean the backlight, adapter, or insert. Insert the brush — CLEANING PAD SIDE DOWN — into the adapter opening on the bottom of the unit.
-
Page 8: Operating Instructions
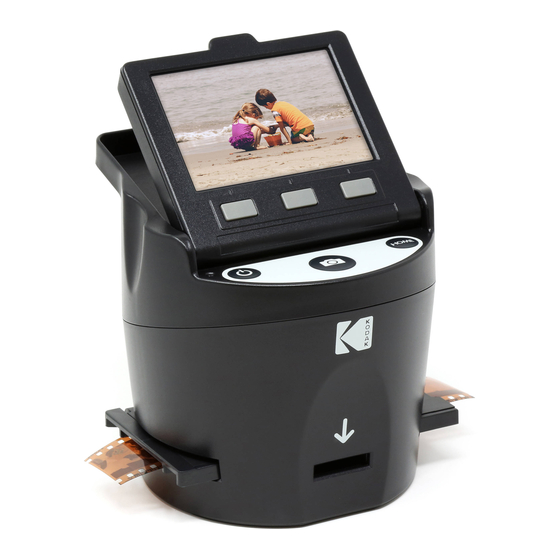
6. OPERATING INSTRUCTIONS NOTE: Illustrations are for instructional purposes only, and may be different from the actual product. 1. Function Keys 2. Power On/Off Button 3. Capture Button 4. Tilt-up LCD Screen 5. Home Button 6A. CONTROLS 1. Function keys (soft keys): The function is indicated by the text that will appear on the screen above the corresponding key. -
Page 9: B. Preparing Media To Scan
6B. PREPARING MEDIA TO SCAN Before using your film scanner, you must insert an SD card (not included) or the unit will not operate. There is no built-in memory. Load your film/slide into the appropriate adapter and insert according to the Tray Directory below. (Table can be found onscreen at Home>Settings>Film Tray). - Page 10 TRAY DIRECTORY FILM FILM TYPE ADAPTER INSERT TYPE NEEDED NEEDED Negative Color Negative 135 No. 2 None Color Negative 126 No. 1 None Color Negative 110 No. 2 No. 5 Slide Slide Positive 135 No. 1* None Slide Positive 126KPK No.
- Page 11 Flip up the top cover of the adapter. Place insert with your slide or film into adapter. This film scanner features speed-load adapters to make scanning easy and straightforward. Simply push them into the device until you hear a click, and you can feed in slides or negatives one after the other without needing to remove and reload the adapters.
-
Page 12: C. Operation
6C. OPERATION Upon powering on, and before displaying the HOME screen, the screen displays the currently selected film type, adapter, and insert information for 5 seconds and then brings up the capture mode screen. HOME SCREEN The Home screen will appear when the unit is powered on, whenever the Home button is pushed, and any time SAVE/EXIT is selected. -
Page 13: Capture Mode
7. CAPTURE MODE 1. Press the soft function key under the Capture icon on the screen to go to the capture mode. Your loaded image will appear on the LCD screen. The status bar on the top, indicating the active mode and settings, will disappear after 15 seconds. -
Page 14: Capture Mode
4. The Color Adjustment screen will appear. • Press the right function key (“Info”) to review your film type, adapter and insert. • Press the center function key (“Select”) to adjust color and brightness. • Press the left function key to return to the image and then press “Select”... -
Page 15: Gallery Mode
For each setting (R, G, B) a scale will appear at the bottom of the screen. Press the center function key (“Adjust”) to adjust each color, then press the function keys under the decrease (–) and increase (+) symbols. Press the center key again (“Save/Back”) to save your selection. -
Page 16: B. Flip Image
8A. ROTATE You can rotate the image left or right. To select an image to rotate: 1. Enter gallery mode as described above. 2. Use the left < and right > function keys to scroll through images. 3. To rotate the image, press the center soft key (select). -
Page 17: D. Slideshow
8C. DELETE To delete an image, navigate the top status bar to display the trash can icon. Press the center function key to “Select.” You will be asked to confirm if you want to delete that image. Home 8D. SLIDESHOW View stored images in succession. -
Page 18: Settings
9. SETTINGS MODE From the Home screen, select Settings by pressing the soft function key under the Settings icon. Press the corresponding soft function key under the left < and right > arrow symbols to scroll through the settings: • Film Type •... -
Page 19: Settings
1. Choose one of the 3 film types by pressing the center function key (“Select”). Choose Back to return to the Settings menu. Home Home 2. For each film type, select the film size. Home Home... - Page 20 3. Once the film type and size are selected, a confirmation screen will appear with directions. Press Save/Exit to save and return to the Home screen. 4. Repeat the process to change film types or sizes. From the Settings menu, continue to select additional settings from the submenus.
- Page 21 3. Select the desired setting by pressing the Save/Exit button. Note: This will then take you back to the Home screen. 4. To go to the previous slide, press the Back button. Home 9C. LCD BRIGHTNESS 1. Select LCD Brightness from the settings menu.
- Page 22 3. To confirm your selection, press the Save/Exit button. Note: This will then take you back to the Home screen. Home 9D. USB UPLOAD This mode will allow you to access your SD™ card (not included) from your computer. Note: While connected to a computer, you will be unable to use the film scanner.
- Page 23 3. Wait for the scanner to connect to the computer. This may take a few seconds. When connecting, your computer will recognize the scanner as an external device. 4. When finished, press the disconnect button and then unplug the USB cable. 9E.
- Page 24 2. From the Tray Directory, you will be able to see which adapter you need for each compatible film or slide type. Note: The film type cannot be actively changed from the Tray Directory. To change the film type, select Film Type from the Settings menu, as described in section 9A of this user manual.
- Page 25 2. You will be able to see the currently used and available space on the inserted SD™ card (not included). The image count is approximate and may not be an exact reflection of available space. Note: This film scanner is not equipped with internal memory and an SD™...
- Page 26 2. Cycle through the available languages using the arrow buttons. To confirm your selection, press the Save/Exit button. Note: This will redirect you back to the Home screen. Available languages include: English Italian German Spanish French Home 10. SPECIFICATIONS Power source: AC adapter, USB DC5V output Sensor: 14MP CMOS sensor File format: JPEG Resolution: 14MP/22MP interpolation...
- Page 27 12. WARRANTY LIMITED WARRANTY TO ORIGINAL CONSUMER This KODAK SCANZA Digital Film Scanner (“Product”), including any accessories included in the original packaging, as supplied and distributed new by an authorized retailer is warranted by C&A Marketing, Inc. (the “Company”) to the original consumer purchaser only, against certain defects in material and workmanship (“Warranty”) as follows:...
- Page 28 (f) A Product or part that has been modified to alter functionality or capability without the written permission of the Company; (g) Consumable parts, such as batteries, fuses and bulbs; (h) Cosmetic damage; or (i) If any KODAK SCANZA Digital Film Scanner serial number has been removed or defaced.
- Page 29 This Warranty is valid only in the country where the consumer purchased the Product, and only applies to Products purchased and serviced in that country. This Warranty does not cover images “burnt” into the screen. The Company does not warrant that the operation of the Product will be uninterrupted or error-free.
- Page 30 This warranty gives you specific legal rights, and you may have other rights that vary from state to state or province to province. Contact your authorized retailer to determine if another warranty applies. Kodak does NOT manufacture this Product or provide any Warranty or support. Authorized KODAK Brand Licensee C&A Marketing, Inc.
- Page 32 The Kodak trademark, logo and trade dress are used under license from Kodak. SD is a trademark of SD-3C LLC in the United States, other countries or both. Mac is a trademark of Apple Inc., registered in the U.S. and other countries.
Need help?
Do you have a question about the SCANZA and is the answer not in the manual?
Questions and answers
I have coptured an image on my Kodak Scanza;I'm connected by USB to my iMacMonterey OS 12.76; is the image stored on my computer, and if so where? Do I need a memory card when II use the USB?
@Andrei Sarna-Wojcicki
When using the Kodak Scanza connected by USB to your iMac, images are first saved to an SD card (not included) inserted in the scanner. The Scanza does not have internal memory and cannot scan directly to the computer. After scanning, you transfer the images from the SD card to your iMac via the USB connection. So yes, a memory card is needed for this process.
This answer is automatically generated
Card error
A card error on the Kodak SCANZA means that either no SD™ card is inserted or the inserted SD™ card is full. The scanner will not operate without an SD™ card, as it has no built-in memory.
This answer is automatically generated