Advertisement
Quick Links
G00-TPD0019A Rev. 14/05-01
INSTALLATION INSTRUCTION
MANUAL DE INSTALACIÓN
FOR
PARA
1
Safety Information
Información de seguridad
Read the precautions and instructions in this manual before installing and using this lock. Save this manual for future reference.
Lea las precauciones e instrucciones de este manual antes de instalar y usar este cerradura. Guarde este manual para consultarlo en el
futuro.
CAUTION /
ADVERTENCIA :
Please use four alkaline batteries for the best performance.
Use cuatro baterías alcalinas para obtener un mejor desempeño.
A. Do not attempt to disassemble any internal components of the lockset personally. Doing so will void the limited warranty.
B. Do not drop or hit the lockset. Too much shock may result in permanent damage.
C. Do not use pins or sharp objects to press on the keypad.
D. Always create a backup of information you want to keep (such as the programming code and user codes). Please use
the last page of this booklet as your reference.
E. Please change programming code before operating this lockset.
A. No intente desmontar los componentes internos del juego de cerradura usted mismo. Anulará la garantía limitada.
B. No deje caer o golpee el juego de cerradura. Muchos golpes pueden causar daño permanente.
C. No use clavijas u objetos afilados para oprimir el teclado.
D. Genere siempre un respaldo de la información que desea guardar (Como los códigos de programación y códigos del usuario). Use la
última página de este folleto como referencia.
E. Cambie el código de programación antes de operar este juego de cerradura.
CARE and MAINTENANCE
/CUIDADO Y MANTENIMIENTO:
The following instructions should be followed to protect and maintain your lockset:
A. Remove locks, or do not install locks, prior to painting your door.
B. Periodically clean with mild soap and a soft cloth only.
C. Do not use any chemical products containing alcohol, benzene, hydrochloric acid or nitric acid, and avoid
using sharp or abrasive objects to clean this lockset.
D. Do not let any water or liquid into lockset during installation process.
Se deben seguir las siguientes instrucciones para proteger y mantener correctamente su juego de cerradura:
A. Retire las cerraduras, o no instale una cerradura, antes de pintar la puerta.
B. Limpie periódicamente con jabón y paño suaves.
C. No use productos abrasivos o químicos que contengan alcohol, benceno, ácido clorhídrico o nítrico, y evite usar objetos afilados o
abrasivos para limpiar este juego de cerradura.
D. No permita que entre agua o cualquier líquido al juego de cerradura durante el proceso de instalación.
2
Pre-installation — tools Required / Hardware Included
Instalación previa - Herramientas requeridas/Hardware incluido
Optional
Optional
Facultatif
Facultatif
WARNING /
ADVERTENCIA:
If the door needs to be drilled, be familiar with how to use your drill safely, and understand all the door preparation steps before
proceeding.
Si debe perforar la puerta, familiarícese con el uso seguro del taladro y entienda todos los pasos de preparación de la puerta
antes de proceder.
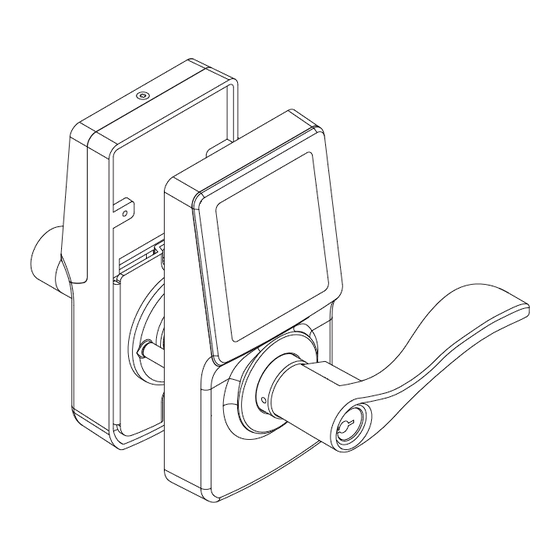
Part
Description
Pieza
Descripción
AA
1-1/4" Screw /
Tornillo de 1-1/4"
BB
13/64" Screw /
Tornillo de 13/64" (5 mm)
CC
5/16" Screw /
Tornillo de 5/16" (7,9 mm)
DD
3/4"Wood Screw /
Tornillo de 3/4" (19 mm)
AA
Optional
Optional
Facultatif
Facultatif
BB
DD
Part
Description
Descripción
de la pieza
A
Key /
Llave
B
Cylinder /
C
Exterior Assembly /
D
Power Cable /
E
Exterior Gasket /
F
Interior Gasket /
G
Mounting Plate /
H
Interior Assembly /
I
Battery Cover /
J
Screw Hole Cover /
K
Latch /
L
Strike Plate /
M
Dust Box /
CC
J
3
Pre-installation (Continued) — Door Preparation
Instalación Previa (Continuación) - Preparación de la Puerta
NOTE: If your door is pre-drilled, check the hole sizes to make sure they are the proper size. If they are the proper size, skip
to the Installation section.
NOTA: Si su puerta ya está perforada, verifique el tamaño de los orificios para asegurarse de que son del tamaño correcto.
Si son del tamaño correcto, pasea la sección de instalación.
Using the template, mark the door and drill the holes, and chisel out a mortise.
Con la plantilla, marque la puerta y perfore lo orificios, y cincele una muesca.
NOTE: Drill from both sides to prevent wood splitting.
NOTA: Perfore de ambos lados para evitar dañar la madera.
1"(25mm)
Optional
Facultatif
Backset
Entrada
Prepare the door jamb – using the strike plate as a pattern, drill the latch and screw holes, and chisel out a mortise until
the strike plate fits flush.
Prepare el portante de la puerta: usando el cerradero como plantilla, perfore los orificios de la cerradura y el cerradero, y
cincele una muesca hasta que el cerradero entre perfectamente.
Quantity
Cantidad
2
1
2
4
Door jamb hole dimension
Dimensión del orificio del portante
de la puerta
a.
1/2"(13 mm)
b.
1-1/4
"(32 mm)
c.
1"(24 mm)
Strike dimension
Dimensión del cerradero
d.
1/8"(3 mm)
e.
2-3/4"(70 mm)
Cilindro
Ensamble exterior
Cable de alimentación
Casquillo exterior
Casquillo interior
Placa de montaje
Ensamble interior
Cubierta de la batería
Tapa Del Orificio De Tornillo
Pestillo
Cerradero
Guardapolvo
BB
I
H
F
AA
G
L
M
K
DD
2-1/8"(54mm)
1"
(25mm)
Centerline
Línea central
2-1/8"(54mm)
Strike Plate
Gâche
d
c
e
b
a
Quantity
Cantidad
2
1
1
1
1
1
1
1
1
1
1
1
1
E
C
B
A
D
Note: For drive-in latch, skip step d. Simply insert latch.
Nota: Para el pestillo de accionamiento rotativo,
saltéese el paso b. y solo inserte el pestillo.
Faceplate
Placa frontal
Outline
Línea
externa
o l e
c i o
h h
o r i fi
a t c
Chisel 5/32" deep
o f l
d e l
Cincele hasta 5/32"
p t h
a d
d i d
D e
f u n
(3 mm) de
r o j o
P r o
c e r
profundidad.
d e l
Dust box
Guardapolvo
DD
Strike Plate
Strike Plate
Advertisement

Related Manuals for Windsor 1335

Summary of Contents for Windsor 1335
- Page 1 G00-TPD0019A Rev. 14/05-01 Part Description Quantity INSTALLATION INSTRUCTION Descripción Cantidad de la pieza MANUAL DE INSTALACIÓN Key / Llave Cylinder / Cilindro Exterior Assembly / Ensamble exterior Power Cable / Cable de alimentación Exterior Gasket / Casquillo exterior PARA Interior Gasket / Casquillo interior Mounting Plate / Placa de montaje...
- Page 2 TEMPLATE Fold here. Place on the door edge. Doble aquí. PLANTILLA Drill a 1” (25 mm) diameter Coloque sobre el borde hole at the center of the door de la puerta. edge. Perfore un orificio de 1" NOTE: MEASUREMENTS BELOW ARE JUST A GUIDELINE. (25 mm) en el centro del borde de la puerta.
Need help?
Do you have a question about the 1335 and is the answer not in the manual?
Questions and answers