
Related Manuals for Homeguard HGWIP-711


Summary of Contents for Homeguard HGWIP-711
-
Page 1: Quick Start Guide
Quick Start Guide HGWIP-711 © HOMEGUARD 2016 www.homeguardworld.com support@homeguardworld.com MODEL HGWIP-711... - Page 2 GIVES YOU PEACE OF MIND WHEREVER YOU ARE Welcome Thank you for choosing HOMEGUARD. Getting started is easy. HOME CHILDREN ELDERLY RELATIVES PETS Surveillance Playing/Sleeping Safe-guarding Monitoring...
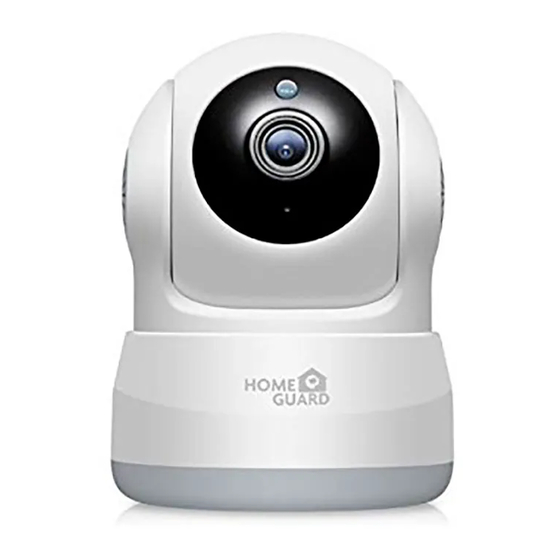
- Page 3 What’s included Parts & Description Sensor Lens Pan / Tilt Camera Quick Start Guide User Manual Power Adapter LED Light Reset Button Speaker MicroSD Power Port Warning Sticker Bracket Fixings Wall Plug...
-
Page 4: Network Connection
Get the App Step 1 Network Connection For the best experience, download the Homeguardcare app for your smartphone by scanning the QR code below or searching for “Homeguardcare” in the app store. Connect the AC adapter to Connect the camera to your router your camera and plug it in. - Page 5 Step 2 WiFi Configuration Guide HOMEGUARD IP Camera Part NO.: XXXXXXXX Username: admin Password: 123456 DID: VIEW-000117-LZVZU DDNS: 005mryg.nwsvr1.com Launch Homeguardcare App, Select "Add cameras via Select "Please scan the camera’s Name the camera and Input correct WiFi password The camera will try to connect If connected, it will go back to Click “Add Camera”...
- Page 6 Click "More", select "Wi-Fi Config", fill in the Wi-Fi password and click "Configuration". Congratulations! Your HOMEGUARD Camera is set up and ready to go. You are now free to position your camera anywhere in your home where you get a WiFi signal and view it remotely from anywhere in the world on your Smartphone or Tablet! Please remember to change your password in the Advanced Setting-User Setting.
-
Page 7: Live View
Live View Monitoring Options Tap the monitoring screen, the video menu action bar will appear. 1. For 2-way Audio, ensure that the speaker is on. To Talk press & hold the Mic button until you’ve finished talking, then release. 2. Press Menu to switch between IR LED On/Off & Set or call Preset (for Pan&Tilt camera). Cruise Vertically Cruise Horizontally Menu... - Page 8 View from Mac or Windows PC Specifications Install Homeguardcare software for your Mac or Windows PC from the included CD. Description Item Hardware Features Wi-Fi Support Power Interface Reset Button Built-in MicroSD socket Built-in Microphone and speaker 4 infrared LED, 5m Night Vision Range Resolution 1280 ×...
Need help?
Do you have a question about the HGWIP-711 and is the answer not in the manual?
Questions and answers
**** **** conecta aceasta camera? Nu reusesc
To connect the Homeguard HGWIP-711 camera, follow these steps:
1. Download the App: Install the *Homeguardcare* app on your smartphone by scanning the QR code in the manual or searching for "Homeguardcare" in your app store.
2. Power the Camera: Connect the AC adapter to the camera and plug it into a power source.
3. WiFi Configuration:
- Ensure your smartphone is connected to the same Wi-Fi network you will use for the camera.
- Open the *Homeguardcare* app and add the camera by scanning the QR code on the bottom of the camera.
- Enter the username and password.
- Click "More," select "Wi-Fi Config," enter the Wi-Fi password, and click "Configuration."
4. Completion:
- If the LED indicator blinks quickly, Wi-Fi configuration is successful.
- Once connected, you can position the camera anywhere within the Wi-Fi range and view it remotely from your smartphone or tablet.
5. Security: Change your default password in *Advanced Setting > User Setting* for security reasons.
This answer is automatically generated
how to install nvr camera
To install the Homeguard HGWIP-711 NVR camera, follow these steps:
1. Prepare the Components:
- Ensure you have the IP camera, power adapter, and your iOS/Android device ready.
- Confirm you are within range of the Wi-Fi network you’ll use for the camera.
2. Download the App:
- Download the "Homeguardcare" app by scanning the QR code in the manual or searching for it in your app store.
3. Connect the Camera:
- Connect the AC adapter to the camera and plug it in.
- Use the app to add the camera by scanning the QR code at the bottom of the camera.
4. Configure Wi-Fi:
- Open the app, go to "More" > "Wi-Fi Config."
- Enter your Wi-Fi SSID and password, then click "Configuration."
- Wait for the Wi-Fi indicator to flash slowly, indicating setup completion.
5. Position the Camera:
- Place the camera anywhere with a Wi-Fi signal.
- You can now view it remotely from your smartphone or tablet.
6. Change the Password:
- In the app, go to "Advanced Setting" > "User Setting" and update your password.
The camera is now installed and ready for use.
This answer is automatically generated