Table of Contents

Related Manuals for Garrison 2477821


Summary of Contents for Garrison 2477821
- Page 1 Portable Air Conditioner (Local Air Conditioner) Instruction Manual Thank you for purchasing our Portable Air Conditioner. Before using your air conditioner, please read this instruction manual carefully and keep it for future reference. READ AND SAVE THESE INSTRUCTIONS!
- Page 2 Contents P r e p a r a t i o n - - - - - - - - - - - - - - - - - - - - - - S a f e t y P r e c a u t i o n s - - - - - - - - - - - - - - - - C a u t i o n s - - - - - - - - - - - - - - - - - - - - - - - -...
-
Page 3: Preparation
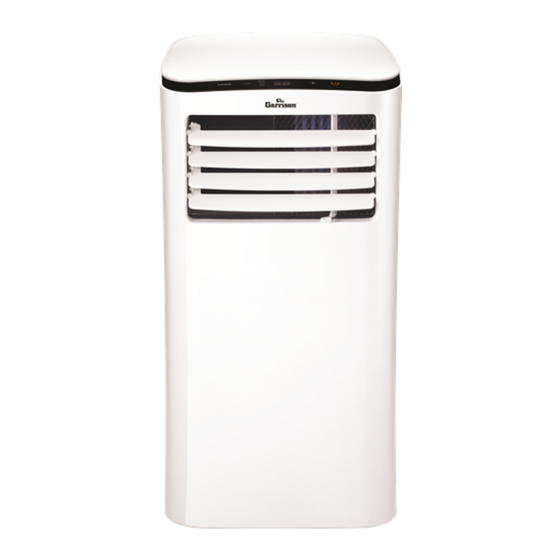
Preparation Control panel Remote signal receptor Handle Horizontal louver control (both sides) lever(adjust manually) Air filter NOTE: PHA cannot be adjusted. (behind the grille) Vertical louver control Upper air intake lever(adjust manually) NOTE: PHA cannot be adjusted. Drain outlet Air outlet Panel Lower air intake Bottom tray... - Page 4 Preparation NOTE: The unit you purchased may look like one of the following:...
-
Page 5: Safety Precautions
Safety Precautions Please read these instructions before you start the installation -DO NOT install your air conditioner in a wet room, such as process. Improper installation can damage the unit and, your a bathroom or laundry room. Too much exposure to water personal property, and also poses a personal safety hazard. -
Page 6: Caution -
Cautions -This appliance can be used by children ages 8 years or older and persons with reduced physical, sensory, and/or mental capabilities or lack of experience and knowledge if they have been given supervision or instruction concerning use of the appliance in a safe way and understand the hazards involved. Children shall not play with the appliance. - Page 7 Installation Note About Fluorinated Gasses Choosing the Right Location -This air-conditioning unit is a hermetically sealed unit that contains fluorinated gasses. For specific information on the types of gasses and the amount, please refer to the relevant label on the unit. -Installation, service, maintenance, and repair of this unit must be performed by a certified technician.
- Page 8 Installation Tools Needed Window Installation Kit -Medium Philips screwdriver; -Tape measure or ruler; -Knife or scissors; -Saw (optional, to shorten window adapter for narrow windows) Step One: Preparing the Exhaust Hose assembly Accessories Press the exhaust hose into the window slider adapter and unit adapter, then clamp automatically by elastic buckles of the adaptors.
- Page 9 Installation Note: Once the Exhaust Hose assembly and Adjustable Window Slider are prepared, choose one of the following two installation methods. Type 1: Hung Window Installation Foam seal B (Adhesive type-shorter) Insert the window slider adapter Window slider B Window slider A (if required) into the hole of the window slider.
- Page 10 Installation Foam seal C (Non-adhesive type) Security Bracket 2 Screws Cut the non-adhesive foam If desired, install the security seal C strip to match the bracket with 2 screws as shown. window height. Insert the foam seal between the glass and the window frame to prevent air and insects from getting into the room.
-
Page 11: Operation
Operation MODE button Power button Selects the appropriate operating mode. Power switch on/off. Each time you press the button, a mode is selected in the sequence of COOL, FAN, LED display and DRY .The mode indicator light illuminates Shows the set temperature while on cool mode. While on DRY under each mode setting. -
Page 12: Operation Instructions
Operation Operation Instructions temperature control at its location. To activate the Follow Me/Temp COOL operation Sensing feature, point the remote control toward the unit and press the -Press the "MODE" button until the "COOL" indicator light comes on. Follow Me/Temp Sensing button. The remote display shows the actual -Press the ADJUST buttons "+"... -
Page 13: Maintenance
Operation Maintenance Water Drainage Safety Precautions -Always unplug the unit before cleaning or servicing. -During dehumidifying modes, remove the drain plug from the back of -DO NOT use flammable liquids or chemicals to clean the unit. the unit, install the drain connector (5/8" universal female mender) with -DO NOT wash the unit under running water. - Page 14 Faults Diagnosis Please check the machine according to the following form before asking for maintenance: Problem Troubleshooting Possible Cause The Water Collection Tray is full. Turn off the unit, drain the water P1 Error Code from the Water Collection Tray, Unit does not turn and restart the unit.
- Page 15 Design and Compliance Notes Design Notice In order to ensure the optimal performance of our products, the design specifications of the unit and remote control are subject to change without prior notice. Energy Rating Information The Energy Rating for this unit is based on an installation using an unextended exhaust duct without window slider adapter (as shown in the Installation section of this manual).
-
Page 16: Sociable Remark
Sociable Remark When using this dehumidifier in European countries, the following information must be followed: DISPOSAL: Do not dispose of this product as unsorted municipal waste. Separate collection of such waste for special treatment is necessary. It is prohibited to dispose of this appliance in domestic household waste. For disposal, there are several possibilities: A) The municipality has established collection systems, where electronic waste can be disposed of at least free of charge to the user.
Need help?
Do you have a question about the 2477821 and is the answer not in the manual?
Questions and answers