
Related Manuals for Logicube WriteProtect BAY


Summary of Contents for Logicube WriteProtect BAY
- Page 1 WriteProtect™ BAY User’s Manual Logicube, Inc. Chatsworth, CA 91311 Phone: 818 700 8488 Fax: 818 700 8466 Version: 1.07 Date: 11/29/16 MAN-WP-BAY Logicube WriteProtect™ BAY User’s Manual...
- Page 2 LOGICUBE IS NOT LIABLE FOR ANY INCIDENTAL OR CONSEQUENTIAL DAMAGES, INCLUDING, BUT NOT LIMITED TO PROPERTY DAMAGE, LOSS OF TIME OR DATA FROM USE OF A LOGICUBE PRODUCT, OR ANY OTHER DAMAGES RESULTING FROM PRODUCT MALFUNCTION OR FAILURE OF (INCLUDING WITHOUT...
- Page 3 MUCH DETAIL AS POSSIBLE. AT LOGICUBE’S SOLE AND ABSOLUTE DISCRETION, REASONABLE TELEPHONE AND EMAIL SUPPORT MAY ALSO BE AVAILABLE FOR THE LIFE OF THE PRODUCT AS DEFINED BY LOGICUBE. EXCEPT AS OTHERWISE SPECIFICALLY PROVIDED IN THIS AGREEMENT, LOGICUBE PRODUCTS ARE...
- Page 4 RoHS Certificate of Compliance LOGICUBE PRODUCTS COMPLY WITH THE EUROPEAN UNION RESTRICTION OF THE USE OF CERTAIN HAZARDOUS SUBSTANCES IN ELECTRONIC EQUIPMENT, ROHS DIRECTIVE (2002/95/EC). THE ROHS DIRECTIVE PROHIBITS THE SALE OF CERTAIN ELECTRONIC EQUIPMENT CONTAINING SOME HAZARDOUS SUBSTANCES SUCH AS MERCURY, LEAD, CADMIUM, HEXAVALENT CHROMIUM AND CERTAIN FLAME-RETARDANTS IN THE EUROPEAN UNION.
- Page 5 4.2 U ............................ 12 SAGE 5: USING THE WEB INTERFACE .................. 13 5.0 W ....................13 NTERFACE NTRODUCTION 5.1 USB D ..........................13 EVICE 5.1.1 Drives ........................... 14 5.1.2 HPA/DCO ........................15 5.1.3 Exports ......................... 16 Logicube WriteProtect™ BAY User’s Manual...
- Page 6 5.5.1 Services ........................25 5.5.2 HTTP Proxy ........................26 5.6 S ......................... 26 OFTWARE PDATES 5.7 P ..........................26 OWER 6: UPDATING THE WRITEPROTECT BAY SOFTWARE ........... 27 6.0 L ......................27 OADING OFTWARE 6.1 S .................... 27 OFTWARE OADING NSTRUCTIONS 6.1.1 From Network –...
-
Page 7: Introduction
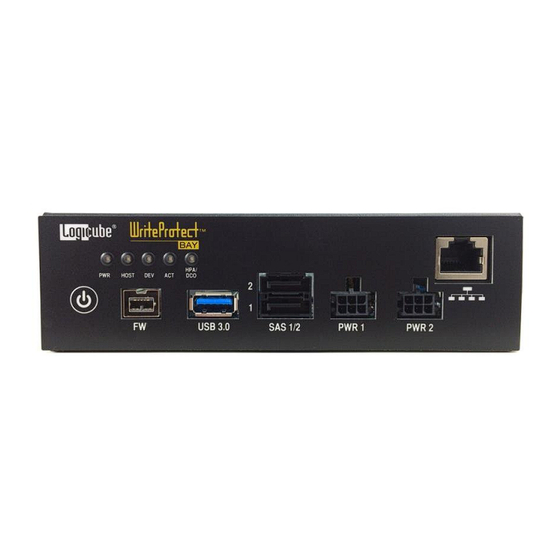
SuperSpeed USB 3.0 host connection to easily manage large capacity hard drives. The WriteProtect BAY is the only portable write-blocker on the market that provides support for 5 different storage technologies in a 5.25” half height design that fits into the drive bay of your forensic workstation. -
Page 8: S Pecifications 1.3 I N The B Ox
5 LEDs for power, host, device, activity, HPA/DCO detection allow you to easily monitor all processes. Compatible with forensic acquisition and analysis software. 1.2 Specifications 1.3 In the Box The following items are included with WriteProtect BAY: 2 SAS/SATA power & data cables 1 FireWire cable ... -
Page 9: Ptions
Avoid dropping the Logicube WriteProtect BAY or subjecting it to sharp jolts. When in use, place it on a flat surface. Keep the unit dry. If the WriteProtect BAY needs to be cleaned, use a lightly damp, lint free cloth. Avoid using soap or other cleaning agents particularly those containing bleach, ammonia, alcohol or other harsh chemicals. -
Page 10: Writeprotect Bay
2: Getting Started 2.0 Overview of the WriteProtect BAY WriteProtect BAY – Right angled view Logicube WriteProtect BAY User’s Manual... - Page 11 This will provide power to the WriteProtect BAY. Connect the USB 3.0 host cable to an available USB port. The WriteProtect BAY is now ready to be used and will turn on when the computer is turned on. User’s Manual...
- Page 12 2. Press and immediately release the power button on the WriteProtect BAY. The Power LED will start blinking as the WriteProtect BAY begins to shut down. The Power LED and the fans will turn off within 30 seconds. When the Power LED turns off, the WriteProtect BAY has fully shut down.
-
Page 13: E Xternal D Rives
Taking the drive out of the enclosure could cause any device (including computers) not to read the drive contents properly. 2.4 LEDs The WriteProtect BAY has five (5) LEDs: PWR – Power LED ... - Page 14 HPA and/or DCO detection On – Detects the presence of an HPA and/or DCO on the connected drive Off – Does not detect the presence of an HPA and/or DCO on the connected drive User’s Manual WriteProtect BAY Logicube...
-
Page 15: Quick Start
WriteProtect. 3.1 Registry Optimization Logicube recommends a registry entry to optimize the USB 3.0 transfer speeds for windows 7 and Windows 8/8.1. No registry optimization is needed for Windows 10. The registry entries can be downloaded from: http://updates.logicube.com/WriteProtectOptimization/WriteProtect_Optimization.zip... -
Page 16: Rives
Windows may not automatically detect the added drives. It is recommended to go to Disk Management, click Action, then click Refresh. When drives are disconnected, refreshing Disk Management may also be required to refresh the list of connected drives. User’s Manual WriteProtect BAY Logicube... - Page 17 If FireWire drives are not detected, disconnect the FireWire drive from the WriteProtect, wait a few seconds, then re-connect the FireWire drive. HPA/DCO can be managed and configured through the web browser interface (additional information TBD). Third party tools can always be used to manage HPA/DCO. User’s Manual WriteProtect BAY Logicube...
-
Page 18: Remote Connectivity
See Section 5.0 Web Interface Introduction for details on the web interface. Logicube WriteProtect BAY User’s Manual... -
Page 19: Using The Web Interface
Advanced configuration and settings File Browsing Software and firmware updates The following sections give a brief explanation of each screen on the web interface. 5.1 USB Device This screen has three tabs: Drives, HPA/DCO, and Exports. Logicube WriteProtect BAY User’s Manual... -
Page 20: Drives
If a drive has an HPA or DCO detected, the following icon will be displayed: Clicking the icon will show additional details of about the drive. User’s Manual WriteProtect BAY Logicube... -
Page 21: Hpa/Dco
You can also set an HPA or DCO on a drive by clicking the SET HPA/DCO icon. A window will appear and the HPA and/or DCO size can be set. This is a persistent change and will alter the drive’s total visible capacity/size. User’s Manual WriteProtect BAY Logicube... -
Page 22: Exports
If a file cannot be previewed, the following message will appear: 5.3 Write Protect Statistics This will display two tabs: About WriteProtect and Adv. Drive Statistics. 5.3.1 About The About screen will show information about the WriteProtect including the current software installed. User’s Manual WriteProtect BAY Logicube... -
Page 23: Adv. Drive Statistics
The Adv. Drive Statistics tab displays S.M.A.R.T. information for connect drives that support S.M.A.R.T. 5.4 System Settings The System Settings screen allows users to configure five different settings for the WriteProtect: User Profiles/Configurations Passwords Language/Time Zone USB Device User’s Manual WriteProtect BAY Logicube... -
Page 24: User Profiles/Configurations
Type to ‘Removable’. 3. Go to User Profiles/Configurations tab and click the New icon. 4. Type a name for this profile. For example, removable and click the OK icon. The profile name should appear on the screen. User’s Manual WriteProtect BAY Logicube... - Page 25 This helps ensure that only the desired changes are saved. Do not highlight and save over the INITIAL.DB configuration. This is the default configuration of the WriteProtect and is used to reset the device to the factory default settings. User’s Manual WriteProtect BAY Logicube...
-
Page 26: Passwords
0 through 9 and A through F. 5.4.2.2 Auto Lock Tap the Auto Lock icon to set the time to automatically lock the configuration and require a password. By default, this is set to 1 minute. User’s Manual WriteProtect BAY Logicube... - Page 27 Remember the Config Lock Key! If the WriteProtect is configured to load with the Config Lock set (enabled) and the password is forgotten, the only way to delete the Config Lock is to change profiles using the Command Line Interface (CLI). User’s Manual WriteProtect BAY Logicube...
-
Page 28: Language/Time Zone
NTP and adjust the time as needed. The WriteProtect also has a time zone setting. Tap Time Zone to select the time zone region. Tap the OK icon to continue. User’s Manual WriteProtect BAY Logicube... -
Page 29: Usb Device
WEB INTERFACE After selecting the region, select the time zone and tap the OK icon to set the time zone. 5.4.4 USB Device This section allows advanced configuration for the WriteProtect. User’s Manual WriteProtect BAY Logicube... - Page 30 Always proceed with caution when changing the DCO. By default, this is set to DISABLED, disallowing changes to the DCO. If changes need to be performed to the DCO, set this to ENABLED. 5.4.5 HPA This screen allows the auto-removal of HPA to be enabled or disabled. User’s Manual WriteProtect BAY Logicube...
-
Page 31: N Etwork S Ettings
For example, if HTTP is disabled, users will not be able to see the WriteProtect through a web browser over the network. Please contact your Network or Systems Administrator before changing any of these services. User’s Manual WriteProtect BAY Logicube... -
Page 32: Http Proxy
Section 6.0 Loading New Software for step-by-step information on how to update the software and firmware. 5.7 Power Off This screen allows the user to remotely turn off the WriteProtect or refresh the Graphical User Interface (GUI). User’s Manual WriteProtect BAY Logicube... -
Page 33: Updating The Writeprotect Bay Software
6: Updating the WriteProtect BAY Software 6.0 Loading New Software New and improved software will be released from time to time and will always be available on the WriteProtect support page at http://www.logicube.com/knowledge/WriteProtect. 6.1 Software Loading Instructions There are two methods of how to update the WriteProtect software: A. -
Page 34: From Network – Via The Web
‘Software Updates’ screen. 6.1.2 From USB Drive – Via software download The latest software can also be downloaded from Logicube’s website and be placed onto a USB flash drive. It is recommended to use an empty USB flash drive. -
Page 35: F Irmware L Oading I Nstructions
60 seconds. When the firmware update finishes, the WriteProtect will reboot automatically. b. FIRMWARE UPGRADE NOT AVAILABLE – This message will appear if the device does not require a firmware update. No further action is necessary if this message appears. User’s Manual WriteProtect BAY Logicube... -
Page 36: T Echnical S Upport I Nformation
SOFTWARE UPDATES Technical Support Information For further assistance please contact Logicube Technical Support at: (001) 818 700 8488 7am-5pm PST, M-F (excluding US legal holidays) or by email to techsupport@logicube.com User’s Manual WriteProtect BAY Logicube...
Need help?
Do you have a question about the WriteProtect BAY and is the answer not in the manual?
Questions and answers