Table of Contents
Advertisement
Quick Links
Advertisement
Table of Contents

Subscribe to Our Youtube Channel
Related Manuals for Bush 487/6474


Summary of Contents for Bush 487/6474
-
Page 1: Instruction Manual
Instruction manual 411009... - Page 2 You’ll soon be enjoying your new Outdoor DAB Radio. It all begins here, with your instructions. Don’t worry, there’s nothing too technical coming up. Just simple, step-by-step guidance to get you up and running quickly. Sound good? Then let’s get started. Help and Guidance We’re here to help you get the most from your Outdoor DAB Radio.
- Page 3 Contents Safety information Safety information Getting to know your Outdoor DAB Radio Ready? Let’s begin Connecting the antenna Power connection Inserting batteries (optional) Initial set-up Adjusting the volume Time and date Change the mode Connect to a Bluetooth device USB charging Using your Outdoor DAB Radio Radio antenna DAB Radio mode...
- Page 4 Contents Changing the Scan setting Audio mode Storing an FM station preset Tune to an FM station preset FM display information Bluetooth mode Connect to a Bluetooth device Setting the alarm Stop the Alarm Snooze Turn off the Alarm Sleep timer Cancel the Sleep timer Display backlight timeout Display language...
- Page 5 This page is left intentionally blank section of these instructions, or online at www.argos-support.co.uk If you still require further assistance, call one of our experts on 0345 600 3021.
- Page 6 This page is left intentionally blank...
-
Page 7: Safety Information
Safety information... -
Page 8: Safety Information
Safety information Important - Please read these instructions fully before installing or operating Power source • Only use the power supply that came with the product. Using an unauthorised power supply will invalidate your guarantee and may irrecoverably damage the product. •... - Page 9 Safety information Important - Please read these instructions fully before installing or operating Heat sources and flames Do not leave it in high temperatures as electronic devices and plastic parts may warp in heat. Ventilation Do not block or cover slots, holes or openings on the product by placing on soft furnishings such as carpets, rugs or beds as these are provided for functionality and/or ventilation to ensure safe operation of the product.
-
Page 10: General Safety Information
Safety information Important - Please read these instructions fully before installing or operating General safety information • Keep the product and all its parts out of reach of small children. • This product is not intended for use by persons (including children) with reduced physical, sensory or mental capabilities, or lack of experience and knowledge, unless they have been given supervision or instruction concerning the use of the appliance by a person responsible for their safety. - Page 11 This page is left intentionally blank section of these instructions, or online at www.argos-support.co.uk If you still require further assistance, call one of our experts on 0345 600 3021. Safety information...
- Page 12 This page is left intentionally blank...
- Page 13 Getting to know your Outdoor DAB Radio...
- Page 14 Getting to know your Outdoor DAB Radio You’ll be up and running in no time Ready? Let’s begin... Please read these instructions carefully. They contain important information which will help you get the best from your product and ensure safe and correct installation and operation.
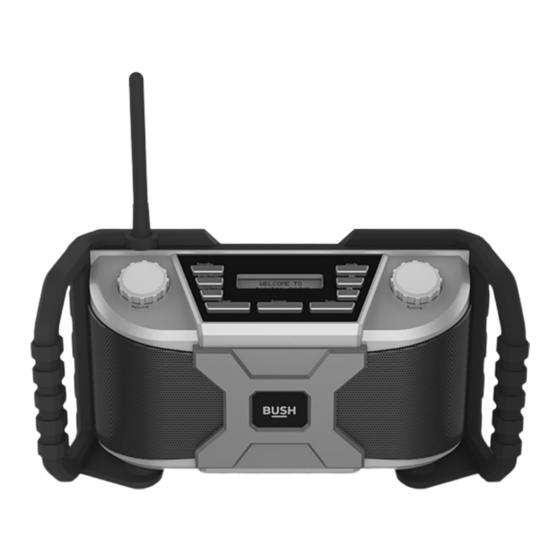
- Page 15 Getting to know your Outdoor DAB Radio You’ll be up and running in no time Fig 1. 1. Volume jog control - rotate and release 10. Snooze 2. Radio antenna 11. Scan for radio stations 3. Power on/standby 12. Skip back 4.
-
Page 16: Connecting The Antenna
Getting to know your Outdoor DAB Radio You’ll be up and running in no time Connecting the antenna Screw the separate radio antenna into the top of the radio, just above the volume control. Power connection 1. Connect the mains power lead into the socket, underneath the rubber cover on the back of the Radio, 2. -
Page 17: Adjusting The Volume
Getting to know your Outdoor DAB Radio You’ll be up and running in no time Initial set-up 1. Press and release the Standby button on the top of your radio. Your radio will switch on and begin an automatic scan for DAB stations. A progress bar will show the progress of the scan and the number of stations found during the scan will also be displayed. -
Page 18: Change The Mode
Getting to know your Outdoor DAB Radio You’ll be up and running in no time If you do wish to set the time and date manually, turn on the radio and follow the steps below: 1. Press and hold the Menu/Info button until <Full scan> is displayed. 2. -
Page 19: Usb Charging
Note: Some products will automatically search for a new device and so the ‘Add new device’ option is not available. 4. When found, your Radio will be displayed as ‘BUSH OUTDOOR’ . Select the device name to begin pairing. 5. When pairing is complete ‘Search…’ will stop flashing in the display, Connected will be displayed and a short tone will sound. - Page 20 This page is left intentionally blank...
-
Page 21: 3 Using Your Outdoor Dab Radio
Using your Outdoor DAB Radio... -
Page 22: Dab Radio Mode
Using your Outdoor DAB Radio Let’s get started Radio antenna Before you use the radio, you must first screw the separate radio antenna into the top of the radio, just above the volume control. DAB Radio mode Check that your Radio is in DAB mode. If you are not already in DAB mode, press and release the Mode button until you are in DAB mode (check the display). -
Page 23: Prune Dab Stations
Using your Outdoor DAB Radio Let’s get started Prune DAB stations You can remove the DAB stations in the station list that cannot be received in your area. These are listed with a ‘?’ prefix. In DAB mode: 1. Press and hold the Menu/Info button until <Full scan> is displayed 2. -
Page 24: Dab Display Information
Using your Outdoor DAB Radio Let’s get started 2. Use the Tune control to move to the Preset location and station that you would like to listen to (1-10). 3. Press and release the Enter button. The radio will instantly tune to that station and begin to play. -
Page 25: Dynamic Range Control (Drc)
Using your Outdoor DAB Radio Let’s get started Dynamic range control (DRC) In DAB mode: The dynamic range for each radio programme is set by the broadcaster for each radio station and may be different for the types of programme broadcast, such as pop or classical music or a chat show. -
Page 26: Fm Radio Mode
Using your Outdoor DAB Radio Let’s get started FM Radio mode If you are not already in FM mode, press and release the Mode button to go to FM mode (check the display). If you were listening to an FM station when you switched the Radio off then this station will be automatically selected when you switch the Radio back on. -
Page 27: Storing An Fm Station Preset
Using your Outdoor DAB Radio Let’s get started Audio mode The radio will automatically switch between Stereo and Mono, depending on the quality of the signal being received but you can override this function and manually switch between Stereo and Mono. 1. -
Page 28: Fm Display Information
Using your Outdoor DAB Radio Let’s get started Tune to an FM station preset In FM mode: 1. Press and release the Preset button. Preset Recall <1:> is displayed together with the name or frequency of the station stored there, or (Empty) if no previous station has been stored. -
Page 29: Bluetooth Mode
Note: Some products will automatically search for a new device and so the ‘Add new device’ option is not available. 4. When found, your Radio will be displayed as ‘BUSH OUTDOOR’ . Select the device name to begin pairing. 5. When pairing is complete ‘Search…’ will stop flashing in the display, Connected will be displayed and a short tone will sound. - Page 30 Note: If your previously paired device is within range but does not automatically connect, go to the Bluetooth connectivity settings on your device and select BUSH OUTDOOR to reconnect. 2. You can use the controls on your paired Bluetooth device as well as those on your radio.
-
Page 31: Setting The Alarm
Using your Outdoor DAB Radio Let’s get started Setting the alarm Note: Check that the radio has the correct time and date before you set an alarm. With your radio switched on (not in Standby mode): 1. Press and hold the Menu/Info button to enter the menu options.. 2. -
Page 32: Stop The Alarm
Using your Outdoor DAB Radio Let’s get started 11. Use the Tune control to set the volume for your alarm. Press and release the Enter button. Note: Remember to set the alarm radio volume to one that will wake you. The alarm volume will increase progressively until it reaches the alarm volume you have set. -
Page 33: Sleep Timer
Using your Outdoor DAB Radio Let’s get started Sleep timer You can set your radio to turn off automatically using the sleep timer. You can choose from Sleep off, 15, 30, 45, 60 and 90 minutes. With your radio switched on (not in Standby mode): 1. -
Page 34: Software Version
Using your Outdoor DAB Radio Let’s get started setting. With your radio switched on (not in Standby mode): 1. Press and hold the Menu/Info button to enter the menu options. 2. Use the Tune control to scroll to <System>. Press and release the Enter button. 3. -
Page 35: Factory Reset
Using your Outdoor DAB Radio Let’s get started With your radio switched on (not in Standby mode): 1. Press and hold the Menu/Info button to enter the menu options. 2. Use the Tune control to scroll to <System>. Press and release the Enter button. 3. - Page 36 This page is left intentionally blank...
-
Page 37: 4 Other Information
Other information... -
Page 38: Other Information
Water resistance level: IPX4 (protected against splashing water) Frequency range: DAB: Band III, 174 MHz to 240 MHz 87.5 MHz to 108 MHz Bluetooth: 2.4GHz-2.480GHz Bluetooth version: Pairing name: BUSH OUTDOOR Profiles HFPV1.5, A2DPV1.2, AVRCPV1.4, HSP1.2, GAVDP1.2, IOP Other information... - Page 39 This page is left intentionally blank section of these instructions, or online at www.argos-support.co.uk If you still require further assistance, call one of our experts on 0345 600 3021. Other information...
- Page 40 This page is left intentionally blank...
-
Page 41: 5 Product Support
Product support... -
Page 42: Troubleshooting
Product support Help is always at hand Troubleshooting No sound / power: Adjust the volume. Check that the mains power wall socket is switched on and that your radio is not in Standby mode. If you are using a Bluetooth connected device, increase the volume on the secondary device and on your radio. - Page 43 Product support Help is always at hand The function buttons do not respond: • Check that the mains power lead is connected at the back of your radio and the mains power wall socket is switched on. Press and release the Standby button. •...
-
Page 44: Help And Assistance
Product support Help is always at hand Help and assistance If you require any technical guidance or find that your Outdoor DAB Radio is not operating as intended, a simple solution can often be found in the Troubleshooting section of these instructions or online at www.argos-support.co.uk If you still require further assistance, call one of our experts on 0345 600 3021*. -
Page 45: Disposal
Product support Help is always at hand Disposal • This product should not be treated as normal household waste and it should be recycled. Please take it to your nearest collection facility or for further details contact your local council or visit www.recycle-more.co.uk •... -
Page 46: Guarantee
Call us now and activate your 12 month guarantee Thank you for choosing Bush. Your new product is guaranteed against faults and breakdowns for 12 months. Don’t forget to register it with us today so we can provide you with our best possible after-sales service and useful updates. - Page 47 This page is left intentionally blank section of these instructions, or online at www.argos-support.co.uk If you still require further assistance, call one of our experts on 0345 600 3021. Product support...
- Page 48 Contact: www.argos-support.co.uk Helpline: 0345 600 3021.
Need help?
Do you have a question about the 487/6474 and is the answer not in the manual?
Questions and answers