Dometic RM 2551 Installation And Operating Instruction
Refrigerator for lp-gas and electric operation
Hide thumbs
Also See for RM 2551:
- Installation instructions manual (54 pages) ,
- Service manual (52 pages) ,
- Installation manual (45 pages)
Table of Contents
Advertisement
REFRIGERATOR FOR LP-GAS AND ELECTRIC OPERATION.
RM 2551
FOR YOUR SAFETY
If you smell gas:
1. Open windows.
2. Don't touch electrical switches.
3. Extinguish any open flame.
4. Immediately call your gas supplier.
FOR YOUR SAFETY
Do not store or use gasoline or other
flammable vapors and liquids in the
vicinity of this or any other appliance.
WARNING: Improper installation,
adjustment, alteration,service or
maintenance can cause injury or
property damage. Refer to this
manual. For assistance or additional
information consult a qualified
installer, service agency or the gas
supplier.
USA
Service Office
The Dometic Corporation
509 South Poplar Street
LaGrange, IN 46761
Phone: 219-463-4858
822 70 91-00 (French 3109294.003)
INSTALLATION AND
OPERATING INSTRUCTIONS
RM2551
Corporate Office
2320 Industrial Parkway Elkhart, IN 46515
For Service Center Assistance
Call: 800-544-4881
Contents:
Installation
Operating Instructions
Maintenance & Service
AVIS
Cet appareil doit être réparé
seulement par un réparateur
autorisé. Modification de
l'appareil pourrait être
extrèmement dangeruse, et
pourrait causer mal ou mort.
CANADA
Dometic Distribution Inc.
866 Langs Drive
Cambridge,Ontario
N3H 2N7 Canada
Phone: 519-653-4390
Page
4
8
12
Advertisement
Table of Contents

Related Manuals for Dometic RM 2551


Summary of Contents for Dometic RM 2551
- Page 1 INSTALLATION AND OPERATING INSTRUCTIONS REFRIGERATOR FOR LP-GAS AND ELECTRIC OPERATION. RM 2551 RM2551 Contents: FOR YOUR SAFETY Page If you smell gas: Installation Operating Instructions 1. Open windows. Maintenance & Service 2. Don’t touch electrical switches. 3. Extinguish any open flame.
- Page 3 Heater Reigniter Flue baffle Power module cover Protection cover Screw for protection cover Burner jet 12 Volt Terminal block Manual gas shutoff valve Inlet fitting Flexible cord Drain water hose FIG. 1 Refrigerator control panel LEGEND 1. Main Power Button ON/OFF 2.
- Page 4 CERTIFIED INSTALLATION INSTALLATION Certified installations require one roof vent and one GENERAL INSTRUCTION lower side vent. This appliance is designed for storage of foods For "Certified Vent System Kits" see page 15. and storage of frozen foods and making ice. For further information contact your dealer or distributor.
- Page 5 VENTILATION HEIGHTS Refer to FIG. 3., page 4 Installation with roof Minimum ventilation vent and lower side vent heights in Refrigerator Inches RM 2551 44-1/2 1130 CLEARANCES FIG. 4 Minimum clearances in inches to combustible materials are: G: Top NOTE: Wood Strip...
- Page 6 INSTALLING REFRIGERATOR IN ENCLOSURE NOTE: DO NOT install the appliance directly on carpeting. Carpeting must be removed or protected by a metal or wood panel be- neath the appliance which extends at least full width and depth of the appliance. NOTE: A wood strip must be in place across the upper opening of the enclosure.
-
Page 7: Drain Water Hose
GAS CONNECTION Hook-up to the gas supply line is accomplished at the manual gas valve, which is furnished with a 3/8" SAE (UNF 5/8" -18) male flare connection. All completed connections should be checked for leaks with soapy water. ! WARNING DO NOT use a flame to check for gas leaks. -
Page 8: Electrical Connection
ELECTRICAL CONNECTION OPERATING 120 Volts AC Connection INSTRUCTIONS The refrigerator is equipped with a three-prong (ground- IMPORTANCE OF LEVELING A ing) plug for your protection against shock hazards and REFRIGERATOR should be plugged directly into a properly grounded three-prong receptacle. DO NOT cut or remove the In an absorption refrigerator system, ammonia is lique- grounding prong from this plug. - Page 9 Refrigerator control panel GAS MODE START UP INSTRUCTIONS Move the AUTO/GAS mode selector button (2) to the A. A continuous 12 volt DC supply must be available for UP position. The AUTO mode indicator lamp (A) will the electronic control to function. go off.
- Page 10 Refrigerator control panel LIMP MODE OF OPERATION DESCRIPTION OF OPERATING MODES This control system contains a feature where it will continue to operate the cooling system in the event of a failure of a major operating component. AUTO MODE If the control cannot read the temperature sensor and When operating in the AUTO mode, the AUTO mode control to the preset temperature, then the control will indicator lamp (A) will illuminate.
-
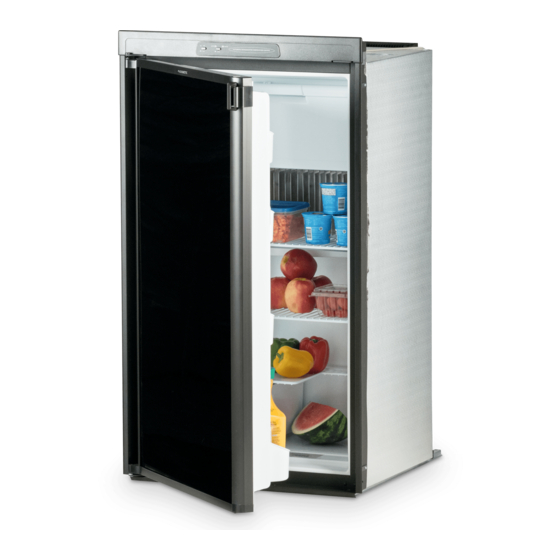
Page 11: How To Use The Refrigerator
CLEANING HOW TO USE THE REFRIGERATOR Cleaning the refrigerator is usually done after it is defrosted or put into storage. To clean the interior liner FOOD STORAGE COMPARTMENT of the refrigerator, use lukewarm weak soda solution. The food storage compartment is completely closed and Use only warm water to clean the finned evaporator, unventilated, which is necessary to maintain the re- gaskets, ice trays and shelves. -
Page 12: Refrigerator Removal
Refer to section INSTALLATION, page 4 to 8. 3. PERIODIC MAINTENANCE 1. CARTRIDGE HEATER To keep your Dometic refrigerator operating efficiently The heat necessary for the operation of an absorption and safely, periodic inspection and cleaning of several cooling unit is supplied by an electric heater mounted in components once or twice a year is recommended. -
Page 13: Troubleshooting
C. Check the control system by connecting/disconnec- 10. Reinstall burner, being careful that the end of the ting 120 volt AC power, start/stop the engine, etc. burner fits into the slot on the burner bracket. Check Compare the operation with the operation described to make sure slots are centered under the flue tube in section Operating Instructions. -
Page 14: Panel Dimensions
Conversion Kit Number. For further information, please 200 74 19-16/7 Jet, No. 43 contact the Dometic Corporation listed on the front page. 293 06 97-06/1 Burner 293 03 79-00/9 Electrode... - Page 15 CERTIFIED VENT SYSTEM KITS Refr. Model Components Drawing RM 2551 Roof Vent 3103633 Base 3103634 Cap (Both Required) Lower Side Vent 3102364 3102277 3102970 3102972 3101534 3101782 3101337 For further information, contact your dealer or distributor.
- Page 16 RM 2551 MO-FO 9836...