
Related Manuals for Rowe Scan 450i 24 inch KIT 40


Summary of Contents for Rowe Scan 450i 24 inch KIT 40
- Page 1 R O T H + W E B E R G m b H APP CENTER ecoPrint Scan 450i O P E R A T I N G M A N U A L R E V I S I O N 1 . 5 . 3...
- Page 2 ROWE Scan 450i Series The present Operating Manual includes a description of all devices of the ROWE Scan 450i series and their fields of use. Safety instructions are given in Annex B. It is imperative to read them before using the device. Moreover, technical safety notes are given in Annex B.
-
Page 3: Typographical Conventions
In the individual chapters of this Operating Manual some typographical conventions are used. These conventions allow for quick familiarization with the manual. They simplify handling of this manual and help you to familiarize quickly with the ROWE Scan 450i scanner. Comments... - Page 4 1.2 Scanner Upgrades ........................9 1.3 System Overview ........................14 1.4 Unpacking of Device ......................16 1.5 PC Requirements ........................16 1.6 Connection of ROWE Scan 450i to Power Supply ............17 2 Installation ......................... 19 2.1 Erecting Scanner ........................20 2.2 Starting Software Installation ....................
- Page 5 5.10.1.2 File Format ..........................47 5.10.2 ROWE COPY APP Settings ......................49 5.10.2.1 Printer Selection ........................50 5.10.2.2 Output Settings for ROWE Printer ..................50 5.10.2.3 Output Settings for Inkjet Printer ..................52 5.10.2.4 Set Function ........................... 52 5.10.3 Settings Independent of Function ..................... 52 5.10.3.1 Color Mode ..........................
- Page 6 6.12 Favorites ..........................100 7 ROWE COST TRACKER / CENTER APP ..............102 7.1 Main View ROWE COST TRACKER APP ................ 103 7.2 Menu Order report ......................104 7.3 ROWE COST CENTER APP ....................106 7.3.1 Allocation of Limits and Discounts .................... 106 7.3.2 Allocation of Limits and Discounts ....................
- Page 7 7.6.1 Cost Control ........................... 115 7.6.2 Job Category Administration ...................... 116 7.6.3 Order Report Administration ...................... 118 7.6.3.1 Backup Settings ........................118 7.6.3.2 Deleting Order Report ......................119 7.6.4 Export/Import ..........................119 7.7 Warnings, Limits, Errors ....................120 7.7.1 Warnings ............................121 7.7.1.1 Login ............................
- Page 8 B.3.6 Take-back of Devices at the End of Service Life (WEEE) ............137 C Service and Contact ...................... 139 D About this System ......................140...
-
Page 9: Rowe Scan 450I Series
ROWE Scan 450i series. of the main functions of the ROWE Scan 450i series. of the scope of supply and the options of the ROWE Scan 450i series. of the software applications of the ROWE Scan 450i series. ... -
Page 10: Basic Models Of Rowe Scan 450I Series
E-mail: vertrieb@rowe.de 1.2 Scanner Upgrades As an option, the ROWE Scan 450i -40 basic model can be upgraded to KIT 60 by installing a software upgrade. An overview is given in Fehler! Verweisquelle konnte nicht gefunden werden.. B/W and/or gray scale... - Page 11 B/W+COLOR ScanModule ROWE Scan 450i 11.15 KIT 60 B/W+COLOR ScanModule Table 1.1: Maximum scan speed of ROWE Scan 450i series The scan speed depends upon the width of the original and the configuration of the computer. ROWE APP Description TWAIN + EDIT...
- Page 12 Inkjet. Table 1.2: ROWE APP CENTER By default, the ROWE Scan 450i is delivered including ROWE TWAIN APP as well as a 30-day trial version of ROWE SCAN/COPY APP. Optionally, models with extended features can be activated on the spot by means of a software upgrade. An overview of the available APPS is given in Table 1.2.
-
Page 13: Optional Accessories
10 kg. The flat screen is not included in the scope of supply. ROWE Scan 450i MFP stand 24” / 36” / 44” Intended to integrate a ROWE Scan 450i into an inkjet printer (up-to-date list of compatible printers on request). - Page 14 Calibration chart for ROWE Scan 450i 36“ ROWE Scan 450i Calibration Chart 44“ Calibration chart for ROWE Scan 450i 44“ For information on the available accessories for the individual scanner types, please refer to the current ROWE Scan 450i leaflet.
-
Page 15: System Overview
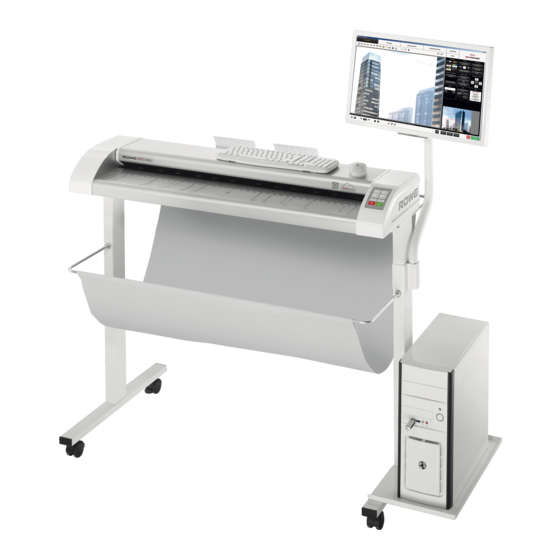
1.3 System Overview Figure 1.1 shows the ROWE Scan 450i front view. The following components are shown: Scanner top Control panel Feed table with graduation for formats Feeding slot for document feed Zero point Locking scanner top (on both sides) Figure 1.1: ROWE Scan 450i... - Page 16 If you want to mark the favorite keys of the control panel, use a conventional permanent marker. Please use household cleaning agents to remove or clean it. Figure 1.3 shows the back of the ROWE Scan 450i with the left side box. There, you see the following connections: Connection for 24 V power unit USB slot (USB 3.0 for ROWE Scan 450i) to connect scanner to PC...
-
Page 17: Unpacking Of Device
Annex B.3.1 (Page 130). When unpacking the scanner, do not lift it by grabbing the side boxes (see Figure 1.4). Figure 1.4: Unpacking of ROWE Scan 450i Before installing the device, check the consignment for completeness. Check the scope of supply by means of the list in Chapter 1.2 on Page 9. -
Page 18: Connection Of Rowe Scan 450I To Power Supply
1.6 Connection of ROWE Scan 450i to Power Supply Before using the ROWE Scan 450i, connect the scanner to the power supply using the power unit. Plug the connector socket of the supplied power unit into the connection on the back of the scanner. - Page 19 When several devices are connected to one socket using an extension cord and/or a multiple socket, the total current draw shall not exceed 10 A. The socket has to be located near the scanner.
-
Page 20: Installation
2 Installation In this chapter, you learn how to install the software on a PC to operate the ROWE Scan 450i. The PC shall comply with the minimum requirements mentioned in Chapter 1.5. However, the optimum requirements indicated there are recommended. -
Page 21: Erecting Scanner
2.1 Erecting Scanner Place the scanner either on the suitable ROWE floor stand, the suitable ROWE MFP stand (see Optional Accessories ROWE Scan 450i Series, Chapter 1.2 on Page 9), or on a sturdy table. Erect the scanner in a way that document feed and outlet can be accessed from all sides. -
Page 22: Selecting Folder
Figure 2.3: Welcome dialog box case. 2.3 Selecting Folder When selecting the folder (Figure 2.4), a folder where to install the ROWE Scan 450i software is already suggested. The shown figures have the following meaning: Destination folder : Currently selected... -
Page 23: Installation Process
2.4 Installation Process "Install" After actuating the button, the files will be installed. In the meantime, the installation progress and the current state are displayed as shown in Figure 2.5. Figure 2.5: Installation process 2.5 Installation of Device Drivers During data transmission several dialog boxes pop up indicating that the appropriate drivers for the device are being installed. -
Page 24: Installation Of Additional Plug-Ins
2.6 Installation of Additional Plug-ins After having completed the installation of device drivers and files, additional plug-ins required for use of the ROWE Scan 450i software are "Next“ installed. By actuating (see Figure 2.8) installation will be continued. Figure 2.8: Homepage for installation of plug-ins In the opening dialog box (Figure 2.9), you are... -
Page 25: Scanner
2.7 Shutting Down Computer – Connecting Scanner – Switching ON Computer and Scanner „Finish“ After actuating you are prompted to shut the computer down (Figure 2.11). "Yes" Please confirm by actuating . Now wait until the computer has been shut down and switched OFF. -
Page 26: Continuing Installation
2.8 Continuing Installation If Windows XP is installed on your computer, the operating system may browse for new scanner software after restart. Otherwise, you can skip this step. For driver installation, the dialog boxes in Figures 18 to 21 are displayed. Figure 2.13: Disable Windows update "No, not this time"... -
Page 27: Establishing Connection To Scanner
Figure 2.16: Driver installation finished 2.9 Establishing Connection to Scanner After having restarted the computer, start the Setup Wizard Start Programs ROWE → → Scan Series and follow the instructions. Figure 2.17: Start Setup Wizard Setup... -
Page 28: Activation Of License Options
As an option, you can also contact the ROWE Sales Department (see Chapter 1.1). By default, the ROWE Scan 450i is fitted with a 30-day trial license for ROWE SCAN/COPY APP. "Next" This is why you can press... -
Page 29: Calibration Of Scanner
2.11 Calibration of Scanner Now, the scanner needs to be calibrated to obtain perfect scan results. For this purpose, place the supplied calibration chart in the paper feed of the scanner. The calibration chart has to be placed with the printed side facing up and with Figure 2.20: Calibration of scanner the depicted arrow facing the front because the calibration process cannot... -
Page 30: Switching Scanner On/Off
3 Switching Scanner ON/OFF Operate the ROWE scanner at a supply voltage of 100 to 240 volts and a frequency of 50 / 60 Hz, only. -
Page 31: Connection Of Power Unit
ROWE Scan 450i software (see Chapter 2) prior to use. Plug the connector of the power unit into the socket to switch the device ON. Figure 3.1: Position connector power unit On the control panel of the scanner (see also Figure 1.2 on Page 15) you see two LEDs. -
Page 32: Simple Scan
4 Simple Scan Moreover, the ROWE Scan 450i scanners are fitted with automatic width detection (see scan format, Chapter 5 on Page 58). -
Page 33: Performing A Scan
SCAN APP (see Chapter 5.10.1.1 on Page 46) if required. "Start" Press the button (2) on the control panel of the scanner or in ROWE SCAN APP. "Start“ button on the control panel (2) and in ROWE SCAN APP have the same function. -
Page 34: Rowe App Center
5 ROWE APP CENTER ROWE APP CENTER is the central software needed to operate the ROWE Scan 450i series. The present chapter describes how to use the scanner efficiently by means of this software. - Page 35 Includes ROWE ScanManager TWAIN, LT plus ROWE COPY APP Scan-to-Copy, Multiprint, Multitasking, Recopy, closed loop color calibration, one printer driver each for inkjet printer and ROWE printer, etc. Sending printjobs: Webbased clients, Cloud, USB, Preview, ROWE AUTO CROP (recognizes and eliminates white borders automatically).
-
Page 36: Starting Rowe Scan App / Rowe Copy App
PC and switch it ON. Otherwise, the APP can be used in a limited demo mode only. The ROWE COPY APP is supplied with one printer driver each for an inkjet printer and a ROWE printer only. Drivers for further printers are to be purchased as an option. -
Page 37: Main Window Of Rowe Scan App
"ScanManager Touch" instead. 5.2 Main Window of ROWE SCAN APP Figure 5.2: ROWE SCAN APP overview The ROWE SCAN APP includes the following components: Functions (depending on the purchased license options not all functions are available (see Chapter 5.4, Page 37) Toolbar of main viewer (see Chapter 5.8, Page 41) -
Page 38: Selection Of Language
5.4 Functions Figure 5.5: ROWE APP CENTER: SCAN/COPY/PRINT APP In order to render your work as easy as possible, the control elements of ROWE APP CENTER are divided into so-called functions so that only the required functions are available. By selecting one of the buttons in the top line of ROWE APP CENTER you can switch between different functions. -
Page 39: Main Viewer
For detailed information see Chapter 5.11, Page 61. For upgrades resp. additional ROWE APPS see Chapter 2.10, Page 27. 5.5 Main Viewer Figure 5.6: Main viewer The main viewer serves to display the document scanned last and/or a loaded image file. -
Page 40: General Viewer
As soon as you make changes in the Settings (Page 44) affecting the appearance of the image (e.g. brightness, color mode, etc.), the view is updated automatically in the viewer so as to see the effects of the settings immediately. 5.6 General Viewer Figure 5.7: Interaction General Viewer - Main Viewer The small viewer (1) embedded at the bottom on the right serves to keep track of the position in... -
Page 41: Action Keys
Figure 5.6: Toolbar with action keys In the toolbar on the bottom right side of the ROWE SCAN APP, there are keys which are linked to the most important functions required to use the ROWE Scan 450i. By means of these keys you can start a scan job or print a document on a printer. -
Page 42: Toolbar Of Main Viewer
Save/print : Depending on the selected function, action key (5) is labeled "Save" (Function Scan Copy ) or "Print" (Function ). In both cases, output is initiated by pressing the key – either in a file or on a printer. You need this key when you want to edit the image and/or settings after the scan (prescan, edit, output) and/or ... - Page 43 This is how you can position edges precisely – in particular for large-sized drawings. This function can only be with the ROWE EDIT PROFESSIONAL APP. Reset width detection : This function allows to deactivate automatic width detection for the scan effected before.
-
Page 44: Toolbar Editing And Measuring Functions
type of modification such as black correction can be undone and/or repeated. 5.9 Toolbar Editing and Measuring Functions Figure 5.8 Toolbar under Main Viewer The toolbar under the Main Viewer provides functions for image editing and measuring of distances or areas. Vertical mirroring On / Off : Mirror entire image along vertical axis. -
Page 45: Settings
This function is available with ROWE EDIT PROFESSIONAL APP, only. 5.10 Settings The appearance of the settings area in ROWE SCAN/COPY APP (No. (4) in Figure 5.4, Page 37) is Scan Copy adapted slightly depending on the selected function so that the essential functions are always available depending on your work process. -
Page 46: Rowe Scan App Settings
In the following paragraphs, the settings relating to the selected function will be explained briefly. The respective settings options will be described in detail in a separate paragraph. The ROWE PRINT APP and Job list deserve special attention and will be dealt with in separate chapters. -
Page 47: Storage Location
format, further options are available (see 5.10.1.1 ). Info : In this area, special status information is given. The contents can be defined (see 5.10.3.5 ). 5.10.1.1 Storage Location Figure 5.10: Settings Storage location Local : Save on local computer (drive, folder) E-mail : Send as attachment to an e-mail. -
Page 48: File Format
Depending on your computer configuration, Figure 5.12: "Scan to Mail" - E-mail address the operating system may ask for your standard e-mail program. Make sure that an e- mail program is installed on your computer and select it if required. For large-sized files sending by e-mail may not be possible. - Page 49 incremented. In this way, you can save many scans in one directory one after another without having to adjust the file name before each scan. You can place the number at any position in the file name. For this purpose, enter the character "%"...
-
Page 50: Rowe Copy App Settings
5.10.2 ROWE COPY APP Settings Figure 5.16: Settings – ROWE COPY APP When you are in ROWE COPY APP, the settings are as follows: Color mode : see 5.10.3.1 Quality: see 5.10.3.2 Scan format : see 0. ... -
Page 51: Printer Selection
Inkjet printer: see 5.10.2.3 5.10.2.2 Output Settings for ROWE Printer Figure 5.18: Folder settings If you print on a ROWE printer featuring a folding machine, you can select the following folding options: Select folding program Header position: Here, you can define in which quadrant there is a header if any. If a folding program is activated, the drawing is rotated automatically so that the text field is always at the top. - Page 52 After having enabled all requested settings, you return to the previous view by pressing Figure 5.19: Extended settings for ROWE printer In the advanced settings you can select the following options if you selected a ROWE printer: Priority : Define behavior in printer job list.
-
Page 53: Output Settings For Inkjet Printer
: Printer does not print and instead requires the respective roll format giving a message. Larger : Printer uses the larger format available next (e.g. ISO A0 instead of A1). Larger (roll empty: fit): If a fitting medium format is inserted but empty, the printer ... -
Page 54: Color Mode
5.10.3.1 Color Mode Figure 5.23: Color mode One of the most important settings is the color mode. Color gray scale black/white Selection of (RGB) and and/or . The following scan is effected in the mode set here. If you effected a gray scale and/or black/white scan and switch to color later, the image is, however, displayed in gray scale in the Viewer. -
Page 55: Quality
5.10.3.2 Quality Figure 5.24: Quality settings Here, you can select settings affecting the quality of the scanned originals. Resolution : Selection of the resolution to be used for the next scanning operation. The before selection has to be made the scan. In case of the available "Turbo modes", a lower scanning resolution is used in feeding direction and afterwards interpolation is affected. - Page 56 Contrast : Increase / reduce contrast (setting range -127...128, 0: neutral). Gamma : Adjust the gamma curve (setting range 1...25, 17: neutral). This setting should not be changed because the default value (17) perfectly matches the scanner's color space. Background compensation : This slide control is extremely useful if the background of a scanned original is not really white.
- Page 57 Figure 5.26: Expert mode – Color settings Image settings/Color settings : If you switch to "Image setting", you see the submenu depicted in Figure 5.25. Red/ Green/Blue : By means of these three slide controls, you can shift the weighting of the three color channels red, green, and blue (R, G, B).
- Page 58 When optimizing markings with permanent marker heavily, other colors of the image may change slightly, too. You can check the result in the Viewer at any time. Should some permanent markers not be visible at all (white), reduce the value for background compensation if applicable.
-
Page 59: Scan Format
5.10.3.3 Scan Format In the field "Scan format", you can determine the dimensions of the following scan. If you actuate the button as shown in the adjoining figure, a menu pops up where you can select the following settings: Auto : The format is established automatically using the width detection feature. -
Page 60: Scaling/Margins
User-defined User-defined : If you select " “, you can enter any dimension for the scan range in the displayed text fields: Width : Scan width in mm Length : Scan length in mm Start at : Start position in feeding direction from beginning ... - Page 61 Scale factor : Enlargement and/or reduction factor in % (100 %: no scaling). Setting range 1.0 to 999.0 %. Page size : Auto (according to set factor) or scaled to a special default format (e.g. ISO A4). Fixed format On/Off : If the fixed ...
-
Page 62: Info
Figure 5.33: Area "Info" 5.11 Favorites ROWE SCAN/COPY/PRINT APP provides a vast range of settings to adjust scans and copies according to individual requirements. Often a manageable number of settings and/or combinations of settings are used over and over again. In order that you do not have to set and... - Page 63 Figure 5.34: Functions - Favorites When clicking the "Favorites“ function, the depicted menu pops up: List of favorites : Here, all favorites already saved are listed. In order to load and activate the saved settings, simply click on the entry in the list.
-
Page 64: Multiprint Favorites
Printing a second color copy on an inkjet printer, Issuing three more copies on a ROWE printer scaled to ISO A3 including folding, Saving the scan as TIFF file in a folder with activated background compensation, and ... - Page 65 Add new output configuration (2): Figure 5.39: Create / edit Multiprint favorites Another output configuration is added. The new configuration includes the parameters currently set in the ROWE COPY/PRINT APP. Edit output configuration (3) : Here, you can subsequently change the settings for the respective configuration.
-
Page 66: Job List
changes. Delete output configuration (4) : Click here if you want to remove an output configuration from the favorite. If you start an output with a Multiprint favorite being activated, a dialog box pops up after pressing the start key where you can check/set on which output devices to output: Activate/deactivate output on device Enable the field if you want to output on... - Page 67 Figure 5.41: Job list Print jobs are shown in a table; each line presents one job. The default information on the jobs given in the columns is Job number Date/time of order User initiating the job Name of printer ...
-
Page 68: Rowe Print App
5.13 ROWE PRINT APP By means of the ROWE PRINT APP you can create extensive print jobs as single files or complete sets with individual settings for each file. An overview of ROWE PRINT APP is given in Figure 5.43. -
Page 69: Layout Of Rowe Print App
5.13.1 Layout of ROWE PRINT APP Figure 5.43: Print Master PRO – Overview ROWE PRINT APP is divided into the following sections (see Figure 5.43): File list : List of files added to a print job (see Chapter 5.13.2). File presets : Here, you can make the settings which shall apply to the file highlighted in list (1) (see Chapter 5.13.3). - Page 70 Add file(s) : Add one or several files to the print job at once. The files are output in the order given in the list. Move file in list up/down: You can change the print order subsequently by highlighting the respective file in the list and afterwards pressing the corresponding arrow key. Preview : By means of this key you open a preview of the file selected in the list (highlighted in dark gray).
- Page 71 If you output the file on a ROWE printer and set a folding program (if a folding machine is available), the file is rotated automatically in a way that the header is at the top and visible after folding.
-
Page 72: File Settings
5.13.3 File Settings Figure 5.46: ROWE PRINT APP - File settings File presets All settings made in the section always apply to the file selected (highlighted) in the file list. If you selected several files in the list, the settings made are adapted to all highlighted files. - Page 73 5.10.3.4 . Folding : If output is effected on a ROWE printer with folding machine, a folding program can be selected here. Moreover, you can define in which quadrant any text field shall be located. If a folding program is activated, the drawing is rotated automatically so that the text field is always at the top.
-
Page 74: Job Settings
5.13.4 Job Settings Figure 5.47: Job settings Job settings All settings made in the section apply to all files within a set, i.e. to all files available in the file list. Printer Page tolerance : Selection of printer for output of set. With the option you can determine the tolerance by which the dimensions of the documents may be exceeded (in %) for the document being printed on the next smaller roll nonetheless. - Page 75 copies of the 1 file, then all copies of the 2 file etc. are output. Jobname / PIN / Account Jobname : Here you can define a user defined jobname which helps the identification of the print job in the job list. : Here you can define a PIN / password for protecting the printjob against other ...
- Page 76 : Printer does not print and requires the respective material giving a message. Ignore : Printer uses the material available (e.g. paper instead of transparent) Format : Response of printer to missing roll format : Printer does not print and requires the respective roll format giving a message. ...
- Page 77 Figure 5.49: Info texts Info texts : Here, you can enter additional information on a print job. This information helps to identify the job in the job list. The info texts are provided for future extensions and do not yet have any function (also see Chapter 6.9).
-
Page 78: General Print App Settings
5.13.5 General PRINT APP Settings Figure 5.50: General settings The general settings of the ROWE PRINT APP offer the following options: WEB CONNECT APP Printer cockpit always on top : If you start the printer cockpit from the WEB CONNECT APP, you can specify here, if it should be always in foreground or not. -
Page 79: Configuration Of Rowe Scan/Copy App
5.14 Configuration of ROWE SCAN/COPY APP By pressing the button shown on the right which can be found on the left of the action keys in the lower section of the ROWE SCAN/COPY APP you can make several basic settings. - Page 80 settings. In general, this option is reasonable only if you want to scan a special area of the original. Runout : Select where and how the scanner shall output the original after the scan: Back, Back hold, Front, Front hold, Hold High Performance Mode: When enabling this mode, in the Scan to File mode, creation of ...
-
Page 81: Rowe Scan/Copy App Touch
5.15 ROWE SCAN/COPY APP TOUCH ROWE Scan 450i scanners can be operated with a desktop computer with mouse and keyboard or with a touch screen. For touch screen operation, the specially optimized version of ROWE SCAN/COPY APP is available while the regular version is not intended for touch screen operation (i.e. - Page 82 Every time a number needs to be entered, a virtual numeric keypad is shown automatically. Figure 5.53: Numeric keypad If you touch a text field with the finger where a text needs to be entered (e.g. a file name), a virtual keyboard is shown automatically.
-
Page 83: Rowe Configmanager
6 ROWE ConfigManager The ROWE ConfigManager provides all administrative functions for the scanners of the ROWE Scan 450i series. Apart from configuring all basic settings, printers can be set, license upgrades can be loaded, or the scanner can be recalibrated here among others. -
Page 84: Starting Rowe Configmanager
Licenses: Display of existing license options, loading of license upgrades (see 6.6). Update: Here you can check whether a new version of the ROWE Scan 450i software is available (see 6.7). Parameter: Administration of general parameters (see 6.10). - Page 85 Login: Authentication/access protection for advanced settings (see 6.11). Favorites: Here you can set additional options for the behavior of the favorites in ROWE SCAN/COPY/PRINT APP (see 6.12). Email: Settings for email notification (only available with copy system ROWE ecoPrint, see ...
-
Page 86: Status Of Scanner
PC Whether an original was placed and if yes its approximate width Whether calibration is required Whether maintenance by the ROWE Service is required Protocol Under you can see the scanner's intensity of utilization. There you can see the number of scans already effected, the overall scan length, as well as the operating hours of the scanner. -
Page 87: Printer
6.5 Printer Figure 6.5: Selection of printer actions In order to set up your printer, ConfigManager provides numerous options: Add printer (see 6.5.1) Delete printer (see 6.5.2) Profile printer: Create a color profile for an inkjet printer to optimize the color ... - Page 88 NOT available (name Figure 6.10: Warning - printer name changed, not available, license invalid, etc.), a corresponding message is displayed when starting ROWE COPY/PRINT APP. In this case, the loaded favorite should be modified! Check for: Correct name, network connection, license, etc.
-
Page 89: Deleting Printer
Closed In order to achieve a reproducible reproduction of color, ROWE ConfigManager offers the " loop calibration " option. This means that the printer prints a specific color pattern (a so-called target ) about which the precise color values are known. - Page 90 all printers already installed. In the following dialog select the medium for which you want to create a profile. As some color printers have several rolls, you further have to indicate on which roll the medium can be found. Make sure that the appropriate medium is actually available on the selected roll.
-
Page 91: Configuring Printer
6.5.4 Configuring Printer If you want to configure the settings of a printer Configure printer already installed, select the option " " Printer under " ". Afterwards, you are prompted to select the printer to be configured. The list shows all Next printers already installed. -
Page 92: Stamp Programs
Figure 6.17: Extended printer settings In the extended settings you can make some complex settings affecting the behavior of the printer quite individually. The most important settings refer to the printable area of inkjet printers and margins. You should not make any modifications in this section unless problems occurred in this connection. -
Page 93: Add Stamps
If you are not already logged in as administrator user, you are requested to do so, as soon as you press one of the buttons (see 6.11). In order to add, delete and configure stamps you need the ROWE PRINT SPECIALS APP. -
Page 94: Delete Stamp
Now create the the drawing. With the help of the editor you can draw any user defined graphics and texts. All objects can be applied with special effects like transparencies for example. You can use special placeholder texts in order to print dynamically generated text contents onto your sheets. -
Page 95: Scanboxes
scans via the Windows access permission. Public access : Defines whether any user is allowed to use the scan box as scan target directory in the ROWE SCAN APP or whether access is protected by a user name/password. - Page 96 Scanbox Name : A freely selectable name (without special characters). Afterwards, the scan box can be identified by this name in the scan box configuration and the ROWE SCAN APP . Username/Password : Here, you have to enter the access data to access the shared ...
-
Page 97: Licenses
ROWE website using your Internet browser where you can order the requested upgrades. But you can also contact the ROWE Support (e.g. if you do not have an Internet connection on your computer). For the contact details please see Page 9. -
Page 98: Parameters
You can call the function Update only after logging in as an administrator (see 6.11). Figure 6.23: ConfigManager - Parameters The following parameters are available: Password protect ScanManager settings: You can protect the ROWE SCAN/COPY APP settings with a password (see 5.13.5) to prevent unauthorized persons from changing... - Page 99 If this parameter is activated, you can set a correction in y direction between 0,980 and 1.020 per mill in ROWE SCAN/COPY APP under "Expert mode". In case of existing favorites, this parameter is to be checked for correctness and to be saved, once.
-
Page 100: Login
immediately because of missing resources (e.g. a medium roll with a certain width), the queue will be blocked by default until, in order to prevent the distortion of the order. If you do not want this behavior, you can define a timeout, after which those jobs are suspended, such that printing continues with the next job. -
Page 101: Favorites
6.12 Favorites Figure 6.27: ConfigManager - Favorites In addition to the numerous ROWE SCAN/COPY/PRINT APP options regarding handling of Favorites favorites (see 5.11), in the function you can define for each individual parameter whether it shall be saved in the favorite (checked) or not (not checked). - Page 102 Parameter range output device ( ) you want to make the changes.
-
Page 103: Rowe Cost Tracker / Center App
7 ROWE COST TRACKER / CENTER APP By means of the ROWE COST TRACKER APP all scan/print and – if applicable – folding operations can be collected and evaluated so that a precise breakdown of the accruing costs is possible. The ROWE COST CENTER APP extends those features by and account management which allows the preparation of precise accounting and a limitation of device use if required. -
Page 104: Main View Rowe Cost Tracker App
7.1 Main View ROWE COST TRACKER APP Figure 7.1: Overview of ROWE Cost Control Professional with job report ROWE Cost Control Professional comprises of the following components: Via this tab in the ConfigManager, “Cost Control” can be opened. Menu Order report (see 7.2) Menu User administration (see 7.4) -
Page 105: Menu Order Report
7.2 Menu Order report The order report includes information on each performed job (scanning, printing, or folding). This information can be filtered by various criteria and be exported into a file with comma-separated values (.csv) for further analysis in tables. In the standard version, only the order report is provided. - Page 106 Example: Prescan and scan or scan and subsequent print. The view of the ROWE COST TRACKER APP version deviates from the ROWE COST CENTER APP view in that information on cost centers and costs is given in the Professional version, only.
-
Page 107: Rowe Cost Center App
7.3 ROWE COST CENTER APP In addition to the options for consumption analysis provided in ROWE COST TRACKER APP, the ROWE COST CENTER APP provides an extensive user and cost center administration which allows precise breakdown and accounting of the costs caused by use of devices. Moreover, use of devices by user and cost center can be limited by setting limits. -
Page 108: Menu User Administration
User limits User group limits Cost center limits Cost center group limits Figure 7.4: Fields for limits 7.4 Menu User Administration This menu includes four areas where the administrator can create accounts for users and user groups and set limits for users and user groups. -
Page 109: User Administration
Status, By means of the field a user can be disabled temporarily to prevent login to ROWE SCAN/COPY/PRINT APP. If user groups are available, the user can be allocated to a group. The field is located under the main window. -
Page 110: User Group Administration
After successful creation of a user account, cost centers can be allocated to that user. If cost centers are available, a list of all cost centers appears which can be allocated by means of the button Add cost center Cost centers already allocated are listed in alphabetic order and can be removed by Figure 7.9: Add cost centers to user Remove account... -
Page 111: User Limits
limit can be suspended temporarily; i.e. NO job category limits can be booked for this user group. Modifications in the main window are confirmed, rejected, or deleted – if allowed – by means of the buttons. Figure 7.13: Buttons – User group administration In the following, the configuration of user-related limits is described as an example. -
Page 112: User Group Limits
This operation can be repeated for all existing job categories. A job category which is not allocated may result in a refusal of the ROWE SCAN/COPY/PRINT APP to execute the job (see Figure 7.17). Figure 7.17: Error message Limit exceeded 7.4.4 User Group Limits... -
Page 113: Cost Center Administration
Status Available date The fields serve to allow bookings on this cost center in the ROWE SCAN/COPY/PRINT APP or not. Figure 7.20: Create/edit cost centers It is not possible to charge to inactive cost centers and cost centers with an... -
Page 114: Cost Center Group Administration
The field defines whether job category limits can be used for this cost center group in ROWE SCAN/COPY/PRINT APP. Figure 7.22: Define / modify cost center group After successful definition of the cost center group, cost centers can be added to this group. -
Page 115: Menu Config Setup
7.6 Menu Config Setup In this menu, the behavior of the ROWE SCAN/COPY/PRINT APP with Cost Control Professional being activated is defined. Moreover, it is possible to save and restore the recorded consumption... -
Page 116: Cost Control
SCAN/COPY/PRINT APP. A note regarding the saving status is given in red and/or green font. Figure 7.24: Menu Config Setup – Cost Control Figure 7.25: Cost Control Settings Cost Control Professional: The ROWE COST CENTER APP can be deactivated by disabling... -
Page 117: Job Category Administration
In this case, the ROWE COST TRACKER is active and jobs are recorded, only. Cost center editable : Define whether the user shall be allowed to enter a cost center (in a text box) independently when logging onto ROWE SCAN/COPY/PRINT APP. - Page 118 Name of the job category is defined by the system Color and cannot be modified. This also applies to the mode Price The field defines the height of costs of the job category per set unit of measure. A currency has been waived intentionally in order to ensure utmost flexibility.
-
Page 119: Order Report Administration
A file with the name means that the monthly backup file does NOT include any information. Such a file may occur if all information from the order report were deleted and ROWE Cost Control created a monthly backup file automatically afterwards. -
Page 120: Deleting Order Report
7.6.3.2 Deleting Order Report Order report delete In the area the monthly backup files can be removed from the order report or all information including the current month can be deleted. In a list, the available files can be displayed and Delete deleted by pressing the button in the... -
Page 121: Warnings, Limits, Errors
Export By pressing a backup file is created in the selected folder. Import Under the main window, the button Cost Control can be pressed to access the menu for restoring of backup files. In this menu, you select the file to be restored by means of the file manager. -
Page 122: Warnings
7.7.1 Warnings 7.7.1.1 Login Cost Control menu login/password is activated, a window pops up when ROWE SCAN/COPY/PRINT APP has been started. After having entered login name password, the authentication is started when Figure 7.34: Cost Control login Start pressing Cancel... -
Page 123: Editing Range
7.7.1.2 Editing Range For being able to change a data record, you have highlight line corresponding list first. This warning may Figure 7.38: Error message - No selection made appear if you try to delete or change an entry without having highlighted it before. The fields in the administration menus marked with... -
Page 124: Cost Center Query
Cost center group administration 7.7.1.3 Cost Center Query Figure 7.44: List cost centers Figure 7.45: User-defined cost centers Depending on how the query for cost centers is set in the system, different windows pop up. After having selected a cost center, the check whether the user is allowed to use this cost center and, if selected, whether sufficient limit is available is started after pressing the... -
Page 125: Examples For Limits
one group at most. All jobs affected in ROWE SCAN/COPY/PRINT APP are then entered in the respective user group. The advantage of a limitation by user group is that only a few settings are to be made for job category limits if many users are divided into a few groups. -
Page 126: Limit By Cost Center Group
Allocate users and/or user groups to the respective cost center group(s). All jobs affected in ROWE SCAN/COPY/PRINT APP are then entered in the respective cost center group. The advantage of this limitation is that only a few settings are required for the job category limit if some cost centers can be included in groups. -
Page 127: Maintenance Of Scanner
8 Maintenance of Scanner The present chapter describes how to clean the scanner of the ROWE Scan 450i series and how to replace wear parts. -
Page 128: Cleaning Of Scanner
8.1 Cleaning of Scanner Dirt and dust particles on the glass plate of the scanner may result in a deterioration of the scan result. This can be avoided by regular cleaning of glass plate, reflector rollers, and feed table. Figure 8.1: Cleaning of glass plate In order to clean glass plate, reflector rollers, and feed table, first open the scanner top. - Page 129 In order to replace the glass plate, first open the scanner top (see Figure 1.1, Page 147). Recess for thumbs Upper support for glass plate Glass plate Lower support, retaining clip Figure 8.2: Glass plate Now, put both thumbs into the recesses above the glass plate and push it down.
-
Page 130: Trouble Shooting
9 Trouble Shooting This chapter describes the actions to be taken if a problem occurs when using the scanner. -
Page 131: Malfunction Indicator Lamp On Control Panel
Chapter 1.5 No connection via USB Check whether the entry "ROWE Scanner" is available in the Windows Device Manager. Check whether the Windows Utility "ROWE Scan- Controller" is started (perform a restart of the PC). If applicable, deactivate firewalls and afterwards reinstall the software. -
Page 132: Scanning Problems
9.3 Scanning Problems The following table lists some possible problems when working with the ROWE SCAN/COPY APP and describes remedial actions. Problem Remedy ROWE SCAN/COPY APP Make sure that the scanner is switched ON and recognized by the PC. does detect Restart ROWE SCAN/COPY APP. -
Page 133: Scan Quality
very thin, faulty detection may occur. Auto Auto (Sensor). Image too wide on both Make sure to use the scan format and not sides applicable, recalibrate the scanner. 9.5 Scan Quality In case of problems with decreasing scan quality, you should usually recalibrate the scanner (see Chapter 6.4). -
Page 134: A Technical Requirements
A.1 Java Runtime Environment In order to be able to use all functions of the ROWE APPS, a "Java Runtime Environment", version 1.6.0 update 39 or higher has to be installed. If it is not yet installed on your computer, it will be... -
Page 135: B Safety Notes
B Safety Notes This Annex includes safety notes to be read prior to commissioning of the scanner of ROWE Scan 450i series. You obtain information on possible risks of personal injury and property damage regarding the devices of ROWE Scan 450i series. -
Page 136: B.1 Disclaimer
Operating Manual. In particular failures impairing safety have to be eliminated immediately. The ROWE systems of the Scan 450i series shall exclusively be used as described in this Operating Manual. Another use or use exceeding the above shall not be deemed intended use. The manufacturer is not liable for damages resulting therefrom. -
Page 137: B.3.2 Fuse Protection
The devices shall be kept dry. B.3.2 Fuse Protection The ROWE scanner must be protected by fuses (10 A). B.3.3 Assembly and Commissioning The device shall only be connected to a grounded socket with VDE homologation and located close to the machine. Check in advance whether the mains voltage complies with the nominal voltage indicated on the type plate. -
Page 138: B.3.5 Commitment Of Operators
Use of wearing parts which are not approved by ROWE may damage the devices. ROWE does not accept any liability if wearing parts are used which are not approved by ROWE. Observe the safety notes on the wearing parts. - Page 139 For disposal please contact the Roth + Weber GmbH Company (www.rowe.de or your local sales partner) in order to obtain information about the current mode of take-back.
- Page 140 C Service and Contact Should you have any questions about the ROWE products or need any technical support in case of problems with your ROWE device, do not hesitate to contact our Service Department: Phone: +49 (0) 2743 9217 -21...
- Page 141 D About this System Copyright©2003-2014 ROTH + WEBER GmbH. All rights reserved.
- Page 142 This software is partly based on the work of Python Software Foundation (http://www.python.org, License/Copyright) The authors of Python for Windows Extensions – pywin32 (http://sourceforge.net/projects/pywin32, License/Copyright) Independent JPEG Group (http://www.ijg.org, License/Copyright) The authors of libtiff (http://www.libtiff.org, License/Copyright) The authors of libpng (http://www.libpng.org, License/Copyright) ...
- Page 143 Table of Figures Figure 1.1: ROWE Scan 450i ..........................14 Figure 1.2: Control panel ROWE Scan 450i ....................15 Figure 1.3: Back of ROWE Scan 450i ......................15 Figure 1.4: Unpacking of ROWE Scan 450i ....................16 Figure 2.1: Installation screen ..........................
- Page 144 Figure 5.42: Edit print jobs ..........................66 Figure 5.43: Print Master PRO – Overview ....................68 Figure 5.44: ROWE PRINT APP – File list ....................... 68 Figure 5.45: File preview ........................... 69 Figure 5.46: ROWE PRINT APP - File settings ....................
- Page 145 Figure 6.26: ConfigManager - Change password ..................99 Figure 6.27: ConfigManager - Favorites ....................... 100 Figure 7.1: Overview of ROWE Cost Control Professional with job report ........... 103 Figure 7.2: Fields in order report ........................104 Figure 7.3: Order report table ........................
- Page 146 Figure 7.16: Reset current consumption ...................... 111 Figure 7.17: Error message Limit exceeded ....................111 Figure 7.18: Cost center administration ....................... 112 Figure 7.19: Cost center list ........................... 112 Figure 7.20: Create/edit cost centers ......................112 Figure 7.21: Cost center group administration ...................
Need help?
Do you have a question about the Scan 450i 24 inch KIT 40 and is the answer not in the manual?
Questions and answers