Advertisement
Advertisement
Table of Contents

Related Manuals for Quadrone Maximus


Summary of Contents for Quadrone Maximus
- Page 1 Instruction Manual...
- Page 2 Introduction • Thank you for choosing Quadrone! This is a four-axis aircraft that can fly outdoors, in order to make it easier to control the aircraft. Please carefully read this manual before operating your Quadrone. Please keep this manual for future reference.
-
Page 3: Warning
• If this is your first time flying a quadcopter read the manual carefully. Seek the help of an experienced pilot to help you fly. These safety instructions are intended not only for the protection of your Quadrone but also to protect your own safety. Improper operation can cause injury or property damage. -
Page 4: Included
Ni-Cad and Alkaline batteries. • Make sure the batteries are installed correctly to ensure correct polarity. If you do not plan to use your Quadrone for an extended period of time, remove the batteries from the controller to avoid battery leakage which may damage the controller. -
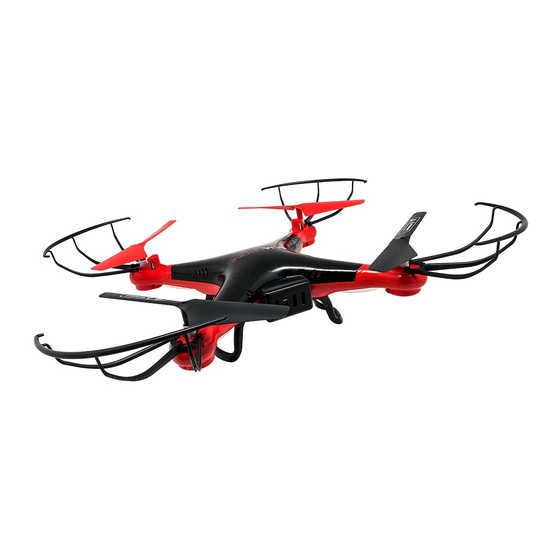
Page 5: Quadrone Diagram
Quadrone Diagram Blade Motor Canopy Remote Controller Diagram Power Indicator Antenna Throttle Joystick Directional Joystick Unlock/Emergency Stop Forward/Backward Trim Buttons Auto Land/Auto Take-off Headless Mode One Key Return Aileron Trim Buttons Power Button Shoot Photo Flip Button Shoot Video Speed Selection Remote Controller Battery Installation 1. -
Page 6: Charging Your Drone
Charging Your Drone 1. Ensure the drone is powered OFF. 2. Open the battery compartment. 3. Unplug the battery and remove it from the drone. 4. Connect the battery to 5. Plug the USB charger into 6. Reinsert the battery into the the included USB charger. -
Page 7: Syncing The Quad And Remote
fly. Power Button • If you are not going to use your Quadrone for an extended period of time, please take out the batteries in your remote controller. Potential battery leakage could occur and possibly damage the remote or create a fire hazard. - Page 8 Pull down on the throttle joystick. The Quadrone will begin to descend. Turning Push the throttle joystick to the right. The Quadrone will turn to right. Push the throttle joystick to the left. The Quadrone will turn to left. Forward/Backward Push the directional joystick to forward.
-
Page 9: Practice Tips
Narrow the circle as your skills progress. Trimming the Quad • If your Quadrone is leaning to or favoring a side, you may need to use the trim feature to balance it out so it flies straight. If the Quadrone leans to... -
Page 10: Flips And Rolls
Flips and Rolls • Your Quadrone can perform impressive flips and rolls in midair. In order to do this, press the flip button on your remote during flight. Move the directional joystick in any direction and the aircraft will perform a coinciding flip. -
Page 11: Speed Selection
Speed Selection • Your Quadrone can fly at four speeds. To select a speed, simply press the Speed Selection button on your remote change the speed. The remote will beep each time the speed changes. The default speed is 25% full speed. -
Page 12: Changing The Blades
Changing the Blades • If a blade breaks or falls off your Quadrone during a crash, it will be up to you to repair it. Use the screwdriver included in the package to remove the screw, detaching the Propeller from the Drone. Rotate counter-clockwise to loosen. Remove the damaged blade from the motor. -
Page 13: Troubleshooting
Troubleshooting Problem Cause Solution Drone’s LED lights blink continuously Repeat power Unable to sync to for more than 4 seconds after quad is sequence and re-sync. remote controller. turned on. No response to controller. (See pg. 5) 1. Remote batteries have been 1. -
Page 14: Safety Guidelines
Safety Guidelines • Follow community-based safety guidelines, as developed by organizations such as the Academy of Model Aeronautics (AMA). • Fly no higher than 400 feet and remain below any surrounding obstacles when possible. • Keep your drone in eyesight at all times, and use an observer to assist if needed. -
Page 15: Limited 90-Day Warranty
Limited 90-Day Warranty DGL Group, Ltd. warrants to the original consumer that this product is free from any electrical or mechanical defects for a period or 90 DAYS from the date of purchase. If any such defect is discovered within the warranty period, DGL Group, Ltd. - Page 16 Warning: Changes or modifications to this unit not expressly approved by the party responsible for compliance could void the user’s authority to operate the equipment. NOTE: This equipment has been tested and found to comply with the limits for a Class B digital device, pursuant to Part 15 of the FCC Rules.
Need help?
Do you have a question about the Maximus and is the answer not in the manual?
Questions and answers