Table of Contents
Advertisement
RFL Electronics ©
This entire
published or stored in an electronic retrieval system, in whole or in part, by any means – electronic or otherwise. For
GARD 8000 SYS
November 28, 2017
GARD 8000 System
Instruction Manual
RFL Electronics
353 Powerville Road ● Boonton Twp., NJ 07005-9151 USA
Tel: 973.334.3100 ● Fax: 973.334.3863
Email:
sales@rflelect.com
RFL Electronics is a subsidiary of Hubb ell Power Systems, Inc.
Publication Number MC8000SYS
Printed in U.S.A.
Revised November 28, 2017
document is the property of RFL Electronics and may not be reproduced, transmitted,
permission, contact:
●
www.rflelect.com
customer.service@rflelect.com
i
RFL Electronics
(973) 334-3100
Advertisement
Table of Contents

Related Manuals for RFL Electronics GARD 8000

Summary of Contents for RFL Electronics GARD 8000
- Page 1 RFL Electronics © This entire document is the property of RFL Electronics and may not be reproduced, transmitted, published or stored in an electronic retrieval system, in whole or in part, by any means – electronic or otherwise. For permission, contact: customer.service@rflelect.com...
- Page 2 This manual has been compiled and checked for accuracy. The information in this manual does not con stitute a warranty of performance. Rfl electronics . reserves the right to revise this manual and make changes to its contents from time to time.
- Page 3 Related Documentation RFL can provide the end user with a GARD 8000 System Emulator on a separate CD; this is not provided with the documentation package. Also available is a Logic Programming Manual to assist the user with schematic and spreadsheet design used with the GARD logic.
- Page 4 6.8 COMMS I/ O BASE MODULE AND COMMS M ODULES....................6-37 6.9 POW ER SUPPLY M ODULE..............................6-40 6.10 GA RD SYSTEM A LARMS ..............................6-45 6.11 MIDPLANE....................................6-50 6.12 CURRENT LIMIT MODULE ..............................6-50 GARD 8000 SYS RFL Electronics November 28, 2017 (973) 334-3100...
- Page 5 SECTION 16. GA RD DNP3 CONFIGURATION AND SNMP TRA P A GENT ...............16-1 16.1 OVER VIEW OF GA RD DNP3 ...............................16-1 16.2 RS-485 CONNECTIONS................................16-2 16.3 DNP3 W EB PA GE SET-UP..............................16-3 16.4 DNP V3.00 DEVICE PROFILE DOCUM ENT ........................16-13 GARD 8000 SYS RFL Electronics November 28, 2017 (973) 334-3100...
- Page 6 16.7 PROCEDURE FOR LOA DING MIB’S TO THE GA RD 8000 ..................16-21 SECTION 17. INDEX.....................................17-1 SECTION 18. APPLICATION NOTES ..............................18-1 SECTION 19. ACCESSORY EQUIPM ENT .............................19-1 19.1 AUXILIARY HYBRID CHASSIS: ............................19-1 GARD 8000 SYS RFL Electronics November 28, 2017 (973) 334-3100...
- Page 7 Figure 4-18. 50W Power A mplifier Circuit Board ..........................4-51 Figure 4-19. PLC Rear of 50W RF Chassis ............................4-52 Figure 4-20. GARD 8000 Controller Module (Co mmissioning, Current Diff) ................4-55 Figure 4-21. Current Diff. Relay Wiring..............................4-56 Figure 4-22. GARD 8000 Current Diff Relay, I/ O Connections .....................4-56 Figure 5-1.
- Page 8 Figure 6-12. GARD 8000 6U System I/O modules , rear panel v iews ...................6-27 Figure 6-13. GARD 8000 6U System I/O module, board v iew showing ju mper locations ............6-28 Figure 6-14. GARD 8000 3U System I/O modules, rear panel views ....................6-29 Figure 6-15.
- Page 9 Figure 7-65. System Logic Configuration web page ........................7-106 Figure 7-66. Input Mapping web page (Typical)..........................7-107 Figure 7-67. Input Mapping web page (Typical)..........................7-108 Figure 7-68. System Logic Configuration web page ........................7-109 GARD 8000 SYS RFL Electronics November 28, 2017 (973) 334-3100...
- Page 10 Figure 10-6. CLI Meter, Front Panel Mounting on 3U Chassis.....................10-17 Figure 10-7. PLC Dig ital Module (500455-1) ..........................10-18 Figure 10-8. 9508 RF Chassis Mounted on the GARD 8000......................10-19 Figure 10-9. Front View of the 9508 RF Chassis showing Module locations................10-20 Figure 10-10.
- Page 11 Figure 13-17. Current Differential Relay Primary Settings ......................13-20 Figure 13-18. Current Differential Relay Backup Settings......................13-24 Figure 13-19. Current Differential Relay SOE Settings ........................13-29 Figure 13-20. Current Differential Relay Oscillography Settings ....................13-32 GARD 8000 SYS RFL Electronics November 28, 2017 (973) 334-3100...
- Page 12 Figure 15-9. Metering Module Status..............................15-13 Figure 15-10. Metering Module General Status ..........................15-13 Figure 15-11. Metering Module Threshold Status ..........................15-14 Figure 15-12. Metering Module Analog Values ..........................15-16 Figure 16-1. DNP3 Functional Block Diagram ..........................16-1 GARD 8000 SYS RFL Electronics November 28, 2017 (973) 334-3100...
- Page 13 Figure 16-13. SNMP Trap Receivers ..............................16-18 Figure 16-14. Enabling the Trap Receiver M IB ..........................16-19 Figure 16-15. Downloading the RFL M IB ............................16-20 Figure 16-16. Sav ing the MIB ................................16-20 GARD 8000 SYS RFL Electronics November 28, 2017 xiii (973) 334-3100...
- Page 14 Table 6-9. PLC Analog Module Assembly Part Nu mbers (500930) ....................6-18 Table 6-10. Ju mper Settings and Switch Function for the GA RD 8000 PLC Dig ital Module...........6-20 Table 6-11. Ju mper Settings and Control Settings for the GARD 8000 PLC Analog Module..........6-23 Table 6-12 System I/O Modules................................6-26 Table 6-13.
- Page 15 Table 10-20. Line Board, Setup Ju mpers and Switch Sett ings ......................10-43 Table 12-1. Audio Tone Logic Block Diagrams ..........................12-1 Table 13-1 LED Functions on Front Current Diff. Board .......................13-3 Table 13-2 Maximu m Nu mber of Oscillography Records ......................13-79 GARD 8000 SYS RFL Electronics November 28, 2017 (973) 334-3100...
- Page 16 LIST OF EFFECTIVE PAGES When revisions are made to the GARD 8000 System Instruction Manual, the entire section where revisions were made is replaced. For the edition of this manual dated February 1, 2016 the sections are dated as follows:...
-
Page 17: Section 12. Audio Tone
13, 14, and 15. Section 13 is an updated Distance Relay Manual and Section 14 is a first release of the Current Diff. Module. Section 15 is an Index. Reflects 6.4 Release. GARD 8000 SYS RFL Electronics November 28, 2017 xv ii... - Page 18 Display. SOE alarms and new PS added to Section 6. Section 7 and 15 updated. Reflects 7.3 Image Software Release. Remove Distance Relay Module from manual, minor 3-1-09 updates to most sections. 3-1-09 GARD 8000 SYS RFL Electronics November 28, 2017 xv iii (973) 334-3100...
- Page 19 Section 1, 3, 6, 13 updated. Section 16 updated with RFL 8-1-14 8-1-14 SNMP MIB added. 2-1-16 Updates to Section 6, 14 and 16. Section 19 added. 2-1-16 Corrected the procedure for section 4.6.3.1.3 OUTPUT 11-28-17 IMPEDANCE GARD 8000 SYS RFL Electronics November 28, 2017 (973) 334-3100...
- Page 20 3U GARD Unit shown, position of labels on 6U unit similar CAUTION FOR YOUR SAFETY THE INSTALLATION, OPERATION AND MAINTENANCE OF THIS EQUIPMENT SHOULD ONLY BE PERFORMED BY QUALIFIED PERSONS ONLY. GARD 8000 SYS RFL Electronics November 28, 2017 (973) 334-3100...
- Page 21 Failure to comply with these precautions, or with specific warnings elsewhere in this manual, violates safety standards of design, manufacture, and intended use of this product. Rfl electronics . assumes no liability for failure to comply with these requirements.
- Page 22 AND FLOOR MATS, AND LEAVE MODULES IN THEIR ANTI-STATIC BAGS UNTIL THEY ARE READY TO BE INSTALLED. WARNING! YOUR GARD 8000 TERMINAL MAY BE EQUIPPED WITH FIBER OPTIC INPUT/OUTPUT MODULES THAT HAVE FIBER OPTIC EMITTER HEADS. FIBER OPTIC EMITTER HEADS USE A LASER LIGHT SOURCE THAT...
-
Page 23: Section 1. Product Information
SECTION 1. PRODUCT INFORMATION Please go to the next page for the following Product Information Sheets: GARD 8000 System GARD 8000 Teleprotection Channel GARD 8000 Programmable Single Function PLC GARD 8000 Current Differential Module IEC 61850 Ethernet Tripping Module GARD 8000 SYS... - Page 24 Product Information This page intentionally left blank GARD 8000 SYS RFL Electronics April 1, 2013 (973) 334-3100...
-
Page 25: Section 2. Applications
Applications SECTION 2. APPLICATIONS 2.1 SYSTEM OVERVIEW The GARD 8000 System is a complete Teleprotection and Relay Terminal for line protection and transfer trip applications. 2.2 FEATURES One product for all teleprotection and line protection needs. High-speed, secure and reliable synchronous communications. -
Page 26: Figure 2-1. Web Bro Wser Interface Overview
Applications 2.2.1 BUILT IN WEB SERVER The GARD 8000 System has a built-in web server that contains all the settings necessary to configure and use the system. Communication to the web browser is done through a laptop PC. The GARD 8000 System will also support an optional Touch Screen Display (TSD) which is fixed to the GARD Front Panel. -
Page 27: Ga Rd 8000 A Rchitecture
The Base System modules have fixed locations (slots) in the chassis. All Interface, Function and Optional Modules can be located in any free slot. Any Interface, Function or Optional Module may also be added to a GARD 8000 System in the field. Note: All chassis illustrations are shown with the front cover removed. -
Page 28: Figure 2-2. Ga Rd 8000 3U Chassis Front And Rear View
3U Chassis Front View Input/Output Comms (Built In) 3U Chassis Rear View Analog Input (typical) System I/O Figure 2-2. GARD 8000 3U Chassis Front and Rear View Redundant Power Supply Additional Comms Main Power Supply Comms (Built In) Controller Module (Slot 11) - Page 29 Applications 2.3.1 HARDWARE ARCHITECTURE A GARD 8000 System always includes Power supply, single or redundant with alarm relays and rear terminal block Controller module, single or redundant, with rear System I/O’s Display With TPS module with front System I/O’s ...
-
Page 30: Figure 2-4. Ga Rd 8000 Conceptual Design
2.3.2 SYSTEM ARCHITECTURE The GARD 8000 is built up of a number of modules that interact over three internal buses; the control bus, the logic bus and the comms bus. The Base system always consists of one Controller Module and one Display With TPS Module, plus one Power Supply Module. - Page 31 GARD. Functional modules are not aware of redundant operation in the system. Information on the status of the redundant system is available through the system Web pages. GARD 8000 SYS RFL Electronics February 14, 2011...
-
Page 32: Figure 2-5. Front And Rear Of 3U Chassis
Applications 2.3.3 GARD 8000 HARDWARE CONFIGURATION A GARD 8000 System can be built up with Functional Modules as required for a specific application. The following example describes a factory default configuration of a 3U chassis consisting of the following modules: ... -
Page 33: Figure 2-6. Ga Rd 8000 Dc Connection Diagram, 3U Distance Relay Plus Teleprotection System
Out 7 Out 8 PS 2 Minor 11 10 23 22 19 18 Alarm Slot 4 Slot 4 Figure 2-6. GARD 8000 DC Connection diagram, 3U Distance Relay Plus Teleprotection System GARD 8000 SYS RFL Electronics February 14, 2011 973.334.3100... -
Page 34: Ga Rd 8000 Base System
TPS Module. While this system will provide the functionality of a digital teleprotection system, order specific inputs and outputs need to be added. 2.4.1 POWER SUPPLY The GARD 8000 Power Supply comes in two versions: Wide range: 48/125 Vdc or 115 Vac 250 Vdc: 220/250 Vdc or 230 Vac 24 Vdc 19 –... -
Page 35: Figure 2-7. Alarm Configurat Ions
The Controller Module provides two functions that are packaged on one board; the System processing and the Logic processing. The GARD 8000 can be supplied with a Redundant Controller Module. In this case, the Redundant Controller Module operates in stand-by mode, monitoring all traffic in and out of the Main Controller Module and retaining a mirror image of all settings and configurations. -
Page 36: Figure 2-8. Antenna
System I/O board convert from inputs to outputs. They are thus available for time synchronization of external devices. The GPS receiver has to be connected to an externally mounted antenna, provided as an accessory. Figure 2-8. Antenna 2.4.5 METERING MODULE OPTION GARD 8000 SYS RFL Electronics May 1, 2013 2-12 973.334.3100... - Page 37 See section 5.5 The programmable LED’s are factory configured or customized by the end user. Below is a typical LED configuration for a GARD 8000 3U chassis with a PLC FSK Module. Note that typically not all GARD 8000 SYS...
-
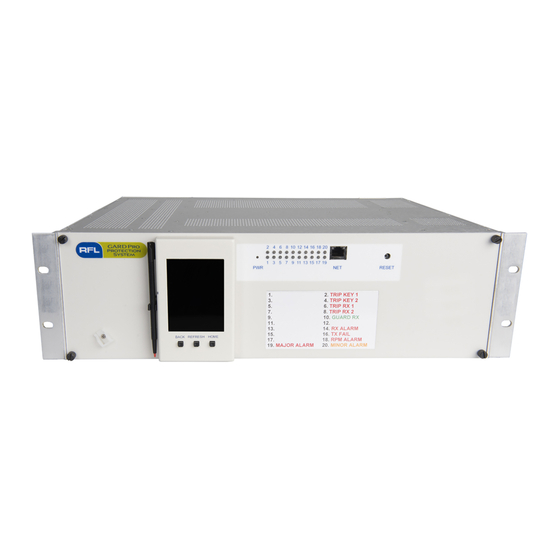
Page 38: Figure 2-9. Programmable Led's, 3U Chassis
16. LED16 TX Fail 15. LED15 18. LED18 RPM Alarm 17. LED17 20. LED20 System Minor Alarm 19. LED19 System Major Alarm LED,s are shown active Figure 2-9. Programmable LED’s, 3U Chassis GARD 8000 SYS RFL Electronics May 1, 2013 2-14 973.334.3100... -
Page 39: Figure 2-10. Programmable Led's, 6U Chassis
RX Alarm TX Fail RPM Alarm System Major Alarm System Minor Alarm RJ-45 Ethernet Port Programmable reset button RESET will reset the LED's as specified Figure 2-10. Programmable LED’s, 6U Chassis GARD 8000 SYS RFL Electronics May 1, 2013 2-15 973.334.3100... -
Page 40: Figure 2-11. Typical Led Color Configuration For A Ga Rd 8000 With A Plc Fsk Module
LED7 LED17 LED8 Active LED18 Active LED9 LED19 Healthy Alarm LED10 Active LED20 Healthy Alarm Figure 2-11. Typical LED Color Configuration for a GARD 8000 with a PLC FSK Module. GARD 8000 SYS RFL Electronics May 1, 2013 2-16 973.334.3100... - Page 41 RS-449/X.21/V.35 interface provided on the System I/O and/or via any of the optional communication interfaces. The 96-Bit TPS operates over one 64 kbps channel; additional TPS modules can be added to the base system. GARD 8000 SYS RFL Electronics May 1, 2013 2-17 973.334.3100...
-
Page 42: Communication Interfa Ces
6U chassis or on the right side of the 3U chassis. The remaining half of the board can be equipped with a set of six inputs, solid state outputs or relay outputs. Figure 2-12. Communicati on interface GARD 8000 SYS RFL Electronics May 1, 2013 2-18 973.334.3100... - Page 43 RS-449, X.21 and V.35 can be configured with data rates of 56 kbps, 64 kbps - 768 kbps GARD 8000 Comms Subsystem. GARD 8000 has two 12 x 64 kbps internal comms buses and the physical comms interface can be selected to use either of these two buses.
-
Page 44: Figure 2-13. T1/ E1Drop And Insert And Terminal Pass Thru
While T1 uses a bandwidth of 1.584 Mbps (24 x 64 kbps channels) and E1 uses 2.084 Mbps (30 x 64 kbps channels), the GARD 8000 System uses only up to 12 of these channels, following the n x 64 kbps C37.94 standard. - Page 45 RS-232 data connections across another GARD 8000 communications interface. The two ports can be used completely independently at any baud rate using one 64 kbps timeslot per port. If desired, both ports can use a single timeslot when both heads are running at 19.2 kbps or below.
-
Page 46: System Sequence Of Events Recording (Soe)
2.6 SYSTEM SEQUENCE OF EVENTS RECORDING (SOE) The GARD 8000 is supplied with a Sequence of Events Recorder (SOE). Up to 512 events are recorded, and time stamped with a 1 ms resolution. -
Page 47: Teleprotection System
The GARD 8000 System is customized to provide the number of channels, type and number of channel interfaces, inputs and outputs and redundancy to meet your application needs. -
Page 48: Distance Protection Termina L
The Distance Protection Module is a full featured protection terminal. It can be used as a stand-alone non-pilot or pilot distance protection system, or can operate in parallel with the GARD 8000 Current Differential Protection Module providing an independent and different measuring principle. -
Page 49: Current Differential Protection
Distance Protection Manual. 2.10 CURRENT DIFFERENTIAL PROTECTION A Current Differential Protection Module can be integrated in the GARD 8000 System. Using one 64 kbps channel, the current differential relay can use the same communication link as the teleprotection system module, or it can have its separate channel interface. -
Page 50: Aux Comm Unications Channel
Applications 2.12 AUX COMMUNICATIONS CHANNEL Two GARD 8000 Systems can be configured as shown in Figure 2-11, where two units communicate using a T1/E1 link. The typical application shows an RFL 9300 at each remote end. Each 9300 is connected to the GARD 8000 using a 64kb/s co-directional link employing a G.703 comms module. -
Page 51: Figure 2-14. Typical Ga Rd 8000 Aux Co Mmunication Channel Applicat Ion
Applications GARD 8000 GARD 8000 T1/E1 G.703 G.703 64kb/sec 64kb/sec Co-directional Co-directional RFL 9300 RFL 9300 Figure 2-14. Typical GARD 8000 Aux Communicati on Channel Application GARD 8000 SYS RFL Electronics May 1, 2013 2-27 973.334.3100... -
Page 52: Remote Service Cha Nnel
9745GD (A) (n.n.n.100) 9745GD(C) (n.n.n.120) n.n.n.121 COM 1 192.168.1.4 Primary See 5.7.1 for web page set-up Figure 2-15. Remote Access Service Channels for the “System Configuration” web page. See Figure 5-26 GARD 8000 SYS RFL Electronics May 1, 2013 2-28 973.334.3100... - Page 53 When selecting a Remote Service Channel IP address, insure that it is on the same IP sub-network as the IP address for the GARD’s rear Ethernet port. The Remote Service Channel’s IP address must not conflict with any IP address on the IP network. GARD 8000 SYS RFL Electronics May 1, 2013 2-29 973.334.3100...
- Page 54 Applications This page intentionally left blank GARD 8000 SYS RFL Electronics May 1, 2013 2-30 973.334.3100...
-
Page 55: Section 3. Technica L Data
Inputs and Outputs: The GARD 8000 System can be configured with up to 20 input and output modules on the rear part of the chassis. Relay outputs are jumper selectable Form A or Form B, and in addition each input and output has an inverter and a timer associated with it that has settings for both pick-up (debounce) delay and drop-out (pulse-stretch) delay. - Page 56 ANSI C37.90.1-1989 (SWC and Fast Transient) EN 60255-5 (1500 Vrms Breakdown Voltage and Impulse Withstand) IEN 60255-22-1 (SWC Class III) EN 60255-22-2 (ESD Class III) EN 60255-22-4 (Fast-Transient Class III) EN 60834-1 GARD 8000 SYS RFL Electronics September 24, 2012 973.334.3100...
-
Page 57: Communication Interfa Ces Specifications
3.2 COMMUNICATION INTERFACES SPECIFICATIONS Audio Tone Interface: The GARD 8000 System can be supplied with two or four FSK audio tone transceivers. All transceivers are bidirectional and can be programmed for any operating frequency or bandwidth between 300Hz and 4kHz. Channel one can be set to operate as a modem channel. This channel provides a communication link to the remote terminal for remote interrogation, setting changes or system testing from the local terminal. - Page 58 600 Ohms Digital Teleprotection Interfaces (Standard 8-Bit): The GARD 8000 Digital Teleprotection functionality is provided on the Display with TPS module. Up to 32 functions of digital protection are available for use over a maximum of 4 digital channels. Each of the 4 channels has 8 functions.
-
Page 59: Current Differentia L Specifications
3.3.4 STATUS BIT OPERATING TIME Transmission time: 6 – 24 ms (average = 16 ms, CRC protected). 3.3.5 DIRECT TRANSFER TRIP Back-to-back channel time of 3ms, as measured to a solid state output. GARD 8000 SYS RFL Electronics September 24, 2012 973.334.3100... -
Page 60: Pow Er Line Carrier Specifications
Maximum Receive Input Level: 25 Vrms Receive Dynamic Range: >40 dB Receive Sensitivity: 5mVrms Receive Input Impedance: Terminated Mode 1 50 Ohms Terminated Mode 2 75 Ohms Unterminated > 30 K Ohms GARD 8000 SYS RFL Electronics September 24, 2012 973.334.3100... -
Page 61: Specifications For The 9508 Rf Chassis (Option)
107250-5 200 Vdc to 300 Vdc Output Power: 30 Vdc@ 0.25 Amps 92 Vdc@ 2.4 Amps Operating Temperature: -20 C to +65 C (-4 F to +149 Humidity: +95% @ +40 degC. GARD 8000 SYS RFL Electronics September 24, 2012 973.334.3100... -
Page 62: Ga Rd M Etering M Odule Specifications
Nominal Voltage 110/120 Vac Continuous rating 220 Vac Max Reading 300V Peak Accuracy +/- 0.1% (60 to 300V) Frequency Range 40-70 Hz Accuracy +/-0.001 Hz (15 ppm) Power Accuracy (>1 Amp load current) GARD 8000 SYS RFL Electronics September 24, 2012 973.334.3100... -
Page 63: Ga Rd Telem Etry T Ransm Itter M Odule Specifications
0.01 % maximum. Resolution 16-Bit Environmental Requirements Operating Temperature Full performance {-20° C to + 70° C (-4 F to 158° F)} Humidity 0 to 90% GARD 8000 SYS RFL Electronics September 24, 2012 973.334.3100... - Page 64 Technical Data This page intentionally left blank GARD 8000 SYS RFL Electronics September 24, 2012 3-10 973.334.3100...
-
Page 65: Section 4. Installat Ion A Nd Commissioning
This section contains installation instructions for the GARD 8000, including unpacking, mounting, and interconnection wiring. Refer to Table 4-9 for a list of modules used in the GARD 8000. Located at the end of the Installation Section are procedures for commissioning various modules in the GARD System. -
Page 66: M Ounting
4.2.2 INTERCONNECTED CHASSIS GARD 8000 terminals ordered as part of a larger system may be interconnected with other chassis and mounted in a relay rack or cabinet, or on shipping rails for installation into a rack or cabinet at the customer's site. -
Page 67: Figure 4-1. Mounting Dimensions For Ga Rd 8000
(13.335) (3.81) 2.25 (5.715) 18.312 (46.512) (48.26) Inches (cm) 6U Chassis 17.625 (44.768) 10.5 (26.67) (3.81) 2.25 (5.715) (7.62) 2.25 18.312 (5.715) (46.512) (48.26) Figure 4-1. Mounting dimensions for GARD 8000 GARD 8000 SYS RFL Electronics November 28, 2017 973.334.3100... -
Page 68: Ventilation
Slide the equipment into the rack or cabinet. Install and tighten screws to all panels to secure the equipment in place. 4.4 VENTILATION The specified operating temperature range for GARD 8000 equipment is -20 C to +70 F to +158 F). -
Page 69: Connections
Paragraphs 4.5.1 through 4.5.10 provide basic descriptions of all the connections that must be made. Refer to the "as supplied" drawings furnished with your GARD 8000 for more detailed descriptions of the connections that must be made to your system. - Page 70 INPUT POWER. IMPROPER GROUND CONNECTIONS MAY RESULT IN SYSTEM MALFUNCTIONS, EQUIPMENT DAMAGE, OR ELECTRICAL SHOCK. 4.5.3 CHASSIS GROUND CONNECTIONS A protective earth stud at the lower right rear of the GARD 8000 chassis is the main ground for the GARD 8000 terminal. GARD 8000 SYS...
-
Page 71: Figure 4-2. Location Of Protective Earth Stud
If your GARD 8000 is equipped with Fiber Optic Modules, fiber optic connectors must be connected to the fiber optic heads on the rear panel of the GARD 8000. Type ST series bayonet fiber optic connectors (or their equivalent) are used with both singlemode and multimode fibers. The exact mating connector used will depend upon the head that is installed in the fiber optic module, and the specific optic cable being used. -
Page 72: Figure 4-3. Location Of Tb1
GARD 8000 end of the connection. When using PLC Modules in a 3U chassis, the GARD 8000 power supply is adequate to power the full chassis including the 10W amplifier; however, some 6U chassis installations may require an external +/-15Vdc power supply. -
Page 73: Figure 4-4. Location Of Synchronous Mu Lti-P Rotocol Interface
50085 MAJO MINO 500875 6U Chassis Rear View ETHERNET RS-485 MOD BUS IRIG- Analog Input (Slot 1 and 2 typical) 1PPS Power Supply I/O Figure 4-4. Location of Synchronous multi-protocol interface GARD 8000 SYS RFL Electronics November 28, 2017 973.334.3100... -
Page 74: Figure 4-5. Pin-Outs Rs-449, X.21, V.35
Not Used SD (B) (Send Data B) ST (B) Not used on X.21 RD (B) (Receive Data B) Not Used RT (B) (Receive Timing B) Figure 4-5. Pin-Outs RS-449, X.21, V.35 GARD 8000 SYS RFL Electronics November 28, 2017 4-10 973.334.3100... -
Page 75: Figure 4-6. Pin-Outs G.703
Not Used SD + SD - Not Used RD + RD + RD - RD - Not Used Not Used SD + SD - RJ-48C DB-15 Male Figure 4-7. Pin-Outs, T1/E1 GARD 8000 SYS RFL Electronics November 28, 2017 4-11 973.334.3100... -
Page 76: Figure 4-8. Pin-Outs, Rs-232
TX Data B+ (RS-485 output) Ground 6 7 8 9 RX Data B+ (RS-485 input) TX Data B- (RS-485 output) TX/RX (2W) TX (4W) RX (4W) Figure 4-9. Pin-Outs, Audio Tone Module GARD 8000 SYS RFL Electronics November 28, 2017 4-12 973.334.3100... -
Page 77: Figure 4-10. Terminal Block Connections, Metering Module
6U chassis and horizontal for the 3U chassis, the terminal assignments are the same. See 6.13 for a more detailed description of this module. Figure 4-11. Terminal Block Connections, Telemetry Transmitter Module GARD 8000 SYS RFL Electronics November 28, 2017 4-13 973.334.3100... - Page 78 THE GARD CHASSIS. After all other connections have been made to the GARD 8000, input power connections can be made to the Power Supply I/O at the rear of the chassis. If only one power supply is installed at the front of the chassis in the slot designated as “Power Supply 1”, input power connections must be made to the...
-
Page 79: Table 4-3. Ga Rd 8000 Modules, General In Formation
Installation and Commissioning Table 4-3. GARD 8000 modules, general information Additional Location of Module in GARD 8000 Assy. Module Description Information Chassis – Number ront or Paragraph: Power Supply 48-125V 500305 Power Supply 250V 500315 Power Supply I/O 500310 Controller Module (Primary) -
Page 80: Commissioning Procedures
Installation and Commissioning Table 4-9. GARD 8000 modules, general information – Cont…. For Additional Location of Module in GARD 8000 Assy. Module Description Information Chassis – Number ront or see Paragraph: Comms I/O Base 500850 RS-499,X21, V35 Comms Unit 500855 Plugs into Comms I/O Base G.703 Comms Unit... - Page 81 Confirm a proper Ground connection utilizing the protective earth stud on the Power Supply I/O. Remove the Front Panel. Power up the GARD 8000 chassis by applying power from station battery (early models of the GARD 8000 did not have On/Off power switches). The LED-DS1 on the power supply should be green.
-
Page 82: Figure 4-12. Power Supply I/ O Module (Teleprotection Co Mmissioning)
In the 3U chassis, SW2 should be in the NORM position (left-front view) and not in the Disable position. g. After a successful boot up the GARD 8000 is ready for interrogation through the front Ethernet Port located on the DISPLAY Module. -
Page 83: Figure 4-13. Gard 8000 Controller Module (Teleprotection Co Mmissioning)
Subnet Mask: 255.255.255.0 Standard Cat 5 Patch Cable Note: The GARD 8000 is delivered with pre-set IP addresses. The front port IP address is factory set to 192.168.1.1 with a subnet mask of 255.255.255.0. The Rear port IP address is configurable. - Page 84 Right click on the connection you would like to use (local area connection) to connect to the GARD 8000, and choose Properties from the pull-down menu. d. Scroll up/down until you can see the “Internet Protocol (TCP/IP)” protocol listed as shown on the following page.
-
Page 85: Table 4-4. Front Port Ethernet Led's
Frames being received. Communicating with the GARD 8000-Administrator Login Upon successful login to the GARD 8000 unit the following page will be displayed. Unless the Administrator ‘Admin’ User Name and Password were changed by the IT dept. or changed at RFL due to a special request the default Administrative User Name and Passwords are programmed for: Admin. - Page 86 4.6.1.3 VERIFYING CHASSIS CONFIGURATION STATUS ‘Home’ Once a successful connection to the GARD 8000 is established, click on in order to display a current Chassis Configuration Status as shown below. This webpage is a pictorial representation of the front and rear of the 3U chassis. The two left columns represent the rear of the 3U chassis, and the right column represents the front of the 3U chassis.
- Page 87 Installation and Commissioning Module not Configured or in Alert Modules Fully Configured, not in Alert or Alarm GARD 8000 SYS RFL Electronics November 28, 2017 4-23 973.334.3100...
- Page 88 The GARD 8000 can be configured with different Communication Interface modules. In order to verify a status of the local chassis, each Comms module installed in the Gard 8000 system can be ‘looped back’ either by the software or using a ‘hard loopback’. Please use the following steps to enable the software’s Local Loopback.
- Page 89 5. While a software Local Loopback is enabled, click on ‘Settings’, select Chassis Configuration and then click on ‘Teleprotection (TPS)’. 6. In the ‘Teleprotection Channel Configuration’ click on ‘Edit’ for a channel being used. GARD 8000 SYS RFL Electronics November 28, 2017 4-25 973.334.3100...
- Page 90 TPS channel. The status page is a snapshot of the diagnostic counters and it needs to be updated during the monitoring process. Note: Most of the Web Pages are supported by “Help” option. Select “Help” while a particular web page is displayed. GARD 8000 SYS RFL Electronics November 28, 2017 4-26 973.334.3100...
- Page 91 2 input cards to various points which are tied to 8 functions of a TPS module. Before the Gard 8000 is placed in service a programming of Input Mapping should be verified and confirmed with the LOGIC DRAWIGS provided with the SALES ORDER.
- Page 92 6. At the same time, go to the Output Test menu and verify ‘Logic 1’ under ‘Bus’ and ‘Field.’ 7. Use an Ohm Meter to verify an operation of the appropriate outputs. 8. Set all inputs back to Normal. GARD 8000 SYS RFL Electronics November 28, 2017 4-28 973.334.3100...
- Page 93 Installation and Commissioning This ends the Commissioning Procedure GARD 8000 SYS RFL Electronics November 28, 2017 4-29 973.334.3100...
- Page 94 2. Confirm a proper Ground connection utilizing the protective earth stud on the Power Supply I/O. 3. Remove the Front Panel. 4. Power up the GARD 8000 chassis by applying power from station battery (early models of the GARD 8000 did not have ON/Off power switches). The LED-DS1 on the power supply should be green.
-
Page 95: Figure 4-14. Power Supply I/ O Module (Audio-Tone Co Mmissioning)
In the 3U chassis, SW2 should be in the NORM position (left-front view) and not in the Disable position. g. After a successful boot up the GARD 8000 is ready for interrogation through the front Ethernet Port located on the DISPLAY Module. -
Page 96: Figure 4-15. Gard 8000 Controller Module (Audio-Tone Co Mmissioning)
Subnet Mask: 255.255.255.0 Standard Cat 5 Patch Cable Note: The GARD 8000 is delivered with pre-set IP addresses. The front port IP address is factory set to 192.168.1.1 with a subnet mask of 255.255.255.0. The Rear port IP address is configurable. The factory set rear port IP address is provided on a removable sticker on the System I/O module, and is also specified in the order packing sheet for the GARD 8000 System. - Page 97 Right click on the connection you would like to use (local area connection) to connect to the GARD 8000, and choose Properties from the pull-down menu. d. Scroll up/down until you can see the “Internet Protocol (TCP/IP)” protocol listed as shown on the following page.
- Page 98 Installation and Commissioning Communicating with the GARD 8000-Administrator Login Upon successful login to the GARD 8000 unit the following page will be displayed. Unless the Administrator ‘Admin’ User Name and Password were changed by the IT dept. or changed at RFL due to a special request the default Administrative User Name and Passwords are programmed for: Admin.
- Page 99 Over/Under Voltage Alarm on ‘Alarm Configuration Page’) if the output voltage is equal to or higher than +/- 24.75V and the Low Voltage is below +/- 16.25V. 5. Click on ‘Save’ to store any changes done on this web page GARD 8000 SYS RFL Electronics November 28, 2017 4-35 973.334.3100...
- Page 100 ‘Modem’ the programming changes have to be done at two web pages: ‘Audio Tone Configuration’ and ‘Option Settings’. See below. To display the Option Settings page click on ‘Settings’, select ‘System Logic Configuration’, at the System Logic Configuration page select ‘Option Settings’ GARD 8000 SYS RFL Electronics November 28, 2017 4-36...
- Page 101 Also, the Front Panel LEDs will indicate a ‘Loss of Comms’ in the following webpage. condition and a type of Alarm or Condition will be indicated on the Custom Designed Front Panel Nameplate. GARD 8000 SYS RFL Electronics November 28, 2017 4-37...
- Page 102 Repeat the steps in 4.6.2.6 above to verify the General Status after a software loopback is enabled. A Minor Alarm indicating the software enabled is in ‘Internal Loopback’ will be displayed as shown in the following webpage. GARD 8000 SYS RFL Electronics November 28, 2017 4-38...
- Page 103 5. To display the ‘LED Logic Assignments’, go to the Home page and click on ‘Settings’, select ‘System Labels and Triggers’, then select ‘LED Logic Assignments’ Note: Most of the Web Pages are supported by “Help” option. Select “Help” while a particular web page is displayed. GARD 8000 SYS RFL Electronics November 28, 2017 4-39...
- Page 104 ‘SOE Triggers and Labels’. 3. Click on ‘Clear All SOE’ and then click ‘OK’ at the security window as shown on the following webpage. A page will be displayed similar to the second webpage below. GARD 8000 SYS RFL Electronics November 28, 2017 4-40 973.334.3100...
- Page 105 10. Click on ‘Test’ menu, select ‘System Test’, click on ‘Audio Tone’ module and verify a shift of frequencies on the configured channels 11. Click on ‘SOE’ menu, select ‘System and Teleprotection’ and verify Sequence of Events recorded during the local trip testing. GARD 8000 SYS RFL Electronics November 28, 2017 4-41...
- Page 106 Installation and Commissioning GARD 8000 SYS RFL Electronics November 28, 2017 4-42 973.334.3100...
- Page 107 Installation and Commissioning GARD 8000 SYS RFL Electronics November 28, 2017 4-43 973.334.3100...
- Page 108 LEDs should illuminate for all tripped channels. Exercise all aspects of the primitive and alarm logic observing all outputs for their correct response. 4. If desired, exercise all the steps described for a Local-End testing. This ends the commissioning procedure GARD 8000 SYS RFL Electronics November 28, 2017 4-44...
- Page 109 OPEN THE FRONT DOOR, AND REMOVE AND RE-SEAT ALL FRONT PANEL MODULES. After the GARD 8000 PLC is installed and prior to being placed in service, a few basic adjustments and measurements must be performed to ensure proper operation. The output power of the system...
-
Page 110: Figure 4-16. Plc Analog Module Test Points
Installation and Commissioning 4.6.3.1.2 OUTPUT POWER The GARD 8000 PLC transmitter is specified to provide 10W into a 50 ohm load. Adjustments to the output power are made with a 50 ohm dummy load connected. Any additional devices in the transmit path, such as hybrids, will reduce the effective output power. - Page 111 Installation and Commissioning 4.6.3.1.3 OUTPUT IMPEDANCE Once the GARD 8000 PLC has been connected to the line the output impedance should be adjusted to match that of the actual line. Impedance mismatches can cause signal reflections and other undesirable effects. The GARD 8000 PLC Power Amplifier provides an output impedance adjustment to accommodate small variations in actual line conditions.
- Page 112 If this is a 2W system, perform the following Hybrid Tuning Procedure. The purpose of tuning the hybrid is to match the impedance of the GARD 8000 PLC system to the transmission line, thereby minimizing reflected power. Refer to Figure 4-16.
- Page 113 Record the actual reading with FSVM ____________________ CAUTION If your GARD 8000 has more than two PLC Digital Modules installed, remove the additional PLC Modules from the front of the unit when upgrading to new PLC software. You can only upgrade a PLC Module with ONE additional PLC Module installed.
-
Page 114: Figure 4-17. Location Of 50W Power A Mp Lifie R
Installation and Commissioning section 10.8.14 and 10.8.15 or the factory system drawings provided for proper interconnecting cabling between the GARD 8000 chassis and the 9508 RF chassis. Make the following settings as required on the GARD PLC General Settings web page:... -
Page 115: Figure 4-18. 50W Power A Mplifier Circuit Board
13. Disconnect the line coupling from the 2W I/O connector on the rear of the 9508 RF chassis and connect a 50 ohm dummy load. 14. Reinstall the connector at J5. GARD 8000 SYS RFL Electronics November 28, 2017 4-51... -
Page 116: Figure 4-19. Plc Rear Of 50W Rf Chassis
4. Adjust the Line Tuning Units for minimum reflected power according to the manufacturer’s recommendations. A Reflected Power reading of <4% or 14dB (forward & reverse) should be achieved for optimum performance. 5. Trans-hybrid adjustment: GARD 8000 SYS RFL Electronics November 28, 2017 4-52 973.334.3100... - Page 117 Home web page click on “Settings,” select “File Operations,” select “Save File to PC," select “Gard System Manual PDF.” The GARD 8000 Emulator software can be used ahead of an actual commissioning in an off- line mode in order to program the Current Diff Relay or GARD8000 system settings and save them to a file.
- Page 118 Main Power Supply or Supplies, ensure that the power supply or supplies match the power requirements. 2. The Main power supply of the GARD 8000 is labeled on the rear terminal block as Power Supply #1. If the GARD 8000 relay was configured with the Main and Redundant Power Supplies, connect the power source on the rear terminal block labeled for Power Supply #1 and Power Supply #2.
-
Page 119: Figure 4-20. Gard 8000 Controller Module (Co Mmissioning, Current Diff)
Controller Module (see below). The front panel needs to be removed to observe the Status LED’s. 2. A complete Boot-up of the GARD 8000 is indicated by the LED #1 lighting Green. For more information about other status Led’s on the Controller module please refer to the GARD8000 System Manual, section 6.1... -
Page 120: Figure 4-21. Current Diff. Relay Wiring
Installation and Commissioning AC SCHEMATIC GARD 8000 Current Differential Relay Wiring SLOT 3 Figure 4-21. Current Diff. Relay Wiring Figure 4-22. GARD 8000 Current Diff Relay, I/O Connections GARD 8000 SYS RFL Electronics November 28, 2017 4-56 973.334.3100... - Page 121 TX to RX connectors (rear of the GARD). If the Comms interface is one of the Electrical Interface modules (T1/E1, RS-449, X.21, V.35, G.703) a ‘hard loopback’ connector would have to be made. Please refer to the GARD 8000 Instruction Manual, Section 4.5 to obtain the ‘pinouts’ for the Electrical Interface adapters.
- Page 122 Remote addresses of the Current Diff Relay match. Verify/modify the Local or Remote Current Diff addresses by clicking on “Settings,” selecting “Chassis Configuration,” “Current Diff Relay” and then clicking on “Comms Settings.” See below. GARD 8000 SYS RFL Electronics November 28, 2017 4-58 973.334.3100...
- Page 123 After either Loopback is enabled, verify the status of the Current Diff Relay: from the ‘Home’ page click on the “Current Diff Relay” module, and select “Communications Status.” A web page similar to the one shown below will appear. GARD 8000 SYS RFL Electronics November 28, 2017 4-59 973.334.3100...
- Page 124 Additional logical inputs or outputs could be mapped in the Input Mapping and Output Mapping Logic blocks located in the Current Diff Relay Logic Design. GARD 8000 SYS RFL Electronics November 28, 2017 4-60 973.334.3100...
- Page 125 8Kbps Remote Service channel (depending on the type of communication link). The Remote Service Channel function of the GARD 8000 can be used to interrogate a remote end. Please refer to the GARD8000 instruction manual (Section 2.13 and 5.3.4) for more information.
- Page 126 To access the Test Mode, from Home page click on “Test,” select “System Test” and then click on “Current Diff Relay.” At the Current Diff Relay Test page check the box “Enter Test Mode” and then click on “Run Test” (See below). GARD 8000 SYS RFL Electronics November 28, 2017 4-62 973.334.3100...
- Page 127 RFL Customer Service at 973-334-3100 or by e-mail: sales@rflelect.com. To retrieve the Current Diff Relay ‘Last Trip’ click on the “Home” page, click on “Current Diff Relay” and then select “Last Trip”. GARD 8000 SYS RFL Electronics November 28, 2017 4-63...
- Page 128 Installation and Commissioning 4.6.4.14 CURRENT DIFF RELAY RECOMMENDED SETTINGS FOR FUNCTIONAL TESTING 1. General Settings: GARD 8000 SYS RFL Electronics November 28, 2017 4-64 973.334.3100...
- Page 129 Installation and Commissioning 2. Communications Settings: 3. Primary Settings: GARD 8000 SYS RFL Electronics November 28, 2017 4-65 973.334.3100...
- Page 130 Installation and Commissioning 4. Backup Settings: GARD 8000 SYS RFL Electronics November 28, 2017 4-66 973.334.3100...
- Page 131 Installation and Commissioning 5. SOE Settings: GARD 8000 SYS RFL Electronics November 28, 2017 4-67 973.334.3100...
- Page 132 Simulation of INTERNAL FAULTS can be performed on a GARD unit setup for a Local Loopback or on two GARD units setup for Two Terminal/End-to-End configuration. Before proceeding with the Functional Testing verify the wiring of the Current Diff Relay to the Power System Simulator! GARD 8000 SYS RFL Electronics November 28, 2017 4-68...
- Page 133 Power Simulator Settings for a Local End (or a Remote End if configured) to verify Metering and Status: Local End Remote End Phase Frequency Phase Frequency Source Amplitude Amplitude Angle (Hz) Angle (Hz) 0° 60.00 180° 60.00 240° 60.00 60° 60.00 120° 60.00 -60° 60.00 GARD 8000 SYS RFL Electronics November 28, 2017 4-69 973.334.3100...
- Page 134 60.00 4.5A 0° 60.00 0° 60.00 0° 60.00 180° 60.00 4.5A 180° 60.00 Typical Trip Time +/-3ms Solid State Output Relay Output Differential 15.40ms 18.90ms High Set Trip 10.30ms 13.50ms GARD 8000 SYS RFL Electronics November 28, 2017 4-70 973.334.3100...
- Page 135 0° 60.00 0° 60.00 240° 60.00 4.5A 240° 60.00 120° 60.00 120° 60.00 Typical Trip Time +/-3ms Solid State Output Relay Output Differential 15.10ms 18.40ms High Set Trip 13.10ms 16.60ms GARD 8000 SYS RFL Electronics November 28, 2017 4-71 973.334.3100...
- Page 136 Phase to Phase Fault AB: Settings for a Local End Pre-Fault Settings Fault Settings Phase Frequency Phase Frequency Source Amplitude Amplitude Angle (Hz) Angle (Hz) 0° 60.00 0° 60.00 180° 60.00 180° 60.00 0° 60.00 0° 60.00 GARD 8000 SYS RFL Electronics November 28, 2017 4-72 973.334.3100...
- Page 137 Phase to Ground Fault A G: Settings for a Local End Pre-Fault Settings Fault Settings Phase Frequency Phase Frequency Source Amplitude Amplitude Angle (Hz) Angle (Hz) 0° 60.00 0° 60.00 0° 60.00 0° 60.00 0° 60.00 0° 60.00 GARD 8000 SYS RFL Electronics November 28, 2017 4-73 973.334.3100...
- Page 138 After each test, the operation of the trip outputs can be verified by retrieving the Current Diff Relay SOE Records, System SOE records, Current Diff Relay Oscillography records, and Current Diff Relay Last Trip. GARD 8000 SYS RFL Electronics November 28, 2017 4-74 973.334.3100...
- Page 139 1. At the Home Web page, click on “Settings” and select ‘File Operations.’ 2. Click on “Send File to Gard 8000.” 3. At “Send File to Gard 8000” select ‘System Logic Data Base (.txt file). (Note: The txt file has to be loaded before the edn file) 4.
- Page 140 Installation and Commissioning This page intentionally left blank GARD 8000 SYS RFL Electronics November 28, 2017 4-76 973.334.3100...
-
Page 141: Section 5 August
RS-232 serial port. See Section 5.2.3 There is an Ethernet switch built into the GARD 8000 that allows a connection from the front or rear. The GARD does not permit simultaneous access by two operators at once. The second operator will receive a notification if the unit is in use. -
Page 142: Figure 5-2. Front View Of The 6U Chassis Showing Location Of The Rj-45 Port
System User Interface GARD 8000 Protective System RJ- 45 Ethernet Port Figure 5-2. Front View of the 6U Chassis showing location of the RJ-45 port GARD 8000 SYS RFL Electronics August 1, 2012 973.334.3100... -
Page 143: Figure 5-3. Rear View Of 6U Chassis Showing Location Of Rj-45 (O R Fiber Optic) And Rs-232 Ports
MOD BUS Fiber Optic Ground Connectors (bayonet) Input From Optional GPS IRIG-B Antenna 1PPS Figure 5-3. Rear View Of 6U Chassis showing location of RJ-45 (or Fiber Optic) and RS-232 ports GARD 8000 SYS RFL Electronics August 1, 2012 973.334.3100... -
Page 144: Figure 5-4. Front View Of 3U Chassis Showing The Location Of The Rj-45 Port
Figure 5-5. Rear view of 3U chassis showing the location of the RJ-45 (or Fiber Optic) and the RS-232 ports A valid Ethernet connection is one that has the Link established, and is represented by a solid light (or blinking light) on the left LED of the connector. GARD 8000 SYS RFL Electronics August 1, 2012... -
Page 145: Figure 5-6. Co Mmunication Overview (Typical)
Local User Interface GARD Factory Settings: IP Address 192.168.1.1 Subnet 255.255.255.0 PC Settings: IP Address 192.168.1.10 (typ) Subnet 255.255.255.0 RJ-45 Cable : Cat5 Patch Lead RJ-45 (Straight) Figure 5-6. Communication Overview (Typical) GARD 8000 SYS RFL Electronics August 1, 2012 973.334.3100... -
Page 146: Ethernet A Ccess
System User Interface 5.2 ETHERNET ACCESS GARD 8000 is delivered with pre-set IP addresses. The front port IP address is fixed, and factory set to 192.168.1.1 with a subnet mask of 255.255.255.0. The rear port IP address is configurable. The IP Address assigned to the front port is 192.168.1.1 for every GARD 8000 chassis. DO NOT plug this port into a LAN. -
Page 147: Figure 5-8. Ga Rd Login Access
Windows XP operating systems. Connect your PC to the GARD 8000 using a Cat 5 Patch Cable to the front RJ-45 Ethernet port. From Internet Explorer go to the Address Bar and enter the IP Address of the GARD 8000 which is 192.168.1.1, then press the Enter button. -
Page 148: Figure 5-9. Tcp/Ip Address Setup
Note: The System Configuration web page is divided into 3 separate and distinct sections, only the top section is shown here. For more information on System Configuration including ‘Time Settings’ see 7.3.1 Figure 5-9. TCP/IP Address setup GARD 8000 SYS RFL Electronics August 1, 2012 973.334.3100... -
Page 149: Table 5-3. Rear Ethernet Port Leds
Data: 8, Parity 0, Stop Bits 1, Enable Hardware Flow Control Note: All GARD 8000 Rear RS-232 ports are preconfigured for an IP address of 192.168.1.1 at the factory, and the IP Address assigned to the PC by the PPP connection will be 192.168.1.2. - Page 150 System User Interface Click Start, click Run, type ncpa.cpl, and then click OK. 2. Click on Create a new connection. 3. Click Next. GARD 8000 SYS RFL Electronics August 1, 2012 5-10 973.334.3100...
- Page 151 System User Interface 4. Choose Set up and advanced connection, and click Next. 5. Choose Connect directly to another computer, and click Next. GARD 8000 SYS RFL Electronics August 1, 2012 5-11 973.334.3100...
- Page 152 System User Interface 6. Choose Guest and click Next. 7. Name the connection as you wish, and click Next. GARD 8000 SYS RFL Electronics August 1, 2012 5-12 973.334.3100...
- Page 153 8. Select the COM port you wish to use, and click Next. 9. If you want this connection to be accessible by other users on the PC, choose Anyone’s use. Otherwise choose My use only. Click Next. GARD 8000 SYS RFL Electronics August 1, 2012 5-13 973.334.3100...
- Page 154 System User Interface 10. Enable the option to add a shortcut to the desktop and click Next. 11. Click on Properties. GARD 8000 SYS RFL Electronics August 1, 2012 5-14 973.334.3100...
- Page 155 System User Interface 12. Click on Configure… 13. Change the baud rate to 9600. And click on OK. GARD 8000 SYS RFL Electronics August 1, 2012 5-15 973.334.3100...
- Page 156 14. On the Options tab disable the Prompt for name… option. And click on OK. You have now properly setup the connection. Connect the RS-232 cable the front port on the GARD 8000 and double-click the icon on the desktop to initiate the connection. Once the connection is established, navigate to http://192.168.1.1/...
-
Page 157: Chassis Configuration Status Pa Ge
90 degrees to the right. To get a true representation of the front of the 6U chassis you must rotate the right column 90 degrees to the right. This was done to simplify the creation of this web page. GARD 8000 SYS RFL Electronics August 1, 2012 5-17 973.334.3100... -
Page 158: Figure 5-11. Typical Chassis Configuration Status Page For 6U Chassis
Once in the ‘Chassis Configuration’ mode Each of the installed modules can be configured, by clicking on a box. Selecting a module will bring up that modules configuration settings screen. Refer to the GARD 8000 Distance Relay Manual for information on configuring web pages for the Distance Relay Module. -
Page 159: Front Pa Nel Of System Displa Y With Tps Module
Laptop computer. The screen on the TSD can be adjusted for landscape display if the GARD 8000 is mounted vertically in a rack (See 5.5.2). The illustration below shows the TSD mounted in a GARD 3U chassis, its mounting and operation is the same in a 6U chassis. The Push Button Interface can be accessed from the main menu or by toggling the Home button, a stylus is provided with the TSD. -
Page 160: Figure 5-13. Touch Screen Orientation
Figure 5-20 or to the "Push Button Interface" if configured as shown in Figure 5-19. There is no "Enter" or "Esc" key. Figure 5-14. Touch Screen Initialization. 5.5.4 SCREEN DISPLAY, WAKE-UP GARD 8000 SYS RFL Electronics August 1, 2012 5-20 973.334.3100... -
Page 161: Figure 5-15. Tsd Led Labels
LED Names: This TSD page will show the LED assignments on the Front Panel Display Unit of the GARD, label information and LED color assignments are shown. There are an additional 20 virtual LED’s available (not shown). Following is a typical GARD 8000 “LED Names” display. For LED Logic Assignment Configuration see section 7.3.2. -
Page 162: Figure 5-16. Measured Values
System User Interface module. “Summed Values” will display Math Points derived from various DNP supported modules in the GARD 8000. See section 16 for DNP3 configuration. System Values System Label GARD6U155_00279_001_A_CO1 System Time 2/9/2009 19:17:13:0 Figure 5-16. Measured Values. Inventory: This TSD page will display a list of modules currently installed in the GARD. The modules are shown in either the front or rear slots with their appropriate slot number. -
Page 163: Figure 5-17. Events Log (Soe's)
Push Button Interface: This link will bring the user to the Push Button Interface (if the interface had been previously configured) as shown in Figure 5-19. The following sub-section gives details on configuring the Push Button Interface. GARD 8000 SYS RFL Electronics August 1, 2012 5-23 973.334.3100... -
Page 164: Figure 5-18. Tsd Push Button Interface Configuration
Check after configuration will appear as a display the OFF is complete single reset button buttons as on the TSD OFF = logic value 0 Figure 5-18. TSD Push Button Interface Configuration. GARD 8000 SYS RFL Electronics August 1, 2012 5-24 973.334.3100... -
Page 165: Figure 5-19. Tsd Push Button Interface
If a Push Button Interface web page is not configured (i.e. 0 input bits are selected) the TSD will automatically display the Main Menu as shown below, this is the default. Figure 5-20. TSD Main Menu. GARD 8000 SYS RFL Electronics August 1, 2012 5-25 973.334.3100... -
Page 166: Passwords A Nd Security
System User Interface 5.6 PASSWORDS AND SECURITY When accessing the GARD 8000 via a web browser, the first page is the log in screen as shown below. Figure 5-21. Administrator Login The ‘Admin’ user has the following administrator privileges: o Rear port TCP/IP address assignments... -
Page 167: Figure 5-22. Access Administration Page
System User Interface 5.6.1 SETTING ACCESS LEVELS IN THE ADMINISTRATION PAGE From the “Users” pull down menu select “Administration Page.” The web page below will appear. Figure 5-22. Access Administration page GARD 8000 SYS RFL Electronics August 1, 2012 5-27 973.334.3100... - Page 168 5.6.2 SETTING SECURITY IN THE WEB/FTP SERVER ADMINISTRATION PAGE From the “Users” pull down menu select “WEB/FTP Server Administration Page.” The following web page will appear GARD 8000 SYS RFL Electronics August 1, 2012 5-28 973.334.3100...
-
Page 169: Figure 5-23. W Eb/Ftp Server Ad Min Istration Page
When using https all traffic between the browser and server is encrypted. The server on the GARD 8000 may be configured to listen to http requests, https requests, both or none for front and rear Ethernet ports independently. The option to listen to none or turn off the server is available only for the rear port. -
Page 170: Table 5-4. Security Levels
System User Interface In order to perform the security tasks involved the GARD 8000 needs a certificate file and private key file, both of which must be PEM (Privately Enhanced Mail) encoded. The unit comes with an RFL self-signed certificate. You may choose between using the built in certificate and key or a custom certificate and key that you upload. - Page 171 This procedure was written based on Firefox version 2, but should be similar for other versions. 1. Click on the link to the RFL GARD 8000 certificate authority certificate as shown at the bottom of the web page in Figure 5-23 2.
-
Page 172: Figure 5-24. User Access Web Page
Set these bits to trigger alarms in conjunction with the system logic Use this area to compose a messge displayed to the user at logon Figure 5-24. User Access Web Page GARD 8000 SYS RFL Electronics August 1, 2012 5-32 973.334.3100... -
Page 173: Figure 5-25. User Access Log
Figure 5-25. User Access Log The above web page displays the access log, note that repeated entries are listed as “Repeat Count = xx” where “xx” is the number of repeated entries. GARD 8000 SYS RFL Electronics August 1, 2012 5-33 973.334.3100... -
Page 174: Rem Ote Service Channels
Go to Settings > System Labels and Triggers > System Configuration to access this web page. The Service Channel configuration is the middle section of this web page. Figure 5-26. Remote Service Channels GARD 8000 SYS RFL Electronics August 1, 2012 5-34 973.334.3100... -
Page 175: Figure 5-27. Remote Service Examp Le
End-Point Type Allows a GARD unit to be designated Secondary or Primary. Unused Ports All unused ports in GARD 8000 are closed. Firewalls and encryption With Image Software Release 7.1 encryption is provided as an option (See 5.6.2). 5.7.1 CONFIGURING A REMOTE SERVICE CHANNEL... -
Page 176: Figure 5-28. Remote Service Channel, Co Mmunication Time Slot Configuration
5. Click on “Configure Time Slots” and set the 64kCom0 channel for the next available time slot. (See the Figure below). Click on “Save.” Figure 5-28. Remote Service Channel, Communication Time Slot Configuration GARD 8000 SYS RFL Electronics August 1, 2012 5-36 973.334.3100... -
Page 177: Figure 5-29. Remote Service Channel, Set-Up Ga Rd (A)
If the 64Kbps COM0 channel was properly configured in the Communications Time Slot Configuration it should be displayed as: enabled at 64Kbps on “Comms Head @slot#”, location. See below. Figure 5-29. Remote Service Channel, Set-Up GARD (A) GARD 8000 SYS RFL Electronics August 1, 2012 5-37... -
Page 178: Figure 5-30. Remote Service Channel, Set-Up Ga Rd (B)
If the 64Kbps COM0 channel was properly configured in the Communications Time Slot Configuration it should be displayed as: enabled at 64 kbps on “Comms Head @slot#”, location. Figure 5-30. Remote Service Channel, Set-Up GARD (B) GARD 8000 SYS RFL Electronics August 1, 2012 5-38... -
Page 179: Guidelines For Configuring A Pc For Ip Networks
64Kbps COM0 can be used. The connection can be used from the Rear or Front Ports. To connect from the GARD 8000 (A) Rear Port to the GARD 8000 (B) in this example use the following IP address: 10.1.3.101. -
Page 180: Figure 5-31. Obtain An Ip Address Automatically
System User Interface Figure 5-31. Obtain an IP Address Automatically Figure 5-32. Automatic Private IP Address GARD 8000 SYS RFL Electronics August 1, 2012 5-40 973.334.3100... -
Page 181: Figure 5-33. Internet Protocol Version
2. With “Category” selected go to “View Network States and Tasks” 3. Click on “Local Area Connection” > Properties 4. Select “Internet Protocol Version 4” as shown below. Figure 5-33. Internet Protocol Version 5. Click “Properties” GARD 8000 SYS RFL Electronics August 1, 2012 5-41 973.334.3100... -
Page 182: Figure 5-34. Entering The Ip Address
You may ignore this and continue to the GARD 8000 homepage. Note: Depending on the speed of your PC it may take a few seconds for the IP settings to take effect. -
Page 183: Figure 5-35. Local Area Connections Properties
2. A Network and Dial Up Connection window will appear. 3. Right click on the connection you would like to use (local area connection) to connect to the GARD 8000, and choose Properties from the pull-down menu. A window similar to the one shown in Figure 5-35 should appear. -
Page 184: Figure 5-36. Internet Protocol Properties/Ip Address
You may ignore this and continue to the GARD 8000 homepage. Note: Depending on the speed of your PC it may take a few seconds for the IP settings to take effect. -
Page 185: Section 7 April
Module Descriptions SECTION 6. MODULE DESCRIPTIONS This section discusses the major modules used in the GARD 8000 system. These modules are listed in Table 6-1 below, which includes assembly numbers, and where to find additional information. The Base System modules have fixed locations (slots) in the chassis and the Interface modules can be located in any free slot. -
Page 186: Figure 6-1. Module Placement In Ga Rd 8000 3U Chassis
Power Supply No2. Spare Single Main Controller (Slot 2) Power Supply No1. Functional Modules (Slot 3 and 4) Display with TPS (Slot 1) Figure 6-1. Module Placement In GARD 8000 3U Chassis GARD 8000 SYS RFL Electronics April 23, 2015 973.334.3100... -
Page 187: Figure 6-2. Module Placement In Ga Rd 8000 6U Chassis
9 10 11 1PPS 6U Midplane Power Supply No1 Power Supply No2 Spare Display with TPS Redundant Module Controller Module Controller Module Figure 6-2. Module Placement In GARD 8000 6U Chassis GARD 8000 SYS RFL Electronics April 23, 2015 973.334.3100... -
Page 188: Controller Module
Module Descriptions 6.1 CONTROLLER MODULE The function of the Controller Module is to oversee the operation of the entire GARD 8000 system. This module interfaces the user to the system, and allows the user to configure the function modules. The unit contains a PowerPC (PPC) that runs the web server and translates user requests into commands to the other modules. -
Page 189: Figure 6-3. Controls And Indicators Locator Drawing For Controller Module
Module Descriptions NORMAL DISABLE 6-3a. Top view (component side) 6-3b. Front view Figure 6-3. Controls and indicators locator drawing for Controller module GARD 8000 SYS RFL Electronics April 23, 2015 973.334.3100... -
Page 190: Table 6-2. Controls And Indicators For The Ga Rd 8000 Controller Module
Module Descriptions Table 6-2. Controls and indicators for the GARD 8000 Controller Module Reference Description Function Designation LED indicator Indicates status of System Boot as follows: Solid Green indicates final boot completed. (Operating system and application software is running) Intermediate boot stages are indicated by other colors. - Page 191 Module Descriptions 6.1.2.1 OVERVIEW The GARD 8000 Controller Module offers a redundant operation mode when used in a 6U chassis. When equipped with two Controller Modules, a GARD system can disable a faulty module and transfer its functionality to the standby unit.
- Page 192 “flip- flopping” between the modules as the system may experience a disturbance following a swap. It is intended to ensure continued system operation despite a failure of the controller. 6.1.2.4 CONTROLS AND INDICATORS LED Indicator GARD 8000 SYS RFL Electronics April 23, 2015 973.334.3100...
-
Page 193: Table 6-3. Web Page, Controller Card, Status Color Codes
Controller Card modules in slots 10 and Table 6-3. Web Page, Controller Card, Status Color Codes Controller Card Status Slot 10 or 11 Controller Card Background Color GARD 8000 SYS RFL Electronics April 23, 2015 973.334.3100... -
Page 194: Displa Y With Tps M Odule
Figure 6-4. Chassis Configuration Status web page for 6U Chassis with Redundancy 6.2 DISPLAY WITH TPS MODULE The Display With TPS module (500410) performs the following three basic functions: User interface GARD 8000 SYS RFL Electronics April 23, 2015 6-10... - Page 195 There is also an RS-449 / X.21 / V.35 interface on the module. There is a 37-pin connector for this interface located on the Power Supply I/O module rear panel, at the rear of the GARD 8000 chassis. This can be seen near the top of Figure 6-23. An optional G.703 digital interface utilizing a 15-pin connector is also available in place of the above (See Figure 6-24).
-
Page 196: Figure 6-5. Controls And Indicators Locator Drawing For Display With Tps Module
6-5a. Top view (component side) ETHERNET STATUS LED’S LED NO2 SW17 LED NO1 DS1 to DS20 6-5b. Front view Figure 6-5. Controls and indicators locator drawing for Display with TPS module GARD 8000 SYS RFL Electronics April 23, 2015 6-12 973.334.3100... -
Page 197: Table 6-4. Controls And Indicators For The Ga Rd 8000 Display With Tps Module
Module Descriptions Table 6-4. Controls and indicators for the GARD 8000 Display With TPS Module Reference Description Function Designation DS1 to DS20 LED indicators Front panel multi-color LEDs (Green, Red, Orange). The function of these LEDs is programmable by the user. -
Page 198: Digita L Tps Module
Functionality of the TPS system is dependent on logic programming. Standard default logic is available to satisfy most applications. For applications that are not covered in one of the default logics, custom logic can be provided by RFL. Table 6-5. Jumper Settings for the GARD 8000 Digital TPS Module Reference Description... -
Page 199: Audio Tone Tps Module
6.4 AUDIO TONE TPS MODULE The Audio Tone TPS module (500820-4) provides four bi-directional channels of FSK audio tone teleprotection. It is typically used on leased phone lines, copper wire, microwave channels or on audio GARD 8000 SYS RFL Electronics April 23, 2015 6-15 973.334.3100... -
Page 200: Table 6-6. Ju Mper Settings And Switch Function For The Ga Rd 8000 Audio Tone Tps Module
The channels are programmable from 300Hz to 4kHz. Channel 1 can be configured for protection, or as an internal modem for remote interrogation. Channels 2 through 4 are for protection only. Table 6-6. Jumper Settings and Switch Function for the GARD 8000 Audio Tone TPS Module Reference Description... -
Page 201: Pow Er Line Carrier Modules
RX Data B+ (RS-485 input) 6.5 POWER LINE CARRIER MODULES GARD 8000 Systems with Power Line Carrier (PLC) capability are equipped with a PLC module set consisting of a Digital PLC module and an Analog PLC module. The Digital PLC module plugs into... -
Page 202: Table 6-8. Plc Analog Module Assembly Part Nu Mbers (500935)
(Ohms) Hybrid 500930 30-392 500930-1 390-500 500930-2 30-392 500930-3 390-500 500930-4 30-500 (External Amp) 500930-10 30-392 500930-11 392-500 (On-Off Only) 500930-20 30-392 500930-21 392-500 500930-22 30-392 500930-23 392-500 500930-30 30-500 GARD 8000 SYS RFL Electronics April 23, 2015 6-18 973.334.3100... -
Page 203: Figure 6-8. Plc Digital Module
TP19 TP10 TP17 TP22 TP20 TP14 TP15 TP12 TP18 TP16 TP13 TP11 Top View TP25 TP26 TP27 TP3 TP24 DS1 DS3 DS5 DS7 Front View Figure 6-8. PLC Digital Module GARD 8000 SYS RFL Electronics April 23, 2015 6-19 973.334.3100... -
Page 204: Table 6-10. Ju Mper Settings And Switch Function For The Ga Rd 8000 Plc Dig Ital Module
Note: The following table lists test points designed for factory use only. These points are not ESD protected. Users should not need to connect test equipment to these points in the field. Table 6-10. Jumper Settings and Switch Function for the GARD 8000 PLC Digital Module. Reference... - Page 205 Module Descriptions Table 6-9. Continued - Jumper Settings and Switch Function for the GARD 8000 PLC Digital Module. Reference Description Function Designation Test Point GND: Digital ground TP10 Test Point GND: Digital ground TP11 Test Point +3.3VA: 3.3V Analog supply...
-
Page 206: Figure 6-9. Plc Analog Module Top View
Module Descriptions J31 J34 J33 J32 J35, 36 TP10 TP11 J39* J38* J40* *Jumpers added on revised board Figure 6-9. PLC Analog Module Top View GARD 8000 SYS RFL Electronics April 23, 2015 6-22 973.334.3100... -
Page 207: Figure 6-10. Plc Analog Module Panel View
Adjust Adjust Figure 6-10. PLC Analog Module Panel View Figure 6-11. Power Amp Section of PLC Analog Module Table 6-11. Jumper Settings and Control Settings for the GARD 8000 PLC Analog Module. GARD 8000 SYS RFL Electronics April 23, 2015 6-23 973.334.3100... - Page 208 Used to select 2-wire operation via Internal Skewed Hybrid or 4-wire operation. 3-pin Header IN = 2-wire operation via Skewed Hybrid. OUT = 4-wire operation (Jumper not used on assembly 500930-20) GARD 8000 SYS RFL Electronics April 23, 2015 6-24...
- Page 209 Module Descriptions Table 6-10. continued - Jumper Settings and Control Settings for the GARD 8000 PLC Analog Module. Reference Description Function Designation Rx connector BNC Connector 2-pin Header Selects 75 Ohm termination with J27 installed and J28 uninstalled. Max power dissipation is 1 Watts. Do not install with J24 in CONNECT(ON/OFF) position.
-
Page 210: System I/ O M Odules
BNC connectors labeled “IRIG-B” and “1PPS” function as receive input signals from IRIG-B equipment external to the GARD 8000. The IRIG-B input signal can be modulated or unmodulated. A Jumper on the System I/O Module must be set by the user to indicate if the input signal is modulated or unmodulated. -
Page 211: Figure 6-12. Gard 8000 6U System I/O Modules , Rear Panel V Iews
1PPS 6-12a 6U System I/O Module with 6-12b 6U System I/O Module with Electrical Ethernet Connector Fiber Ethernet Connector Figure 6-12. GARD 8000 6U System I/O modules , rear panel views GARD 8000 SYS RFL Electronics April 23, 2015 6-27... -
Page 212: Figure 6-13. Gard 8000 6U System I/O Module, Board V Iew Showing Ju Mper Locations
SPARES IRIG UNMOD NONE TERM 50 OHM 600 OHM GROUNDED ISOLATED REQ'D NONE 50 OHM 600 OHM Figure 6-13. GARD 8000 6U System I/O module, board view showing jumper locations GARD 8000 SYS RFL Electronics April 23, 2015 6-28 973.334.3100... -
Page 213: Figure 6-14. Gard 8000 3U System I/O Modules, Rear Panel Views
6-14a System I/O Module with Fiber Ethernet Connectors Electrical Ethernet Connector (500435 and 500435-1 TSD) (500430 and 500430-1 TSD) Figure 6-14. GARD 8000 3U System I/O modules, rear panel views GARD 8000 SYS RFL Electronics April 23, 2015 6-29 973.334.3100... -
Page 214: Figure 6-15. Gard 8000 3U System I/O Module, Board V Iew Showing Ju Mper Locations
IRIG IRIG NORM NORM Figure 6-15. GARD 8000 3U System I/O module, board view showing jumper locations Table 6-13. Jumpers required on GARD 8000 System I/O module when optional GPS module is not installed Jack Number (See Jumper Installed across these... -
Page 215: Discrete I/O Base Module And I/O M Odules
IN - IRIG-B shield is grounded IN - Must be installed 13-14 IN - 600 Ohm 1PPS termination All other jumpers should be removed (no connection). 6.7 DISCRETE I/O BASE MODULE AND I/O MODULES GARD 8000 SYS RFL Electronics April 23, 2015 6-31 973.334.3100... -
Page 216: Figure 6-17. Co Mponent Side Of Input Unit (500805)
22 and 21 on the Discrete I/O Base module, and so forth. The same correlation exists when the unit is plugged onto a Comms I/O Base module. This is shown pictorially in Figure 6-19. GARD 8000 INPUT UNIT Figure 6-17. Component side of Input Unit (500805) 6.7.1.1 REDUNDANT INPUT UNIT The Redundant Input Unit (500805-1) is used to provide redundant protection of the opto-isolators. -
Page 217: Figure 6-18. Top And Rear V Iews Of Discrete I/ O Base Module
Location of I/O Module Location of I/O Module Alternate assembly with Discrete I/O Base Rear Panel Compression Blocks (500800-1) Figure 6-18. Top and Rear views of Discrete I/O Base module GARD 8000 SYS RFL Electronics April 23, 2015 6-33 973.334.3100... - Page 218 Module Descriptions Connector (mates with Midplane) Discrete I/O Base Module GARD 8000 INPUT UNIT Discrete I/O Base Rear Panel Figure 6-18. Top and Rear views of Discrete I/O Base module (continued) GARD 8000 SYS RFL Electronics April 23, 2015 6-34...
-
Page 219: Figure 6-19. Co Mponent Side Of Relay Output Unit (500815)
22 and 21 on the Discrete I/O Base module, and so forth. The same correlation exists when the unit is plugged onto a Comms I/O Base module. This is shown pictorially in Figure 6-20. GARD 8000 RELAY OUTPUT UNIT Figure 6-19. Component side of Relay Output Unit (500815) GARD 8000 SYS... -
Page 220: Figure 6-20. Top And Rear V Iew O F Discrete I/O Base Module
Module Descriptions Connector (mates with Midplane) Discrete I/O Base Module GARD 8000 INPUT UNIT Discrete I/O Base Rear Panel Figure 6-20. Top and Rear view of Discrete I/O Base module GARD 8000 SYS RFL Electronics April 23, 2015 6-36 973.334.3100... -
Page 221: Comms I/ O Base Module And Comms M Odules
Relay Output Unit Refer to paragraphs 6.7.1, 6.7.2 and 6.7.3 for additional information on these modules. WARNING! YOUR GARD 8000 TERMINAL MAY BE EQUIPPED WITH COMMS MODULES THAT HAVE FIBER OPTIC EMITTER HEADS. FIBER OPTIC EMITTER HEADS USE A LASER LIGHT... -
Page 222: Table 6-15. Characteristics Of Ga Rd 8000 Long Haul Fiber Units
Average into mi (2km.) 50μm fiber Detector -11dBm to -19dBm Average into 62.5μm fiber Table 6-17. Characteristics of GARD 8000 Short Haul Module, Single Mode Fiber Heads (C37.94) at 25ºC Assembly Type Wavelength/ Connector Re ce iver Tx Power Typical... -
Page 223: Figure 6-21. Top And Front Views Of Co Mms I/O Base Module
Location of I/O Module Location of Comms Module Alternate assembly with Commpression Blocks (500850-1) Comms I/O Base Rear Panel Figure 6-21. Top and Front views of Comms I/O Base module GARD 8000 SYS RFL Electronics April 23, 2015 6-39 973.334.3100... -
Page 224: Pow Er Supply M Odule
RS-449, X21, V35 G703 Module T1/E1 Interface E1, 75 Ohm Module Module BNC Module Figure 6-22. Panel views of various types of Comms I/O modules available 6.9 POWER SUPPLY MODULE 6.9.1 DESCRIPTION GARD 8000 SYS RFL Electronics April 23, 2015 6-40 973.334.3100... -
Page 225: Table 6-18. Ga Rd Po Wer Supply Modules, General Informat Ion
2500-Vdc Hipot, Oscillatory, and Fast-Transient tests specified in IEEE C37.90. Two of the supplies can accept ac or dc as detailed in the table below. The GARD 8000 can be powered with either one or two Power Supply modules. The first power supply is inserted into any power supply slot. -
Page 226: Table 6-19. Ga Rd 8000 Po Wer Supply Specificat Ions
Module Descriptions Table 6-19. GARD 8000 Power Supply Specifications 500305 500315 500325 Power Supply Specifications Input Voltage 48-125 Vdc or 120 Vac 200-300 Vdc or 220 Vac 19-29 Vdc Range Max Output Current: 4.00 Amps (combined total) 4.00 Amps (combined total) 4.00 Amps (combined total) -
Page 227: Figure 6-23. Power Supply I/ O Module, Rear Panel View
The Power Supply I/O module also has a 37-pin connector for the RS-449 / X.21 / V.35 interface that is standard with each system. Refer to Tables 4-1 and 4-2 for pin out information. Table 6-20. Power Supply I/O Module, Multiprotocol assemblies Assembly Number Chassis 500310-2 500310-5 GARD 8000 SYS RFL Electronics April 23, 2015 6-43 973.334.3100... -
Page 228: Figure 6-24. Optional Power Supply I/ O Module, G.703 Interface Rear Panel View
This ensures that the chassis will cause an alarm condition when power is lost. Table 6-21. Power Supply I/O Module, G.703 Option assemblies Assembly Number Chassis 500310-4 500310-5 GARD 8000 SYS RFL Electronics April 23, 2015 6-44 973.334.3100... -
Page 229: Ga Rd System A Larms
6.10 GARD SYSTEM ALARMS There are several potential sources for alarms in the GARD 8000 system. Most alarm triggers in the system can be masked by the user. This means that for a given alarm trigger, the user can decide to allow the system to generate a Major Alarm, Minor Alarm, or to ignore the alarm altogether. - Page 230 SOE alarms will only change state when an SOE event occurs. If an SOE alarm is active and the user changes the setting to make the trigger no longer key an alarm, the alarm will not clear until the next SOE event. GARD 8000 SYS RFL Electronics April 23, 2015 6-46 973.334.3100...
-
Page 231: Figure 6-25. A Larm Configurations Web Page
Module level alarm outputs can be mapped to the system alarm outputs for major, minor, both or none. Figure 6-25. Alarm Configurations web page GARD 8000 SYS RFL Electronics April 23, 2015 6-47 973.334.3100... -
Page 232: Table 6-22. Ga Rd Module Level Alarms
Invalid G.703 Configuration (Co-Directional) Test mode active Loopback enabled. Comms problem Comms bus problem, PLL fail/no lock, Octet Timing not detected (if enabled), RX carrier loss. Continued on next page……. GARD 8000 SYS RFL Electronics April 23, 2015 6-48 973.334.3100... - Page 233 Active if the Reflected Power Meter has failed. Distance Relay Setting Module Checksum Error Real Time Clock Error Real Time Clock Stopped CPU RAM Error DSP RAM Error Calibration Error EEPROM Error Low Battery GARD 8000 SYS RFL Electronics April 23, 2015 6-49 973.334.3100...
-
Page 234: Midplane
Module Descriptions 6.11 MIDPLANE There are two types of GARD 8000 midplanes, one for the 3U chassis (500415), and one for the 6U chassis (500445). The midplanes are mounted in the chassis, such that, modules can be plugged in from the front or rear of the chassis. This can be seen in Figures 6-1 and 6-2. -
Page 235: Figure 6-26. Current Limit I/O Module Terminal Block Connections
200 mA RLY- 180 mA 180 mA 1 Amp 20 mA 20 mA 200 mA 180 mA 20 mA 6U Chassis Figure 6-26. Current Limit I/O Module terminal block connections GARD 8000 SYS RFL Electronics April 23, 2015 6-51 973.334.3100... -
Page 236: Telem Etry Tra Nsmitter M Odule
R CH 5 R CH 1 GND7 GND3 TB12 R CH 2 R CAL B R CH 6 GND4 GND8 Figure 6-27. Setting Resistors and Jumpers on the Telemetry TX Module GARD 8000 SYS RFL Electronics April 23, 2015 6-52 973.334.3100... -
Page 237: Section 7. Chassis Configuration Settings
System Logic Configuration 7-106 Telemetry Transmitter Module Settings (Option) 7-73 Teleprotection Configuration 7-18 Teleprotection Configuration (Optional 96-Bit System) 7-27 Time Slot Settings 7-30 Time Slot Settings (Optional 96-Bit System) 7-32 Timer Settings 7-113 GARD 8000 SYS RFL Electronics April 1, 2012 973.334.3100... -
Page 238: M Odule Settings
In Figure 7-1, the background colors of the card slot locations will change according to the module status as follows: Yellow = Minor alarm Green = Normal condition Blue =Module not configured or disabled Red = Major alarm Gray =Empty slot GARD 8000 SYS RFL Electronics April 1, 2012 973.334.3100... -
Page 239: Figure 7-2. Chassis Configuration Settings Web Page For 6U Chassis With Redundancy
This slot will show “Disabled Digital Interface”until one of the base system interfaces (RS-449, X.21, V.35) are configured. However if your system has the optional G.703 built in interface, this slot will show “G.703” 7.2.1 INPUT MODULE SETTINGS GARD 8000 SYS RFL Electronics April 1, 2012 973.334.3100... -
Page 240: Figure 7-3. Input Card In Slot #2 Rear Left Web Page
Figure 7-3. Input Card in slot #2 Rear Left web page Description Enter the desired description for each of the 6 inputs (Input 1 through Input 6) on the I/O module. Check To Enable GARD 8000 SYS RFL Electronics April 1, 2012 973.334.3100... - Page 241 Typically a message similar to the one below will display in the system tray of your computer, do not exit until such a message is displayed. 7.2.2 ADDITIONAL INPUT MODULES Repeat the steps from section 7.2.1 for the remaining Input modules in the chassis. GARD 8000 SYS RFL Electronics April 1, 2012 973.334.3100...
-
Page 242: Figure 7-4. Chassis Configuration Settings Web Page
From the toolbar select Settings, Chassis Configuration. A web page similar to the one shown below will appear, showing the installed modules and their current status. Figure 7-4. Chassis Configuration Settings web page GARD 8000 SYS RFL Electronics April 1, 2012... -
Page 243: Figure 7-5. Relay Output Card In Slot #4 Rear Left Web Page
Check off any or all of the boxes to enable the outputs to be linked to the logic. Module Enable Select Module Enable to activate the I/O module to be active within the GARD chassis. Module Disable GARD 8000 SYS RFL Electronics April 1, 2012 973.334.3100... - Page 244 It is a good practice to disable any outputs through the output programming page if they are not mapped. This will ensure that they are not mapped. GARD 8000 SYS RFL Electronics April 1, 2012...
-
Page 245: Figure 7-6. Chassis Configuration Settings Web Page
(RS449, X.21 or V.35) can be selected for this interface. Select Disabled Digital Interface to configure the communications interface for the TPS channels. A screen similar to the one in Figure 7-7 will appear. GARD 8000 SYS RFL Electronics April 1, 2012... -
Page 246: Figure 7-7. Co Mmunications System Configuration Web Page
Figure 7-7. Communications System Configuration web page Note: The Communications System Configuration displays the configuration of all communications I/O modules in a GARD 8000 system. Figure 7-7 only refers to the Digital Interface Module configuration in this example. Some parameters may not apply to all modules. - Page 247 64 kbps is used. Gard Comms Subsystem The GARD 8000 has two independent communications busses referred to as communications subsystems. This parameter allows the user to select which of the two communications busses the digital interface uses for its transmit and receive data.
- Page 248 There must be two T1/E1 Interface Modules in the GARD system to use the Drop and Insert feature, one is set to “Pass-Thru 1” and the other is set to “Pass-Thru 2.” The GARD 8000 system supports either 2 independent terminal multiplexers, or a single drop and insert multiplexer.
- Page 249 Communication Interface (or head) must be clicked on the Configuration Web page to access Timeslot Configurations. Refer to Section 7.2.10.1 for Time Slot Settings. The Async Module can only be installed in the chassis rear top locations. GARD 8000 SYS RFL Electronics April 1, 2012 7-13 973.334.3100...
-
Page 250: Figure 7-8. Co Mmunications System Status
From the toolbar select “Measured” > “Comms Status,” a web page similar to the one shown below will appear. Figure 7-8. Communications System Status Module Location Displays the physical location in the GARD 8000 chassis of the configured communications interface. Module Type Displays the type of communications interface configured. User Label The descriptive name for the communications interface. -
Page 251: Figure 7-9. Digital Interface Status
The descriptive name for the communications interface. Module Type Displays the type of communications interface configured. Chassis Location The physical location in the GARD 8000 for the selected communications interface. Line Rate The selected data rate for the communications interface. GARD 8000 SYS... - Page 252 This will indicate the polarity of the TX and RX clock, NORM/NORM, NORM/INVERT, INVERT/NORM, INVERT/INVERT. This is typically set to NORM/NORM. The settings NORM/INVERT, INVERT/NORM, INVERT/INVERT are provided to work with non-standard equipment. GARD 8000 SYS RFL Electronics April 1, 2012 7-16...
- Page 253 This will indicate which files have been loaded into the GARD. The other indicators at the bottom of this web screen read the information from the GARD, and are normally factory installed. GARD 8000 SYS RFL Electronics April 1, 2012 7-17 973.334.3100...
-
Page 254: Figure 7-10. Chassis Configuration Settings Web Page
Figure 7-10. Chassis Configuration Settings web page In the web page shown above, select Teleprotection (TPS). A screen similar to the one shown on the following page will appear. GARD 8000 SYS RFL Electronics April 1, 2012 7-18... -
Page 255: Figure 7-11. Teleprotection Channel Configuration At Slot #1 Front Web Page
The GARD TPS module is capable of providing up to four 8-Function digital teleprotection channels. Depending on the logic used, activate the appropriate teleprotection (TPS) channels by selecting TPS from each of the four drop down menus, as applicable. GARD 8000 SYS RFL Electronics April 1, 2012 7-19 973.334.3100... -
Page 256: Figure 7-12. Teleprotection Channel Configuration At Slot #1 Front Web Page
Figure 7-12. Teleprotection Channel Configuration at slot #1 Front web page Click on the Edit button for the TPS channel you wish to configure. A screen similar to the one shown on the following page will appear. GARD 8000 SYS RFL Electronics April 1, 2012 7-20 973.334.3100... -
Page 257: Figure 7-13. Tps Channel 1 Slot #1 Front Web Page
This is a status indication that the TPS channel is either Enabled and In Service, or Disabled. The Channel Service is automatically enabled once the user selects the Comms. Head and Timeslot in the Communications Time Slot Page and clicks on the Save button. Remote Service GARD 8000 SYS RFL Electronics April 1, 2012 7-21... - Page 258 Remote Service enables the “8K Remote Interrogation” feature of a TPS Channel. This is a communication scheme between local and remote GARD 8000 controllers that runs at 8kHz, and is only used if a dedicated 64K communication channel is not available for Remote Interrogation. The “8K Remote Interrogation”...
- Page 259 This is a status indication, which can be either A or B. In TPS the Rx Direction is forced to receive on Bus A. TPS will always receive data from the A Bus. Select save to enter the changes from the TPS channel configuration page. GARD 8000 SYS RFL Electronics April 1, 2012 7-23 973.334.3100...
-
Page 260: Figure 7-14. Tps Status
From the Home Page click on the Teleprotection Module. A page similar to one shown below will appear. Figure 7-14. TPS Status This read only web page gives information to the user on the status of the TPS Module. GARD 8000 SYS RFL Electronics April 1, 2012 7-24... - Page 261 Indicates the number of CRC errors detected in the previous second. Errored Seconds This indicates the number of seconds in which any number of CRC errors were detected since the last reset of the counter. GARD 8000 SYS RFL Electronics April 1, 2012 7-25...
- Page 262 This will indicate which files have been loaded into the GARD. The other indicators at the bottom of this web screen read the information from the GARD, and are normally factory installed. GARD 8000 SYS RFL Electronics April 1, 2012 7-26 973.334.3100...
-
Page 263: Figure 7-15. Chassis Configuration Settings Web Page (96-Bit System)
In the web page shown in Figure 7-15, select 96-Bit (TPS). A screen similar to the one shown below will appear. Figure 7-16. 96-Bit TPS Channel 1 at slot #1 Front web page GARD 8000 SYS RFL Electronics April 1, 2012 7-27 973.334.3100... - Page 264 Enter the transmitter address for this TPS channel, between 0 and 255. Rx Address Enter the receiver address for this TPS channel, between 0 and 255. 96-Bit TPS Channel 1 at slot #1 Front Definitions (continued) GARD 8000 SYS RFL Electronics April 1, 2012 7-28...
- Page 265 In the box provided, enter the starting bit number for the transmitter for the TPS channel Rx Start Bit Sets the start position for logic data from the TPS functions to the logic bus. Tx Start Bit GARD 8000 SYS RFL Electronics April 1, 2012 7-29...
-
Page 266: Figure 7-17. Chassis Configuration Settings Web Page
Figure 7-17. Chassis Configuration Settings web page Select the communications interface whose time slot is to be configured (RS-449). Selecting RS-449 will cause a screen similar to the one shown on the following page to appear. GARD 8000 SYS RFL Electronics April 1, 2012 7-30 973.334.3100... -
Page 267: Figure 7-18. Co Mmun Ications System Configuration Web Page
Chassis Configuration Settings Figure 7-18. Communicati ons System Configuration web page Select Configure Time Slots and the screen shown on the following page will appear. GARD 8000 SYS RFL Electronics April 1, 2012 7-31 973.334.3100... -
Page 268: Figure 7-19. Co Mmun Ications Time Slot Configurat Ion Web Page
Figure 7-19. Communicati ons Time Slot Configuration web page There are up to twelve time slots available in the GARD 8000. Pull down menu’s are provided for each time slot listing the selections available. The time slot will be reserved for the device or channel that is assigned to it. -
Page 269: Figure 7-20. Co Mmun Ications Time Slot Configurat Ion Web Page (96 -Bit)
Once all required time slots have been configured select SAVE to complete the time slot configuration. 7.2.9 TELEPROTECTION STATUS (96-BIT SYSTEM) GARD 8000 SYS RFL Electronics April 1, 2012 7-33 973.334.3100... -
Page 270: Figure 7-21. 96-Bit Telep Rotection Web Page
From the Home Page click on the 96-Bit Teleprotection Module. A page similar to one shown below will appear. Figure 7-21. 96-Bit Teleprotection web page This read only web page gives information to the user on the status of the TPS Module. GARD 8000 SYS RFL Electronics April 1, 2012 7-34... - Page 271 This indicates the number of seconds in which any number of CRC errors were detected since the last reset of the counter. Bit Error Rate This indicates the percentage of received bits in error compared to the total number of bits received. GARD 8000 SYS RFL Electronics April 1, 2012 7-35...
- Page 272 This will indicate which files have been loaded into the GARD. The other indicators at the bottom of this web screen read the information from the GARD, and are normally factory installed. GARD 8000 SYS RFL Electronics April 1, 2012 7-36 973.334.3100...
-
Page 273: Figure 7-22. Async Co Mms Configuration
From the Chassis Configuration Settings web page select “Async Comms” the following web page will appear. Figure 7-22. Async Comms Configuration Select the channel to be configured; the following web page will appear. Figure 7-23. Async Comms Channel Settings GARD 8000 SYS RFL Electronics April 1, 2012 7-37 973.334.3100... -
Page 274: Table 7-1. Timeslot Baud Rate
(incl. start and stop) Sets the number of bits per character, including start, data, parity, and stop bits. 9, 10, and 11 are the available options. Possible character formats are listed on the following page: GARD 8000 SYS RFL Electronics April 1, 2012 7-38 973.334.3100... -
Page 275: Table 7-2. Character Formats
3-wire cable is being used select no, since RTS is not supported. Click on Home to get to the Chassis Configuration Status web page. Then click on Async Comms, a web page similar to the one shown on the following page will appear. GARD 8000 SYS RFL Electronics April 1, 2012 7-39 973.334.3100... -
Page 276: Figure 7-24. Async Co Mms Channel Settings
Chassis Configuration Settings Figure 7-24. Async Comms Channel Settings Click on General Status to get to the Async Comms Status web page as shown on the following page. GARD 8000 SYS RFL Electronics April 1, 2012 7-40 973.334.3100... -
Page 277: Figure 7-25. Async Co Mms Status Web Page
Chassis Configuration Settings Figure 7-25. Async Comms Status web page GARD 8000 SYS RFL Electronics April 1, 2012 7-41 973.334.3100... -
Page 278: Figure 7-26. Co Mmun Ications Time Slot Configurat Ion Web Page For Async Co Mms Module
ASN@slot9 Ch1_2Use for channel 1 and 2 on the same timeslot Note: To switch the same timeslot from using Ch1, to using Ch2, you may have to select “Not Used” or “idle” first. GARD 8000 SYS RFL Electronics April 1, 2012 7-42 973.334.3100... -
Page 279: Figure 7-27. Chassis Configuration Settings Web Page
Figure 7-27. Chassis Configuration Settings web page Click on the Audio Tone button. A Web page similar to the one shown on the following page will appear. GARD 8000 SYS RFL Electronics April 1, 2012 7-43... -
Page 280: Figure 7-28. Audio Tone Configuration Web Page
Click on Channel 1 Settings to go to the Audio Tone Configuration, Channel 1 Settings web page as shown in Figure 7-30. The Channel 2 through 4 Settings web pages, are similar. GARD 8000 SYS RFL Electronics... -
Page 281: Figure 7-29. Audio Tone General Settings Web Page
Pass Thru: The channel will be configured to function as a transfer filter with programmable bandwidth and amplification. Modem: The channel will function as a modem. Channel 2 Type Can be set to On, Off, or Pass Thru. General Settings Definitions (continued) GARD 8000 SYS RFL Electronics April 1, 2012 7-45 973.334.3100... - Page 282 RX Logic Bus Start Bit (3-511 inc 1) The range of Rx logic bus start bits can be set from 3 to 511 in increments of 1. RX Logic Bus Length (0-32 inc 1) GARD 8000 SYS RFL Electronics April 1, 2012 7-46 973.334.3100...
-
Page 283: Figure 7-30. Audio Tone Channel 1 Settings Web Page
32. Note; If this is not set the Rx logic bus length cannot be set to more than 16. Figure 7-30. Audio Tone Channel 1 Settings Web page GARD 8000 SYS RFL Electronics April 1, 2012 7-47 973.334.3100... - Page 284 The user is cautioned that the summation of all Rx inputs combined can exceed the receive capability of the ATP module. This setting should equal the actual receiver level measurement for the channel. GARD 8000 SYS RFL Electronics April 1, 2012 7-48 973.334.3100...
- Page 285 A security timer Ch1 BLOCK Attack (0-1000 inc 0.25)* A long term security timer Ch1 BLOCK Decay (0-1000 inc 0.25)* A long term security timer *See note on next page. GARD 8000 SYS RFL Electronics April 1, 2012 7-49 973.334.3100...
-
Page 286: Table 7-3. Reco Mmended Security Timer Settings
680 Hz +/-150 Hz 935, 1615, 2295, 2975 960 Hz +/-240 Hz 1320, 2280 Minimum channel spacing between center frequencies. Shifts shown indicate the frequency shift for each channel spacing. GARD 8000 SYS RFL Electronics April 1, 2012 7-50 973.334.3100... -
Page 287: Figure 7-31. Audio Tone Status Web Page
Figure. Click on Channel Status to go to the Channel Status web page as shown in Figure 7-33. Click on Modem Status to get to the Modem Status (Remote Status) web page as shown in Figure 7-34. GARD 8000 SYS RFL Electronics... -
Page 288: Figure 7-32. Audio Tone, General Status Web Page
Single 1, 2, Dual 3, 4 Dual 1, 2, Dual 3, 4 Simple Module Enable The indicator will be GREEN if the module is enabled, and RED if the module is disabled. GARD 8000 SYS RFL Electronics April 1, 2012 7-52 973.334.3100... - Page 289 The indicator will be GREEN if there are no logic bus errors. Pic Version Reports the PIC microcontroller software revision number, starting at version 1.0. DSP Software Version The current version of the Digital Signal Processor software. GARD 8000 SYS RFL Electronics April 1, 2012 7-53 973.334.3100...
-
Page 290: Figure 7-33. Audio Tone, Channel Status Web Page
Chassis Configuration Settings Figure 7-33. Audio Tone, Channel Status Web page Channel Status Web Page definitions for column 1 GARD 8000 SYS RFL Electronics April 1, 2012 7-54 973.334.3100... - Page 291 The actual channel 1 - 4 received status. Can be High Frequency, Low Frequency, or Blank. Chan 1 through Chan 4 Noise Detectors The actual channel 1 - 4 received noise detection status. Can be Normal, AM Noise, FM Noise, or AM and FM Noise GARD 8000 SYS RFL Electronics April 1, 2012 7-55...
-
Page 292: Figure 7-34. Audio Tone, Modem Status Web Page
Figure 7-34. Audio Tone, Modem Status Web page Modem Status Web Page definitions for column 1 Remote Label A label set by the user at the remote GARD 8000 unit. Modem Channel OK The indicator will be GREEN if the modem channel is OK. - Page 293 The number of address test failures since the last reset. Channel Delay Measured The actual one-way channel delay measurement. Channel delay Tests Failed Since Reset The number of channel delay test failures since the last reset. GARD 8000 SYS RFL Electronics April 1, 2012 7-57 973.334.3100...
-
Page 294: Figure 7-35. Chassis Configuration Settings Web Page
Figure 7-35. Chassis Configuration Settings web page Click on the Power Line Carrier button. A Web page similar to the one shown on the next page will appear. GARD 8000 SYS RFL Electronics April 1, 2012 7-58... -
Page 295: Figure 7-36. Power Line Carrier Configuration Web Page
Click on General Settings to go to the Power Line Carrier Configuration, General Settings web page as shown on the following page. Click on Checkback Settings to go to the Power Line Carrier Configuration, Checkback Settings web page as shown in Figure 7-39. GARD 8000 SYS RFL Electronics April 1, 2012 7-59 973.334.3100... -
Page 296: Figure 7-37. Power Line Carrier General Settings Web Page
Chassis Configuration Settings Figure 7-37. Power Line Carrier General Settings Web page General Settings Definitions: GARD 8000 SYS RFL Electronics April 1, 2012 7-60 973.334.3100... - Page 297 For example; to reject carrier signals more than 15dB below nominal, set the Min. Rx Level to 15. Factory recommended value for On/Off is 15dB. General Settings Definitions (continued): GARD 8000 SYS RFL Electronics April 1, 2012 7-61...
- Page 298 In 3F mode selects the Trip 1 direction, and The Trip 2 direction is automatically set to the opposite direction. The options are Shift Up or Shift Down. General Settings Definitions (continued): GARD 8000 SYS RFL Electronics April 1, 2012 7-62 973.334.3100...
- Page 299 Local TX causes Block Selects whether or not to generate a local block when a block is transmitted to the far end. Can be Enabled or Disabled. General Settings Definitions (continued): GARD 8000 SYS RFL Electronics April 1, 2012 7-63...
- Page 300 The RX logic bus length can be set from 0 to 24 in increments of 1. Refer to System Logic PDF for help. Check the SAVE button to save your settings. GARD 8000 SYS RFL Electronics April 1, 2012 7-64...
-
Page 301: Figure 7-38. Receiver Operating Range And Dynamic Range
SNR Alarm Threshold (FSK Only) Issues an alarm, and disables tripping for noise levels exceeding the ratio setting. Recommended setting 10 dB (0 dB to 30 dB range) Figure 7-38. Receiver Operating Range and Dynamic Range GARD 8000 SYS RFL Electronics April 1, 2012 7-65 973.334.3100... -
Page 302: Figure 7-39. Power Line Carrier Checkback Settings (On-Off Only) Web Page
Chassis Configuration Settings Figure 7-39. Power Line Carrier Checkback Settings (on-off only) Web page GARD 8000 SYS RFL Electronics April 1, 2012 7-66 973.334.3100... - Page 303 23 in one hour increments. Checkback start time Min (0-59 inc 1) Sets the Minute in real time when the checkback sequence will be initiated. Can be set from 0-59 in one minute increments. GARD 8000 SYS RFL Electronics April 1, 2012 7-67...
-
Page 304: Figure 7-40. Plc Status Web Page
Click on General Status to go to the PLC General Status web page as shown on the following page. Click on Counter Values to go to the Counter Values web page as shown in Figure 7-42. GARD 8000 SYS RFL Electronics... -
Page 305: Figure 7-41. Plc General Status Web Page
Reports the TX power output level of the PLC system in dBm referenced to 50 Ohms. RX Level Reports the received level (in dB) relative to the normal RX level set during commissioning. TX Fail Alarm Indicates whether the transmitter is in alarm mode. GARD 8000 SYS RFL Electronics April 1, 2012 7-69 973.334.3100... - Page 306 Test X Failed (Where X is the number of the test, X can be 1 to 8) Version Info. Rear Board ID Indicates the ID of the Rear Board. PLC Software Version Reports the PLC software version starting at 1. GARD 8000 SYS RFL Electronics April 1, 2012 7-70 973.334.3100...
- Page 307 Reports the PIC microcontroller software revision number, starting at version 1.0. ACTEL Firmware Version (Minor) Reports the ACTEL software version minor number starting at version 0, (for example 1.0). HMI Interface Version Reports the HMI Interface Version. GARD 8000 SYS RFL Electronics April 1, 2012 7-71 973.334.3100...
-
Page 308: Figure 7-42. Plc Counter Values Web Page
In on-off mode indicates the Stop 1 Key count. Trip 2 RX (FSK)/ Stop 2 (On/Off)c2 In FSK mode indicates the RX Key 2 count. In on-off mode indicates the Stop 2 key count. PLC Counters Definitions (continued): GARD 8000 SYS RFL Electronics April 1, 2012 7-72 973.334.3100... - Page 309 Checkback tests count Indicates the total checkback test count. Checkback Pass count Indicates the total checkback pass count. Checkback Fail count Indicates the total Checkback Fail count. 7.2.13 TELEMETRY TRANSMITTER MODULE SETTINGS GARD 8000 SYS RFL Electronics April 1, 2012 7-73 973.334.3100...
-
Page 310: Figure 7-43. Telemetry Transmitter Module Settings
General Settings web page will appear. Click General Settings for the following web page. Figure 7-43. Telemetry Transmitter Module Settings Eight channels can be configured; their definitions are shown on the following page. GARD 8000 SYS RFL Electronics April 1, 2012 7-74 973.334.3100... -
Page 311: Table 7-5. Telemetry Analog Gain
Applies GND Input to the designated channel. A Telemetry Transmitter Status web page can be viewed: From the home page select Telemetry > General Status. The following web page will appear. GARD 8000 SYS RFL Electronics April 1, 2012 7-75... -
Page 312: Figure 7-44. Telemetry Transmitter Module Status
Figure 7-44. Telemetry Transmitter Module Status The Telemetry Transmitter Status web page will display the voltage value of the input and also the revision and version levels of the listed components. GARD 8000 SYS RFL Electronics April 1, 2012 7-76... -
Page 313: System La Bels And Triggers
From the toolbar select Settings>System Labels and Triggers. A screen similar to the one below will appear, showing a sub menu. Figure 7-45. System Labels and Triggers – System Configuration Select System Configuration. The following screen will appear. GARD 8000 SYS RFL Electronics April 1, 2012 7-77... -
Page 314: Figure 7-46. System Configuration Web Page
The user system labels provide text boxes for identifying the GARD 8000 chassis. Examples include substation names, line numbers or other information that can be applied to the complete GARD 8000 system. Communications modules and I/O modules have additional label fields to further identify specific functions within the GARD 8000 System. -
Page 315: Table 7-6. Clock Quality Level Indication
The interface is receiving time from IRIG-B, but there is no 1 pps signal lock. The GPS is reporting good health, but there is no 1 pps signal lock. The clock is free running. GARD 8000 SYS RFL Electronics April 1, 2012 7-79 973.334.3100... -
Page 316: Figure 7-47. Time Settings Web Page
Sets the expected timing source for alarm purposes, set to None if no external timing is used. The choices are shown on the pull-down menu. Click SAVE when the settings are complete. GARD 8000 SYS RFL Electronics April 1, 2012 7-80 973.334.3100... -
Page 317: Figure 7-48. System Labels And Triggers – Led Logic Assignments
Figure 7-48. System Labels and Triggers – LED Logic Assignments Select LED Logic Assignments from the drop down menu. The following screen will appear: Figure 7-49. LED Logic Assignments web page GARD 8000 SYS RFL Electronics April 1, 2012 7-81... - Page 318 Chassis Configuration Settings The GARD 8000 has 20 LED’s. Each led can have one of four states; Green Yellow LED Labels: Each LED can be assigned a “Global Label” and each color can be assigned a different label in inserting text into the appropriate label field.
-
Page 319: Figure 7-50. Input Card In Slot#2 Rear Left Web Page
If the LED is to be assigned to either an HMI In or HMI Out bit the HMI assignments can be obtained from either the Edit HMI Labels page or from the GARD 8000 system logic drawing. GARD 8000 SYS... -
Page 320: Figure 7-51. System Labels And Triggers – Soe Triggers And Labels
Figure 7-51. System Labels and Triggers – SOE Triggers and Labels Select SOE Triggers and Labels from the drop down menu. The following screen will appear: Figure 7-52. Sequence of Events Configuration web page GARD 8000 SYS RFL Electronics April 1, 2012 7-84 973.334.3100... - Page 321 The SOE Triggers and Labels page allows the user to enable SOE triggers and assign the trigger labels that will be displayed in the GARD 8000 system SOE log. There are 191 triggers available. An SOE trigger can only be assigned in the GARD 8000 logic files.
- Page 322 “bookmarked” in your browser for reference at a later date. To download an SOE event select SOE>SOE Text Download from the toolbar. The following page gives a typical example of the information displayed. Note that only a portion of the page is shown here. GARD 8000 SYS RFL Electronics April 1, 2012 7-86 973.334.3100...
-
Page 323: Figure 7-53. Sequence Of Events, Text Download
Chassis Configuration Settings Figure 7-53. Sequence of Events, Text Download GARD 8000 SYS RFL Electronics April 1, 2012 7-87 973.334.3100... -
Page 324: Figure 7-54. System Counters Web Page
“Reset System Counters” button. Trig #: The Trig # column identifies the trigger number used in the custom logic file. The first 2 numbers are reserved by the GARD 8000 system and cannot be assigned or changed by the user. Label: Label for each of the triggers. -
Page 325: Figure 7-55. System Labels And Triggers – Logic Bit Labels
Figure 7-55. System Labels and Triggers – Logic Bit Labels Select Logic Bit Labels from the drop down menu. The following screen will appear: Figure 7-56. Logic Bit Labels web page GARD 8000 SYS RFL Electronics April 1, 2012 7-89... - Page 326 GARD 8000 system to identify that logic bit. Bit 0, bit 1 and bit 2 are reserved by the GARD 8000 system and cannot be assigned or changed by the user.
-
Page 327: Figure 7-57. System Labels And Triggers – Edit Hmi Labels
Figure 7-57. System Labels and Triggers – Edit HMI Labels Select Edit HMI Labels from the drop down menu. The following screen will appear: Figure 7-58. Edit HMI Labels web page GARD 8000 SYS RFL Electronics April 1, 2012 7-91... - Page 328 Chassis Configuration Settings The GARD 8000 has 128 user definable Human Machine Interface, HMI, bits. There are 64 HMI bits defined as input bits and 64 HMI bits defined as output bits. The HMI bits can be assigned to provide functions like LED assignment without using bits on the logic bus.
-
Page 329: A Larm Configuration
From the toolbar select Settings. A dropdown screen similar to the one below will appear. Figure 7-59. Settings – Alarm Configuration Select Alarm Configurations from the drop down menu. The following screen will appear. GARD 8000 SYS RFL Electronics April 1, 2012 7-93 973.334.3100... -
Page 330: Figure 7-60. A Larm Configurations Web Page
The alarm configurations page lists each module in a GARD 8000 system and allows mapping of the modules alarm state to the GARD 8000 system alarm contacts. Any module alarm can be mapped to activate the GARD 8000 Major Alarm, Minor Alarm, Both Major and Minor Alarms or no alarm using the dropdown web page. - Page 331 (0 = No Alarm, 1 = Alarm) Clock Quality: Alarm will become active if the expected clock source is not synchronized. Note, source set on the “Time Settings” web page. GARD 8000 SYS RFL Electronics April 1, 2012 7-95...
-
Page 332: Table 7-7. Bit Error Rate Threshold Settings
1E-5 1 per 100,000 Slot #: Indicates the physical slot the module is inserted into in the GARD 8000 chassis. Location: Indicates if the module is in the front or rear or the chassis. In a 3 rack unit chassis the module location is also identified as occupying the left or right half of the module on modules that have multiple function capabilities like the communications interface base or the discrete I/O base. - Page 333 Both: Activates the GARD 8000 Major and Minor Alarm contacts on the PS I/O when the module alarm goes active None: Does not activate either the GARD 8000 Major or Minor Alarm contacts on the PS I/O when the module alarm goes active Status: Will show whether a module is in an alarm state.
-
Page 334: File Operations
The above also applies to the GARD Emulator. Select “Send File to GARD 8000” web link if a file is to be sent from a PC to the GARD 8000. Select “Save File to PC” web link if a file is to be saved to a PC from the GARD 8000 unit. -
Page 335: Figure 7-62. Send File To Ga Rd 8000 Web Page
Chassis Configuration Settings 7.5.1 SEND FILE TO GARD 8000 Select Send File To GARD 8000. The web page shown below will appear. Figure 7-62. Send File to GARD 8000 web page The “Type of File” field will default to “Whole Chassis Configuration.” Select the type of file to be downloaded to the GARD 8000 system from the pull down menu. - Page 336 Chassis Configuration Settings The following files appear as choices in the “Send file to GARD 8000” pulldown menu. Whole Chassis Configuration This file contains all the settings for a complete chassis. It can be loaded from a PC to configure the GARD unit in one step.
- Page 337 PLC board is updated. CAUTION If your GARD 8000 has more than two PLC Digital Modules installed, remove the additional PLC Modules from the front of the unit when upgrading to new PLC software. You can only upgrade a PLC Module with ONE additional PLC Module installed.
- Page 338 TSD Files The GARD 8000 System supports an optional Front Panel TSD (Touch Screen Display). This display can be uniquely configured for each customers needs. Various Setting and Status databases containing web pages formatted for the TSD can be selected as well as customized databases. (See Section 5.4...
-
Page 339: Figure 7-64. Save File To Pc Web Page
System Logic (.EDN File) System Logic DSN (.DSN File) System Logic PDF (.PDF File) Chassis Drawing (.PDF File) This file contains GARD layout and application drawings specific to each customer. GARD 8000 SYS RFL Electronics April 1, 2012 7-103 973.334.3100... - Page 340 Below is a description of a typical extracted file. The first four lines are heading information describing the relay; this is followed by the settings information in columns from left to right, see below. Actual Settings Table: GARD 8000 SYS RFL Electronics April 1, 2012 7-104...
- Page 341 This is a Database Status File for the Metering Module. It can be saved to a PC. TSD Files The GARD 8000 System supports an optional Front Panel TSD (Touch Screen Display). The following Status database files can be extracted from the GARD.
-
Page 342: System Logic Configuration
From the toolbar select Settings>System Logic Configuration. A screen similar to the one below will appear. Figure 7-65. System Logic Configuration web page GARD 8000 SYS RFL Electronics April 1, 2012 7-106... -
Page 343: Figure 7-66. Input Mapping Web Page (Typical)
2 input cards to various points which are tied to 8 functions of a Teleprotection module. See the example shown below. Figure 7-66. Input Mapping web page (Typical) GARD 8000 SYS RFL Electronics April 1, 2012 7-107 973.334.3100... -
Page 344: Figure 7-67. Input Mapping Web Page (Typical)
Selecting the drop down list for the item to be mapped will provide a list of all available inputs. An example of input mapping for logic is shown below. Figure 7-67. Input Mapping web page (Typical) 7.6.2 OUTPUT MAPPING GARD 8000 SYS RFL Electronics April 1, 2012 7-108... -
Page 345: Figure 7-68. System Logic Configuration Web Page
2 output cards to various points which are tied to 8 functions of a Teleprotection module. From the toolbar select Settings> System Logic Configuration. A screen similar to the one below will appear. Figure 7-68. System Logic Configuration web page GARD 8000 SYS RFL Electronics April 1, 2012 7-109... -
Page 346: Figure 7-69. Output Mapping Web Page (Typical)
UNBLOCK TRIP – If a hardware output is mapped to UNBLOCK TRIP, that hardware output will operate when the communications has been lost. The output will then go active for a predetermined amount of time. GARD 8000 SYS RFL Electronics April 1, 2012 7-110 973.334.3100... -
Page 347: Figure 7-70. System Logic Configuration Web Page
Option Setting choices are set up in the TXT file and are loaded in during a System Logic Database TXT upload. From the toolbar select Settings> System Logic Configuration. A screen similar to the one below will appear. Figure 7-70. System Logic Configuration web page GARD 8000 SYS RFL Electronics April 1, 2012 7-111... -
Page 348: Figure 7-71. Option Settings Web Page (Typical)
Start inputs of the logic keying the transmitter. When DCB is selected. The blocking portion of the logic is enabled and allows the transmitter to utilize the Stop input on the transmitter logic. GARD 8000 SYS RFL Electronics April 1, 2012 7-112 973.334.3100... -
Page 349: Figure 7-72. System Logic Configuration Web Page
TXT upload. Timers are programmable from 0-32767ms in 0.25ms increments. To go to the Timer Settings page, from the toolbar select Settings> System Logic Configuration. A screen similar to the one shown below will appear. Figure 7-72. System Logic Configuration web page GARD 8000 SYS RFL Electronics April 1, 2012 7-113... -
Page 350: Figure 7-73. Timer Settings Web Page (Typical)
Available timers will be dependant on the functional modules and the logic files loaded into the GARD 8000 chassis. Please refer to the System Logic section of the manual for a detailed description of the timers associated with different GARD 8000 configurations and logic files. GARD 8000 SYS... -
Page 351: Section 9 March
SECTION 8. SYSTEM LOGIC 8.1 LOGIC OVERVIEW The GARD 8000 relies on logic to interconnect the modules and implement logical operation on the signals. Users familiar with the 9745 will find this concept similar but enhanced. The logic is custom designed for each configuration of modules and user requirements. -
Page 352: Figure 8-2. Three Input And Gate
Table 8-3. Truth table for Two Input OR gate Input 1 Input 2 Output False False False INPUT 1 False True True OUTPUT True False True INPUT 2 True True True Figure 8-3. Two Input OR gate GARD 8000 SYS RFL Electronics March 26, 2008 973.334.3100... -
Page 353: Figure 8-4. Three Input Or Gate
Table 8-5. Truth table for XOR gate Input 1 Input 2 Output False False False INPUT 1 False True True OUTPUT True False True INPUT 2 False True True Figure 8-5. XOR gate GARD 8000 SYS RFL Electronics March 26, 2008 973.334.3100... -
Page 354: Figure 8-6. Inverter Gate
An INVERTER gate has one input and one output, as shown in Figure 8-6. The output is always the inverse of the input. Table 8-6. Truth table for NOT gate Input Output True False True False OUTPUT INPUT Figure 8-6. Inverter gate GARD 8000 SYS RFL Electronics March 26, 2008 973.334.3100... -
Page 355: Figure 8-7. Latch
H = High or True No change L = Low or False = False to True Transition No change = True to False Transition X = Don’t Care Figure 8-7. Latch GARD 8000 SYS RFL Electronics March 26, 2008 973.334.3100... -
Page 356: Figure 8-8. Toggle Gate
TRUE the output will be FALSE and the initial condition is not important. The initial state will in almost all cases be set to zero and the reset should be used to clear the function. TOGGLE TOGGLE INIT FALSE INIT TRUE Figure 8-8. Toggle Gate GARD 8000 SYS RFL Electronics March 26, 2008 973.334.3100... -
Page 357: Figure 8-9. Timer
If the input remains false less than the decay time, the output will not go false. TIMER # OUTPUT INPUT GATE # ATTACK/DECAY VALUES (in ms) a. Symbol ATTACK TIME TRUE INPUT FALSE DECAY TIME TRUE OUTPUT FALSE b. Timing Diagram Figure 8-9. Timer GARD 8000 SYS RFL Electronics March 26, 2008 973.334.3100... -
Page 358: Figure 8-10. Buffer
The buffer primitive has one input and one output as shown in Figure 8-10. It takes an input and outputs the same result. Figure 8-10. Buffer 8.2.11 TRUE AND FALSE In positive logic, True = 1 and False = 0. GARD 8000 SYS RFL Electronics March 26, 2008 973.334.3100... -
Page 359: Logic Configurat Ion
The available hardware outputs will be shown and the possible logic points to drive them can be selected from a pull down list. GARD 8000 SYS RFL Electronics March 26, 2008... -
Page 360: Figure 8-11. System Logic Configuration Web Page
From the toolbar select Settings, System Logic Configurations. A screen similar to the one below will appear. Figure 8-11. System Logic Configuration web page GARD 8000 SYS RFL Electronics March 26, 2008 8-10 973.334.3100... -
Page 361: Figure 8-12. Input Mapping Web Page
2 input cards to various points which are tied to 8 functions of a TPS module. See screen shot below. A user can select a single input to key more than one input function. Figure 8-12. Input Mapping web page GARD 8000 SYS RFL Electronics March 26, 2008 8-11... -
Page 362: Figure 8-13. Output Mapping Web Page
Figure 8-13. Output Mapping web page If a hardware output is mapped to NOT USED, that hardware output will not be tied to the logic, and will not operate under any situation. GARD 8000 SYS RFL Electronics March 26, 2008 8-12 973.334.3100... -
Page 363: Figure 8-14. Option Settings Web Page
Logic Configuration>Option Setting. A screen similar to the one below will appear. Select Option Settings – A screen similar to the one below will appear. Figure 8-14. Option Settings web page GARD 8000 SYS RFL Electronics March 26, 2008 8-13... -
Page 364: Figure 8-15. System Timer Setting Web Page
TXT upload. Timers are programmable from 0-32767ms in .25ms increments. To go to the Timer Settings page from the toolbar select Settings>System Logic Configurations. A screen similar to the one shown below will appear. Figure 8-15. System Timer Setting web page GARD 8000 SYS RFL Electronics March 26, 2008 8-14... -
Page 365: Default Tps Logic
96 functions. Reference information on this system is not provided here. The default TPS only logic in the GARD 8000 provides 12 inputs, 2 channels of transfer trip, each with 8 transfer functions, and 12 outputs. The following tables describe the signals and configuration settings. -
Page 366: Table 8-9. Option Settings
This sets the length of time the unblock trips are held active from the start of the unblock security timer. (effectively 150 m Channel X Unblock Trip Window in the default) GARD 8000 SYS RFL Electronics March 26, 2008 8-16... -
Page 367: Default Tps & Distance Logic
8.5 DEFAULT TPS & DISTANCE LOGIC The default TPS & distance logic in the GARD 8000 provides 12 inputs, 1 channel of transfer trip with 8 transfer functions, a distance relay and 12 outputs. The following tables describe the signals and configuration settings. -
Page 368: Table 8-12. Output Mapping
Trip signal from the over frequency function, step 3 Excess number of trips Trip signal from the Breaker Monitor for excess number of trips Excess breaker current Trip signal from the Breaker Monitor for excess accumulated breaking current GARD 8000 SYS RFL Electronics March 26, 2008 8-18 973.334.3100... -
Page 369: Table 8-13. Opt Ion Settings
Selects whether the input is a 52A or 52B BFI Polarity Normal Selects the polarity of the BFI input is normal or inverted 89B Polarity Normal Selects the polarity of the 89B input is normal or inverted GARD 8000 SYS RFL Electronics March 26, 2008 8-19 973.334.3100... -
Page 370: Table 8-14. Default Logic Timers
Re-trip breaker fail delay delayed after it goes active 5 ms This sets the length of time the re-trip breaker fail output is Re-trip breaker fail hold held active after it goes away. GARD 8000 SYS RFL Electronics March 26, 2008 8-20 973.334.3100... -
Page 371: Logic Design Reserved I/O
SOE to be stored. In addition, when one of these triggers becomes active, any SOE trigger caused by a matching Received Block Trigger, that was received in the last 4-5 seconds must be deleted. GARD 8000 SYS RFL Electronics March 26, 2008 8-21 973.334.3100... -
Page 372: Table 8-17. Logic Bit Assignment
These bits can be user defined. IOOUT3 – IOOUT509 These bits can be user defined. IOOUT510 Must be driven True by logic design. IOOUT511 Must be driven False by logic design. GARD 8000 SYS RFL Electronics March 26, 2008 8-22 973.334.3100... -
Page 373: M Etering M Odule Logic Bus Pla Cem Ent
Over VAr Unit 3 Trip Phase C 59P Unit 1 Trip Over VAr Unit 4 Trip Three Phase 59P Unit 1 Trip OR of all 4 Under VAr Trip Units GARD 8000 SYS RFL Electronics March 26, 2008 8-23 973.334.3100... - Page 374 System Logic This page intentionally left blank GARD 8000 SYS RFL Electronics March 26, 2008 8-24 973.334.3100...
-
Page 375: Section 9. Teleprotection
For applications that are not covered in one of the default logics, custom logic can be provided by RFL. The GARD 8000 Teleprotection Channel is fully programmable and is suitable for Direct Transfer Trip, Permissive Transfer Trip, and Blocking and Unblocking applications. Each of these is described on the following pages. -
Page 376: Figure 9-1. Permissive Underreaching Transfer Trip
Figure 9-1. Permissive Underreaching Transfer Trip Figure 9-2. Permissive Overerreaching Transfer Trip GARD 8000 SYS RFL Electronics March 1, 2006 973.334.3100... -
Page 377: Figure 9-3. Direct Transfer Trip
DTT systems are typically backup protection. Because the teleprotection unit is solely responsible for tripping, without supervision from the local relay, security and dependability is of the utmost importance. Figure 9-3. Direct Transfer Trip GARD 8000 SYS RFL Electronics March 1, 2006 973.334.3100... -
Page 378: Figure 9-4. Direct Ional Co Mparison Blocking
GARD 8000. If the reverse element detects a fault, the start input is keyed and a block signal is sent to the remote end to prevent tripping for the external fault. However, if the forward looking element also detects a fault, the stop input is keyed and the block signal is discontinued allowing the remote end to trip for the internal fault. -
Page 379: Teleprotection Settings
“unblock (trip). Unblocking schemes also provide for a 150ms unblock (trip) after a loss of channel is detected by the receiver. Figure 9-5. Directional Comparison Unblocking 9.3 TELEPROTECTION SETTINGS Refer to paragraph 7.2.6 for Teleprotection Configuration Settings. GARD 8000 SYS RFL Electronics March 1, 2006 973.334.3100... - Page 380 Teleprotection This page intentionally left blank GARD 8000 SYS RFL Electronics March 1, 2006 973.334.3100...
-
Page 381: Section 15 April
The PLC Module consists of two plug-in modules: 1) a Digital Module which plugs into the front of the GARD 8000 chassis, and 2) an Analog module which plugs into the rear of the GARD 8000 chassis. The module set can be used in a GARD 8000 3U or 6U chassis. - Page 382 RFL will modify any logic designed for the previous PLC software version (V13) and earlier PLC software to work with version 17. Please do not hesitate to contact RFL for technical support at 973- 334-3100 ext 226 or via e-mail at customerservice@rflelect.com GARD 8000 SYS RFL Electronics April 23, 2015 10-2...
-
Page 383: Fsk Operation
Security is defined as the probability that a false trip event will be declared at the receive end of the link as a function of the signal to noise ratio of the link. GARD 8000 SYS RFL Electronics April 23, 2015 10-3 973.334.3100... -
Page 384: Figure 10-1. Gard 8000 Plc Fsk Block Diagram
TX Power Monitor Balance Skewed FPGA Circuit Network Hybrid RX Atten. Line I/F Components Existing GARD Hardware Controller/Logic +/-18V Power Supply Discrete I/O Figure 10-1. GARD 8000 PLC FSK Block Diagram GARD 8000 SYS RFL Electronics April 23, 2015 10-4 973.334.3100... -
Page 385: Figure 10-2. M Inimu M Channel Spacing (Fsk)
700 Hz Minimum Channel Spacing Bidirectional TX Center BW RX Center BW 200 Hz 200 Hz 200 Hz 200 Hz 1200 Hz Minimum Channel Spacing Figure 10-2. Minimum Channel Spacing (FSK) GARD 8000 SYS RFL Electronics April 23, 2015 10-5 973.334.3100... -
Page 386: On-Off Operation
On-Off operation defines the absence of a tone (Off) to be the guard condition. The presence of a tone (On) is the trip condition. Since there is no tone present under normal non-trip operating conditions, no receive AGC functions may be performed. Therefore, the nominal receive signal level is determined GARD 8000 SYS RFL Electronics April 23, 2015 10-6 973.334.3100... - Page 387 Remote initiation is accomplished by sending a specific code to the master. This code tells the master to initiate a test sequence. This code is not available as a response code from remotes for normal tests. GARD 8000 SYS RFL Electronics April 23, 2015 10-7 973.334.3100...
-
Page 388: Figure 10-3. Gard 8000 Plc On/Off Block Diagram
Controller/Logic +/-18V Power Supply Discrete I/O Figure 10-3. GARD 8000 PLC On/Off Block Diagram On/Off Systems transmit and receive on the same frequency. Therefore, the local receiver cannot differentiate between remote transmissions and local transmissions. In addition, checkback sequences are detected as a sequence of trip events. The local receiver will report all trip events through the Logic Bus interface whether the source is from local transmissions, checkback sequences, or real trips. -
Page 389: Setting The Transmit Ca Rrier Frequency Range
10.4 SETTING THE TRANSMIT CARRIER FREQUENCY RANGE The operating band transmit carrier frequency is normally factory set, however if changes are required in the field the following settings may be followed. GARD 8000 SYS RFL Electronics April 23, 2015 10-9... -
Page 390: Figure 10-4. Gard Plc Analog Module Carrier Frequency Range Jumper Settings
J38* * Jumpers added on revised circuit board Figure 10-4. GARD PLC Analog Module Carrier Frequency Range Jumper Settings Table 10-4. PLC Analog Module Assembly Part Numbers (part number series 500935) GARD 8000 SYS RFL Electronics April 23, 2015 10-10... -
Page 391: Table 10-5. Tx Filter Ju Mper Settings (Part Number Series 500935)
11-12 11-12 11-12 11-12 11-12 11-12 11-12 390-500 11-12 13-14 13-14 13-14 11-12 13-14 13-14 13-14 11-12 Continued…….. Table 10-6. PLC Analog Module Assembly Part Numbers (part number series 500930) GARD 8000 SYS RFL Electronics April 23, 2015 10-11 973.334.3100... -
Page 392: Tx Level M Eter Ca Libration
The process consists of enabling the transmitter on the digital board to output a full scale signal (10 Watts) and then adjusting the amplifier output until GARD 8000 SYS RFL Electronics... -
Page 393: Reflected Power M Eter Ca Libration
(digital) or rear (analog) module is changed or if the transmit or receive frequency is changed. The calibration consists of two parts where the DC offset error and gain error is adjusted out. GARD 8000 SYS RFL Electronics April 23, 2015 10-13 973.334.3100... - Page 394 11. Put a 25 ohm load across the Line port (or in Tx port in 4W application) 12. Calibrate the gain: On the test page, change the setting “Calibrate RPM” to “Calibrate Gain.” Click on “Run Test”. GARD 8000 SYS RFL Electronics April 23, 2015 10-14...
-
Page 395: Carrier Level Indicator
* The screen will indicate above 40% for these conditions. Note that the RPM indication will not drift over time more than 1%, given constant line conditions. Tolerances measured at the GARD 8000 chassis connector. Adding Hybrids will degrade accuracy. 10.7 CARRIER LEVEL INDICATOR The GARD PLC has a carrier level indicator output for use with external measuring devices such as a panel meter (see 10.7.1) or an analog RTU input. -
Page 396: Figure 10-5. Plc Analog Module, Carrier Level Indicator Modes - Ju Mpers
+10 dB 5.0V 5.0V 1.00 mA 100 uA +6 dB 4.0V 4.0V 0.80 mA 80 uA +3 dB 3.25V 3.25V 0.65 mA 65 uA Nominal 2.5V 2.5V 0.50 mA 50 uA GARD 8000 SYS RFL Electronics April 23, 2015 10-16 973.334.3100... -
Page 397: Figure 10-6. Cli Meter, Front Panel Mounting On 3U Chassis
0 uA 10.7.1 CARRIER LEVEL INDICATOR, FRONT PANEL METER A popular option for the GARD 8000 when PLC is employed is a Carrier Level Indicator Meter (CLI Meter). Typically the meter is factory installed on the Front Panel as shown below. -
Page 398: Figure 10-7. Plc Dig Ital Module (500455-1)
1. Set the RX level to a non 0 dB level relative to nominal (the further from 0 dB without exceeding the range of the meter the better). 2. Adjust R237 (Scale) such that the meter displays the relative level of the RX signal. GARD 8000 SYS RFL Electronics April 23, 2015 10-18 973.334.3100... -
Page 399: Using The Rfl 9508 Rf Chassis With The Ga Rd 8000 Plc
Power Line Carrier 10.8 USING THE RFL 9508 RF CHASSIS WITH THE GARD 8000 PLC The RFL 9508 RF Chassis, used with the GARD PLC, amplifies the RF outputs of the GARD PLC before they are passed to the line coupling equipment. The RFL 9508 RF Chassis shown below develops 50 Watts PEP. -
Page 400: Figure 10-9. Front View Of The 9508 Rf Chassis Showing Module Locations
BALANCE 50W POWER AMP RX FILTER BOARD (Mounted on f ront door, not shown f or clarity ) Figure 10-9. Front View of the 9508 RF Chassis showing Module locations GARD 8000 SYS RFL Electronics April 23, 2015 10-20 973.334.3100... -
Page 401: Figure 10-10. 9508 Rf Chassis Block Diagram
The Power Amplifier is mounted on the front cover of the 9508 RF Chassis. The function of the Power Amplifier is to amplify the RF outputs of the GARD 8000 before these signals are passed to the line coupling equipment. The Power Amplifier develops an RF output of 50 Watts. A green LED is located on the left side of the Power Amplifier front panel as shown in the Figure below. -
Page 402: Figure 10-12. 9508 Rf Chassis Power A Mp Lifier, Power Supply
SWITCHING DRIVE OUTPUT TRANSIENT CURRENT TRANS- CIRCUITRY FILTERING PROTECTION LIMITING STATION FORMER BATTERY INPUT +30 Vdc OPTICAL ISOLATOR PULSE WIDTH MODULATOR Figure 10-13. 9508 RF Chassis Power Amplifier, Power Supply GARD 8000 SYS RFL Electronics April 23, 2015 10-22 973.334.3100... -
Page 403: Figure 10-14. Tx Filter, Top View
The bandwidth of the filter can be set to either 8kHz or 16kHz using two programmable jumpers, J1 and J45. The filter center frequency is tunable from 24kHz to 496kHz using programmable jumpers. The outer edges are 20kHz and 500kHz. The 8kHz bandwidth is used for most applications. GARD 8000 SYS RFL Electronics April 23, 2015 10-23 973.334.3100... -
Page 404: Figure 10-15. Balance Board
PC board as the Attenuator Board. It is used in place of the Balance Board in the external RF Chassis for 100W applications as shown in Figure 10-23. GARD 8000 SYS RFL Electronics... -
Page 405: Figure 10-16. Line Board
From Power Amp 2 Line Coupling (when used) Equipment Complex Impedance Hybrid Balance Matching Transformers Network Transformers Surge Arrestors Receive Receive Output Attenuator Rx Filter Figure 10-17. Block Diagram, RFL 9508 Line Board GARD 8000 SYS RFL Electronics April 23, 2015 10-25 973.334.3100... - Page 406 10.8.5.1.4 Dummy Load An internal Dummy Load and Attenuator Board are provided as described in Section 10.8.8. observe the signal going to the line coupling equipment use test points TP1 and TP2. GARD 8000 SYS RFL Electronics April 23, 2015 10-26...
-
Page 407: Figure 10-18. Rfl 9508 Rx Filter Board
10.8.6 RX FILTER The function of the Rx Filter is to prevent harmonics and noise from coming into the GARD 8000 PLC from the power line that is out of the bandwidth of the filter. The bandwidth of the Rx Filter can be set to either 8kHz or 16kHz using two programmable jumpers on the board. -
Page 408: Figure 10-19. Rfl 9508 Rx Connection Board
10.8.8 ATTENUATOR BOARD The RFL 9508 Attenuator Board consists of five 10 watt power resistors, several other smaller resistors, a two-position toggle switch, and two test points. Figure 10-20. RFL 9508 Attenuator Board GARD 8000 SYS RFL Electronics April 23, 2015 10-28... -
Page 409: Figure 10-21. Rfl 9508 Rf Mother Board, Rear View
Two-pin plug-in type External Amp Fail input INT AM P FAIL 8-position terminal block Power Amplifier Fail, Relay Contacts EXT AM P FAIL (See the following table for terminal assignments) GARD 8000 SYS RFL Electronics April 23, 2015 10-29 973.334.3100... -
Page 410: Table 10-12. Tb-1 Terminal Assignments
This will cause surge currents to pass through the Mother Board and chassis before exiting to ground. Connecting directly to the sub-station ground bar is preferred. 10.8.10 MODULE PLACEMENT IN THE RF CHASSIS (50W SYSTEMS) GARD 8000 SYS RFL Electronics April 23, 2015 10-30... -
Page 411: Figure 10-22. Module Placement In A Typical 50W 9508 Rf Chassis (Top View)
50 Watt systems are housed in a 6U high chassis. The upper part of the chassis is the RF Section, and the lower part of the chassis is the GARD 8000. Module placement in the RF Chassis is shown below. - Page 412 It has five connectors on the front for plug-in modules, and several connectors and an eight-position terminal strip, which protrude through the rear to allow for connections to other modules in the chassis. GARD 8000 SYS RFL Electronics April 23, 2015 10-32 973.334.3100...
-
Page 413: Figure 10-23. Cable Connections In The Rf Chassis
J9 of Motherboard 2-conductoir cable for Amplifier Fail function * If the coax is connected to J4, then J5 is unused. If the coax is connected to J5, then J4 is unused. GARD 8000 SYS RFL Electronics April 23, 2015 10-33... -
Page 414: Figure 10-24. Module Placement In The Au Xiliary 3U Chassis For The 100W System
Table 10-15. RF Analog Chassis Jumper Configurations and other Settings Module See Paragraph: 50W Power Amplifier 10.8.13.1 Tx Filter 10.8.13.2 Balance Board 10.8.13.3 Line Board 10.8.13.4 Attenuator 10.8.13.5 Rx Filter 10.8.13.6 GARD 8000 SYS RFL Electronics April 23, 2015 10-34 973.334.3100... -
Page 415: Figure 10-25. Location Of 50W Power A Mplifier Module
As shown above; effective October 2010, two switch blocks have been added to the Power Amplifier Circuit Board. These DIP switches are factory set to protect the circuit board from overvoltage or excessive phase angle situations. See Table 10-14 for a description of the switch settings. GARD 8000 SYS RFL Electronics April 23, 2015 10-35... -
Page 416: Table 10-16. Function Of Ju Mpers, Connectors And Potentiometers On Power A Mp
Note: All jumper and potentiometer settings are made at the factory and should not need field adjustment, except the gain potentiometer R83, and the threshold potentiometer R8. For DIP Switch settings SW1 and SW2 see the following table. Set to ON to enable the DIP Switch. GARD 8000 SYS RFL Electronics April 23, 2015 10-36 973.334.3100... -
Page 417: Table 10-17. Function Of Dip Switches Sw1 And Sw2 On Power A Mp Board
27 of the jumpers are located on the 107828-2 board. This is the board with the two large air core inductors shown below with the location of the jumpers. The remaining 17 Jumpers are located on the GARD 8000 SYS RFL Electronics... -
Page 418: Figure 10-27. Location Of Ju Mpers On The Tx Filter, Pc Board 107828 -2
Mother Board PC Board PC Board (107828-2) (107828-1) 8kHz 16kHz Air Core Inductor L2 Air Core Inductor L1 Figure 10-27. Location of jumpers on the Tx Filter, PC Board 107828-2 GARD 8000 SYS RFL Electronics April 23, 2015 10-38 973.334.3100... -
Page 419: Table 10-18. Tx Filter Setup Ju Mpers
10. Adjust L2 for a minimum level on the meter. If a null is not seen, the lowest value of the second series capacitance may have to be varied. 11. Set Jumper J44 back to the “Norm” position. GARD 8000 SYS RFL Electronics April 23, 2015 10-39 973.334.3100... -
Page 420: Figure 10-28. Location Of Ju Mpers On The Tx Filter, Pc Board 107828-1
Power Line Carrier Figure 10-28. Location of jumpers on the Tx Filter, PC Board 107828-1 GARD 8000 SYS RFL Electronics April 23, 2015 10-40 973.334.3100... -
Page 421: Figure 10-29. Location Of Ju Mpers On The Balance Board
Figure 10-29. Location of jumpers on the Balance Board Table 10-19. Setting Jumpers on the Balance Board Number Of Amplifiers Jumper Settings Jumper Settings Jumper Settings One (50W) Two (100W) GARD 8000 SYS RFL Electronics April 23, 2015 10-41 973.334.3100... -
Page 422: Figure 10-30. Location Of Ju Mpers On The Line Board
250V .001U .002U 55869 55689 56UH 100UH 180UH 55688 55869 130/ 33UH 10UH 18UH 18UH J14 J21 J15 J22 J17 J18 Figure 10-30. Location of jumpers on the Line Board GARD 8000 SYS RFL Electronics April 23, 2015 10-42 973.334.3100... -
Page 423: Table 10-20. Line Board, Setup Ju Mpers And Switch Sett Ings
TP2 or TP3. Test point Tx monitor high, test point. Test point Rx monitor high, test point. Jumper Used for factory testing. In normal operation this jumper is not installed. GARD 8000 SYS RFL Electronics April 23, 2015 10-43 973.334.3100... -
Page 424: Figure 10-31. Attenuator Board, Location Of Sw1
L2 controls the balance of the filter (flat response at both sides of center frequency). L1 controls the attenuation at the upper side of center frequency. L3 controls the attenuation at the lower side of center frequency. GARD 8000 SYS RFL Electronics April 23, 2015 10-44 973.334.3100... -
Page 425: Figure 10-32. Location Of Ju Mpers On The Rx Filter Board, Showing Jumper Groupings
Check the attenuation at the selected center frequency +/- 12kHz. Adjust L1 to get the desired attenuation at +12 kHz >9.5 dBm. Adjust L3 to get the desired attenuation at +12 kHz >9.5 dBm. GARD 8000 SYS RFL Electronics April 23, 2015 10-45 973.334.3100... - Page 426 Tune the TX filter to the proper band (section 10.8.13.2) Tune the RX filter to the proper band (section 10.8.13.6.1) Set the transceiver Transmit and Receive frequencies Perform the commissioning procedure. GARD 8000 SYS RFL Electronics April 23, 2015 10-46...
-
Page 427: Figure 10-33. Rear Panel W Iring Of A Typical Ga Rd 8000 With A 50W 9508 Rf Chassis
8000 Switched Station Battery PLC Analog Module for External Device Disconnect To Station Battery Figure 10-33. Rear Panel Wiring of a typical GARD 8000 with a 50W 9508 RF Chassis GARD 8000 SYS RFL Electronics April 23, 2015 10-47 973.334.3100... -
Page 428: Figure 10-34. Rear Panel W Iring Of A Typical Ga Rd 8000 With A 100W 9508 Rf Chassis
8000 Switched Station Battery PLC Analog Module for External Device Disconnect To Station Battery Figure 10-34. Rear Panel Wiring of a typical GARD 8000 with a 100W 9508 RF Chassis GARD 8000 SYS RFL Electronics April 23, 2015 10-48 973.334.3100... -
Page 429: Figure 10-35. Schemat Ic, Ga Rd 8000 Plc Analog Module, B-500934-K 30-392 Khz, 50 Oh M (Sheet 1 O F 4)
Power Line Carrier Figure 10-35. Schematic, GARD 8000 PLC Analog Module, B-500934-K 30-392 KHz, 50 Ohm (Sheet 1 of 4) GARD 8000 SYS RFL Electronics November 7, 2011 10-47 (10-48 blank) 973.334.3100... - Page 430 Power Line Carrier Figure 10-35. Schematic, GARD 8000 PLC Analog Module, B-500934-K, 30-392 KHz, 50 Ohm (Sheet 2 of 4) GARD 8000 SYS RFL Electronics November 7, 2011 10-49 (10-50 blank) 973.334.3100...
- Page 431 Power Line Carrier Figure 10-35. Schematic, GARD 8000 PLC Analog Module, B-500934-K 30-392 KHz, 50 Ohm (Sheet 3 of 4) GARD 8000 SYS RFL Electronics November 7, 2011 10-51 (10-52 blank) 973.334.3100...
- Page 432 Power Line Carrier Figure 10-35. Schematic, GARD 8000 PLC Analog Module, B-500934-K 30-392 KHz, 50 Ohm (Sheet 4 of 4) GARD 8000 SYS RFL Electronics November 7, 2011 10-53 (10-54 blank) 973.334.3100...
-
Page 433: Figure 10-36. Default Logic, Ga Rd 8000 On-Off Plc
Bit 128 Bit 100 Bit 106 Bit 112 Bit 118 PLC_MODULE1 Figure 10-36. Default Logic, GARD 8000 On-Off PLC For reference ONLY. See specific drawings provided with your order. GARD 8000 SYS RFL Electronics November 7, 2011 10-55 (10-56 blank) -
Page 434: Figure 10-37. Default Logic, Ga Rd 8000 Fsk Plc
AND2 TIMER ENABLE_RPM_ALARM NUMBER=9 ATT_DEC=50_50 TRIG8 TRUE IOOUTS11 FALSE For reference ONLY. IOOUTS10 See specific drawings provided with your order. Figure 10-37. Default Logic, GARD 8000 FSK PLC GARD 8000 SYS RFL Electronics November 7, 2011 10-57 (10-58 blank) 973.334.3100... -
Page 435: Section 16 February
SECTION 11. TESTS AND DIAGNOSTICS 11.1 INTRODUCTION Pointing to Test on the GARD 8000 toolbar and clicking on SYSTEM TEST brings the user to the System Testing web page. The page consists of a Chassis inventory page with radio buttons for each functional module. -
Page 436: Input M Odule Test
Selecting a module will bring up that module’s test screen. Selecting the Input module in Chassis Rear bottom, Slot #8 will bring you to the web page shown below. Figure 11 2. Input Card web page GARD 8000 SYS RFL Electronics February 14, 2011 11-2 973.334.3100... - Page 437 Indicates the starting logic bit and if the module is using default logic assignment or custom logic assignment. Description: Each of the 6 input functions include the description programmed in with the GARD 8000 logic file or in the Input Card configuration screen. Slot #: Indicates the physical slot number of the module in the GARD 8000 chassis.
- Page 438 The test Configuration section consists of the following: Description: Each of the 6 input functions include the description programmed in with the GARD 8000 logic file or in the Input Card configuration screen are repeated. Mode: This is a drop down box. It allows the tester to set the input to the following modes: Normal Normal mode is the normal operating condition for the input.
- Page 439 If there is a minor alarm or whenever any functio n is in a state other than Normal the Minor alarm indicator will be yellow. During normal conditions this indicator will be Green. GARD 8000 SYS RFL Electronics February 14, 2011 11-5 973.334.3100...
-
Page 440: Output Module T Est
Selecting a module will bring up that module’s test screen. Selecting the Solid State output module in chassis Slot #9 Rear top will bring you to the web page shown below. Figure 11-3. Output Module web page GARD 8000 SYS RFL Electronics February 14, 2011 11-6 973.334.3100... - Page 441 Indicates the starting logic bit and if the module is using the default logic assignment or custom logic assignment. Description: Each of the 6 output functions include the description programmed in with the GARD 8000 logic file or in the output module configuration screen. Slot #: Indicates the physical slot number of the module in the GARD 8000 chassis.
- Page 442 125 ms. The test Configuration section consists of the following: Description: Each of the 6 output functions include the description programmed in with the GARD 8000 logic file or in the Input Card configuration screen. Mode: This is a drop down box that allows the tester to set the input to the following test modes: Normal Normal mode is the normal operating condition for the output.
- Page 443 If there is a minor alarm or whenever any function is in a state other than Normal the Minor alarm indicator will be yellow. During normal conditions this indicator will be Green. GARD 8000 SYS RFL Electronics February 14, 2011 11-9 973.334.3100...
-
Page 444: Comm Unications Modules
The data on the Local loop-back and remote loop-back tests are transmitted to the designated receiving terminals and redirected. Care must be taken to isolate the outputs of GARD 8000 chassis to prevent false tripping of GARD 8000 systems during test. -
Page 445: Figure 11-4. Digital Interface Web Page
Module Type: The protocol is the type of interface the Digital Interface Module is configured as. This can be RS-449, X.21 or V.35. GARD 8000 SYS RFL Electronics February 14, 2011 11-11... - Page 446 Receive Activity: Indicates the presence of incoming data to the Digital Interface Module to the communications bus. This is the data that is going to be sent to the remote terminal. GARD 8000 SYS RFL Electronics February 14, 2011 11-12...
- Page 447 Tests and Diagnostics Loop-Back Modes: The GARD 8000 Digital interface module is capable of performing 3 loop-back tests, Manual loop-back, Local loop-back and Remote loop-back. Loop-Back Mode Tests: Each loop-back mode has an Enable / Disable button associated with it. By clicking on the button the user can enable different types of loop-back tests.
-
Page 448: Figure 11-5. Manual Loopback
The manual lop-back requires an external loop-back connector attached to the 37-pin interface connector. The loop-back connector acts as a crossover for the transmit data and receive data. The GARD 8000 must be disconnected from the remote terminal. See Figure 11-5. GARD 8000... -
Page 449: Figure 11-6. Local Loopback
Click on the “Local Loop-Back” button to enable. Click on “Execute”. Set the devices, TPS channels or Functional modules, TX and RX addresses to the same value. GARD 8000 SYS RFL Electronics February 14, 2011 11-15 973.334.3100... -
Page 450: Figure 11-7. Remote Loopback
The remote loop-back function directs the received data back out the Digital Interface Module to the remote GARD 8000 system. The local transmit data is interrupted. The received data is passed through to the local GARD 8000 system and returned to the transmitting GARD 8000 System. See Figure 11-7. Digital Interface... - Page 451 Provides the user a means to reset the error counters of the Digital interface module. Time Slot Configuration Button: The time slot configuration button allows the user to view the communications time slot assignment of the Digital interface module. GARD 8000 SYS RFL Electronics February 14, 2011 11-17...
-
Page 452: Figure 11-8. C37.94 Web Page
Tests and Diagnostics 11.4.2 C37.94 SHORT-HAUL FIBER INTERFACE Figure 11-8. C37.94 Web page GARD 8000 SYS RFL Electronics February 14, 2011 11-18 973.334.3100... - Page 453 Tests and Diagnostics The GARD 8000 C37.94 interface module is capable of performing 2 loop-back tests, Local loop-back and Remote loop-back. Configuration status information: User Label: This is a user-defined label. This label can identify a line number, remote substation or any other information that may assist in identifying the interface.
-
Page 454: Figure 11-9. Local Loopback
Click on the “Local Loop-Back” button to enable. Click on “Execute”. Set the devices, TPS channels or Functional modules, TX and RX addresses to the same value. GARD 8000 SYS RFL Electronics February 14, 2011 11-20 973.334.3100... -
Page 455: Figure 11-10. Manual Loopback
The remote loop-back function directs the received data back out the C37.94 interface module to the remote GARD 8000 system. The local transmit data is interrupted. The received data is passed through to the GARD 8000 system. See figure 11-10. - Page 456 Provides the user a means to reset the error counters of the C37.94 interface module. Time Slot Configuration Button: The time slot configuration button allows the user to view the communications time slot assignment of the multiprotocol module. GARD 8000 SYS RFL Electronics February 14, 2011 11-22...
-
Page 457: Figure 11-11. G.703 Web Page
Tests and Diagnostics 11.4.3 G.703 ELECTRICAL INTERFACE Figure 11-11. G.703 web page The GARD 8000 G.703 interface module is capable of performing 2 loop-back tests, Local loop-back and Remote loop-back. GARD 8000 SYS RFL Electronics February 14, 2011 11-23 973.334.3100... - Page 458 Configured: Indicates that the module is properly configured. Green indicates that the modules configured, red indicates that the module is not configured. GARD 8000 SYS RFL Electronics February 14, 2011 11-24 973.334.3100...
- Page 459 “DISABLED” if all loop-back modes are disabled. The Digital Interface will also issue a minor alarm while in loop-back and the Digital Interface button on the inventory pages will be yellow. GARD 8000 SYS RFL Electronics February 14, 2011 11-25 973.334.3100...
-
Page 460: Figure 11-12. Manual Loopback
The remote loop-back function directs the received data back out the G.703 interface module to the remote GARD 8000 system. The local transmit data is interrupted. The received data is passed through to the GARD 8000 system. See figure 11-13. - Page 461 Provides the user a means to reset the error counters of the multiprotocol module. Time Slot Configuration Button: The time slot configuration button allows the user to view the communications time slot assignment of the multiprotocol module. GARD 8000 SYS RFL Electronics February 14, 2011 11-27...
-
Page 462: Figure 11-14. Long Haul Fiber Web Page
Tests and Diagnostics 11.4.4 LONG HAUL FIBER Figure 11-14. Long Haul Fiber web page GARD 8000 SYS RFL Electronics February 14, 2011 11-28 973.334.3100... - Page 463 Time Slot Configuration Button: The time slot configuration button allows the user to view the communications time slot assignment of the multiprotocol module. GARD 8000 SYS RFL Electronics February 14, 2011 11-29...
-
Page 464: Figure 11-15. Local Loopback
Tests and Diagnostics Loop-Back Mode Tests: The GARD 8000 Fiber Optic interface module is capable of performing 2 loop-back tests, Local loop- back and Remote loop-back. Loop-Back Mode Tests: Each loop-back mode has an Enable / Disable button associated with it. By clicking on the button the user can enable different types of loop-back tests. -
Page 465: Figure 11-16. Manual Loopback
The remote loop-back function directs the received data back out the Fiber Optic interface module to the remote GARD 8000 system. The local transmit data is interrupted. The received data is passed through to the GARD 8000 system. See figure 11-16. -
Page 466: Figure 11-17. Manual Loopback
Set the Fiber Optic interface to internal timing on the settings page. Label the existing fiber optic cables as the transmitter and receiver then remove the fibers from the GARD 8000 chassis and install protective covers over the ends of the fibers. - Page 467 Fallback Communications bus1 clock Fallback Communications bus2 clock One communications interface in the GARD 8000 must be chosen as the primary clock source. The remaining interfaces must be configured as slaves will synchronize their transmit clocks to the primary source.
- Page 468 Indicates if the interface is the communications system clock source, master, or receives its communications clock, slave. One interface on each of the GARD 8000 communications buses must be configured as the master source; the remaining interfaces must be configured as slaves.
-
Page 469: Figure 11-18. T1/ E1 Web Page
Tests and Diagnostics 11.4.5 T1/E1 ELECTRICAL INTERFACE Figure 11-18. T1/E1 Web page GARD 8000 SYS RFL Electronics February 14, 2011 11-35 973.334.3100... - Page 470 Tests and Diagnostics The GARD 8000 T1/E1 Interface module is capable of performing 2 loop-back tests, Local loop-back and Remote loop-back. Configuration and alarm status: User Label: This is a user-defined label. This label can identify a line number, remote substation or any other information that may assist in identifying the interface.
-
Page 471: Figure 11-19. Manual Loopback
The remote loop-back function directs the received data back out the T1/E1 interface module to the remote GARD 8000 system. The local transmit data is interrupted. The received data is passed through to the GARD 8000 system. See figure 11-20. - Page 472 Counts bad words based on cyclic redundancy Check bits (CRC) in the T1/E1 data stream. Frame Bit Errors: Counts the number of frame bit errors in Super Frame Mode. The GARD 8000 checks a framing message to determine if the communications system is still properly framed. For each invalid frame message the counter will increment.
-
Page 473: Audio Tone Module Test
Tests and Diagnostics 11.5 AUDIO TONE MODULE TEST Figure 11-21. Audio Tone Protection Test Web page Note: Do not use the REFRESH button on this web page, as it may cause unpredictable results. GARD 8000 SYS RFL Electronics February 14, 2011 11-39... - Page 474 1) Normal: Channel 1 transmitter is operating normally. 2) Low: Channel 1 will transmit at the lower configured frequency. 3) High: Channel 1 will transmit at the higher configured frequency. 4) Off: Channel 1 transmitter is off. GARD 8000 SYS RFL Electronics February 14, 2011 11-40...
- Page 475 3) Not Active: No tones are being received. 4) Disabled; Remote channel 1 receiver is disabled. 5) Modem Fail: Modem is not functioning. Remote Chan 1 Rx Level Displays the Remote Chan 1 receiver level in dB. GARD 8000 SYS RFL Electronics February 14, 2011 11-41 973.334.3100...
- Page 476 Reset Date and Time Indicates the Date and Time that the Reset Counter was reset to zero. Remote Address Expected Displays the expected remote address. Remote Address Received Displays the received remote address. GARD 8000 SYS RFL Electronics February 14, 2011 11-42 973.334.3100...
- Page 477 Indicates the number of times that the channel delay has exceeded the threshold. The Channel Delay Test is conducted approximately once per second. Reset Counters When box is checked the “Address Test Failed Counter” and the “Channel Delay Test Failed Counter” will be reset. GARD 8000 SYS RFL Electronics February 14, 2011 11-43 973.334.3100...
-
Page 478: Plc M Odule Test
From the pull down menu select “System Test” the following web page will appear. Then click on Power Line Carrier to go to the PLC Module Test web page as shown in Figure 11-23. Figure 11-22. System Testing web page with PLC Module (typical) GARD 8000 SYS RFL Electronics February 14, 2011 11-44 973.334.3100... -
Page 479: Figure 11-23. Plc Module Testing Web Page
Tests and Diagnostics Figure 11-23. PLC Module Testing web page Note: Do not use the REFRESH button on this web page, as it may cause unpredictable results. GARD 8000 SYS RFL Electronics February 14, 2011 11-45 973.334.3100... - Page 480 Reset all Counters When box is checked, it resets all counters. Recommission Unit When box is checked, it recommissions the RX AGC and Attenuator. Follow the steps listed on the webpage. GARD 8000 SYS RFL Electronics February 14, 2011 11-46 973.334.3100...
- Page 481 Indicates the status of the last checkback test. Start Checkback/Remote Init In Master mode it starts the checkback sequence. In Remote mode it sends the Remote Initiate code to the master end. GARD 8000 SYS RFL Electronics February 14, 2011 11-47...
-
Page 482: Current Differientia L Rela Y Test
11.7 CURRENT DIFFERIENTIAL RELAY TEST From the pull-down menu select “System Test.” Then click on Current Diff Relay to go to the Current Diff Test web page as shown in Figure 11-25. GARD 8000 SYS RFL Electronics February 14, 2011 11-48 973.334.3100... -
Page 483: Figure 11-24. System Testing, Current Diff
Tests and Diagnostics Figure 11-24. System Testing, Current Diff Figure 11-25. Current Diff Relay Testing web page (Screen 1 of 2) GARD 8000 SYS RFL Electronics February 14, 2011 11-49 973.334.3100... - Page 484 When red this indicates that the module has received an invalid configuration message from the controller and rejected it. If the module had previously received a valid configuration it will continue to use the previous configuration. Green indicates the last configuration was valid. GARD 8000 SYS RFL Electronics February 14, 2011 11-50...
- Page 485 This will indicate if the relay is configured for single pole (“1-pole”) or three pole (“3-pole”) operation. Current Diff Relay Test definitions – Comms Channel 1 - 2 Enabled Indicates which Comm Channel is enabled. Continued……. GARD 8000 SYS RFL Electronics February 14, 2011 11-51 973.334.3100...
- Page 486 When red this indicates that the guard before trip criteria has not been satisfied and the relay will not trip in primary protection mode. Green indicates that either the criteria have been satisfied or guard before trip has been disabled by the user. GARD 8000 SYS RFL Electronics February 14, 2011 11-52 973.334.3100...
- Page 487 A current (no voltages are applied to the relay, only currents). The data is only valid when the system is in steady-state and there are currents applied to the relay. The remote currents will be displayed as 180º, 300º, 60º or “Error.” Continued……. GARD 8000 SYS RFL Electronics February 14, 2011 11-53...
- Page 488 The following will give the listed components installed version. Relay ACTEL Firmware Ver Relay Board Ver I/O ACTEL Firmware Ver I/O Hardware Ver Current Diff DSP Rev HMI Interface Ver GARD 8000 SYS RFL Electronics February 14, 2011 11-54 973.334.3100...
- Page 489 Single 1 2 3 4 12-1 12-3 Single 1 2, Dual 3 4 12-2 12-5 Channel 1 As A Modem 12-3 12-7 Dual 1 2, Dual 3 4 12-4 12-9 Simple 12-5 12-11 GARD 8000 SYS RFL Electronics September 19, 2005 12-1 973.334.3100...
- Page 490 Audio Tone This page intentionally left blank GARD 8000 SYS RFL Electronics September 19, 2005 12-2 973.334.3100...
- Page 491 Boost Boost Boost Boost Logic Logic Logic Analog Tx Analog Tx Logic Analog Tx Analog Tx Figure 12-1. Audio Tone Logic Block Diagram, Single 1 2 3 4 GARD 8000 SYS RFL Electronics September 19, 2005 12-3 (12-4 Blank) 973.334.3100...
- Page 492 Dual 3 & 4 Function Analog Tx 3 From Boost Logic CH3 RTS Analog Tx 4 CH4 RTS Figure 12-2. Audio Tone Logic Block Diagram, Single 1 2 Dual 3 4 GARD 8000 SYS RFL Electronics September 19, 2005 12-5 (12-6 Blank) 973.334.3100...
-
Page 493: Figure 12-3. Audio Tone Logic Block Diagram, Channel 1 Used As A Modem
Note: This will work if Channel 1 is set up as a “Single In” Logic, s uch as Single 1, 2, 3, 4 Single 1, 2 Dual 3, 4 Figure 12-3. Audio Tone Logic Block Diagram, Channel 1 Used as a Modem GARD 8000 SYS RFL Electronics September 19, 2005 12-7 (12-8 Blank) 973.334.3100... -
Page 494: Figure 12-4. Audio Tone Logic Block Diagram, Dual 1 2 Dual 3 4
From Analog Tx Chan3 RTS Chan 1 RTS Logic Logic Chan 2 RTS Chan4 RTS Figure 12-4. Audio Tone Logic Block Diagram, Dual 1 2 Dual 3 4 GARD 8000 SYS RFL Electronics September 19, 2005 12-9 (12-10 Blank) 973.334.3100... -
Page 495: Figure 12-5. Audio Tone Logic Block Diagram, Simp Le
Boost Boost Boost Boost From From From From Analog Tx Analog Tx Analog Tx Analog Tx Logic Logic Logic Logic Figure 12-5. Audio Tone Logic Block Diagram, Simple GARD 8000 SYS RFL Electronics September 19, 2005 12-11 (12-12 Blank) 973.334.3100... -
Page 496: Section 13. Current Differential Rela Y
An additional set of backup protection algorithms are available when inter-relay communications are lost for any reason. The GARD 8000 Current Differential Module can be configured for optional single-pole tripping. The standard ordering version is for three-pole tripping only. Three terminal configuration is also available as an option. -
Page 497: Configuration
13.2.1 SYSTEM CONFIGURATION OVERVIEW The GARD 8000 System differs from most conventional multifunctional differential relays in that rather than supplied with very complex generic default logic, the GARD 8000 can be easily customized to meet your specific application requirements. For most applications, the factory default logic may be suitable but RFL will modify it free-of-charge when required. -
Page 498: Figure 13-1 Location Of Front Panel Leds
NOTE While most of the GARD 8000 Modules can be installed and removed while powered, it is not recommended to do so while Tripping Circuits are enabled as unintended operations may result. -
Page 499: Figure 13-2 Front And Rear View Of 3U Chassis With Current Differential Module (Typical)
Current Differential Relay 13.2.3 HARDWARE CONFIGURATION A GARD 8000 System can be built up with Functional Modules as required for a specific application, with a selectable number of inputs, outputs and communications interfaces. The following overview describes a factory default configuration of a 3U chassis built up of: ... -
Page 500: Figure 13-3. Current Differential Rear Connections
Supply PS2-2 87L Current PS1 Major Alarm PS2 Minor Alarm Differential Communications C37.94 Compliant TO ANNUNCIATOR OR SCADA Optical Interface Figure 13-4. AC/DC Schematic for GARD 8000 Differential Relay (Typical) GARD 8000 SYS RFL Electronics June 20, 2014 13-5 973.334.3100... -
Page 501: Figure 13-5 File Operations, Cu Rrent Differential
Figure 13-5 File Operations, Current Differential Click “Send File to GARD 8000,” select and SEND the “System Logic Configuration (.ZIP File).” This ZIP file can have a customer assigned name and will contain the following logic files: System Logic Database(.TXT File) System Logic (.EDN File) -
Page 502: Figure 13-7. Ho Me Page
Return to the home page and from the “Settings” pull down menu click “System Logic Configuration” as shown below. Figure 13-7. Home Page The following web page will appear. Figure 13-8 System Logic Configuration GARD 8000 SYS RFL Electronics June 20, 2014 13-7 973.334.3100... -
Page 503: Figure 13-9. Input Mapping Webpage
‘source’) are determined in the OrCAD logic, and can be customized for your application. When changes are made click the “Save” button to save your configuration, a conformation page will appear. GARD 8000 SYS RFL Electronics June 20, 2014 13-8... -
Page 504: Figure 13-10. Output Mapping Webpage
To fully understand what the inputs and outputs are doing in the system logic, the actual System Logic Diagram should be consulted. For example, the current differential inputs are shown as follows: GARD 8000 SYS RFL Electronics June 20, 2014 13-9 973.334.3100... -
Page 505: Figure 13-11. Current Differential Inputs, Schematic Diagram
The physical inputs (in this example Inputs 1 – 6) are mapped on the webpage to logic inputs. Any physical input can be freely assigned to any number of logical inputs. GARD 8000 SYS RFL Electronics June 20, 2014 13-10 973.334.3100... -
Page 506: Figure 13-12. Current Differential Outputs, Schematic Diagram
LCCT TRIG10 LOL_OC_ALARM TRIG15 MAJOR_ALARM TRIG11 MINOR_ALARM TRIG12 BACKUP_MODE TRIG13 STARTUP_MODE RECLOSE_BLOCK AND2 HMIOUT17 OUTPUT_STATUS_BIT_0 TRIG14 OUTPUT_STATUS_BIT_1 OUTPUT_STATUS_BIT_2 OUTPUT_STATUS_BIT_3 OUTPUT_STATUS_BIT_4 OUTPUT_STATUS_BIT_5 OUTPUT_STATUS_BIT_6 OUTPUT_STATUS_BIT_7 Figure 13-12. Current Differential Outputs, Schematic Diagram GARD 8000 SYS RFL Electronics June 20, 2014 13-11 973.334.3100... - Page 507 The Current Differential Module creates a number of logic signals from its measuring element and protection logic. The GARD 8000 System logic uses these signals to perform trip and pilot scheme operations. The default logic is bringing out some of the available signals, but all of the signals shown in the logic diagrams are available for custom logic.
-
Page 508: Rela Y Settings
HMI output bits selected. Values from 1 to 63 are available in the drop down menus for the most and least significant bit. Group GARD 8000 SYS RFL Electronics June 20, 2014 13-13... -
Page 509: Figure 13-14. Current Differential Relay Configurat Ion
Each of the above web pages can be configured by the end user. In many cases the Current Differential Module comes pre-configured from the factory. RFL recommends that the Supervising Engineer carefully review the following information and if necessary consult RFL before making any changes. GARD 8000 SYS RFL Electronics June 20, 2014 13-14 973.334.3100... - Page 510 The following pages list the various settings with their definitions. If changes are made click the “Save” button to save your configuration, a conformation page will appear. The General Settings web page is shown below. GARD 8000 SYS RFL Electronics June 20, 2014 13-15 973.334.3100...
-
Page 511: Figure 13-15. Current Differential Relay General Settings
This function disables outfeed tripping permanently and can be used when abnormally large ct errors can be expected. See Section 13.5.1.2. GARD 8000 SYS RFL Electronics June 20, 2014 13-16... - Page 512 Ground Overcurrent Fault Detector (0.125-15 inc 0.125) This is used to set the threshold for the overcurrent fault detector for ground. The setting must be between 0.125A and 20A (inclusive) in increments of 0.125A GARD 8000 SYS RFL Electronics June 20, 2014 13-17 973.334.3100...
- Page 513 Sets the length of the TX logic bus time-slot. This value is factory set and should not be changed without knowledge of System Logic programming. After all the settings have been entered click the “Save” button to save your configuration, a conformation page will appear. GARD 8000 SYS RFL Electronics June 20, 2014 13-18...
-
Page 514: Figure 13-16. Current Differential Relay Co Mms Settings
Enable to give a minor alarm if the remote station and local real-time clocks are not synchronized. The default is disabled. Note that the current differential algorithm does not rely on real-time clocks so loss of time sync between them is of no consequence for the protection function. GARD 8000 SYS RFL Electronics June 20, 2014 13-19 973.334.3100... -
Page 515: Figure 13-17. Current Differential Relay Primary Settings
Current Differential Relay 13.3.3 PRIMARY SETTINGS The Primary Settings web page is shown below. Figure 13-17. Current Differential Relay Primary Settings GARD 8000 SYS RFL Electronics June 20, 2014 13-20 973.334.3100... - Page 516 This sets the slope for the first segment of the slope characteristic for phase A, B, and C. The setting must be between 0 and 2 (inclusive) in increments of 0.01. The slope characteristic increases the GARD 8000 SYS RFL Electronics...
- Page 517 CT nonlinearities. For further information see section 13.5.1.2.8. To emulate a setting equivalent to the RFL 9300 relay, set the crossover to 20A. GARD 8000 SYS RFL Electronics June 20, 2014 13-22...
- Page 518 Open Conductor Delay (50-5000 inc 50) This sets the delay for the open conductor algorithm. The setting must be between 50ms and 5s (inclusive) in increments of 50ms. For further information see section 13.5.1.5. GARD 8000 SYS RFL Electronics June 20, 2014 13-23...
-
Page 519: Figure 13-18. Current Differential Relay Backup Settings
Current Differential Relay 13.3.4 BACKUP PROTECTION SETTINGS The Backup Settings web page is shown below. Figure 13-18. Current Differential Relay Backup Settings GARD 8000 SYS RFL Electronics June 20, 2014 13-24 973.334.3100... - Page 520 For further information see section 13.5.1.6.2. Ground TOC Characteristic This selects which TOC characteristic curve to use for ground. There are four USA curves and three IEC curves supported. For further information see section 13.5.1.6.2. GARD 8000 SYS RFL Electronics June 20, 2014 13-25 973.334.3100...
- Page 521 Loss of Load Delay (50-5000 inc 50) This sets the delay for the LOL algorithm. The setting must be between 50ms and 5s (inclusive) in increments of 50ms. For further information see section 13.5.1.6.4. GARD 8000 SYS RFL Electronics June 20, 2014 13-26 973.334.3100...
- Page 522 This is used to enable or disable the stub bus TOC functions in the relay. When enabled they use the same TOC configuration settings as the backup TOC routines (see section 13.5.1.6.2). GARD 8000 SYS RFL Electronics June 20, 2014 13-27 973.334.3100...
- Page 523 13.3.5 SEQUENCE OF EVENTS (SOE) SETTINGS The following 2 web pages are used for reporting data; the triggers can be toggled on or off. The SOE Settings web page is shown below. GARD 8000 SYS RFL Electronics June 20, 2014 13-28 973.334.3100...
-
Page 524: Figure 13-19. Current Differential Relay Soe Settings
Remote # 1 Fault Detector Setting this to “Yes” will allow a change in the status of the remote # 1 relays fault detector, triggering an SOE recording. GARD 8000 SYS RFL Electronics June 20, 2014 13-29... - Page 525 SOE recording. A change of state of the logic bus bit will initiate an SOE recording. Note that these bits are inputs to the relay, the relay will transmit the information to the remote relay (hence “Tx” bits). See section 13.5.2.7 for more information. GARD 8000 SYS RFL Electronics June 20, 2014 13-30 973.334.3100...
- Page 526 SOE recording. A change of state of the logic bus bit will initiate an SOE recording. Note that these bits are outputs from the relay, the relay has received the information from the remote relay (hence “Rx” bits). See section 13.5.2.7 for more information. GARD 8000 SYS RFL Electronics June 20, 2014 13-31 973.334.3100...
-
Page 527: Figure 13-20. Current Differential Relay Oscillography Settings
Current Differential Relay 13.3.6 OSCILLOGRAPHY SETTINGS The Oscillography Settings web page is shown below. Figure 13-20. Current Differential Relay Oscillography Settings GARD 8000 SYS RFL Electronics June 20, 2014 13-32 973.334.3100... - Page 528 Thus, a change of state (becoming active or inactive) in any primary tripping element (see sections 13.5.1.2 through 13.5.1.5) or backup element (see sections 13.5.1.6 through 13.5.1.6.5) for any phase or ground that will initiate an oscillography recording. GARD 8000 SYS RFL Electronics June 20, 2014 13-33 973.334.3100...
-
Page 529: Current Differential Rela Y Status
Current Differential Relay 13.4 CURRENT DIFFERENTIAL RELAY STATUS From the Home page select Current Differential; a webpage similar to the one shown below will appear. Figure 13-21. Current Differential Relay Status GARD 8000 SYS RFL Electronics June 20, 2014 13-34 973.334.3100... -
Page 530: Figure 13-22. Current Differential Relay General Status Webpage
Green indicates the module is in service. GARD 8000 SYS RFL Electronics June 20, 2014 13-35 973.334.3100... - Page 531 Settings Group This will indicate which settings group status is being displayed. Relay Options Single-pole Available This indicates if the relay was purchased with the single pole option (“yes” or “no”). GARD 8000 SYS RFL Electronics June 20, 2014 13-36 973.334.3100...
- Page 532 PIC Software Version DSP Software Version I/O ACTEL Firmware Version I/O Hardware Version HMI Interface Version Current Diff DSP Rev 13.4.2 PHASE STATUS The Phase Status web page is shown below. GARD 8000 SYS RFL Electronics June 20, 2014 13-37 973.334.3100...
-
Page 533: Figure 13-23. Current Differential Relay Phase Status Webpage
Current Differential Relay Figure 13-23. Current Differential Relay Phase Status webpage Relay Phase Status Definitions: GARD 8000 SYS RFL Electronics June 20, 2014 13-38 973.334.3100... - Page 534 The local currents will be displayed as 0º, 120º, 240º or “Error” (not available). The remote currents will be displayed as 180º, 300º, 60º or “Error”. 13.4.3 COMMUNICATIONS STATUS The Communications Status web page is shown below. GARD 8000 SYS RFL Electronics June 20, 2014 13-39...
-
Page 535: Figure 13-24. Current Differential Relay Co Mmunicat Ions Status Webpage
This displays the received address from the remote relay (which must match the local settings for receive address). It is displayed to help diagnose addressing problems, which may be caused by network misconnections. GARD 8000 SYS RFL Electronics June 20, 2014 13-40 973.334.3100... - Page 536 Hot Standby Active Channel When red this indicates that the hot standby channel is inactive, green indicates that the channel is active. 13.4.4 TRANSFERRED STATUS GARD 8000 SYS RFL Electronics June 20, 2014 13-41 973.334.3100...
-
Page 537: Figure 13-25. Current Differential Relay Transferred Status Bits Webpage
The transfer trip message is the highest priority message in the relay, and provides a back to back channel time of 3ms, as measured to a solid state output. GARD 8000 SYS RFL Electronics June 20, 2014 13-42 973.334.3100... -
Page 538: Figure 13-26. Current Differential Metering And Status Webpage
These indicate the current measured at the remote 1 relay for each of the relay inputs. The measurements are in A and are referenced to the primary side of the CT. GARD 8000 SYS RFL Electronics June 20, 2014 13-43... - Page 539 These indicate the differential, operate and restraint current calculated at the local relay for ground. The measurements are in A and are referenced to the secondary side of the CT. 13.4.6 LAST TRIP INFORMATION The Relay Last Trip status webpage is shown below. GARD 8000 SYS RFL Electronics June 20, 2014 13-44 973.334.3100...
-
Page 540: Figure 13-27. Current Differential Relay Last Trip Webpage
A ‘trip event’ in this context includes the time period between the first tripping element becoming active and all tripping elements being inactive for a user programmable period of time (see section 13.3.1). GARD 8000 SYS RFL Electronics June 20, 2014 13-45 973.334.3100... -
Page 541: Figure 13-28. Current Differential Relay Last Trip Webpage
From the pull down menu select Test > System Test, and check the Current Differential Relay Module. In the web page that appears check the “Reset SOE” box. Click Run Test. 13.4.8 OSCILLOGRAPHY The Oscillography Records webpage is shown below. GARD 8000 SYS RFL Electronics June 20, 2014 13-46... -
Page 542: Applications
From the pull down menu select Test > System Test, and check the Current Differential Relay Module. In the web page that appears check the “Reset Oscillography” box. Click Run Test. 13.5 APPLICATIONS 13.5.1 PROTECTION FUNCTIONS GARD 8000 SYS RFL Electronics June 20, 2014 13-47... -
Page 543: Figure 13-30. Fau Lt Detectors
Any change that exceeds the user selected setpoint will assert the detector. GARD 8000 SYS RFL Electronics June 20, 2014 13-48 973.334.3100... -
Page 544: Figure 13-31. Peak Change Fault Detector
If the half-cycle is completed in less than 14 sample-periods (7ms) or the half-cycle does not complete within 28 (14 ms) sample-periods the detector asserts. See diagram on the following page. GARD 8000 SYS RFL Electronics June 20, 2014 13-49... -
Page 545: Figure 13-32. Pu Lse Width Fault Detector
The Slope Fault Detector is enabled when a change in direction is measured prior to a zero crossing. Fault Detector is enabled for 75ms Figure 13-33. Slope Change Fault Detector GARD 8000 SYS RFL Electronics June 20, 2014 13-50 973.334.3100... -
Page 546: Figure 13-34. Po Larity Change Fault Detector
The breaker closing fault detector does not actually detect any fault; rather, it simulates a fault when the boost timer expires. This allows the protection algorithms to generate a trip even if there are no active fault detectors when the timer expires. GARD 8000 SYS RFL Electronics June 20, 2014 13-51 973.334.3100... -
Page 547: Figure 13-35. Dual Breaker – Restraint Current
In practice, this means that the restraint current is moved from the lower end of the slope into the higher restraint area: operate Operation Slope With both CT curre With summed CT’s added to the restra Restraint Slope restraint Figure 13-35. Dual Breaker – Restraint Current GARD 8000 SYS RFL Electronics June 20, 2014 13-52 973.334.3100... -
Page 548: Figure 13-36. Charge Co Mparison Current Differential Relaying Princip Le
The GARD current differential relay is also available in a three terminal version. The same operating principles as the two terminal relay are retained, with some additional supervision logic. See the diagram on the following page. GARD 8000 SYS RFL Electronics June 20, 2014 13-53 973.334.3100... -
Page 549: Figure 13-37. Three Terminal Application
13.5.1.2.3 Communicating Current Measurements to Remote Relay Each valid half-cycle current measurement is saved locally for the current differential processing routines. Phase A, B, and C transmit their current measurements only for the positive half-cycle and GARD 8000 SYS RFL Electronics June 20, 2014 13-54 973.334.3100... - Page 550 Phase and ground have independent settings for both the boost level and the duration of the boost. The boost function may be disabled by setting the boost level to zero. GARD 8000 SYS RFL Electronics June 20, 2014 13-55 973.334.3100...
-
Page 551: Figure 13-38 Operate Level Slope Characteristic
If the phase calculates a trip but it is not processed into a qualified trip due to a lack of fault detectors the relay issues a current differential alarm to alert the user of the condition. GARD 8000 SYS RFL Electronics... - Page 552 If the remote relay does not determine it to be an external fault it will trip and send a trip signal back to the originating relay. GARD 8000 SYS RFL Electronics June 20, 2014 13-57 973.334.3100...
- Page 553 Current Differential Relay HST-1-bias (-) GARD 8000 SYS RFL Electronics June 20, 2014 13-58 973.334.3100...
-
Page 554: Figure 13-39. High Set Trip For An External Fau Lt Condition
HST setpoint and the message was actually transmitted. 13.5.1.4.2 Processing received HST messages When the HST message is received the local currents are compared to a blocking current to avoid tripping on through faults. GARD 8000 SYS RFL Electronics June 20, 2014 13-59... - Page 555 Phase imbalance is defined as at least one phase having greater than or equal to 3A (5A CTs) and at least one phase having less than 0.5A (5A CTs). GARD 8000 SYS RFL Electronics June 20, 2014 13-60 973.334.3100...
- Page 556 When the integrated signal exceeds the operate time the output is asserted. As previously mentioned the integration is reset if the measured current drops below the pickup current. GARD 8000 SYS RFL Electronics June 20, 2014 13-61 973.334.3100...
- Page 557 IEC Standard Type B (Very Inverse) IEC Standard Type C (Extremely Inverse) The seven characteristic curves are shown on the following pages. 13.5.1.6.2.4.1 USA Moderately Inverse TOC Characteristic GARD 8000 SYS RFL Electronics June 20, 2014 13-62 973.334.3100...
-
Page 558: Figure 13-41 Usa Moderately Inverse Toc Characteristic
Where td is the time dial setting and M is the multiple of the pickup current: measured current pickup setting The characteristic is shown graphically as follows. Time Dial Setting Figure 13-41 USA Moderately Inverse TOC Characteristic 13.5.1.6.2.4.2 USA Inverse TOC Characteristic GARD 8000 SYS RFL Electronics June 20, 2014 13-63 973.334.3100... -
Page 559: Figure 13-42 Usa Inverse Toc Characteristic
Where td is the time dial setting and M is the multiple of the pickup current: measured current pickup setting The characteristic is shown graphically below Time Dial Setting Figure 13-42 USA Inverse TOC Characteristic 13.5.1.6.2.4.3 USA Very Inverse TOC Characteristic GARD 8000 SYS RFL Electronics June 20, 2014 13-64 973.334.3100... -
Page 560: Figure 13-43 Usa Very Inverse Toc Characteristic
Where td is the time dial setting and M is the multiple of the pickup current: measured current pickup setting The characteristic is shown graphically below. Time Dial Setting Figure 13-43 USA Very Inverse TOC Characteristic 13.5.1.6.2.4.4 USA Extremely Inverse TOC Characteristic GARD 8000 SYS RFL Electronics June 20, 2014 13-65 973.334.3100... -
Page 561: Figure 13-44 Usa Extremely Inverse Toc Characteristic
Where td is the time dial setting and M is the multiple of the pickup current: measured current pickup setting The characteristic is shown graphically below. Time Dial Setting Figure 13-44 USA Extremely Inverse TOC Characteristic 13.5.1.6.2.4.5 IEC Standard Type A TOC Characteristic GARD 8000 SYS RFL Electronics June 20, 2014 13-66 973.334.3100... -
Page 562: Figure 13-45 Iec Standard Type A Toc Characteristic
The characteristic is shown graphically below. Time Dial Setting 0.05 0.01 Multiples of Pickup Figure 13-45 IEC Standard Type A TOC Characteristic 13.5.1.6.2.4.6 IEC Standard Type B TOC Characteristic GARD 8000 SYS RFL Electronics June 20, 2014 13-67 973.334.3100... -
Page 563: Figure 13-46 Iec Standard Type B Toc Characteristic
The characteristic is shown graphically below. Time Dial Setting 0.05 0.01 Multiples of Pickup Figure 13-46 IEC Standard Type B TOC Characteristic 13.5.1.6.2.4.7 IEC Standard Type B TOC Characteristic GARD 8000 SYS RFL Electronics June 20, 2014 13-68 973.334.3100... -
Page 564: Figure 13-47 Iec Standard Type C Toc Character
The backup close into fault elements are only active during a user specified period following the breaker closing. The measured RMS current must exceed the user setpoint for one full cycle period for GARD 8000 SYS RFL Electronics June 20, 2014 13-69 973.334.3100... - Page 565 The stub bus time overcurrent (TOC) routines use the same configuration settings as the backup TOC routines (section 13.5.1.6.2) but have an independent enable/disable control. GARD 8000 SYS RFL Electronics June 20, 2014 13-70 973.334.3100...
- Page 566 The user should confirm, using the status web pages, that both the local and remote relays have entered test mode prior to performing any testing. GARD 8000 SYS RFL Electronics June 20, 2014 13-71 973.334.3100...
- Page 567 The loss of load (section 13.5.1.6.4) and open conductor (section 13.5.1.5) algorithms may be configured by the user to place the module in minor alarm. Communications Alarm When the communications alarm (section 13.5.2.6.2) is active the relay will be in minor alarm. GARD 8000 SYS RFL Electronics June 20, 2014 13-72...
- Page 568 Neither the communications alarm or module minor alarm has any direct impact the protection functions of the relay in any way; they are intended strictly to alert the user. GARD 8000 SYS RFL Electronics June 20, 2014 13-73 973.334.3100...
- Page 569 Under normal steady-state conditions the bits are updated approximately 30 times per second. During trip conditions, however, the status bit messages may be preempted by higher priority protection messages, resulting in lengthened transfer times. GARD 8000 SYS RFL Electronics June 20, 2014 13-74 973.334.3100...
-
Page 570: Figure 13-48 Recloser Block Logic
System Logic. 13.5.2.9 RECLOSER BLOCKING FUNCTION The GARD 8000 provides a recloser blocking output. The logic is shown in Figure 13-48. This logic is implemented in the programmable logic processing of the controller module. The recloser block function is enabled for a period of 3 seconds after the first trip signal is generated by one of the phases. -
Page 571: Figure 13-49 Three Pole Tripping Logic
If the user has enable the single-pole ground tripping feature a trip calculated by ground can cause all three poles to trip. A trip calculated by ground is delayed to allow the trip to be cleared normally. GARD 8000 SYS RFL Electronics... -
Page 572: Figure 13-50 Single Pole Tripping Logic
The above is available as a logical output and can be used to drive a SOE record. GARD 8000 SYS RFL Electronics... -
Page 573: Sequence Of Events And Oscillogra Phy
Maximum number of records is 64, if more than 36 cycles are recorded per record the maximum number of records will be less than 64. Table 13-2 shows the rough correspondence between record length and number of records. GARD 8000 SYS RFL Electronics June 20, 2014 13-78 973.334.3100... -
Page 574: Table 13-2 Maximu M Nu Mber Of Oscillography Records
A logical “1” indicates the remote relay configuration is incompatible with the local relay (e.g. one is single-pole the other is three-pole). Ping-Pong Alarm Comms1 A logical “1” indicates there is a ping-pong alarm active. GARD 8000 SYS RFL Electronics June 20, 2014 13-79... - Page 575 (only meaningful in a single-pole relay). LB Output Major Alarm A logical “1” indicates the relay is in a major alarm condition and is sending this information out to the logic bus. GARD 8000 SYS RFL Electronics June 20, 2014 13-80...
- Page 576 FDs above, this is the only true indication that the relay has an active fault detector. All of the above contributors to the FD are combined and extended as required to generate the aggregate fault detector. GARD 8000 SYS RFL Electronics June 20, 2014 13-81 973.334.3100...
- Page 577 Note that this is tied to an algorithm internal parameter and is not fully processed into a true trip output. This parameter should be reviewed in conjunction with the “aggregate trips” described above. GARD 8000 SYS RFL Electronics June 20, 2014 13-82 973.334.3100...
- Page 578 All oscillography records are stored locally in the relay in a compacted format. To view the records the user must transfer the data from the GARD 8000 system to a PC for viewing. During this process the data is converted to a COMTRADE (1999) format.
- Page 579 Once saved, right click the folder and select “Extract All.” You will now be stepped through an Extraction Wizard, there will be three files saved to your PC as shown in the example below. GARD 8000 SYS RFL Electronics June 20, 2014 13-84 973.334.3100...
- Page 580 To view the record click on the “Config” file. Normally Windows will associate the file with the application, if this does not happen use the standard Windows dialog boxes to associate the “config” file. GARD 8000 SYS RFL Electronics June 20, 2014 13-85 973.334.3100...
- Page 581 Current Differential Relay This page intentionally left blank GARD 8000 SYS RFL Electronics June 20, 2014 13-86 973.334.3100...
-
Page 582: Section 14. Ethernet Tps M Odule
Shown below is a typical IEC 61850 compliant substation with GARD. To Remote Line End To EMS Station Station GARD Host Host Router Backup Primary Station Level Bus Process Level Bus Sensor Figure 14-1 IEC 61850 Compliant Substation GARD 8000 SYS RFL Electronics April 14, 2015 14-1 973.334.3100... -
Page 583: Insta Llation
All other jumpers on the Ethernet TPS Module are factory set and should not be changed. 125V 250V Figure 14-2 Location of J6 Jumper GARD 8000 SYS RFL Electronics April 14, 2015 14-2 973.334.3100... -
Page 584: Figure 14-3 Rear Connections
14.2.2 INPUT PROTECTION The two positive buses are individually fused by the fuses F1 and F2, these fuses will automatically reset. The location of the protection fuses is shown in Figure 14-4. GARD 8000 SYS RFL Electronics April 14, 2015 14-3 973.334.3100... -
Page 585: Figure 14-4 Ethernet Tps Module, Fuse Protection
Ethernet TPS Module Figure 14-4 Ethernet TPS Module, Fuse Protection GARD 8000 SYS RFL Electronics April 14, 2015 14-4 973.334.3100... -
Page 586: Configuration
Figure 14-5 Ethernet TPS, Chassis Configuration Click on “Ethernet TPS” the following web page will appear. Figure 14-6 Ethernet TPS Module, Settings GARD 8000 SYS RFL Electronics April 14, 2015 14-5 973.334.3100... -
Page 587: Figure 14-7 Ethernet Tps Module, General Settings
Ethernet TPS Module General Settings: Click on General Settings, the following webpage will appear. Figure 14-7 Ethernet TPS Module, General Settings GARD 8000 SYS RFL Electronics April 14, 2015 14-6 973.334.3100... - Page 588 Sets the name of the transmitting IED, to allow communication between two IEC 61850 compliant devices. General Settings Definitions Cont….. Conf_rev Sets the configuration revision used as per IEC 61850. GARD 8000 SYS RFL Electronics April 14, 2015 14-7 973.334.3100...
- Page 589 The module will reboot when this setting is changed to disable Once all the settings have been configured click the SAVE button. Retransmission Timer Settings: Click on Retransmission Timer Settings, the following webpage will appear. GARD 8000 SYS RFL Electronics April 14, 2015 14-8 973.334.3100...
-
Page 590: Figure 14-8 Ethernet Tps Module, Retransmission Timer Settings
This rate and the number of retransmissions are settable on this page. Number of Retransmissions Sets the total number of retransmissions. Retransmission Timer 1-16 (2-1000 inc 1) GARD 8000 SYS RFL Electronics April 14, 2015 14-9 973.334.3100... -
Page 591: Figure 14-9 Ethernet Tps Module, Retransmission Timer Settings
1. Click on “Browse” next to the client name and number you are configuring 2. A standard file selection dialog box will appear. Select the right CID file for that client. 3. Click on “Send CIDXX file to Gard.” (Where XX is the client number). GARD 8000 SYS RFL Electronics April 14, 2015 14-10 973.334.3100... -
Page 592: Figure 14-10 Ethernet Tps Module, Logic B It Configuration
“Ethernet TPS” will allow the user to configure the Logic Bus Bits. The incoming GOOSE message has variables that can be mapped to a logic bit using the following settings. Logic Bit GARD 8000 SYS RFL Electronics April 14, 2015 14-11 973.334.3100... - Page 593 Some browsers will require you to right click on the link and select “save target as” or a similar prompt. 14.3.1 ETHERNET TPS MODULE GENERAL STATUS From the Home page click the Ethernet TPS module, the following status page will appear. GARD 8000 SYS RFL Electronics April 14, 2015 14-12...
-
Page 594: Figure 14-11 Ethernet Tps Module, Status
The preceding page will allow the user to determine the health of the Ethernet TPS module as well as the version of its various components. The following items are displayed: Module State GARD 8000 SYS RFL Electronics April 14, 2015 14-13 973.334.3100... -
Page 595: Section 14 April
CID invalid LB map invalid CID nofile LB map invalid LB map nofile CID valid LB map nofile CID invalid LB map nofile CID nofile LB map nofile GARD 8000 SYS RFL Electronics April 14, 2015 14-14 973.334.3100... - Page 596 Unique IEC messages TX Counter for unique IEC messages transmitted. Port 1-2 TX errors Counter for errors on transmit path. Port 1-2 RX errors Counter for errors on receive path. GARD 8000 SYS RFL Electronics April 14, 2015 14-15 973.334.3100...
-
Page 597: Section 15. Ga Rd M Etering M Odule
3U and 6U chassis. 21 20 19 18 17 16 15 14 13 12 11 Chassis Chassis Chassis Chassis Chassis Chassis Figure 15-1. Metering Module Terminal Block Connections GARD 8000 SYS RFL Electronics April 1, 2007 15-1 973.334.3100... -
Page 598: Web Pa Ge Set-Up
Power Threshold settings 15.3.1 CONFIGURING SETTINGS WEB PAGES From the Home page pull down menu click Settings > Chassis Configuration. A webpage similar to the one shown on the next page will appear. GARD 8000 SYS RFL Electronics April 1, 2007 15-2... -
Page 599: Figure 15-2. Metering Module Configuration Settings
GARD Metering Module Figure 15-2. Metering Module Configuration Settings Click on Metering, the following webpage will appear. Figure 15-3. Metering Module – Settings GARD 8000 SYS RFL Electronics April 1, 2007 15-3 973.334.3100... -
Page 600: Figure 15-4. Metering Module – General Settings
TX Logic Bus Length (0 - 64 inc 1) This should be set to 64 Line Label This is a user defined value that will be displayed on status web pages GARD 8000 SYS RFL Electronics April 1, 2007 15-4... -
Page 601: Figure 15-5. Current Thresholds Settings
This setting determines the PT ratio (voltage transformer ratio) for a bus voltage used for displaying primary values. Once all the settings have been entered click save. Current Threshold Settings: Click on Current Threshold Settings, the following webpage will appear. Figure 15-5. Current Thresholds Settings GARD 8000 SYS RFL Electronics April 1, 2007 15-5 973.334.3100... - Page 602 50P-1 Time Delay This sets a minimum delay, during which the measured value must exceed the threshold before the indications are set. Once all the settings have been entered click save. GARD 8000 SYS RFL Electronics April 1, 2007 15-6...
-
Page 603: Figure 15-6. Frequency Thresholds Settings
GARD Metering Module Frequency Threshold Settings: Click on Frequency Threshold Settings, the following webpage will appear. Figure 15-6. Frequency Thresholds Settings GARD 8000 SYS RFL Electronics April 1, 2007 15-7 973.334.3100... - Page 604 In addition, there is a setting that determines the minimum voltage below which frequency measurements are not made. This is named 81 Inhibit Voltage; additionally it has pick up and drop out delay settings included. Once all the settings have been entered click save. GARD 8000 SYS RFL Electronics April 1, 2007 15-8...
-
Page 605: Figure 15-7. Vo Ltage Thresholds Settings
GARD Metering Module Voltage Threshold Settings: Click on Voltage Threshold Settings, the following webpage will appear. Figure 15-7. Voltage Thresholds Settings GARD 8000 SYS RFL Electronics April 1, 2007 15-9 973.334.3100... - Page 606 This does not apply to ground units In addition, there is a setting for each function called Drop Out Ratio. This determines the hysteresis for the voltage elements. Once all the settings have been entered click save. GARD 8000 SYS RFL Electronics April 1, 2007 15-10...
-
Page 607: Figure 15-8. Power Thresholds Settings
GARD Metering Module Power Threshold Settings: Click on Power Threshold Settings, the following webpage will appear. Web page split for clarity, not all labels are shown Figure 15-8. Power Thresholds Settings GARD 8000 SYS RFL Electronics April 1, 2007 15-11 973.334.3100... - Page 608 Before any indicators are set, the measured value must exceed the threshold for a minimum time. This time period is set as “Over Watt Delay.” Once all the settings have been entered click save. GARD 8000 SYS RFL Electronics April 1, 2007 15-12 973.334.3100...
-
Page 609: Figure 15-9. Metering Module Status
The metering module provides three pages to monitor the operation of the module as follows: General Status: Click on General Status, the following webpage will appear. Figure 15-10. Metering Module General Status GARD 8000 SYS RFL Electronics April 1, 2007 15-13... -
Page 610: Figure 15-11. Metering Module Threshold Status
ACTEL Firmware Version Threshold Status: Click on Threshold Status, the following webpage will appear. Web page split for clarity, not all labels are shown Figure 15-11. Metering Module Threshold Status GARD 8000 SYS RFL Electronics April 1, 2007 15-14 973.334.3100... - Page 611 Over VAr Unit 3 Trip Over VAr Unit 4 Trip Under VAr Unit 1 Trip Under VAr Unit 2 Trip Under VAr Unit 3 Trip Under VAr Unit 4 Trip GARD 8000 SYS RFL Electronics April 1, 2007 15-15 973.334.3100...
-
Page 612: Figure 15-12. Metering Module Analog Values
Negative sequence voltage (volts) Zero sequence voltage (volts) Real power P (watts) Reactive power Q (Vars) Apparent power S (VA) Power Factor Frequency (Hz) Rate of Change of frequency (Hz/Sec) GARD 8000 SYS RFL Electronics April 1, 2007 15-16 973.334.3100... -
Page 613: Section 16. Ga Rd Dnp3 Configuration And Snmp Tra P A Gent
Unsolicited messages may be sent to either of the DNP3 master computers. Unsolicited messages are sent when a binary object changes state or an analog value changes by more than a user adjustable GARD 8000 SYS RFL Electronics April 23, 2015 16-1 973.334.3100... -
Page 614: Rs-485 Connections
POWER SUPPLY 1 RS-232 Rear of 3U Chassis IRIG-B ALARM ETHERNET IPPS ETHERNET RS-485 MOD BUS RS-485 MOD BUS TDB+ TDB- IRIG-B RDB+ 1PPS RDB- RS-485 MOD BUS Figure 16-2. RS-485 Connections GARD 8000 SYS RFL Electronics April 23, 2015 16-2 973.334.3100... -
Page 615: Dnp3 Web Page Set-Up
From the Home page select Settings > Chassis Configuration. Then select Settings > DNP > DNP Configuration as shown below. Figure 16-3. DNP Configuration The following web page will appear. GARD 8000 SYS RFL Electronics April 23, 2015 16-3 973.334.3100... -
Page 616: Figure 16-4. Dnp Settings
Support TCPIP Master 1 or 2 Check to enable or disable communications with the individual DNP3 Master Computers. If only one master is used, the configuration for the second master is not required. GARD 8000 SYS RFL Electronics April 23, 2015 16-4 973.334.3100... -
Page 617: Figure 16-5. Deadband Reporting
Figure 16-5. Deadband Reporting Enable Math Points Normally left disabled (default). When enabled will show in the DNP menu as shown below. Figure 16-6. Enabling Math Points See page 16-8 for Math Points. GARD 8000 SYS RFL Electronics April 23, 2015 16-5 973.334.3100... -
Page 618: Figure 16-7. Dnp Scale, Offset, Alias Web Page
Figure 16-7. DNP Scale, Offset, Alias web page Note that the installed modules are grayed out, except for those that can have points mapped to DNP. Click on Power Line Carrier, the following web page will appear. GARD 8000 SYS RFL Electronics April 23, 2015 16-6 973.334.3100... -
Page 619: Figure 16-8. Customer A Lias Entry (Typical)
Note that the counters represented here should always have their scale set to 1 and their offset to 0. Definitions: Parameter Name The corresponding input on the target card. Alias A user entered alias. This alias is shown on the “Point List” web page. GARD 8000 SYS RFL Electronics April 23, 2015 16-7 973.334.3100... -
Page 620: Figure 16-9. Configuring Math Points
If a measurement of 0 – 10 is to be represented as a DNP value of -20 to +20, a scale of 4 and an offset of -20 is used. (0 · 4) + (-20) = -20 (10 · 4) + (-20) = 20 Configuring Math Points: Figure 16-9. Configuring Math Points GARD 8000 SYS RFL Electronics April 23, 2015 16-8 973.334.3100... - Page 621 You must first save the aliases for a modules data points before you can use this feature. Note In order to use the Math Points you must have at least 1 HMI bit enabled on the DNP Point Settings page. See next page. GARD 8000 SYS RFL Electronics April 23, 2015 16-9 973.334.3100...
-
Page 622: Figure 16-10. Po Int List Settings Web Page (Typical)
From the pull-down menu select Settings > DNP > Point List Settings, the following web page will appear. Web page split for clarity, not all labels are shown Figure 16-10. Point List Settings Web Page (typical) GARD 8000 SYS RFL Electronics April 23, 2015 16-10 973.334.3100... - Page 623 C1, C2 and C3 Sets the point for either Class 0, 1, 2, or 3. If no box is checked the class is 0, which is the default. Only one class may be selected. GARD 8000 SYS RFL Electronics April 23, 2015 16-11 973.334.3100...
-
Page 624: Figure 16-11. Po Int List Web Page
This read only web page will display all the points to be sent from the GARD to the master computer. (GARD displays all the point values, however, only enabled point values will be reported to the master). It also shows the value of these points for troubleshooting purposes GARD 8000 SYS RFL Electronics April 23, 2015 16-12 973.334.3100... -
Page 625: Dnp V3.00 Device Profile Docum Ent
GARD DNP Configuration and SNMP Trap Agent 16.4 DNP V3.00 DEVICE PROFILE DOCUMENT DNP V3.00 DEVICE PROFILE DOCUMENT Vendor Name: Rfl electronics . Device Name: RFL GARD Highest DNP Level Supported: Device Function: For Requests Level 2 For Responses Level 2... - Page 626 The DNP communication port shall be 100 Base T Ethernet or RS-485 Point List The points available from the GARD 8000 depend on the number and type of modules installed in the chassis. From that list, any number of points can be selected or deselected by the user.
- Page 627 Degrees 32-bit floating point Analog Input Phase C Voltage Volts 32-bit floating point Analog Input Angle of Phase C Voltage Degrees 32-bit floating point Analog Input Phase C Current Amps 32-bit floating point Analog Input GARD 8000 SYS RFL Electronics April 23, 2015 16-15 973.334.3100...
- Page 628 32-bit floating point Analog Input CH6 analog input Volts 32-bit floating point Analog Input CH7 analog input Volts 32-bit floating point Analog Input CH8 analog input Volts 32-bit floating point Analog Input GARD 8000 SYS RFL Electronics April 23, 2015 16-16 973.334.3100...
-
Page 629: Snmp Trap A Gent
8.3 or higher. Following are the steps required to unlock the SNMP Trap Agent: 1. Login to the GARD and go to the ‘System Information’ page as shown below. Figure 16-12. GARD ID GARD 8000 SYS RFL Electronics April 23, 2015 16-17 973.334.3100... -
Page 630: Figure 16-13. Snmp Trap Receivers
5 monitoring computers access to the Trap Agent. Check to enable Trap Receiver Community name, see note 1 below IP address of monitoring computer Trap Key entry Figure 16-13. SNMP Trap Receivers GARD 8000 SYS RFL Electronics April 23, 2015 16-18 973.334.3100... -
Page 631: Figure 16-14. Enabling The Trap Receiver M Ib
From the “Chassis Configuration Status” page go to Settings > File Operations. Select “Snmp Trap Receiver Mib” and save the file to your PC or Laptop. Figure 16-14. Enabling the Trap Receiver MIB GARD 8000 SYS RFL Electronics April 23, 2015 16-19 973.334.3100... -
Page 632: Rfl Snmp Mib File
“RFL SNMP MIB” Figure 16-16. Saving the MIB 16.6.1 MIB OBJECT (SUB-TREES) The following lists the MIBs scalar and table structure. Note that this software supports “get” functionality only. GARD 8000 SYS RFL Electronics April 23, 2015 16-20 973.334.3100... -
Page 633: Procedure For Loa Ding Mib's To The Ga Rd 8000
SOE Event Table (100 most recent events) soeNumber soeEventData HMIOUT Table hmiOutBit hmiOutBitLabel hmiOutBitValue HMIN Table hmiInBit hmiInBitLabel hmiInBitValue 16.7 PROCEDURE FOR LOADING MIB’S TO THE GARD 8000 GARD 8000 SYS RFL Electronics April 23, 2015 16-21 973.334.3100... - Page 634 Load the RFL GARD MIB file to the MIB browser. Verify that no errors were found during the MIB file loading. UnBrowse SNMP Example. c. Configure the MIB browser with the IP address of the GARD 8000, SNMP v3 user name and password. (Create New Agent ) GARD 8000 SYS...
- Page 635 GARD DNP Configuration and SNMP Trap Agent d. Select File, New Walk as shown below. e. Open the RFL-GARD-MIB then drag & drop the tree into the MIB Walker window. GARD 8000 SYS RFL Electronics April 23, 2015 16-23 973.334.3100...
- Page 636 GARD DNP Configuration and SNMP Trap Agent Click on the Bulk Walk to obtain GET values and populate the tabs. GARD 8000 SYS RFL Electronics April 23, 2015 16-24 973.334.3100...
- Page 637 Click on each of the tabs in screenshot below to populate: cardinventoryTable, hmilnTable, hmiOutTable, soeStatusTextLabel, & TrapRecvTable. d. Clear the SOE records on the GARD 8000 and read the SOE table back. Verify that no data is available in this sub-tree.
-
Page 638: Section 17 August
APPLICATION NOTES · 18-1 CLI · 10-15 APPLICATIONS · 2-1 FRONT PANEL METER · 10-17 ARCHITECTURE CLOCK QUALITY · 7-79 GARD 8000 · 2-3 HARDWARE · 2-5 COM M ISSIONING SYST EM · 2-6 AUDIO-TONE · 4-30 AUDIO TONE · 6-15 CURRENT DIFF ·... - Page 639 FOR MOUNT ING · 4-3 G.703 CO-DIRECTIONAL · 2-21 RS-232 ASYNC · 2-20 DISCRETE I/O BASE M ODULE RS-449, X.21 AND V.35 · 2-21 T OP AND REAR VIEW · 6-33 GARD 8000 SYS RFL Electronics April 23, 2015 17-2 973.334.3100...
- Page 640 T X T UNING · 10-39 ANALOG VALUES · 15-16 RX OPERATING RANGE AND DYNAMIC RANGE · 7-65 T HRESHOLDS CURRENT · 15-5 FREQUENCY · 15-7 SOFT WARE COMPATABILITY · 10-1 GARD 8000 SYS RFL Electronics April 23, 2015 17-3 973.334.3100...
- Page 641 CURRENT DIFF OUTPUTS · 13-11 SYSTEM USER INTERFACE · 5-1 PLC ANALOG MODULE · 10-47 SECURITY · 5-28 LEVELS · 5-30 T IMER SETTINGS · 7-50 TECHNICAL DATA · 3-1 SERVICE CHANNEL GARD 8000 SYS RFL Electronics April 23, 2015 17-4 973.334.3100...
- Page 642 WARNING LABELS · xx OPT ION SETTINGS · 8-19 OUT PUT MAPPING · 8-18 WARRANTY · ii T IMERS · 8-20 WEB SERVER · 2-2, 5-1 TPS M ODULE AUDIO-TONE · 6-15 GARD 8000 SYS RFL Electronics April 23, 2015 17-5 973.334.3100...
- Page 643 Index GARD 8000 SYS RFL Electronics April 23, 2015 17-6 973.334.3100...
-
Page 644: Section 18. Application Notes
Special Audio Tone Teleprotection Configuration Setting September 5, 2008 Special Audio Tone Teleprotection with Transparent Modem AN8000-010 Mode (now included in Section 6) AN8000-011 IRIG-B Signal, through rear RS-232 port September15, 2009 GARD 8000 SYS RFL Electronics April 21, 2011 18-1 973.334.3100... - Page 645 Application Notes This page intentionally left blank GARD 8000 SYS RFL Electronics April 21, 2011 18-2 973.334.3100...
-
Page 646: Section 19. Accessory Equipm Ent
Accessory Equipment SECTION 19. ACCESSORY EQUIPMENT 19.1 AUXILIARY HYBRID CHASSIS: (See the following pages) GARD 8000 SYS RFL Electronics April 23, 2015 19-1 973.334.3100... - Page 647 Accessory Equipment This page intentionally left blank GARD 8000 SYS RFL Electronics April 23, 2015 19-2 973.334.3100...
Need help?
Do you have a question about the GARD 8000 and is the answer not in the manual?
Questions and answers