Table of Contents
Advertisement
Quick Links
Installation Instructions
IMPORTANT:
Read and save
Installer: Leave Installation Instructions with
the homeowner.
Homeowner: Keep Installation Instructions for
future reference.
Save Installation Instructions for local electrical
inspector's use.
Part No. 8529408
Quick Reference
Table of Contents:
Pages
2
2
2
3
3
4
4
Water and drain requirements
5
Advertisement
Table of Contents

Related Manuals for KitchenAid Briva


Summary of Contents for KitchenAid Briva
- Page 1 Installation Instructions IMPORTANT: Quick Reference Table of Contents: Read and save Pages these instructions. Before you start Tools and materials needed Parts supplied Product dimensions IMPORTANT: Cabinet dimensions Installer: Leave Installation Instructions with the homeowner. Electrical requirements Homeowner: Keep Installation Instructions for Water and drain requirements future reference.
-
Page 2: Before You Start
If HOT WATER ACCESSORY TANK Before you start... Accessory Part No. 4396282 will be used, the tank must be installed first. the briva™ is not designed to be used with any other small, "point of use" Your safety and the safety of water tank. -
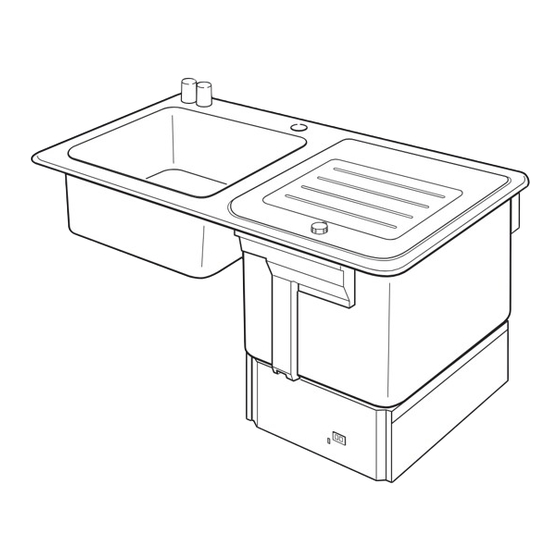
Page 3: Product Dimensions
Product dimensions SIDE FRONT 19-3/8" maximum opened lid 40-1/2" height 1-3/4" factory 16-7/8" to center of installed to center of air gaps single hole 1-1/4" single hole faucet faucet 8" 21" 9-9/16" 22-1/32" center of sink drain GFCI reset buttons water inlet valve 5-1/2 ft. -
Page 4: Water Requirements
Water Electrical requirements requirements Recommended WARNING ground method For dishwasher: • Hot water line with 20-120 psi water For your personal safety, this pressure. appliance must be grounded. This 120°F water at dishwasher. appliance is equipped with a power supply cord having 3-prong ground •... - Page 5 Installation steps Important: upper rail screws If HOT WATER ACCESSORY TANK clamp Accessory Part No. 4396282 will be used, the tank must be installed first. countertop screws lower GFCI clamp cut along back of this corner Install two clamp brackets, inner carton front panel evenly spaced, on front, back and left...
- Page 6 Important: The tabs MUST be under the terminal box as shown. Part No. 8529408 ® Registered Trademark/™ Trademark of KitchenAid, U.S.A. ® Teflon is a registered trademark of E.I. Du Pont de Nemours and Company. 8/2002 © 2002 All rights reserved.
Need help?
Do you have a question about the Briva and is the answer not in the manual?
Questions and answers