Table of Contents
Advertisement
Advertisement
Table of Contents

Related Manuals for connexx ConnexxAir


Summary of Contents for connexx ConnexxAir
- Page 1 Click Dome Draft | english | 2016-12-13 ConnexxAir User Guide...
-
Page 2: Table Of Contents
Included in delivery Components Getting started Assembling the power plug Charging Turning on and off Installing the neckloop Connecting ConnexxAir Programming with ConnexxAir Wearing ConnexxAir Programming on the table Important safety information Important information Status LEDs Troubleshooting Maintenance and care ... -
Page 3: Before You Start
Place ConnexxAir around your patient's neck and wirelessly connect your patient's hearing instruments to the programming software on the PC. No programming cables are necessary. Follow these instructions to set up ConnexxAir and to understand how ConnexxAir works. CAUTION Read this user guide thoroughly and completely and follow the safety information in this document to avoid damage or injury. -
Page 4: Included In Delivery
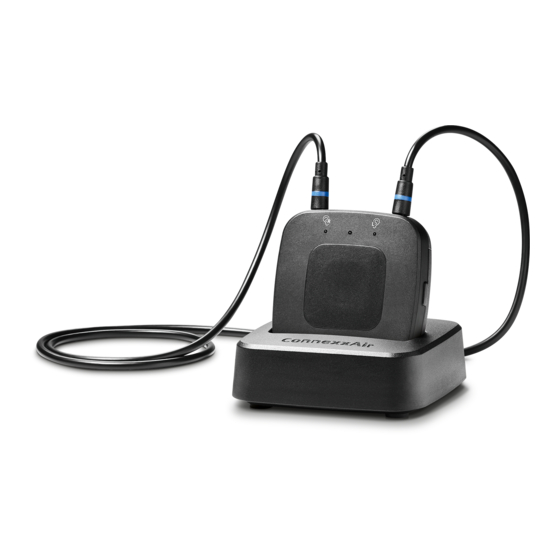
Included in delivery ➊ ➍ ConnexxAir Power plug, with different adapters (depending on ➋ Charging cradle your country) ➌ Neckloop (is also ➎ USB power cable the antenna) ➏ USB Bluetooth dongle Draft | english | 2016-12-13... -
Page 5: Components
Components ➏ ➊ ➍ Power button Reset button (recessed) ➋ ➎ Status LEDs USB port for firmware updates ➌ ➏ Pairing button Battery compartment Draft | english | 2016-12-13... -
Page 6: Getting Started
Getting started Assembling the power plug The power plug comes with several country-specific adapters. Depending on your country you have to assemble the power plug with an adapter: For US sockets, no adapter is required. Fold out the plugs (left picture). For all other sockets, an adapter is required (right picture): Fold the plugs in and slide the adapter onto the folded plugs. -
Page 7: Charging
Charging ConnexxAir is partly charged on delivery. Charge it before first use and when the battery is low and the middle LED is flashing orange. Battery is low Connect the charging cradle with the power plug to a power supply: Carefully push ConnexxAir in the charging cradle. - Page 8 When you take ConnexxAir out of the charging cradle, ConnexxAir is automatically turned on. Further information: ■ A fully charged ConnexxAir can be used for approximately 10 programming sessions before recharging is required. ■ Do not use ConnexxAir for programming while charging.
-
Page 9: Turning On And Off
Turning on and off Turning on: Shortly press the power button. The middle LED first shines green, then goes off. Left and right LED light up shortly. Turning off: Press the power button until the middle LED fades off. The middle LED first shines green, then fades off. -
Page 10: Installing The Neckloop
15 minutes, ConnexxAir turns automatically off. ■ Some of our remote control units or audio streamers have similar neckloops. The neckloop that is intended for ConnexxAir has a blue ring around the connector. Do not mix up neckloops. Draft | english | 2016-12-13... -
Page 11: Connecting Connexxair
Left and right LED light up shortly. If you are using ConnexxAir or a new dongle for the first time, ConnexxAir searches for the dongle - it is in pairing mode. All three LEDs flash green from left to... - Page 12 Further information ■ Use only the supplied dongle. ■ Dongle and ConnexxAir need to be within a range of 10 m (32 ft). ■ If the connection to the PC or to the hearing instruments could not be established, refer to section "Troubleshooting".
-
Page 13: Programming With Connexxair
Programming with ConnexxAir When programming the hearing instruments while your patient is wearing them, you have to ensure that ConnexxAir is worn correctly. Refer to section "Wearing ConnexxAir" When programming hearing instruments that are lying on the table, certain distances must be considered. Refer to section "Programming on the table". -
Page 14: Wearing Connexxair
Wearing ConnexxAir In order to function correctly, your patient must wear the hearing instruments and ConnexxAir with the neckloop around the neck. The neckloop is also the antenna. Unplug one neckloop plug and place the neckloop ➊ loosely around the patient's neck ➋... -
Page 15: Programming On The Table
Programming on the table If you want to pre-configure the hearing instruments you can also have ConnexxAir and the hearing instruments lying on the table. When programming on the table: Place the hearing instruments along the neckloop (refer to the picture). -
Page 16: Important Safety Information
Important safety information WARNING Risk of explosion! Do not use your device in explosive atmospheres (e. g. in mining areas). WARNING Choking hazard! Your device contains small parts which can be swallowed. Keep hearing instruments, batteries and accessories out of reach of children and mentally disabled persons. - Page 17 Move away from the source of interference if you experience difficulty. ### Note: Compatiblity with active implants must be verified. Otherwise, the following two warnings have to be deleted and we have to state that ConnexxAir is not compatible with active implants. WARNING Interference with implantable devices...
- Page 18 WARNING This device may interfere with measuring and electronic equipment. Do not use your device on airplanes or areas where sensitive or life-supporting electronic equipment is used. WARNING Risk of explosion when the rechargeable battery is handled wrong. Do not short circuit, pierce, crush or disassemble the rechargeable battery.
- Page 19 In some countries restrictions for the usage of wireless equipment exist. Refer to local authorities for further information. NOTICE Please make sure that the power plug is easily accessible to remove it from power supply if necessary. WARNING Risk of electrical shock! Do not use obviously damaged devices and return them to point of sale.
- Page 20 WARNING Risk of strangulation! Ensure that the neckloop does not get entangled, e. g. in moving mechanical parts of machines. Use only the delivered neckloop. It will automatically detach when entangled. Do not use the device for children under the age of twelve.
-
Page 21: Important Information
The left and right LEDs blink at data rate, while data is transferred to the respective hearing instrument. When all three LEDs are flashing green from left to right, ConnexxAir is searching for a dongle (pairing mode). Draft | english | 2016-12-13... -
Page 22: Troubleshooting
"Preferences > Devices". ■ If you have a new dongle, you have to manually pair it with ConnexxAir: Press the pairing button shortly. ConnexxAir is not responding ■ Use a long thin tool, for example a wooden or plastic toothpick, and press the reset button. -
Page 23: Maintenance And Care
Maintenance and care NOTICE Do not put your device in water! Do not clean your device with alcohol or benzine. Clean the device as necessary with a soft tissue. Avoid abrasive cleaning liquids with additives such as citric acids, ammonia, etc. Replacing the battery The rechargeable battery is installed on delivery. -
Page 24: Explanation Of Symbols
Firmware update The programming software informs you if a firmware update for ConnexxAir is available. To perform this update: Use the supplied USB cable to connect ConnexxAir and the PC. Follow the instructions on the screen. Explanation of symbols Symbols used in this document Points out a situation that could lead to serious, moderate, or minor injuries. -
Page 25: Operating, Transport, And Storage Conditions
Symbols on the device or packaging Do not dispose of the device with general domestic waste. Read more in section "Disposal information". Read and follow the instructions in the user guide. Operating, transport, and storage conditions Operating conditions Temperature 10 to 45 °C Relative humidity 5 to 93 % During extended periods of transport and storage, please... -
Page 26: Technical Data Of The Power Supply
Technical data of the power supply Golden Profit GPE006H-050100-Z Input voltage: 100-240 V AC Input current: 0.5 A Input frequency: 50-60 Hz Output voltage: 5 V DC Output current: Disposal information Recycle devices, accessories and packaging according to local regulations. To avoid environmental pollution, do not throw batteries into household trash. - Page 27 Wireless functionality USA FCC ID: ### Canada: ### Operating frequencies: f = 3.28 MHz CE, FCC and Industry Canada compliance information can be found inside the battery compartment. ### FCC/IC IDs are missing. The ACMA compliance mark indicates conformity with the electromagnetic interference standards set by the Australian Communications and Media Authority (ACMA).
- Page 28 Part 15 of the FCC Rules. These limits are designed to provide reasonable protection against harmful interference in a residential installation. This equipment generates, uses and can radiate radio frequency energy and, if not installed and used in accordance with the instructions, may cause harmful interference to radio communications.
- Page 29 Legal Manufacturer Sivantos GmbH Henri-Dunant-Strasse 100 91058 Erlangen Germany Phone +49 9131 308 0 Document No. #####-99T##-#### ## Order/Item No. ### ### ## Master Rev##, ##.2016 #### © Sivantos GmbH, ##.2016 www.sivantos.com/brands Draft | english | 2016-12-13...
Need help?
Do you have a question about the ConnexxAir and is the answer not in the manual?
Questions and answers
I have a Connexx Smart Li-Ion Charger for my hearing aids. Yellow bands indicate how much charge the hearing aids have. Green lights mean they are completely charged. Sometimes when I put my hearing aids in, the three bands of light become red. This makes me fear that there will be damage to my hearing aids. I recently sent this charger for repair, but this is still happening. What do you suggest?