Baxi uSense User Manual
Digital clock thermostat
Hide thumbs
Also See for uSense:
- User manual (48 pages) ,
- Installation manual (20 pages) ,
- User manual (16 pages)

Subscribe to Our Youtube Channel
Related Manuals for Baxi uSense


Summary of Contents for Baxi uSense
- Page 1 United Kingdom User Guide Digital clock thermostat uSense Please keep these instructions in a safe place. If you move house, please hand them over to the next occupier.
- Page 2 Thank you for choosing this uSense. You can control your home heating using the uSense or also by using an app. With this uSense, you are in the driver’s seat to control the temperature of your home. It’s all about your comfort, just the way you want it.
-
Page 3: Table Of Contents
Connecting the app with the uSense ........ - Page 4 Installation of the uSense ........
-
Page 5: Manual Menu
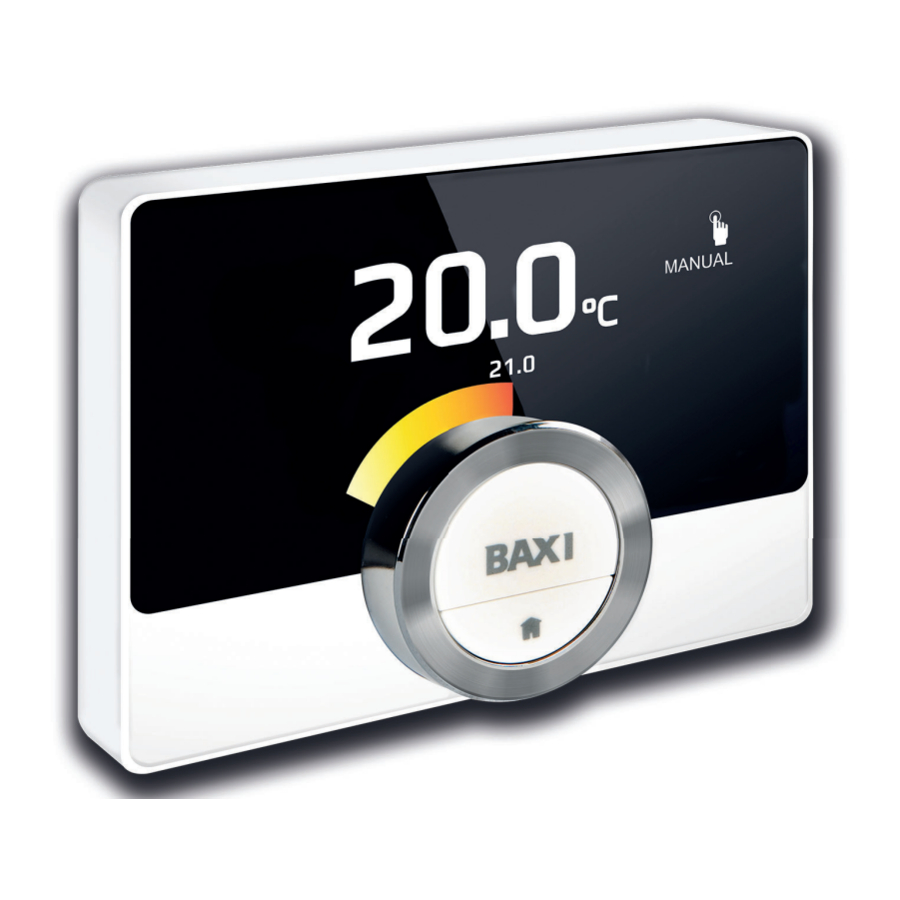
1 Manual menu Manual menu Fig.1 Introduction Introduction This chapter introduces you to the thermostat. You will find basic informa tion, e.g. how to use the rotary dial and buttons plus how to interpret the information on the screen. Chapter: Introduction, page 6 AD-3001023-01 Fig.2 General use... -
Page 6: Introduction
You can even be flexible by switching between three schedules. Do you prefer us ing your mobile device anywhere in the house? The uSense app is availa ble for iOS, Android and Windows. -
Page 7: The Usense And Its App
The uSense and its app Fig.8 The climate in your home contributes to your comfort; with the uSense you are able to control the temperature in your home the way you want it. In case you prefer to control your climate with your mobile device (e.g. -
Page 8: Entering The Quick Access Menu And Menu Items
2 Introduction 2.5.3 Entering the Quick Access menu and menu items Fig.11 The Quick Access menu gives you access to a selection of menu items. Long-press the select button to enter the Quick Access menu from the 21.0 home screen. °C Turn the rotary dial forward or backward to select a menu item. -
Page 9: Screen Shows No Information
Fig.16 When the rotary dial, select button or home button are not operated and no people are in front of the uSense for 30 seconds, the display of the uSense goes in stand-by mode and will show no information (black screen). - Page 10 2 Introduction Fireplace mode: Fireplace mode is active Changing the mode quickly, page 13 Activating fireplace mode, page 19 Temperature scheduling: Tempera ture scheduling is active Changing the mode quickly, page 13 Changing the temperature in scheduling mode, page 14 Short temperature change: Schedul...
-
Page 11: Customising The Main Screen Display
The zones are named CircA, CircB etc. by default. These factory names can be changed in any name you prefer. You can change the names on the uSense or in the app. 7667977 - v.01 - 25102017... -
Page 12: Presence Detection
Fig.18 The main screen of the display will light up (for 5 seconds) if the presence sensor detects that you are in front of the uSense or pass by. You can dis able the presence sensor in the settings menu. -
Page 13: General Use
Antifrost: The room temperature is set to the antifrost temperature setting. Holiday: The room temperature is set to the holiday temperature setting. Fireplace: Continue heating other rooms in the same zone while an additional heat source heats the room where the uSense is located. -
Page 14: Changing The Temperature In Scheduling Mode
Changing the temperature for a short period in schedul ing mode You can change the temperature for a short set period when the uSense is in scheduling mode. At the end of the time period the uSense returns to the scheduled temperature. -
Page 15: Changing The Weekdays Of A Temperature Schedule
3 General use 3.3.1 Changing the weekdays of a temperature schedule You can change, add or delete temperature intervals in one or more week days of a timer program. For example, you can lower the temperature dur ing the night and when you are out of the house. You can set the switch point and the activity (with its temperature) for each interval of the sched... -
Page 16: Copying A Weekday Of A Temperature Schedule
3 General use Changing a switch time The switch time is the start time of new activity interval in the day sched ule. Important When you change a switch time the cursors mark the item you are changing. Fig.25 1. Select the switch time with the rotary dial. 2. -
Page 17: Selecting Another Temperature Schedule
3.3.3 Selecting another temperature schedule Your weekly programme can differ from week to week. The uSense offers you three possible schedules to program. You can set which temperature schedule is active. First you have to enable the use of multiple schedules. -
Page 18: First Option
3 General use 3.6.1 First option 1. Enter the main menu. 2. Select Input Holiday Period. Fig.28 3. Use the rotary dial to select the option holiday mode On. 4. Confirm the selection........7.5°C Important 8.0°C 8.5°C You can short-press the home button to go back one step. -
Page 19: Activating Fireplace Mode
For instance a fire lighted in your fireplace or a large num ber of people can heat the room so much, that the appliance stops heating all the rooms. -
Page 20: Switching The Central Heating On/Off
If your installation has a cooling unit and an outside temperature sensor, you can activate the auto mode via the uSense. In auto mode, the uSense can automatically adjust the inside tempera tures by activating the heating and/or cooling function of the installation. -
Page 21: Customisation
4 Customisation Customisation This chapter helps you with customising the thermostat. Next chapter: Messages and data, page 29 Previous chapter: General use, page 13 First chapter: Manual menu, page 5 AD-3001025-01 Hot water settings Important The hot water settings can only be changed for combi applian ces. -
Page 22: Usense Settings
In case of an appliance power shutdown of more than 2 mi nutes, you have to set time and date again if the uSense is not connected to the internet. 4.2.2 Setting country and language You can choose the country and the language for the text on the display. -
Page 23: Main Screen Setting
Presence sensor The uSense has a sensor for presence detection. When you pass by or approach the uSense, the main screen of the display will light up for 5 sec onds. This setting is on by default. You can switch off the presence detection. -
Page 24: Changing The Name Of An Activity
3. Select and confirm Enable child lock. The message Child lock enabled will appear of the screen. The screen will be locked when the display of the uSense goes in stand-by mode. 4. Short-press a button or turn the rotary dial to reactivate the display. -
Page 25: Changing The Name Of A Zone
5. Confirm your setting. uSense connections (with Wi-Fi and the app) It is possible to operate the uSense with a mobile device. You need a Wi- Fi network and a mobile device with Apple iOS, Android or Windows to make the connection. -
Page 26: Downloading The App
Downloading the app You can install the uSense app on your mobile device. This allows you to operate the uSense when you are not in the same room or out of the house. 1. Download the free app in the App Store, Google Play or Mircosoft Store. -
Page 27: Registering Installer Access
This gives your installer access for up to 72 hours. Advanced settings 4.4.1 Resetting to default settings You can reset most of the uSense settings to their default settings at the same time. Important All connection settings for communication will be deleted too! The temperature schedules, control mode and holiday period will not be reset. -
Page 28: Pre Heat
4 Customisation Important The new offset will be used over the entire temperature range. The application of the new offset on the Current Temperature takes some time. 4.4.4 Pre heat You can choose to enable or disable pre heat depending on the your heat ing preferences. -
Page 29: Messages And Data
3. Confirm the selection. The uSense will now display the current outside temperature. Energy consumption The uSense can display the energy that was used for heating and hot tap water supply from the moment of first use of the appliance. Important This menu item is only available for combi appliances. -
Page 30: Technical Information
5 Messages and data Technical information The uSense can display various built-in properties and parameters. 1. Enter the main menu. 2. Select Technical Information. 3. Confirm the selection. The uSense will now display: Tab.6 Device Information Serial Number: Software Version:... - Page 31 5 Messages and data Fig.46 4. Scroll through the list using the rotary dial. Important 1 E.09.14 ..04 ... 2017 1 A.02.04 ..03 ... 2016 The list contains the complete history of error messages. Most of 1 E.09.14 ...
-
Page 32: Installation
First chapter: Manual menu, page 5 AD-3001027-01 System overview 6.1.1 Systems with gateway Fig.48 The uSense can be connected to three types of appliances (based on the communication protocol): R-bus On/off protocol OpenTherm protocol BSB protocol The communication protocol depends on the type of appliance used in AD-3001019-01 your system. -
Page 33: Preparation
6 Installation Preparation You must check which gateway is needed for the communication between the uSense and your appliance. Fig.52 1. Check the documentation to know which communication protocol is used for the control of your appliance: Tab.11 Communication protocol... -
Page 34: Location Of The Usense
50 m (maximum cable length). AD-3001017-01 Installation of the uSense The installation of the uSense is described in the Quick Start Guide that is delivered in the uSense package. 1. Mount the mounting bracket to the wall following the instructions in the Quick Start Guide. -
Page 35: Software Update
6 Installation Software update Software updates are available for your uSense. To update the software the uSense must be connected to: Wi-Fi The internet The server When all the connections are made the uSense will automatically update the software. Important The first software update will be available within one day. -
Page 36: Troubleshooting
Set the presence sensor to Off The target temperature cannot be set The uSense is in antifrost or holiday Set the uSense to manual mode or tem with the rotary dial. mode. perature scheduling mode. -
Page 37: Appendix
Terms and conditions The legal Terms and Conditions are for the Wi-Fi connection and use of the uSense app. Before you start to setup your Wi-Fi connection and app connection you have to approve the Terms and Conditions. The Terms and Conditions cannot be viewed on the uSense. You have two options to view them: Visit the website of the manufacturer. -
Page 38: Erp Information
WEEE directive (96/2002/EC) (disposal requirements) Drop test: IEC 32-2-60068 Protection classification: IP21 ErP information 8.4.1 Product fiche Tab.20 Product fiche Baxi - uSense uSense uSense uSense Class Contribution to space heating energy efficiency (1) Combined with On/Off appliance (2) Combined with modulating appliance (3) Combined with modulating appliance and outdoor sensor 7667977 - v.01 - 25102017... - Page 39 © Copyright All technical and technological information contained in these technical instructions, as well as any drawings and technical de scriptions supplied, remain our property and shall not be multiplied without our prior consent in writing. Subject to alterations.
- Page 40 For the warranty to be maintained, please make sure... Benchmark checklist is completed Warranty is registered with Baxi The boiler has an annual service For full terms and conditions, visit www.baxi.co.uk/terms Book your service or repair online: www.baxi.co.uk/booking Baxi, Brooks House Coventry Road, Warwick, CV34 4LL.
Need help?
Do you have a question about the uSense and is the answer not in the manual?
Questions and answers