
Subscribe to Our Youtube Channel
Related Manuals for IOGear GUC211V


Summary of Contents for IOGear GUC211V
- Page 1 User Manual Portable Laptop Console Crash Cart Adapter GUC211V PART NO. M1458 www.iogear.com...
- Page 2 ©2017 IOGEAR. All Rights Reserved. Part No. M1458. IOGEAR, the IOGEAR logo is trademarks of IOGEAR. Microsoft and Windows are registered trademarks of Microsoft Corporation. IOGEAR makes no warranty of any kind with regards to the information presented in this document. All information furnished here is for informational purposes only and is subject to change...
-
Page 3: Table Of Contents
Table of Contents Package Contents Overview System Requirements Operating Systems Features Overview Hardware Installation Operation Remote Desktop Toolbar Settings Hotkeys and Macros Search Video Settings Mounting Virtual Media Zoom Virtual Media On-Screen Keyboard Mouse Pointer Mouse Sync Mode Configure Panel Firmware Upgrade VSR Viewer Compliance Information... -
Page 4: Package Contents
IOGEAR’s intuitive GUI (graphical user interface). IOGEAR’s GUI console application can be run from the GUC211V or copied on to and run from the laptop to provide access to the target computer. The console window can be adjusted to fir the size and resolution of the target computer’s desktop by resizing the panel automatically. -
Page 5: Operating Systems
Operating Systems Windows 2000, Windows Vista, Windows 8, Windows 10, Windows 10.1 ® ® ® ® ® Features • Provides direct Laptop-to-Computer desktop access • Programmable macros and hotkeys • Plug-N-Play - No additional software needed • Bi-directional file transfer between connected laptop and computer •... -
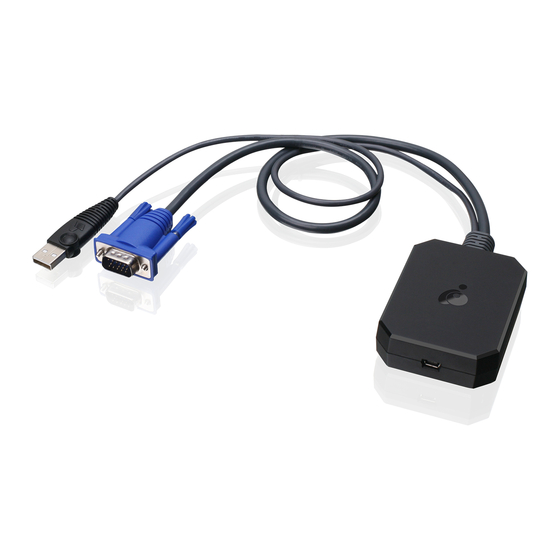
Page 6: Overview
Overview Component Description USB Type-A Connector Connect to the USB 2.0 Port on the target computer to provide keyboard, mouse and virtual media access. VGA Connector Connect to the VGA port on the target computer to provide video signals. Mini USB Port Connect the provided USB Type Mini-B end to this port and connect the USB Type-A end to the laptop. -
Page 7: Hardware Installation
2. Connect the USB Mini-B end of the USB Type-A to USB Mini-B Cable (included in this package) to the Mini USB port on the GUC211V 3. Connect the built-in VGA and USB Type-A connector from the GUC211V to a USB 2.0 port on the target computer or kiosk or server. -
Page 8: Operation
To establish a remote session from the connected laptop, please follow below steps: 1. Connect the GUC211V from the laptop to the target computer or server or kiosk. 2. After the GUC211V is connected to the target computer and laptop, a new Removable Disk drive will install on the laptop. - Page 9 5. When WinClient opens, it will search for the target computer and open a remote session once a connection is established. Note: If the Client AP cannot connect to the target computer, please check the cable connections and click Enumerate. 6.
-
Page 10: Remote Desktop Toolbar
Remote Desktop Toolbar GUC211V’s WinClient interface provides a convenient remote desktop toolbar which is hidden at top center of the remote desktop window. Drag mouse over the top center to open the Toolbar. Toolbar can also be moved to a different location: 1. -
Page 11: Settings
Click icon to bring up the Configure Panel dialog box (see Configure Panel) Click icon to bring up the Firmware Upgrade dialog box (see Firmware Upgrade) Provides firmware version and information of the GUC211V Click icon to exit the viewer. Exiting from a WinClient AP session closes the Remote... -
Page 12: Hotkeys And Macros
Hotkeys and Macros Hotkeys Hotkeys or keyboard shortcuts enable user to designate a specific key combination to trigger an action. The Hotkeys tab allows user to configure which hotkey performs specific actions on the target computer. The hotkeys that invoke an action are shown to the right of its name. Use the checkbox to the left of an action’s name to enable or disable its hotkey. - Page 13 2. Press your selected Function keys one at a time. The selected keys appear in the Edit Hotkey field as you enter press them one at a time. a. You may use the same Function keys for more than one action, as long as the key sequence is not the same.
- Page 14 A more detailed explanation of the Hotkey actions is given in the table below. Action Explanation Exit Remote Location Breaks the connection from the GUC211V and returns to local client computer operation. This is equivalent to clicking the Exit icon on the Remote Desktop Toolbar. Default keys are F2, F3, F4 Adjust Video Brings up the Video Settings dialog box.
- Page 15 User Macros Create User Macros to perform specific actions on the target computer by following below steps: 1. Select User Macros, then click 2. In the dialog box, replace the “New Macro” text with a name of our choice for the macro.
- Page 16 3. Click Set Macro, and then click Record button. 4. Press the keys for macro a. To minimize dialog box, click Minimize. Dialog box will disappears and a small panel appears at top left of the screen.
- Page 17 b. To pause macro recording, click Pause c. To resume macro recording, click Resume d. To stop macro recording, click Stop e. When recording macro, focus must be on the remote screen and cannot be in the macro dialog box. f.
- Page 18 After macros created, it can be run in two ways: 1. By using the Hotkey (if one was assigned) 2. By opening the Macros dialog box and click Play. When running macro from this dialog box, there are 2 options: If Play Without Wait is chosen, then the macro runs the key presses one after another with no time delay between them If Play With Time Control is chosen, then the macros waits for the actual amount of time...
-
Page 19: Search
Search Search, at the top of the dialog box, allows you to filter the list of macros that appear in the large lower panel for you to lay or edit. Click the drop-down menu to choose whether you want to search by name or by key; key in a string for the search;... -
Page 20: Video Settings
Video Settings The options in the video settings dialog box enables users to adjust the Screen Position, slide bar settings (Performance, Video Quality, Detect Tolerance) and Refresh settings, as shown below:... - Page 21 The larger the value, the clearer the picture because the more video data is transmitted Enable Refresh The GUC211V can redraw the screen every 1 to 99 seconds, eliminating unwanted artifacts from the screen. Select Enable Refresh and enter a number from 1 through 99, the GUC211V will then redraw the screen at the interval you specify.
-
Page 22: Mounting Virtual Media
Zoom Controls Zoom factor for the target computer’s console windows. Setting Description Sizes and displays the remove view window at 25% Sizes and displays the remove view window at 50% Sizes and displays the remove view window at 75% 100% Sizes and displays the remove view window at 100% Sizes and displays the target computer’s desktop view window at 100%. - Page 23 2. Click “ ”, then select media source to be added. Depending on the selection, additional dialog box appear to enable user to select the desired Drive, ISO File, Folder, or Removable Disk. 3. If the device only supports full speed USB, please check the Disable High Speed USB Operation Mode box.
- Page 24 5. Read refers to the directed device being able to send data to the target computer Write refers to the redirected device being able to have data form the target computer written to it. For the redirected device to be writeable as well as readable, check the Enable Write box. 6.
- Page 25 8. The selected virtual media devices are now redirected to the target computer where they show up as drives, files, folders, etc. on the target computer’s file system. 9. Once mounted, the virtual media can be treated as if they really existed on the target computer. This enables user to transfer files bi-directionally between the laptop and the connected computer.
-
Page 26: On-Screen Keyboard
On-Screen Keyboard IOGEAR’s GUC211V supports on-screen keyboard in multiple languages, with all the standard keys for each supported language. Click this icon to open the on-screen keyboard. One of the advantages of the on-screen keyboard is that if the keyboard languages of the target computer and laptop’s are not the same, then, there is no need to change settings of either... -
Page 27: Mouse Pointer
Mouse Pointer GUCS211V offers a number of mouse pointer options when working in the target computer’s display. Note: Selecting the Dot pointer has the same effect as the Toggle mouse display hotkey function. Mouse Sync Mode Synchronization of the laptop and target computer mouse pointers can be accomplished automatically and/or manually. -
Page 28: Configure Panel
When Mouse DynaSync is available, clicking the icon toggles its status between enabled and/ or disabled. If disable Mouse DynaSync is chosen, then would need to perform manual synching procedures described under Manual Mouse Synchronization. Manual Mouse Synchronization If the laptop’s mouse pointer goes out of sync from the target computer’s mouse pointer, there are a number of methods to sync them back together: 1. -
Page 29: Firmware Upgrade
Item Description Screenshot These settings let the user configure the GUC211V’s screen capture parameters, when using Screen Capture from the Remote Desktop Toolbar • Path lets user select a directory that the captured screens and video files automatically get saved to. Click Browse, navigate to the directory of your choice, then, click OK. - Page 30 3. The Firmware Upgrade Window opens. 4. Click Browse, then navigate the directory of where the new firmware is located, and select the file.
- Page 31 As the upgrade proceeds, progress information is shown in the Progress Bar. Once the upgrade completes successfully, the GUC211V will reset itself. 6. User may reconnect the GUC211V to check if the updated firmware version is correct.
-
Page 32: Vsr Viewer
VSR Viewer The GUC211V can record a video of the target computer’s desktop display via the Video icon on the Control Panel. Clicking the Video icon will start and stop the recording. Videos are saved to the laptop’s desktop, unless path already specified (see Configure Panel section) Please make sure that Java is downloaded and ready for use on your laptop. - Page 33 4. Double click the folder icon to browse and open a video file (saved under *.vls format)
- Page 34 Below table explains VSR Viewer Icons in details bottom tool bar only. Icon Function Double click this icon to browse and open saved *.vls video files Drag the round button left or right across the play-bar to bring the video to a specific time or frame.
- Page 35 Click this icon to save the video file to a new location and/or under a new file name Click this icon to open a new video file. The VLS Viewer can only open video files with the *.vls extension Click this icon to open the Control Panel window. The Control Panel displays information about every key that was pressed on the keyboard while the video was recording Click this icon to put the VLS Viewer in Full Screen mode.
-
Page 36: Compliance Information
Compliance Information FCC Statement This equipment has been tested and found to comply with the limits for a Class A digital device, pursuant to Part 15 of the FCC Rules. These limits are designed to provide reasonable protection against harmful interference when the equipment is operated in a commercial environment. This equipment generates, uses, and can radiate radio frequency energy and, if not installed and used in accordance with the instruction manual, may cause harmful interference to radio communications. -
Page 37: Limited Warranty
Limited Warranty Warranty Information This product carries a 3 Year Limited Warranty. For the terms and conditions of this warranty, please go to http://www.iogear.com/support/warranty Register online at https://www.iogear.com/registration Important Product Information Product Model Serial Number Contact WE’RE HERE TO HELP YOU! - Page 38 ©2017 IOGEAR ®...
Need help?
Do you have a question about the GUC211V and is the answer not in the manual?
Questions and answers