Table of Contents
Advertisement
Advertisement
Table of Contents

Related Manuals for Hyundai LAC1420IWFS


Summary of Contents for Hyundai LAC1420IWFS
- Page 1 ENGLISH Car Navigation System OWNER’S MANUAL Veloster LAC1420IWFS / LAC1430EWFS (Family) Please read this manual carefully before operating your set and retain it for future reference. Designs and specifications are subject to change without prior notice.
-
Page 2: Table Of Contents
General information Table of contents Safety notes ............7 Types of Playable Discs . - Page 3 Getting started with navigation Table of contents What is GPS? ........... . 20 About satellite signals .
- Page 4 Using the map menu Table of contents Route menu overview ..........27 Continue Guidance/ Stop Guidance .
- Page 5 CD/MP3/WMA/USB/iPod operation Table of contents Playing an audio CD and MP3/ WMA/ USB/ iPod files ....39 Skip to the next track/file ..................39 Skip to the previous track/file ...................
- Page 6 Voice recognition system Table of contents Voice recognition ..........49 Giving voice commands .
-
Page 7: General Information
General information Safety notes Always operate the vehicle in a safe To reduce the risk of fire or electric CAUTION manner. Do not become distracted by shock, do not expose this product to RISK OF ELECTRIC SHOCK the vehicle while driving, and always be dripping or splashing water, rain, or DO NOT OPEN fully aware of all driving conditions. - Page 8 General information CAUTION : CAUTION : • Do not keep the navigation system running with the engine stopped. The driver must not watch the moni- Doing so may discharge the vehicle tor while driving. If the driver watches battery. When you use the navigation the monitor while driving, it may lead to system, always keep the engine run- carelessness and cause an accident.
-
Page 9: Types Of Playable Discs
General information Precautions of handling discs and player Types of Playable Discs This unit plays CD-R or CD-RW con- • A defective or soiled disc • Clean the disc taining audio titles, MP3 or WMA files. inserted into the unit can before playback. -
Page 10: Notes On Copyrights
General information NOTES ON COPYRIGHTS Disposal of your old appliance It is forbidden by law to copy, broadcast, show, broadcast via cable, play in pub- iPod is a trademark of Apple Inc., regis- lic, or rent copyrighted material without tered in the U.S. and other countries. permission. -
Page 11: Name Of Each Component
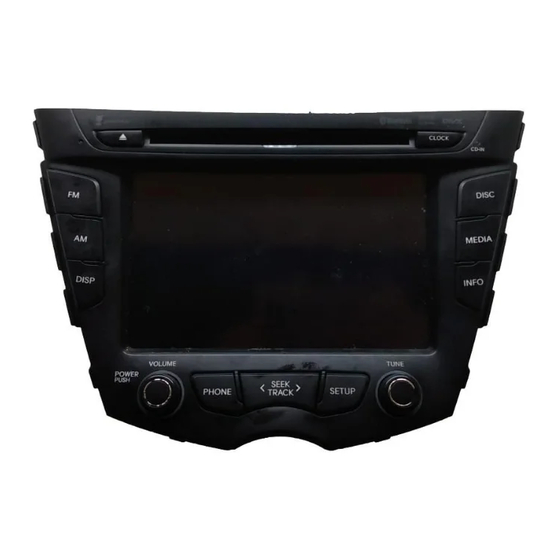
Name of each component Control Panel 1. Disc slot 2. Eject ( Press to eject a disc from the unit. 3. RESET hole You can reset the unit when it doesn't operate normally. Press the RESET hole with a sharp object. 4. - Page 12 Name of each component 9. PHONE 13. DEST Use to enable Bluetooth Hands-Free Press to enter a destination menu. Phone. Various methods for entering a des- tination are available. SEEK/TRACK • Press this button. 14. ROUTE - Automatic tuning: Press to access the [ROUTE] menu RADIO - Track up/down: screen.
-
Page 13: Steering Wheel Remote Control
Name of each component Steering wheel remote control MODE 1. MODE Selects a source. Enables Bluetooth Hands-Free • Press this button to start the voice FM t AM t CD t USB (or iPod) Phone. recognition mode. t BT t AUX t FM... •... -
Page 14: Hvac (Heating, Ventilating, And Air Conditioning) Automatic Control System
Name of each component HVAC (heating, ventilat- 4. AUTO E AUTO: Displays the HVAC Automatic Control System you ing, and air conditioning) Press to set automatically the air set. conditioning and heating mode. Automatic Control System Press to turn the HVAC Automatic Press to switch the indoor/outdoor air Control System off. -
Page 15: Basic Operation
Basic operation Start-up screen Turning the unit off Note If the ejected disc is not removed in The unit starts when the ignition switch Press POWER on the control panel in approximately 10 seconds, the disc is is placed in the ACC or ON position. power on status. -
Page 16: Selecting A Source
Basic operation Selecting a source Rear view camera (Optional) 1. Press "MEDIA" on the control panel. With a rear view camera, automatic The [MEDIA] menu appears on the switching to video from a rear view screen. camera is possible when the gearshift is moved to REVERSE (R) position. -
Page 17: Info/Setup
INFO/SETUP General operations of INFO/ Setup • Variable EQ There are ten kinds of screen menus. SETUP menu - Normal: Natural sound. Quality optimized for driver. The navigation system can be custom- - Dynamic: Strong sound with ized to make it easier for you to use: enhanced bass and stereo. - Page 18 INFO/SETUP • Light Setup • Avoid Area Screensaver You can set the Display Light. If you want to make a detour due to You can set the desired screensaver. traffic conditions, you can use the • Ratio detour function to calculate an alterna- You can set the Ratio to [FULL], [Ratio], tive route from the vehicle location to [Display Off].
-
Page 19: Info
INFO/SETUP Info Valet Mode Help This function is to take care of your You can check the Bluetooth Help. There are three kinds of screen menus. information. If you set this function, we will offer only power on. You can decode this function to push the password. -
Page 20: Getting Started With Navigation
Getting started with navigation What is GPS? Acquiring satellite signals Indicators of the map screen The Global Positioning System (GPS) Before the unit can find your current How to view a map screen is a satellite-based navigation system location and navigate a route, you must The navigation system displays various made up of a network of 24 satel- do the following steps:... -
Page 21: Changing The Scale Of A Map
Getting started with navigation Changing the scale of a map Adjusting the navigation vol- • 1. Touch on the map screen. Indicates the scale of the map. If you want to adjust the navigation vol- ume, follow the below method. •... -
Page 22: Destination Input Menu
Destination input menu Destination menu overview Name Search 5. Input the desired POI name and then touch [OK]. You can find the destination by search- Destination menu ing for the name. Name Search 1. Press [DEST] > Touch [Name Previous Destinations Search]. -
Page 23: Previous Destinations
Destination input menu Previous Destinations Address 5. Input the house number and then touch [Done]. You can find the destination to a loca- You can find the destination by search- tion that you have lastly set as the des- ing the address. tination. -
Page 24: Address Book
Destination input menu Address Book 4. Touch [Set as Destination]. 4. Touch [Set as Destination]. You can find the destination to a loca- 5. Touch [Start Guidance]. 5. Touch [Start Guidance]. tion stored in the Address book. To uti- Drive in accordance with the screen Drive in accordance with the screen lize this function more effectively, des- and voice information. -
Page 25: Previous Map
Destination input menu Previous Map Facilities 4. Touch the preferred facility from the list. This allows you search for a destination You can find a destination from various by scrolling the map. categories of businesses or locations. 1. Press [DEST] > Touch [Previous 1. -
Page 26: Intersection
Destination input menu Intersection Home/Office/User 1 ~ 4 5. Touch the 2nd street name from the list. You can find the destination by search- ing for the intersection. 1. Press [NAV] > Touch [Home], [Office] or [User 1 ~ 4]. 1. -
Page 27: Using The Map Menu
Using the route menu Route menu overview Continue Guidance/ Stop Route Overview You can check information about ther- Guidance Route menu oute between your current location If you no longer need to travel to your andyour destination. Continue Guidance/ destination or if you want to change Stop Guidance your destination, press [ROUTE] >... -
Page 28: Route Info
Using the route menu Route Info Route Options Detour This allows youto view the distance You can change the route selection cri- If you want to make a detour due to tothe next guide point and the turning- teria, by selecting one of these Route traffic conditions, you can use the direction at that guide point. -
Page 29: Avoid Streets
Using the route menu Avoid Streets Edit Waypoints This allows youto avoid certain streets This allows youto edit the waypoints 3. Touch [Done]. due to traffic conditions. You can calcu- when the waypoints are set. The corresponding position will be late an alternative route from the vehicle displayed on the map. -
Page 30: Demo
Using the route menu Demo My places 3. Touch [Add]. After a route is set, a simulation of the There are four options on the My Places route guidance to a destination is auto- Menu. The Home, Office, Favorite matically displayed. Places, and Address Book can be edited. -
Page 31: Bluetooth Wireless Technology
• You can check the Bluetooth phone When it is not connected, the con- compatibility list on the web-site nection failure message appears on If you want to cancel, touch (http://www.navigation.com/hyundai). the screen. [Cancel]. - Page 32 Bluetooth wireless technology To connect using the unit To connect using the phone 5. Input the passkey (Default: 0000) showed on the screen in your phone settings (2) settings when the pop-up screen is displayed 1. Press on the control panel. Your phone’s Bluetooth feature may on the screen.
-
Page 33: Viewing The Connected Bluetooth Phone
Bluetooth wireless technology Viewing the connected blue- Disconnecting/Connecting 3. Touch the disconnected phone again to connect your phone. And then tooth phone again the bluetooth phone touch [Yes]. 1. Touch [View Bluetooth device list] on 1. Touch [View Bluetooth device list] on the “Bluetooth”... -
Page 34: Changing The Passkey
Bluetooth wireless technology Making a call by entering Note • If you make a mistake while dialing, phone number touch to erase one digit at a time. The most basic way to make a call is to If you want to erase all digits at a time, simply dial the number. -
Page 35: Answering Calls
Bluetooth wireless technology Answering calls Using your Phone Book 2. Touch a phone book entry you want to call. 1. When you receive a call, your phone You can use the phone book entries rings and the “Incoming Call” pop- stored on the memory of phone support- up screen is displayed on the screen. -
Page 36: Using Your Calling List
Bluetooth wireless technology Using your Calling list 2. Input the first letter of the entry 2. Touch [Outgoing], [Missed], or in the phone book list you want to [Incoming]. You can use the calling list stored on search by using the keypad, then the memory of phone supporting PBAP touch [Ok]. -
Page 37: Making A Call With Speed Dial Numbers
Bluetooth wireless technology Making a call with speed dial The name (phone number) is stored Touching switches to the next in memory. The next time you touch or previous page in the list. numbers the same name, the name (phone You can use the phone book entries number) is recalled from memory. -
Page 38: Activating The Audio Streaming Mode
Bluetooth wireless technology Activating the audio stream- Skip to the previous/next music Touch to select the previous/next ing mode music. Connect your unit and bluetooth phone before activating the audio streaming Search mode. (Pages 43 - Touch and hold the buttons during playback and then release at the Press MEDIA repeatedly until "BT"... -
Page 39: Cd/Mp3/Wma/Usb/Ipod Operation
CD/MP3/WMA/USB/iPod operation Playing an audio CD and Skip to the next track/file iPod You can play an iPod device on the unit MP3/ WMA/ USB/ iPod files by connecting the iPod to the USB port Touch SEEK/TRACK to select the Disc by using the iPod cable. -
Page 40: Intro Scan
CD/MP3/WMA/USB/iPod operation Intro scan Repeat Disc - MP3/WMA Disc - Audio CD • [Repeat off]: Plays repeatedly all files within the disc or Disc - MP3/WMA The current selected tracks/files are USB. The first 10 seconds of each tracks/files played repeatedly. •... -
Page 41: Random
CD/MP3/WMA/USB/iPod operation Random Playing files by classifying Disc - MP3/WMA • [Random off]: Cancels Random into folder/ Album/ Artist play. All of the tracks/files are played • [Random folder]: The unit plays Randomly. You can play files within the USB by Randomly all files classifying into folder, album, or artist. -
Page 42: Locating A Folder/File Using The List
CD/MP3/WMA/USB/iPod operation Locating a folder/file using Note • [Playlists]: Plays the songs in the • In case of MP3/WMA file, touch the [Playlists]. the list button to move to upper folder. • [Artists]: Plays the songs in the Disc - Audio CD •... -
Page 43: Setting Audio Book Play Speed
The MP3 player requiring installation of • [Audiobook normal]: a driver is not supported. Plays the audio books with original • USB Flash Drive: Devices that support speed. USB2.0 or USB1.1 . • You can check the USB compatibility list on the web-site (http://www.navigation. com/hyundai). - Page 44 CD/MP3/WMA/USB/iPod operation MP3/WMA file requirement iPod device requirement • Sampling Frequency / 16 - 48 kHz • Compatibility with your iPod may vary (MP3) 8 - 44.1 kHz (WMA) depending on the type of your iPod. • Bit rate / within 8 - 320 kbps (MP3) •...
-
Page 45: Radio Operation
Radio operation Listening to the radio stations Storing and recalling stations Note • Up to 18 stations, 6 for each of theFM 1. Press the “FM” or “AM” button to You can easily store up to 6 preset sta- bands and 6 AM stations can bestored select the radio. -
Page 46: As (Autostore)
Radio operation AS (Autostore) To scan broadcast frequen- To scan broadcast frequen- This function lets you automatically cies cies stored in preset buttons store the strong broadcast frequencies. This allows you to search automatically This allows you to search broadcast fre- forward for receivable stations. -
Page 47: Using An Aux Source
Auxiliary device operation Using an AUX source Note • Some auxiliary devices that don’t have It is possible to use auxiliary equipment the video source may not output the with unit. video screen. • In case of some iPod devices, Use the 1. -
Page 48: Adjusting The Video Screen (Default : Center)
Auxiliary device operation Adjusting the video screen (Default : Center) For safety reasons, the video screen cannot be viewed while your vehicle is in motion. To view video screen, you must stop in a safe place and put on the handbrake. -
Page 49: Table Of Contents Voice Recognition System
Voice recognition system Voice recognition Giving voice commands How to say numbers Voice recognition allows hands-free Voice recognition requires a certain 1. Press on the steering wheel operation of the AV system (RADIO, way to say numbers in voice com- remote control. -
Page 50: Voice Command Examples
Voice recognition system Voice command examples 5. After the beep sounds and say “Frequency one-hundred two” or To use the voice recognition function, “one-hundred two mega hertz”. saying one command is sometimes sufficient, but at other times it is neces- 6. -
Page 51: Help Command
Voice recognition system Example 3: Dial number 5. When the spoken numbers are rec- 3. The voice feedback will announce ognized, the system announces the “Possible commands are”. To use this function, you need a mobile recognized numbers and then a phone which is supported a Bluetooth. -
Page 52: Voice Commands
Voice recognition system Voice commands Category Voice command Category Voice command Category Voice command Application Radio News off Phone Dial Number command News on Incoming iPod Next station Missed Previous station Outgoing Radio TA off Phone Book TA on Call Name Bluetooth Preset <number>... - Page 53 Voice recognition system Voice commands Category Voice command Category Voice command Category Voice command iPod Repeat off Directory up Audio CD List (CD, USB) Repeat on List Option Scan start Option Repeat off Random off Repeat folder Repeat track Random all Repeat off Scan start Random album...
-
Page 54: Troubleshooting
How to update the navigation map and turned off. Adjust the volume of voice turning. software guidance. • When driving on a road that is narrow- To update the navigation map and soft- ing fast. ware, visit the site (http://www.naviga- tion.com/hyundai). - Page 55 Troubleshooting Symptom Cause Correction Power doesn’t turn on. The ignition switch is NOT turned ON. Turn the ignition switch to ON. The unit doesn’t operate. The ignition switch is NOT set to ACC. Set the ignition switch to ACC. The power of unit is turned OFF. Turn the unit on by pressing POWER the control panel.
-
Page 56: Index
Tour planner....... 31-32, 39 Hyundai service ........28 2D/ 3D . -
Page 57: Symbols For The Display Of Traffic Problems
Symbols for the display of traffic problems If the traffic problem is on the calculated route, the symbol will be highlighted. Symbol Description Symbol Description Rock fall Stationary traffic Accident Queuing traffic Wind Storm Other danger Road narrow Snow, Ice Chipping Block road, Closed Road work... - Page 58 Support - Hotline Web Site : http://www.navigation.com/hyundai International Toll Free Number: 00800 18 23 53 22 Telephone number for all other countries (or if Toll Free numbers are not supported) : +31 555 384 245...
- Page 59 “Este produto está homologado pela ANATEL, de acordo com os procedimentos regulamentados pela Resolução 242/2000, e atende aos requisitos técnicos aplicados” Para maiores informações, consulte o site da ANATEL www.anatel.gov.br Modelo: LAC1430EWFS 0837-11-1925 (01) 07893299514272...
- Page 60 “Este produto está homologado pela ANATEL, de acordo com os procedimentos regulamentados pela Resolução 242/2000, e atende aos requisitos técnicos aplicados” Para maiores informações, consulte o site da ANATEL www.anatel.gov.br Modelo: LAC1420IWFS 0837-11-1925 (01) 07893299514265...
Need help?
Do you have a question about the LAC1420IWFS and is the answer not in the manual?
Questions and answers