
Related Manuals for HumanTechnik Audioropa LA-70


Summary of Contents for HumanTechnik Audioropa LA-70
- Page 1 LA-70 Seite 2 Bedienungsanleitung Digitaler Ringschleifen- verstärker Page 12 User manual Digital loop amplifier...
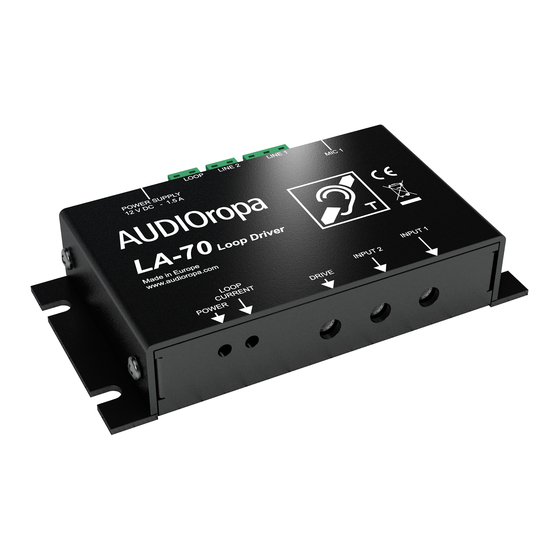
- Page 2 Bedienelemente Mikrofoneingang Eingang LINE 1 Eingang LINE 2 Ringschleifen-Ausgang Eingang Stromversorgung Betriebsanzeige Ringschleifenstromanzeige Schleifenpegel-Regler Pegelregler für Eingang 2 Pegelregler für Eingang 1 Deutsch...
- Page 3 Wir beglückwünschen Sie zum Erwerb des digitalen Ring- scheifenempfängers »LA-70«! Sie haben sich dabei für ein modernes und zuverlässiges Gerät entschieden. Bitte lesen Sie diese Bedienungsanleitung aufmerksam durch, um mit dem Gerät und allen seinen Möglichkeiten vertraut zu werden. Standard-Lieferumfang Überprüfen Sie bitte, ob alle nachfolgend aufgeführten Tei- le enthalten sind: - »LA-70«...
- Page 4 Kontrollleuchten, Einstellregler und Steckplätze POWER: Diese LED-Kontrollleuchte leuchtet durchgehend, wenn der Verstärker mit Netzspannung versorgt wird. LOOP CURRENT: Diese LED-Kontrollleuchte signalisiert, dass ein Signal vom Verstärker zur Schleife ausgeht und die Schlei- fe funktioniert. DRIVE: Mit diesem Regler stellen Sie die Stärke des Schlei- fenstroms ein.
- Page 5 Zur Beachtung: - Trennen Sie das Gerät von der Stromversorgung, bevor Sie Komponenten ein- oder ausstecken. - Bevor Sie den Ringschleifenverstärker mit Strom versorgen, stellen Sie den DRIVE-Regler auf die niedrigste Stufe. Anschluss der Ringschleifenleitung Um ein Ringschleifenkabel oder das Ringschleifenkissen (Sonderzubehör) anzuschließen, verbinden Sie die beiden freiliegenden Kabelenden mit einem der beiden beiliegenden 2-poligen Klemmenstecker.
- Page 6 Line / Masse Mikro / Line / Masse Nutzung des Ringschleifensystems - Hörgeräteträger müssen nun ihre Hörgeräte auf die T- oder MT-Position stellen. - Stellen Sie den Lautstärkeregler auf die optimale Lautstärke ein. Achtung: Bevor Sie Verbindungen zum Gerät herstellen oder trennen, ziehen Sie das Gerät aus der Netzsteckdose.
- Page 7 Fehlerbehebung Kein Ton: - Überprüfen Sie alle Verbindungen. - Kontrollieren Sie, ob die „POWER“-Kontrollleuchte leuchtet. - Die Audioquelle ist nicht angeschlossen. Geringer Lautstärkepegel: - Ringschleife oder Ringschleifenkissen (Sonderzubehör) falsch platziert. - Der Lautstärkeregler ist zu leise eingestellt. Lautstärke- regler am induktiven Empfangsgerät höher einstellen. Verzerrter Ton: - Ringschleifenpegel zu hoch eingestellt.
- Page 8 Wartung und Pflege Der »LA-70« ist wartungsfrei. Bei einer Verschmutzung soll- ten Sie das Gerät gelegentlich mit einem weichen, ange- feuchteten Tuch reinigen. Niemals Alkohol, Verdünner oder andere Lösungsmittel verwenden! Das Gerät sollte nicht über längere Zeit direkter Sonneneinstrahlung ausgesetzt und da- rüber hinaus vor großer Hitze, Feuchtigkeit oder starker me- chanischer Erschütterung geschützt werden.
- Page 9 Entsorgung von gebrauchten elektrischen und elek- tronischen Geräten (anzuwenden in den Ländern der Europäischen Union und anderen europäischen Län- dern mit einem separaten Sammelsystem für diese Geräte). Das Symbol auf dem Produkt oder seiner Verpackung weist darauf hin, dass dieses Produkt nicht als normaler Haushalts- abfall zu behandeln ist, sondern an einer Annahmestelle für das Recycling von elektrischen und elektronischen Geräten abgegeben werden muss.
- Page 10 - 2011/65/EG RoHS-Richtlinie - 2002/96/EG WEEE-Richtlinie - 2004/108/EG EMV-Richtlinie - 2006/95/EG Niederspannungsrichtlinie Die Konformität mit den o. a. Richtlinien wird durch das CE-Zeichen auf dem Gerät bestätigt. CE Konformitätserklä- rungen stehen im Internet unter www.humantechnik.com zur Verfügung. Technische Änderungen vorbehalten. Deutsch...
- Page 11 Deutsch 11...
-
Page 12: Control Elements
Control elements Microphone socket LINE 1 connector LINE 2 connector Loop output connector Eingang Stromversorgung Power indicator Loop current indicator Loop output adjuster Input level control for LINE 2 Input level control for LINE 1 English... - Page 13 We would like to congratulate you on purchasing the »LA-70« digital loop amplifier! You have chosen a modern and reliable device. First, please read this manual carefully to become familiar with the device and all its options be- fore using it. Contents of package Please check if all the listed parts are included: - »LA-70«...
- Page 14 Indicators, controls and connectors POWER: This indicator LED is lit permanently if the amplifier is provided with electric power. LOOP CURRENT: This LED indicates that a signal is transmit- ted to the loop cable and that it is functioning correctly. DRIVE: This control adjusts the loop current.
- Page 15 Connecting the loop cable In order to connect a loop cable or the loop pad (available as accessory), take the free ends of the cable, insert them into one of the included 2-pole terminal connectors and fix them by tightening the screws. Please make sure that only the metal of the cable ends is wedged in the terminal clamps.
- Page 16 Line / Ground Micro / Line /Ground Use of the loop system - Users of hearing aids should now switch to T-coil reception (switch to „T“ or „MT“). - Set the volume to the preferred level. Attention: Before attaching or removing lines to the loop amplifier, disconnect it from the power supply first.
-
Page 17: Troubleshooting
Troubleshooting No sound: - Check all connections. - Check if the power indicator is lit. - Check if the audio source is connected. Low sound level: - Incorrect placement of loop or loop pad (accessory). - Volume is set too low. Check the volume setting of the audio source and the induction receiver (hearing aid). - Page 18 Maintenance and care The »LA-70« does not require any maintenance. If the unit becomes dirty, simply wipe it clean with a soft, damp cloth. Note: Disconnect the »LA-70« from the power supply first. Never use spirits, thinners or other organic solvents. Do not place the »LA-70«...
- Page 19 Disposal of used electric and electronic units (applicable in the countries of the European Uni- on and other European countries with a separate col- lection system). The symbol on the product or the packaging indicates that this product is not to be handled as ordinary household waste but has to be returned to a collecting point for the recycling of electric and electronic units.
-
Page 20: Specification
- 2004/108/EG EMV-directive - 2006/95/EG Low voltage directive Compliance with the directives listed above is confirmed by the CE seal on the device. The complete CE compliance declaration is available on the internet at www.humantechnik.com. Specifications subject to change. English... - Page 21 Humantechnik GmbH Fax: +49 (0) 76 21/ 9 56 89-70 Im Wörth 25 E-mail: info@humantechnik.com D-79576 Weil am Rhein Germany Humantechnik GHL AG Tel.: +41 (0) 61/ 6 93 22 60 Rastatterstrasse 9 Fax: +41 (0) 61/ 6 93 22 61 CH-4057 Basel E-mail: info@humantechnik.com...
Need help?
Do you have a question about the Audioropa LA-70 and is the answer not in the manual?
Questions and answers