Advertisement
Table of Contents
Advertisement
Table of Contents

Related Manuals for Grant 2020 Series


Summary of Contents for Grant 2020 Series
- Page 1 Squirrel Data Logger 2020/2040 SERIES Getting Started...
-
Page 2: Table Of Contents
Contents 1. Hardware Checklist................2 2. General Information................3 3. Communicating with your Logger ...........4 4. Quick Start Example................8 5. Download Process Explained............12 6. Menu and Navigation...............13 7. Connections..................15 8. Accessories..................17 9. Specifications...................19 10. Declaration of Conformity........inside rear cover After reading this document, please refer to the Help contents within SquirrelView (press F1) for further details on your logger and... -
Page 3: Hardware Checklist
1. Hardware Checklist A) SQ2020/2040 Logger B) USB drive containing software (SQA100) C) Getting Started manual (this booklet) D) USB Cable (LC77) E) Mounting bracket/stand for logger (WB6) F) Batteries, 6 x AA G) Current shunt resistors for 4 to 20mA inputs, 10R x 4 (CS202) H) Connectors: 6 way x 4 (18097), 4 way (13975), 3 way (14174), with cable ties Note: 2040 Logger is supplied with 4 extra 6 way connectors... -
Page 4: General Information
2. General Information Installing the batteries The 2020/2040 uses six AA size alkaline batteries located under the removable cover shown below. To insert new or change the existing batteries: 1. Open the battery cover by pushing down and sliding as shown. 2. -
Page 5: Communicating With Your Logger
For quick installation please see the steps below; 1. Ensure you have administration rights on the PC you wish to install software on 2. Ensure any current Grant applications are closed 3. Insert the USB drive into the USB port of your computer, open the USB drive window and run the .exe program. - Page 6 Connect one end of the supplied USB lead to the logger and the other end to the PC. On detection of the logger the PC will install the Grant Instruments SQ20XX USB device drivers Win 7/Vista - USB Device Drivers are automatically installed and no further action is re-...
- Page 7 Ethernet Before using the Ethernet connection please read the configuration manual which can be found under ‘~\SquirrelView\Manuals\SQ20xx Inbuilt Ethernet Configuration.pdf’ where ‘~\SquirrelView’ is the installation directory of SquirrelView. Connect your Ethernet network to the Ethernet port on the logger. Ethernet is only available when the logger is connected to an external power supply. SQ2020/40 18108 Version 17 Page 6...
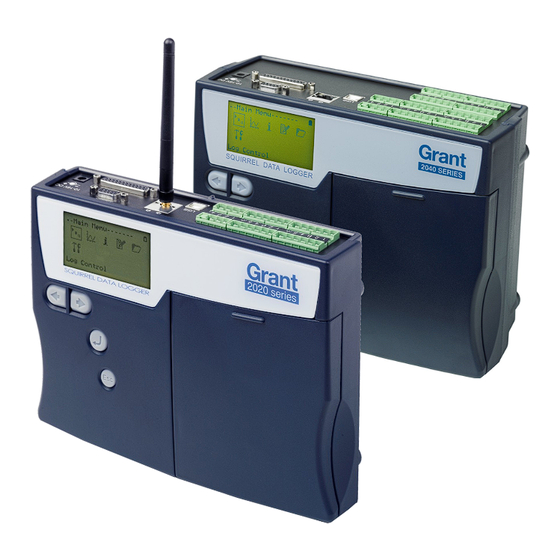
- Page 8 Wi-fi Before using the Wi-fi connection it is necessary to assemble the antenna to the logger as shown below. 1. Screw the antenna onto the threaded socket and orient it in the same direction as the antenna on the receiver connected to the PC (usually vertical). 2.
-
Page 9: Quick Start Example
4. Quick Start Example After installing SquirrelView an example setfile will be installed within the SquirrelView installation directory. The example file will log the internal temperature of the logger. In order to familiarise yourself with the logger the novice user may find this example Setup useful. - Page 10 Running Quick Start Demo In the SquirrelView Assistant click ‘Logger Setup’ to enter the Logger Setup screen. From here open the demo setfile using File -> Open and select the appropriate file for your logger type. The Logger Setup screen is now visible, from here you...
- Page 11 Click Click for Click Click on to send Squirrel- if you Logger setup to View wish to Control logger Assistant. meter to view and start the input status of logging. Let the unit in Real Time. logger log for a few minutes.
- Page 12 In this screen you can now download the Data File and invoke the Export Wizard or download the Data File to Analysis* (See Download Process Explained). The data File is given a unique name (e.g. 28162735.D20). An explanation of the file name is shown on the right;...
-
Page 13: Download Process Explained
5. Download Process Explained Logger Data Files Microsoft Excel Analysis (.d20) (.xls) (.d20) Analysis File (Plus Only) Data File Reader Export external MMC/SD card SquirrelView (.csv) Comma Separated Values The Diagram above shows the download process. Data in the logger is written to the internal memory and may be downloaded by SquirrelView. -
Page 14: Menu And Navigation
6. Menu and Navigation Control Panel The illustration below shows the navigation controls in more detail. RIGHT/DOWN LEFT/UP NAVIGATION NAVIGATION ENTER/CONFIRM & POWER ON ESCAPE/BACK (reverts to previous Menu) To use the 2020/2040 control panel press The display timeout is preset to 10 seconds, this can be changed in the Configuration tab within the Logger Setup window of SquirrelView. - Page 15 Control panel menu Detailed below is a basic explanation of the top menu structure. For more information on the whole menu structure please refer to the Help->Help Content->Loggers within SquirrelView. 6.2.1 Log Control In this menu you can Arm (activate), Pause and Continue or Disarm (deactivate) the logger.
- Page 16 Creating a basic Setup The 2020/2040 allows for the creation of a basic channel setup including logging inter- val, sensor type and sensor power (excitation) if required via the graphical interface, A full setup including more advanced features can be performed using the SquirrelView software included.
- Page 17 6.3.6 Interval Setup A setup created from the control panel will assign all channels to the same logging interval. To change or view this interval choose ‘Intervals’ from the main ‘Setup’ menu. 6.3.6 Sensor Power Setup The sensor power setup can be changed by going to ‘Sensor Power’...
-
Page 18: Connections
7. Connections Analogue Inputs NOTE: Blocks G to K as shown above are only available on 2040 loggers. As the wiring configuration is dependant upon the sensor type used, it is displayed in SquirrelView during the setup. Follow the wiring diagram to attach the required sensor. If you would like to print the diagrams in more detail or view at a later stage select ‘File >... - Page 19 Sensor Power Wiring High Voltage Input Block E Block F Unregulated Logger V1(+ve) Negative V2(-ve) Supply Output V1(-ve) V2(+ve) Regulated 5V Output I/O Socket Wiring Connection ALARM EVENT/STATE PIN 1 Event/State Input 1 I/P 1-8 Event/State Input 2 Event/State Input 3 Event/State Input 4 Event/State Input 5 Event/State Input 6...
-
Page 20: Accessories
These include adapters as shown below which allow you to contact your Squirrel data logger remotely. All are very easy to install and connect directly to the logger via RS232. If you need any further details or wish to make a purchase please contact Grant or your local supplier for more details. - Page 21 18097 Temperature and Humidity probes Grant offers a range of temperature and humidity probes suitable for use with its data loggers and other compatible measurement systems. Bespoke or specialist probes are also available. Please enquire if you have specialist probe needs.
-
Page 22: Specifications
9. Specifications ANALOGUE INPUTS Basic accuracy (5-45°C): ..........± (0.05% readings + 0.025% range) Common mode rejection: ...................100dB Input impedance: ....................> 1MOHM Linearity: ........................0.0015% Series mode line rejection:................50/60Hz 100dB EM field and Conducted RF effect: ………………….………………….…...………….< 1% † DIGITAL INPUTS Zero input voltage............... 0 to 0.5V (or shorted input) One input voltage..............2.7 to 5V (or open circuit input) Input protection........will turn on below about -0.5V and above about 6V ANALOGUE-DIGITAL CONVERSION... - Page 23 Corporation in the United States and other countries. Due to our policy of continuous improvements, specifications may change without prior notice. Grant believe that all information declared is correct at the time of issue. No liability is accepted for errors and omissions. SQ2020/40...
- Page 24 Notas personales: 18108 Versione 17 SQ2020/40 Página 1 www.grantinstruments.com...
-
Page 25: Declaration Of Conformity
Declaration of Conformity Manufacturer:- GRANT INSTRUMENTS (CAMBRIDGE) LTD, Shepreth, Cambridgeshire SG8 6GB Equipment Name/Type Number:- 2020/2040 Description of Equipment:- Squirrel 2020/2040 Data Logger Directives:- EMC Directive 2004/108/EC Including Accessories:- MPU 12V Universal power supply LC71 RS232 serial lead LC77 USB lead This product complies with the requirements of the above Directive(s) when used with sensor leads up to 3m long, compliance may be affected by using longer leads. - Page 26 Grant...
Need help?
Do you have a question about the 2020 Series and is the answer not in the manual?
Questions and answers