Table of Contents

Related Manuals for Roland DJ-202


Summary of Contents for Roland DJ-202
- Page 1 Owner’s Manual Before using this unit, carefully read “USING THE UNIT SAFELY” and “IMPORTANT NOTES” (Startup Guide). After reading, keep the document(s) where it will be available for immediate reference. Copyright © 2017 ROLAND CORPORATION...
-
Page 2: Table Of Contents
Closing Serato DJ Intro About this owner’s manual Upgrading to Serato DJ This manual explains basic operation when using the DJ-202 together You can also upgrade from Serato DJ Intro to Serato DJ and control it with Serato DJ Intro. -
Page 3: Installing The Software
[Agree]. When the following screen appears, drag and drop the The DJ-202 USB driver and Serato DJ Intro are not included in the package. [Serato DJ Intro] icon into the Applications folder. Download them from the Roland or Serato website. -
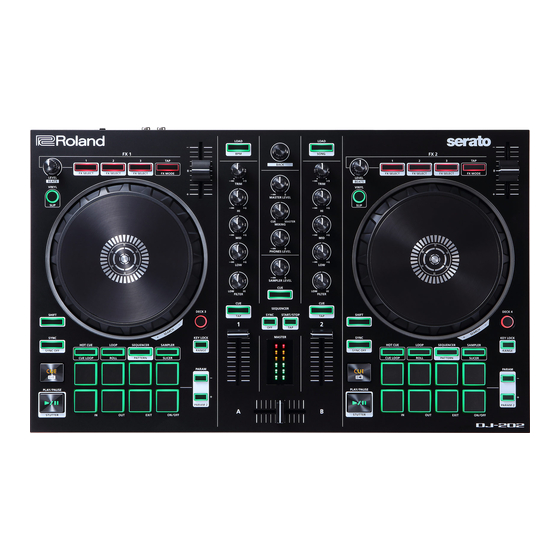
Page 4: Panel Descriptions
Panel Descriptions The top panel of the DJ-202 is divided into three sections by function: browser, deck, and mixer. Phones jack is located on the front side, and input/output jacks are located on the rear side. * The symbol indicates a function that you can use after upgrading to Serato DJ. -
Page 5: Deck Section
Panel Descriptions Deck Section The deck sections located at the left and right control four decks (left: decks 1 and 3, right: decks 2 and 4). [SYNC] button Automatically matches the tempo (pitch) of multiple songs. * In order to use the SYNC function, the song’s tempo must be specified. If a tempo (BPM) has not been specified for the song, you can use the tap tempo function (p. -
Page 6: Tempo Slider
Panel Descriptions Deck section Pad Mode select [SAMPLER] button Selects sampler mode (p. 12). Button: Lit Press [SAMPLER] Assigns sampler to performance pads 1–8. Button: Blinking slowly [SHIFT] + [SAMPLER] Selects slicer mode. Button: Blinking quickly Press [SAMPLER] twice Selects slicer loop mode. Button: Blinking at high speed Sampler is assigned to performance pads 1–4, and manual Press [SHIFT] + [SAMPLER] twice... -
Page 7: Mixer Section
Panel Descriptions Mixer Section This is a four-channel mixer. Here you can adjust the sound, connect sounds, and turn headphone cue on/off. [TRIM] knobs Adjust the volume. [HI], [MID], [LOW] knobs Boost/cut the volume of the high-frequency, mid-frequency, and low- frequency regions. -
Page 8: Front Panel
Panel Descriptions Front Panel [PHONES] jacks Headphones Connect headphones here. Rear Panel (Connecting Your Equipment) Microphone To prevent malfunction and equipment failure, always turn down the volume, and turn off all the units before making any connections. MIDI device Computer Powered speaker, amp PC port MIC IN jack... -
Page 9: Using Serato Dj Intro
In the Finder, open the [Applications] folder and double-click the [Serato DJ Intro] icon. Basic Operations in Serato DJ Intro Songs shown in the browser view can be imported into a deck area, and controlled from the DJ-202. Deck section Waveform panel... -
Page 10: Playing A Song
Using Serato DJ Intro Playing a Song Monitoring Through Headphones Set the DJ-202’s knobs and switches as follows. Set the DJ-202’s knobs as follows. [MASTER LEVEL] knob Turned all the way to the left [MIXING] knob Turned all the way to the left... -
Page 11: Operating The Dj-202
Using the sequencer, “patterns” created using drum sounds (instruments) of If you hold down the [SHIFT] button and press a performance pad, the a Roland TR-909 or TR-808 rhythm machine, or samples of Serato Sampler, hot cue of the pad you pressed is cleared. -
Page 12: Sampler Operations (Sampler)
Operating the DJ-202 Changing instruments Effect Operations You can switch the instrument sounds in units of kits. Serato DJ Intro has two effect units (FX 1, FX 2); you can use FX 1 for deck 1, You can use eight kits. -
Page 13: Using The Sequencer
Using the sequencer, “patterns” created using drum sounds (instruments) of NOTE a Roland TR-909 or TR-808 rhythm machine, or samples of Serato Sampler, When you edit a pattern, the pattern is updated immediately, so you can be edited in step recording (sequencer mode) or realtime recording won’t be able to return the pattern to its state prior to editing. -
Page 14: Synchronizing The Sequencer Tempo With The Serato Dj Intro Tempo
Operating the DJ-202 Realtime recording (INST REC mode) Press the [SEQUENCER] button twice to access INST REC mode. In INST REC mode, the button blinks rapidly. Press the SEQUENCER section’s [START/STOP] button to play the pattern. Strike the performance pads to record instruments. -
Page 15: System Settings
System Settings While holding down the [LOAD] button at the right side (R channel) of the browser section, use a USB cable to connect the DJ-202 to your computer; continue holding down the [LOAD] button until the SEQUENCER section’s [START/STOP] button blinks. -
Page 16: Backing Up Or Restoring Sequencer Data
System Settings Backing Up or Restoring Sequencer Data Returning to the Factory Settings (Factory Reset) The system settings and patterns stored in the DJ-202 can be returned to Backup their factory-set state (factory reset). Here’s how to back up patterns 1–16 and kits (instruments). -
Page 17: Appendix
Appendix Troubleshooting If the DJ-202 does not function in the way you expect, first check the following points. If this does not resolve the problem, consult your dealer or a nearby Roland service center. Problem Items to check Action Page...
Need help?
Do you have a question about the DJ-202 and is the answer not in the manual?
Questions and answers