Table of Contents
Advertisement
Advertisement
Table of Contents

Related Manuals for Miltenyi Biotec autoMACS Pro


Summary of Contents for Miltenyi Biotec autoMACS Pro
- Page 1 autoMACS® Pro Separator User manual Version 5 Original instructions...
- Page 2 Miltenyi Biotec GmbH; however, notwithstanding the foregoing, the owners of the autoMACS Pro Separator may make copies solely for purposes of training personnel in the use and servicing of the unit within their business or organization.
- Page 3 Pro Separator User manual Version 5 EN Original instructions Miltenyi Biotec GmbH Friedrich-Ebert-Straße 68 51429 Bergisch Gladbach Germany Phone +49-2204-8306-0 Fax +49-2204-85197 macs@miltenyibiotec.de www.miltenyibiotec.com...
- Page 5 If you are concerned about the safe use of the instrument, please contact your authorized Miltenyi Biotec service provider or call Miltenyi Biotec Technical Support.
-
Page 6: Table Of Contents
Installation Components included in delivery Materials required for operation autoMACS Pro Separator accessories Unpacking the autoMACS Pro Separator Installing and replacing fluid bottles Installing the MACS MiniSampler, MACS Reagent Rack 4 and tube rack 69 Switching on or off Switching on the instrument 3.1.1... - Page 7 The autoMACS® Pro user interface The Status menu 4.1.1 Sample status 4.1.2 Fluid bottle status 4.1.3 Column status 4.1.4 Tube rack status 4.1.5 MACS MiniSampler status The Reagent menu 4.2.1 Entry of reagents with the 2D code reader 4.2.2 Manual entry of reagents 4.2.3 Deleting reagents 4.2.3.1...
- Page 8 Selecting the appropriate tube rack Monitoring the separation process 6.8.1 Program status 6.8.2 Interrupting cell separation 6.8.3 Fluid bottle illumination Priming the autoMACS Pro Separator 6.10 Cell labeling and separation 6.10.1 Cell separation using the autolabeling function 6.10.2 Cell separation after manual labeling 6.10.3 Working with templates 6.10.3.1 Saving a reagent template...
- Page 9 Maintenance Daily maintenance 7.1.1 Instrument priming 7.1.1.1 Automatic instrument priming at startup 7.1.2 Clean uptake/outlet ports Periodic maintenance 7.2.1 Column exchange 7.2.2 Exchange of hydrophobic air filters 7.2.3 Clean the pump syringe 7.2.4 Cleaning the washing station 7.2.5 Instrument disinfection Corrective maintenance 7.3.1 Valve exchange...
- Page 10 Technical data and specifications 10.1 Technical data and specifications 10.2 Compliance with FCC rules 10.3 EC declaration of conformity Technical support Limited warranty...
-
Page 11: Important Safety Information
Important safety information The autoMACS® Pro Separator is designed for safe use when installed correctly, operated by trained personel operated in accordance with general safety practices and the instructions in this user manual. Warnings and precautions The guidelines in this section explain the potential risks associated with the operation of the instrument and provide important safety information in order to minimize these risks. - Page 12 Safety symbols The following symbols are used to highlight conditions that could cause injury to personnel or damage to equipment. Safety alert. Risk of danger. The documentation needs to be consulted in all cases where this safety symbol is used, in order to find out the nature of the potential hazard and any actions that have to be taken.
- Page 13 Figure 1: Hazard sources and the position of the safety symbols on the front of the autoMACS Pro Separator. Position of the safety symbols on the back of the autoMACS Pro Separator. Figure 2:...
-
Page 14: General Safety Instructions
Customer Support team. Use of a damaged instrument or an instrument with a damaged power cable is expressly prohibited. The autoMACS Pro Separator is intended for indoor use only. Do not use the instrument in areas classified as hazardous locations such as oxygenladen environments. - Page 15 30 V RMS. and 42.4 V peak or 60 Vdc. Only the autoMACS Pro Bottle Sensor Cable should be attached to the Bottle Sensor connector. Only a 2D code reader recommended by Miltenyi Biotec should be connected to the RS232/BCR connector.
- Page 16 Radiation of disassembled units may lead to eye injuries. Be careful of the path of the laser beam or reflection from a mirrored surface. Take care during installation of the autoMACS Pro Separator that the path of the laser beam is not at the same height as that of the human eye during operation.
- Page 17 The autoMACS Pro Separator is classified as a Class 1M laser product per standard IEC 608251:1993+A1:1997+A2:2001. Use of controls or adjustments or performance of procedures other than those specified herein may result in hazardous radiation exposure. Chemical and biological hazards...
- Page 18 Please note that, depending on the type and use of your equipment, additional requirements may apply. For more information, or if you wish to dispose of your endof life Miltenyi Biotec equipment, please contact your local Miltenyi Biotec representative or Miltenyi...
-
Page 19: Wichtige Sicherheitsinformationen
Wichtige Sicherheitsinformationen Der autoMACS® Pro Separator ist für einen sicheren Betrieb ausgelegt, wenn das Ge rät richtig installiert, von geschultem Personal bedient und entsprechend der Sicherheitsrichtlinien und Anweisungen in diesem Benutzerhandbuch eingesetzt wird. Warn- und Sicherheitshinweise Dieses Kapitel erklärt die im Umgang mit dem Gerät möglichen Gefahren und gibt wichtige Sicherheitshinweise zur Vermeidung dieser Gefahren. - Page 20 Gefahrensymbole Die folgenden Symbole werden benutzt um Gefahrensituationen anzuzeigen, welche zu Sach und Personenschaden führen können. Warnzeichen. Gefahrenrisiko. Dieses Benutzerhandbuch muss immer konsultiert werden, wenn dieses Warnzeichen benutzt wird, um mehr über die möglichen Gefahren und entsprechende Handlungsanweisungen zu erfahren. Gefahr eines Stromschlags.
- Page 21 Bitte achten Sie auf die Gefahrenpunkte und die Gefahrensymbole des autoMACS Pro Separator Instruments. Quetsch und Schergefahr Gefahr durch optische Strahlung Gefahr durch Laser Quetsch und strahlung Schergefahr Gefahrenquellen und Gefahrensymbole auf der Vorderseite des autoMACS Pro Separators. Figure 3: Figure 4: Gefahrensymbole auf der Rückseite des autoMACS Pro Separators.
- Page 22 Team. Der Betrieb eines beschädigten Gerätes oder eines Gerätes mit schadhaftem Stromkabel ist ausdrücklich verboten. Der autoMACS Pro Separator ist ausschließlich ausgelegt für den Betrieb in Innen räumen. Bitte benutzen Sie das Gerät nicht in ausgewiesenen Gefahrenzonen wie etwa sauerstoffangereicherten Arbeitsumgebungen. Das Instrument sollte nicht in der Nähe von Radiatoren, Heißlüfter, Öfen oder anderen, Wärme erzeugenden...
- Page 23 An die mit External CAN, CAN1 und CAN2 beschrifteten Buchsen dürfen nur Original autoMACS Pro Geräte angeschlossen werden. Die Spannung an diesen Buchsen darf die gefährlichen Werte von 30 Veff und 42,4 V Spitze bzw. 60 V DC nicht übersteigen.
- Page 24 Sie auf den optischen Weg des Laserstrahls oder der Reflektion durch eine Spie gel oberfläche. Achten Sie bei der Einrichtung des autoMACS Pro Separator darauf, dass sich der optische Weg des Laserstrahls beim Betrieb nicht auf gleicher Höhe mit dem...
- Page 25 Sie zum Abwischen von Substanzen auf dem Scanner ein weiches, trockenes Tuch. Verwenden Sie keinen Alkohol oder andere Reinigungssubstanzen. Der autoMACS Pro Separator ist nach Norm IEC 608251: 1993 + A1: 1997 + A2: 2001 als Klasse 1MLaserprodukt eingestuft. Die Verwendung von anderen als hierin genannten Bedienungs elementen sowie die Anpassung oder Durchführung von anderen als hier genannten Verfahren kann...
- Page 26 Wartung, Transport und Geräteentsorgung Versuchen Sie nicht, den autoMACS Pro Separator selbst zu warten oder zu reparieren – es sei denn, es ist in diesem Benutzerhandbuch oder anderen technischen Unterlagen der Miltenyi Biotec GmbH ausdrücklich vermerkt. Wartung und Reparaturen müssen durch geschulte Fachkräfte ausgeführt werden. Falsche oder unsachgemäße Wartung oder Reparatur an Ihrem Gerät kann zur Gefährdung...
- Page 27 Sie dazu bei, unsere natürlichen Ressourcen zu schonen und die menschliche Gesundheit zu schützen. Miltenyi Biotec setzt sich für den Schutz der Umwelt ein. Miltenyi Biotec bietet in zahlreichen Ländern eigene Rücknahmeprogramme für Altgeräte an und arbeitet weltweit mit lizensierten Partnern zusammen, die an bestehende Recycling...
-
Page 29: Información Importante De Seguridad
Información importante de seguridad El separador autoMACS Pro está diseñado para un uso seguro si se instala correctamente, y se maneja por personal cualificado de acuerdo con las prácticas generales de seguridad y las instrucciones de este manual de usuario. - Page 30 Simbolos de seguridad Los siguientes símbolos se usan para destacar condiciones que podrían causar daños al personal o daños al equipo. Alerta de seguridad. Riesgo de peligro. Es necesario consultar la documentación del equipo siempre que este símbolo de seguridad aparezca, para de esta manera poder averiguar la naturaleza del peligro potencial existente y las acciones necesarias a realizar.
- Page 31 Puntos de peligro ylocalización de símbolos de seguridad que puede encontrar en la Figure 5: parte delantera del autoMACS Pro Separator. Figure 6: Localización de los símbolos de seguridad en la parte transera del autoMACS Pro Separator Instrument.
- Page 32 (incluidos los amplificadores) que produzca calor. Permita que circule suficiente aire alrededor del separador autoMACS Pro – deje al menos 15 cm de separación en todas direcciones – mientras está en funcionamiento para garantizar que el instrumento se enfríe adecuadamente.
- Page 33 No use el instrumento en un lugar húmedo. Evite la elevada humedad o la condensación y proteja a la máquina de salpicaduras. Desenchufe el separador autoMACS Pro de la toma de corriente antes de proceder a su limpieza. No emplee productos de limpieza líquidos ni aerosoles y use siempre un trapo húmedo.
- Page 34 Mantener los dedos etc. lejos de todas las piezas móviles del separador autoMACS Pro y de los accesorios, para evitar aplastamientos, lesiones de corte o daños en el dispositivo. No tocar las bombas de fluido ni ajustar la tubería durante la operación del dispositivo.
- Page 35 Utilizar un paño suave y seco para limpiar cualquier sustancia del escáner. No utilizar alcohol u otra sustancia de limpieza. El autoMACS Pro Separator está clasificado como producto láser 1M de estándar IEC 608251: 1993 + A1: 1997 + A2: 2001.
- Page 36 Electrónicos (Waste of Electrical and Electronic Equipment, WEEE) Por favor, al final de la vida útil de su equipo de Miltenyi Biotec disponga del mismo de acuerdo a la ley WEEE aplicable, la cual puede ser diferente según el país o región.
- Page 37 Para más información, o si desea eliminar su equipo de Miltenyi Biotec en el final de su vida útil, por favor póngase en contacto con su representante local de Miltenyi Biotec o con el Servicio Técnico de Miltenyi Biotec.
-
Page 39: Informations De Sécurité Importantes
Informations de sécurité importantes Le séparateur autoMACS Pro est conçu pour une utilisation sûre, si il est correctement installé et manié par un personnel qualifié, conformément aux mesures de sécurité générales et aux consignes libellées dans ce manuel. Avertissements et précautions Les instructions de ce chapitre expliquent les risques potentiels liés à... - Page 40 Symboles de sécurité Les symboles suivants sont utilisés pour souligner des conditions qui pourraient entraîner des blessures du personnel ou une détérioration du dispositif. Alerte de sécurité. Risque de danger. La documentation doit être consulté dans les cas où un symbole d’alerte de sécurité est mentionné afin de connaitre la nature du danger potentiel et les mesures à...
- Page 41 Figure 7: Les zones de risque et symboles de sécurité sur la face avant du séparateur autoMACS Pro. Figure 8: Les symboles de sécurité sur la face arrière du séparateur autoMACS Pro.
- Page 42 (amplificateurs) qui produisent de la chaleur. Veillez à ce que suffisamment d’air puisse circuler autour du séparateur autoMACS Pro – au moins 15 cm de chaque côté – pendant le fonctionnement afin de garantir le refroidissement adéquat de l’appareil.
- Page 43 3 mètres de longueur maximum. Champ magnétique puissant Le séparateur autoMACS Pro est équipé d’un aimant extrêmement puissant. Il y a un risque d’accident pour Les personnes qui portent un stimulateur cardiaque, une dérivation cérébrale ou un implant médical électronique. Veillez à laisser un espace d’au moins 20 cm entre le cache de l’aimant et les supports ’information...
- Page 44 N’approchez pas vos doigts, etc. des pièces mobiles du séparateur autoMACS Pro et des pièces correspondantes afin d’éviter toute blessure ainsi que toute détérioration de l’appareil due à l’écrasement et au cisaillement. Ne touchez pas les pompes à...
- Page 45 Veiller lors de l’installation de l’autoMACS Pro Separator à ce que le chemin optique rayon laser ne se trouve pas à hauteur des yeux de personnes pendant le service.
- Page 46 Déchets d’Equipements Electriques et Electroniques (DEEE) – Information Client Pensez à recycler vos produits Miltenyi Biotec en fin de vie en conformité avec la directive DEEE en vigueur dans votre pays. Les équipements électriques et électroniques peuvent contenir des substances dangereuses, qui peuvent avoir un effet néfaste sur l‘environnement et / ou la santé...
- Page 47 à des écoorganismes agréés à travers le monde. Miltenyi Biotec vous permet de recycler gratuitement vos équipements Miltenyi Biotec en fin de vie. Les conditions et la disponibilité de cette offre varient selon les pays et les différentes exigences réglementaires.
-
Page 49: Importanti Istruzioni Di Sicurezza
Importanti istruzioni di sicurezza Il separatore autoMACS Pro Separator è stato realizzato per garantire un uso sicuro, se installato correttamente, impiegato da personale specializzato e secondo la nor mativa generale di sicurezza e le istruzioni d´impiego contenute in questo manuale. - Page 50 Simboli di sicurezza I seguenti simboli sono impiegati per sottolineare condizioni che potrebbero causare lesioni a persone o danni all´attrezzatura. Avviso di sicurezza. Rischio di pericolo. Consultare il manuale di istruzioni ogni volta che questo simbolo di sicurezza viene utilizzato, per identificare la natura del potenziale pericolo e stabilire quali azioni intraprendere.
- Page 51 Punti critici e posizioni dei simboli di sicurezza sulla parte frontale del autoMACS Pro Figure 9: Separator. Figure 10: Posizione dei simboli di sicurezza sulla parte posteriore del autoMACS Pro Separator.
- Page 52 Pro Separator, né altri accessori hardware forniti da Miltenyi Biotec. Tutti gli altri coperchi dello strumento e gli accessori hardware possono essere rimossi esclusivamente da personale autorizzato. Prestare particolare attenzione quando si manipolano liquidi.
- Page 53 Non utilizzare lo strumento in ambienti bagnati o umidi. Evitare ambienti ad elevata umidità o condizioni di condensa e proteggere lo strumento dagli schizzi d’acqua. Staccare il autoMACS Pro Separator dalla presa di corrente prima di eseguire la pulizia. Non utilizzare detergenti liquidi o aerosol; utilizzare sempre un panno umido.
- Page 54 Non impedire il movimento del braccio automatizzato e degli accessori hardware durante il funzionamento. Tenere le dita, ecc., lontano da tutte le parti in movimento del dispositivo autoMACS Pro Separator e degli accessori hardware, per evitare lesioni da schiacciamento e ferite da taglio o danni al dispositivo. Non toccare le pompe dei liquidi e non spostare i tubi mentre il dispositivo è...
- Page 55 Non utilizzare alcol o altre sostanze detergenti. Il autoMACS Pro Separator è classificato come prodotto laser della classe 1M secondo lo standard IEC 608251: 1993 + A1: 1997 + A2: 2001.
- Page 56 Si usino solo opzioni ed aggiornamenti raccomandati da Miltenyi Biotec. Si chiedano informazioni al rappresentante locale di Miltenyi Biotec in merito al servizio esteso di strumenti Miltenyi Biotec’s e le modalità di supporto, o ci si riferisca a www.miltenyibiotec.com/support. Lo strumento autoMACS Pro Separator va trasportato con cautela in imballaggi specificati da Miltenyi Biotec.
- Page 57 Miltenyi Biotec si impegna a proteggere l’ambiente. Miltenyi Biotec offre programmi per lo smaltimento dei prodotti dismessi in molti paesi e partner accreditati per lo smaltimento secondo le normative WEEE in tutto il mondo. Miltenyi Biotec consente di riciclare le apparecchiature Miltenyi Biotec gratuitamente. Le condizioni e la disponibilità...
-
Page 59: Introduction
Introduction 1.1 MACS® Technology – the gold standard in cell separation MACS® Technology has become the standard method in cell separation. It is based on • MACS® MicroBeads, highly specific antibodies coupled to superparamagnetic 50 nm particles, • MACS Columns containing a matrix of ferromagnetic spheres, and •... -
Page 60: The Automacs Pro Separator
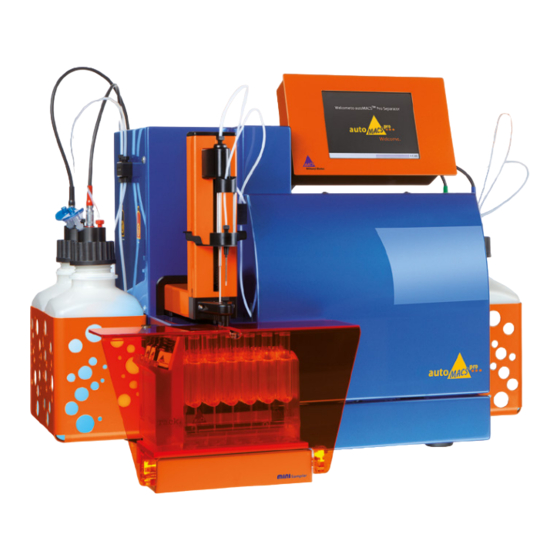
1.2 The autoMACS Pro Separator The autoMACS Pro Separator is a benchtop magnetic cell sorter that allows gentle sorting of more than ten million cells per second from a sample of up to 4×10⁹ total cells. The instrument is designed for use with more than 250 MicroBead-based cell separation reagents for research applications. - Page 61 MACS 2D code Column slots reader Rack detector Mini- Main Sampler switch Figure 1.1: Front view of the autoMACS Pro Separator. Bottle Sensor 2D Code Reader plug External Power socket Figure 1.2: Back view of the autoMACS Pro Separator.
-
Page 63: Installation
Contact your local Miltenyi Biotec representative for assistance. Do not place the autoMACS Pro Separator on an unstable table, cart, stand, tripod, or bracket. As a consequence, the instrument might fall down. This may cause serious bodily harm and/or serious damage to the instrument. -
Page 64: Components Included In Delivery
Solution may be required for disinfection and decontamination. Fluid bottles can be identified by color-code and symbols (table 2.4). For proper operation of the autoMACS Pro Separator, fluid bottles must be filled with a minimum volume of 150-200 mL. It is recommended to use ready-to-use MACS Buffers or fresh, filter- sterilized solutions to prevent potential contamination of the tubing system. - Page 65 To prepare an azide-free running buffer, dilute the MACS BSA Stock Solution 1:20 with autoMACS Rinsing Solution. The autoMACS Pro Washing Solution is a filter-sterilized and ready-to-use solution to rinse the fluidic system after any cell separation. It contains a detergent that dissolves cell aggregates.
-
Page 66: Automacs Pro Separator Accessories
2.3 autoMACS Pro Separator accessories The autoMACS Pro Separator is a benchtop instrument that fits in laminar flow hoods or biosafety cabinets. The operating environment should be stable and vibration-free, dust-free, sufficiently ventilated, and free from sources of electro- magnetic radiation. If the instrument is placed in a laminar flow hood, the following accessories might be required: autoMACS Pro Laminar Hood Plate (# 130-093-246) and, optionally, autoMACS Pro Angle Connector Set (# 130-093-245). - Page 67 Technical Support for assistance (refer to section 11). Note: Two people are required to lift the autoMACS Pro Separator. The instrument must be gripped at the base of the orange bottle baskets located at both sides of the instrument.
- Page 68 Figure 2.3: Remove the foam packaging from both sides of the autoMACS Pro. 4 Grip the instrument at the base of the orange bottle holders and lift it out of the box. Stabilize the front of the instrument while lifting it. Place the instrument onto a stable worktop surface, and remove the plastic bag surrounding it.
-
Page 69: Installing And Replacing Fluid Bottles
(absolute analytical-grade ethanol diluted to 70% with double-distilled water). It is recommended to operate the instrument with ready- to-use MACS Buffers (table 2.2). The autoMACS Pro Separator is delivered with four empty fluid bottles, which connect to the instrument with specifically designed bottle closures. - Page 70 4 Attach the sensor cable plug to the socket labeled Bottle Sensor at the back of the autoMACS Pro Separator and fasten securely. 5 Attach the sensor cables to the cable guide at the back of the autoMACS Pro Separator.
-
Page 71: Installing The Macs Minisampler, Macs Reagent Rack 4 And Tube Rack
MACS Reagent Rack 4 and tube rack The MACS MiniSampler guiding and its corresponding slot located at the front of the instrument. If installed correctly, the autoMACS Pro Separator automatically recognizes the MACS MiniSampler upon initialization. Note: Do not use the same MACS MiniSampler with several different instruments, e.g. - Page 72 Figure 2.10: Secure the MACS Reagent Rack 4. 8 Set a tube rack (e.g. Chill 5 Rack) onto the MACS MiniSampler into the right recess, ensuring that the rack bar code is facing the autoMACS Pro Separator. Figure 2.11: Install the Chill Rack onto the MiniSampler.
- Page 73 9 Attach the protective cover of the MACS MiniSampler. Keep the protective cover attached and closed during operation. Note: The protective cover is sensor- controlled. Running a separation is not possible if the protective cover is open. Figure 2.12: Attach the protective cover of the MACS MiniSampler.
-
Page 75: Switching On Or Off
If you have questions about the type of power source to use, contact your authorized Miltenyi Biotec service provider or local power company. Do not use extension cords or power strips. Do not overload an electrical outlet. - Page 76 For more information about the autoMACS user interface, please refer to section 4. 1 Note the position of the power socket on the rear panel of the autoMACS Pro Separator (see figure 1.2).
-
Page 77: Installing The Pump Syringe
3.1.1.1 Installing the pump syringe 1 Open the front door of the autoMACS Pro Separator. 2 Pull out the plunger of the pump syringe and humidify it with distilled water. Push it halfway into the glass pipe. Figure 3.2: Humidify the plunger. -
Page 78: Installing Automacs Columns
5 Tighten the syringe at the diluter valve by turning the top screw until a resistance is met. 6 Switch on the instrument. The plunger holder will move up again. 3.1.1.2 Installing autoMACS Columns 1 Note the position of the tubing and autoMACS Column slots in the magnet cover (column 1 to the left, column 2 to the right, see figure 1.1). - Page 79 Col_ex has been used for column installation, and can display the due date for the next column exchange. 16 Prime the autoMACS Pro Separator as described in section 3.1.3. 17 Run the program Calibr_2 to calibrate the fluidic volume control of the...
-
Page 80: Set The Date And Time
3.1.1.3 Set the date and time When switching on the autoMACS Pro Separator for the first time, the user is prompted to set the correct time and date. Note: Set the correct date and time to properly schedule maintenance procedures such as column exchanges. -
Page 81: Test The Needle Calibration
3.1.1.5 Test the needle calibration Correct needle calibration is necessary for proper sample and reagent uptake. Before using the autoMACS Pro Separator for the first time, check whether the uptake and output needle are positioned correctly when moving into in the washing station, sample tubes and reagent vials (uptake needle only). -
Page 82: Priming
1 Ensure that all bottles are filled with the appropriate solutions and that the waste bottle is empty. 2 Switch on the autoMACS Pro Separator and wait for the instrument to complete initialization. 3 After initialization is completed, the Status menu will be displayed. For more details on the Status menu, please refer to section 4.1. -
Page 83: Shutting Down The Instrument
3.2.2 Long-term storage If the autoMACS Pro Separator will not be used for more than two weeks, clean the fluidic system and replace the columns with column substitutes. The Store program automatically performs the cleaning procedure and prompts the user to install column substitutes. -
Page 85: The Automacs® Pro User Interface
The autoMACS® Pro user interface The autoMACS Pro user interface is composed of five main menus: Reagent, Separation, Status, Log list and Option. They are accessed through the upper tabbed menu bar (see figure 4.1). Six buttons at the bottom of the screen allow for easy interaction with the instrument. -
Page 86: The Status Menu
4.1 The Status menu The autoMACS Pro Separator is a sensor-controlled instrument that allows easy monitoring during operation. After initialization, the screen automatically displays the Status menu, which helps to monitor the instrument. It displays the current instrument status and can be accessed at any time (see figure 4.1). -
Page 87: Sample Status
4.1.1 Sample status The background color of the sample fields ( ) indicates the sample status. Programs yet to be processed appear in yellow fields. Programs currently undergoing autolabeling appear in purple. Programs in progress in which no autolabeling is being performed switch to orange; completed programs switch to white. -
Page 88: Column Status
Bottle Symbol User action Running buffer Green: no action required Red: refill bottle Grey: connect bottle sensor Washing Solution Green: no action required Red: refill bottle Grey: connect bottle sensor Storage Solution Gray: No liquid detection possible, check visually Waste Green: no action required Red: refill bottle, Grey: connect bottle sensor... -
Page 89: Macs Minisampler Status
Figure 4.6: Tube rack status graphic: Chill 5 Rack was detected. 4.1.5 MACS MiniSampler status If the MACS MiniSampler has been detected correctly, a rectangular symbol is displayed ( ). If it has not been detected, a hand symbol will be displayed in the same field. -
Page 90: Entry Of Reagents With The 2D Code Reader
Figure 4.8: The Reagent menu. 4.2.1 Entry of reagents with the 2D code reader 1 Go to the Reagent menu. Highlight the reagent rack position where the vial will be placed in the reagent rack. 2 Press the Read Reagent button to activate the 2D code reader and present a reagent vial in front of the 2D code reader. -
Page 91: Manual Entry Of Reagents
Figure 4.10: Successfully scanned reagents appear on the screen. 4 Using the same procedure, up to four reagent vials can be scanned and assigned using the 2D code reader. Combinations of four reagents can be saved as a template for later use by pressing the Save Template button. Refer to section 6.10.3 for details on how to use templates. -
Page 92: Deleting Reagents
3 If a correct number is inserted, the software will recognize the reagent or kit. Select the reagent from the list by using the touch screen. 4 Press Ok to confirm the identified reagent and its reagent vial position. 4.2.3 Deleting reagents 4.2.3.1 Deleting a single reagent from the reagent list 1 Highlight the reagent name that is to be deleted. -
Page 93: Sample Rack Template
) is used to enter or modify sample volumes. It is man- datory to assign a volume for autolabeling. For manually labeled samples, it is not mandatory to assign a volume. However, the autoMACS Pro Separator requires this information to calculate and display the total sample processing time. Volumes are... -
Page 94: Assigning A Cell Separation Program
Assigning a wash program The Wash submenu ( ) is used to instruct the autoMACS Pro Separator, which wash program should be applied to each sample after separation. Four wash programs are available to choose from: Qrinse, Rinse, Sleep and Clean. Refer to section 6.4 for a detailed explanation of the respective programs. -
Page 95: The Log List Menu
4.4 The Log list menu The Log list menu displays a complete log of actions performed by the autoMACS Pro Separator. Completed processes are marked with a green checkmark. If a process is listed in red and is marked by an X, the process was either aborted or some problem occurred. -
Page 96: The Option Menu
Safe program once a month. Store – prepares the instrument for long-term storage To store the autoMACS Pro Separator for a period longer than two weeks, the tubing system should be cleaned and the columns should be replaced with column substitutes. -
Page 97: User Settings
Pro Separator 2D code reader. O_init – Optional priming of the instrument at startup By default, the autoMACS Pro Separator does not perform a wash program after initialization. The option O_init allows the user to add an initial rinse program to automatically prime the instrument after initialization. - Page 98 Sepcount – Displaying the number of performed separations The Sepcount program is used to display the number of separations that have been performed on the autoMACS Pro Separator. 1 Go to Option > User settings > Sepcount. 2 Press Run. A dialog box will report the number of separations.
-
Page 99: Calibration
Read the instructions in the chapter Important safety infor mation before operation of the instrument. The autoMACS Pro Separator is calibrated using two programs, Calibr_1 and Calibr_2. Calibr_1 is used to calibrate the settings of the needle arm (x-, y-, and z-axis). - Page 100 1 Go to Option > User settings > Calibr_1. Press Run and then Test. Figure 5.1: Calibration 1 modes. 2 When prompted, place a Chill 15 Rack onto the MACS MiniSampler. Place 15 mL conical centrifugation tubes in positions A1, B1 and C1 and confirm by pressing Done.
- Page 101 Figure 5.3: Uptake needle position in the washing station (arrow). 5 When done with testing the current position, press Done. The next position (NEG needle) will be addressed automatically. Figure 5.4: Test position: NEG needle in the washing station. Figure 5.5: NEG needle in the washing station.
- Page 102 6 Ensure that the NEG needle is centered above the front opening of the washing station. 7 In the following, the needle position can be tested for tube rack position A1 (ORI), B1 (NEG) and C1 (POS) as well as Reagent Rack positions 1-4. To check the exact needle position, use the Move up and Move down buttons to raise or lower the uptake needle, respectively.
-
Page 103: Calibrating The Needle Position
5.1.1.1 Calibrating the needle position If the needles are not positioned correctly in the washing station and/or the sample tubes, run a Calibr_1. Open the washing station cover and remove the MiniSampler cover for better visibility. 1 Go to Option > User settings > Calibr_1. 2 Press Run and then Calibrate. -
Page 104: Calibrate The Washing Station: Neg Needle (Step 2/5)
2 Press Height. Check the central positioning of the uptake needle by using the buttons Move up and Move down. 3 Select Position and adjust by using the Move back and Move fwd buttons. Select Done after making necessary adjustments. Figure 5.10: Calibrate the uptake needle position in the washing station. -
Page 105: Calibration Of The Z-Axis (Step 3/5)
3 Select Height and check the central positioning of the needle by using the buttons Move up and Move down. Select Position and adjust by using the Move back and Move fwd buttons. Select Done after making necessary adjustments. 4 Select Save to save the new configuration. 5.1.1.4 Calibration of the z-axis (step 3/5) 1 Select Calibrate to proceed with calibration. -
Page 106: Calibration Of The X-Axis (Step 4/5)
Press Done to continue with calibration. 6 Press Save to store new settings. 5.1.1.6 Test current calibration settings (step 5/5) 1 Press Test to check the new configuration. The autoMACS Pro Separator will perform a complete test of Calibr_1 settings. - Page 107 Figure 5.14: Calibration 1 Step 5/5: Test calibration. 2 If you haven’t done so yet, place a Chill 15 Rack onto the MACS MiniSampler. Place 5 mL conical centrifugation tubes in positions A1, B1 and C1. Press Done to confirm. 3 If you haven’t done so yet, place the MACS Reagent Rack 4 containing 4 sample vials onto the MACS MiniSampler.
-
Page 108: Calibrating The Uptake Volume
5.2 Calibrating the uptake volume 1 Go to Option > User settings > Calibr_2. Press Run to start the program. 2 Press Calibrate. The calibration is performed automatically. Figure 5.15: Calibration 2 Step 1/1. 3 Press Save to finish Calibr_2. Figure 5.16: Calibration 2 Step 1/2. -
Page 109: Cell Separation
Pro Separator have been developed for optimal separation results, independent from the applied labeling and separation strategy. Please be advised that the autoMACS Pro Separator is specified for use with MACS MicroBeads, autoMACS Columns and other genuine Miltenyi Biotec consumables and accessories only. -
Page 110: Cell Labeling Strategies
6.1 Cell labeling strategies There are two basic approaches for magnetic labeling of cells with MACS MicroBeads: direct and indirect magnetic labeling. For direct labeling, MACS MicroBeads bind directly to a specific cell surface marker protein. For indirect labeling, MACS MicroBeads recognize a primary antibody, its conjugates, or a ligand, binding to a specific cell surface marker protein. -
Page 111: Depletion
the magnet, the magnetically labeled target cells are eluted from the autoMACS Column as the positive fraction. Positive selection can be performed after direct or indirect magnetic labeling using various MACS MicroBeads or MicroBead Kits. MACS Whole Blood MicroBeads are specially developed for the positive selection of leukocyte subsets directly from human whole blood or bone marrow. -
Page 112: Two Subsequent Positive Selections
6.3 Separation programs The autoMACS Pro Separator provides a selection of fourteen pre-set separation programs. The appropriate program is generally chosen depending on the separation strategy, the target cell frequency, and the level of antigen expression. -
Page 113: Depletion Programs
Posseld – Positive selection in standard mode I, double-column program Isolation of cells with frequencies lower than 5% and normal antigen expression, in a small elution volume. Posseld2 – Positive selection in standard mode II, double-column program Isolation of cells with frequencies lower than 5% and normal antigen expression, if purity is the highest priority. - Page 114 2 mL per 1 mL 1 mL/min sample volume * This program must be used with manual labeling. Please contact Miltenyi Biotec Technical Support before using these programs. ** 3-fold predilution of the sample volume. Table 6.1: Output volumes and loading rates of separation programs.
- Page 115 Positive selection Depletion Labeling of target cells Labeling of unwanted cells Frequency of target cells? Depletion Depletion using MACS® > 5 to 10% < 5 to 10% using MACS® Cell Isolation MicroBeads Level of Level of Level of Purity is antigen antigen antigen...
-
Page 116: Wash And Maintenance Programs
The autoMACS Pro Separator is equipped with reusable autoMACS Columns. Therefore, after each cell separation, a thorough washing procedure rinses the columns of the autoMACS Pro Separator. After the wash program is completed, columns and tubing system are filled with Running Buffer. There are obligatory and optional wash programs, which have to be performed daily or at times to ensure proper operation and maintenance of the instrument. -
Page 117: Preparation Of Single-Cell Suspensions
Resuspend cells carefully after centrifugation. Large cell aggregates may interfere with the separation process and may cause pressure variations in the autoMACS Pro fluidic system. It is recommended to use Pre-Separation Filters, 30 µm (# 130-041-407) or Pre-Separation Filters, 70 µm (# 130-095-823) to remove cell clumps that may clog the column. -
Page 118: Adjusting Sample Volumes
Minimal and maximal volumes and total cell numbers in table 6.3 account for autolabeling samples only. Autolabeling protocols are being continually developed and optimized by Miltenyi Biotec. For a current list of Cell Separation Reagents that are optimized for cell separations with the autoMACS Pro... - Page 119 Cell Separation Strategy Nr. of Dilution Autolabeling Reagent reagents volume Minimal Minimal Maximal Maximal volume* total cell volume total number cell number Chill 5 Rack Direct MicroBeads Positive 10⁷ cells per 160 µL 2×10⁷ 1600 µL 2×10⁸ human, rat, non- selection or 80 µL human primate depletion...
-
Page 120: Selecting The Appropriate Tube Rack
6.7 Selecting the appropriate tube rack Three different tube racks are available for processing sample volumes between 0.2 mL and 50 mL. Unless otherwise specifically indicated in the Cell Separation Reagent data sheet, the magnetically labeled cell samples are resuspended at 10⁸ total cells per 500 µL when using manual labeling. -
Page 121: Monitoring The Separation Process
Cell separation can be paused at any time from all menu screens by pressing the Stop button at the lower left side of the screen. The autoMACS Pro Separator will then immediately stop operation and will display a pop-up dialog box. Press Cancel to quit the current process. -
Page 122: Fluid Bottle Illumination
Table 6.6: Fluid bottle illumination status. 6.9 Priming the autoMACS Pro Separator Priming implicates the initial rinsing and filling of the autoMACS Pro Separator tubing system before performing cell separations. The autoMACS Pro Separator must be primed each time the instrument is switched on. Ensure that the MACS MiniSampler has been installed, the waste bottle is empty, and that all fluid bottles are filled with recommended solutions (refer to section 2 and 3 for more details). -
Page 123: Cell Labeling And Separation
The setting of this option O_init is described in section 4.5.2. 1 Switch on the autoMACS Pro Separator and wait for the instrument to complete initialization. 2 After initialization, the autoMACS Pro Separator will display the Status menu (see section 4.1 for more information about the Status menu). -
Page 124: Cell Separation Using The Autolabeling Function
5 Go to the Volume submenu and enter the sample volume using the numeric keypad. Press Enter. 6 Press Run. Note: The autoMACS Pro Separator ensures that there is enough solution for one separation. If more than one separation is to be performed, the user should check whether there is enough solution in the bottles. -
Page 125: Working With Templates
6.10.3 Working with templates For convenience, it is possible to save reagent and separation templates. Reagent templates can be used in combination with separation templates. The autoMACS Pro Separator automatically detects the type of tube rack in use and allows the user to utilize only the number of samples and sample positions the tube rack can handle. -
Page 126: Shutting Down The Instrument
Rinse or Qrinse. However, if Sleep is chosen as a wash program, the autoMACS Pro Separator will not allow definition of any programs beyond this position. Alternatively, press the shutdown button on the upper right hand corner of the screen and confirm. -
Page 127: Maintenance
7.1.1 Instrument priming The autoMACS Pro Separator must be primed each time the instrument is switched on. The Rinse program is used for efficient washing and equilibration of the fluidic system. The instrument automatically prompts the user to perform a rinse before performing a cell separation. -
Page 128: Automatic Instrument Priming At Startup
7.1.1.1 Automatic instrument priming at startup By using the O_init program, the instrument can be instructed to perform an automated rinse sequence at startup. 1 Select Option > User settings > O_init. Press Run. 2 Follow the prompt on the screen to enable or disable the initial wash. 7.1.2 Clean uptake/outlet ports It is recommended to clean uptake and outlet ports daily. -
Page 129: Periodic Maintenance
7.2 Periodic maintenance 7.2.1 Column exchange Exchange autoMACS Pro Separator Columns every other week or after 100 separations, whichever comes first. Refer also to section 3.1.1.2. 1 Open the front door of the autoMACS Pro. 2 Ensure that the fluid bottles are filled with solutions. -
Page 130: Exchange Of Hydrophobic Air Filters
7.2.2 Exchange of hydrophobic air filters Hydrophobic air filters (0.2 μm) are attached to the bottle closures to vent the liquid bottles and to prevent release of aerosols. They should be exchanged once a year to avoid clogging through dust deposits. To avoid clogging of the filters and to prevent contamination of liquids, air filters should be exchanged if they come into direct contact with any liquid. - Page 131 3 When prompted, loosen the plunger lock screw at the bottom of the plunger. Figure 7.3: Unscrewing the plunger lock screw. 4 Press OK. The plunger holder will move to the lowest position. Figure 7.4: The plunger holder is in the lowest position. 5 A dialog window will prompt the user to switch the instrument off, replace the syringe, and tighten the plunger screw.
- Page 132 12 Tighten the syringe at the diluter valve by turning until a resistance is met. 13 Switch on the instrument. The plunger holder will move up again. 14 Prime the autoMACS Pro Separator as described in section 3.1.3. 15 Run the program Calibr_2 to calibrate the fluidic volume control of the...
-
Page 133: Cleaning The Washing Station
7.2.4 Cleaning the washing station The washing station is designed for automated rinsing of the outlet and uptake ports as well as surface cleaning of the uptake and outlet port needle. The washing station should be cleaned as necessary to remove spills and salt crusts. Do not autoclave the washing station or wash using a dishwasher. -
Page 134: Instrument Disinfection
The Safe program is a disinfectant procedure that uses MACS Bleach Solution for cleaning of the autoMACS Pro Separator. Depending on the level of use and general instrument maintenance, it is recommended to run the Safe program every 3 to 6 months to disinfect the fluidic system. -
Page 135: Corrective Maintenance
7.3 Corrective maintenance Four valves regulate the fluidic system of the autoMACS Pro Separator. A fifth valve, referred to as dilutor valve, is connected to the pump syringe. Service plans for preventive and corrective maintenance are available at www.miltenyibiotec.com. However, if leakage occurs, the user can exchange valves and tubing. - Page 136 Figure 7.10: Unscrew the valve cover-screw. 5 Detach all tubing and valve port locks or blind screws from the respective valve. Figure 7.11: Unscrew the valve cover-screw and detach tubing and valve port locks or blind screws. 6 Loosen the two valve screws using the screwdriver (contained in the autoMACS Pro Separator –...
- Page 137 Groove Bracket Hole for Adjust- adjustment ment Figure 7.14: Left: Valve plate driving section. Right: Rear view of the autoMACS Pro Separator valve. 8 Make sure that the bracket of the new valve is positioned horizontally.
-
Page 138: Dilutor Valve Exchange
12 Connect the tubing with the installed new valve and fasten tubing finger-tight. 13 Plug in and switch on the autoMACS Pro Separator. 14 Perform a Rinse program and check the valves visually for leakage and air inlet. - Page 139 4 Unscrew the two hexagonal socket screws using the allen key that was delivered with the new or exchange valve. Figure 7.17: Unscrewing the dilutor valve’s socket srews. 5 Pull the dilutor valve out of the coupling. 6 Insert the new valve. Contact Tech Support for assistance. 7 When the dilutor valve is properly inserted, mount the hexagonal socket screws.
- Page 140 Figure 7.19: The draining tube connects the valve to the washing station. 10 Remove the washing station. Take care to clean spilled fluids with ethanol or disinfectant. Figure 7.20: Dismantle the washing station. Figure 7.21: Dismantle the washing station. 11 Carefully remove the waste distributor from its position by pulling in an upward direction and remove the draining tube from the old diluter valve.
- Page 141 13 Install the waste distributor back to its former position and reinstall the washing station. 14 Install the syringe pump. 15 Switch on the autoMACS Pro Separator. 16 Check for correct function by running the Rinse program. 17 Run the program Calibr_2 to calibrate the fluidic volume control of the...
-
Page 142: Exchange Of The Peristaltic Pump Head
7.3.3 Exchange of the peristaltic pump head 1 Switch off and unplug the instrument. 2 Remove the washing station as described in section 7.2.4, steps 1–6. 3 Press the tubing clamp on the left hand side of the waste distributor and remove the tubing. -
Page 143: Exchange Of Tubing System
7.3.4 Exchange of tubing system If there is any leakage in the tubing system, try to tighten all connections first (refer to section 9.2.2 for details). However, if leaking persists, an exchange of tubing might be required. Please note that each tube has a specific length and should be exchanged with the corresponding spare part only. - Page 144 Figure: 7.26: Removing the fuse holder. 4 Push the fuse holder back into the housing and reconnect the main power cord.
-
Page 145: Quality Control
Quality Control To evaluate any MACS Cell Separation, the separated cells can be analyzed with regard to purity, recovery, and viability. Using MACS MicroBeads, the magnetically labeled cells can be simultaneously stained with fluorochrome-conjugated antibodies. Antibodies of the same specificity can be used in most cases. MACS Fluorochrome-conjugated Antibodies are standardized to evaluate MACS Cell Separations. -
Page 146: Purity Of Isolated Cell Population
8.2 Purity of isolated cell population For most experiments that follow the cell separation, it is necessary to document the purity of the isolated cell subset. It is recommended to analyze the cells by flow cytometry, e.g. the MACSQuant® Intrument. Alternatively, fluorescence microscopy or immunocytochemistry can be used. -
Page 147: Troubleshooting
Troubleshooting If the outcome of a cell separation procedure is deemed unsatisfactory, this may either be due to incorrect function of the instrument or to inappropriate processing of the sample. This section discusses possible instrument malfunctions that may appear. In section 9.3, a list of numerically encoded errors and warning messages are presented along with user actions for troubleshooting. -
Page 148: Hardware Issues Not Indicated By An Error Screen
9.2 Hardware issues not indicated by an error screen 9.2.1 Column leakage 1 If a freshly installed autoMACS Column shows signs of leakage, check if the column is installed properly. The column should be inserted precisely into the column connector and fastened to the point of resistance. If this is not the case, loosen the column connector, insert the column precisely, and tighten the connector again. -
Page 149: Pump Syringe Leakage
9.2.3 Pump syringe leakage Verify that the Running Buffer has equilibrated to room temperature before performing a washing or separation program. Cold buffer will make the plunger seal constrict more than usual and may lead to leakage. Salt crystals may also damage the pump syringe seal. -
Page 150: Outlet Port Is Clogged
Touchscreen remains dark 1 Switch off the instrument, wait five seconds, and switch on again. 2 If the autoMACS Pro Separator still does not initialize, check if the power cord is plugged in correctly and if the electric power is switched on. -
Page 151: Disruption Of Power Supply During Cell Separation
50 mL tube; place a second 50mL tube beside this one. 6 Run the program Qrinse. This will rinse the complete fluidic system with autoMACS Pro Running Buffer eluting the cells into the 50 mL tubes. Depending on which step of the separation program that the interruption occurred, the cells will be found in any one of the vials. -
Page 152: Hardware Issues Indicated By An Error Screen
2 Prepare two 50 mL tubes in a rack and fill two 5 mL syringes with Running Buffer/Separation Buffer. 3 Open the front cover and place absorbent tissue underneath the columns. 4 Pull out the column from the column holder and replace the top connector with a 5 mL syringe filled with Running Buffer. - Page 153 Valve rotation hindered. Valve may be Switch off the instrument, wait 5 seconds blocked or worn and cannot be turned and turn it on again. If error persists, switch correctly. off instrument, loosen air filters on buffer/ waste bottles by a half turn, exchange columns for dummy columns, verify that washing station is free of clogs and salt deposits (clean washing station), verify that...
- Page 154 Technical Support. -7009 Collision of needle with bottom of tube Check if tubes are correctly positioned in could not be detected at expected rack corresponding to template position. programming. Check MACS MiniSampler connection in front of autoMACS Pro Separator.
- Page 155 Check configuration and connection of the MiniSampler seems to be opened by the protective cover, the MACS MiniSampler, moving needle arm hitting the cover. and the front support at the autoMACS Pro Separator then touch Continue. Touch Cancel to abort. -7027...
- Page 156 -7030 The instrument has been shut down Always use Sleep to shut down the without using ˝Sleep˝. instrument. -7031 The given whole blood sample size Do not use sample volumes exceeding the exceeds the maximum volume specified. maximum whole blood sample volume The sample cannot be diluted sufficiently.
-
Page 157: Technical Data And Specifications
WARNING! Read the chapter Important safety information before installation and use. The autoMACS Pro Separator is labeled as a protection class I instrument and must be plugged into a grounded power outlet. The MACS MiniSampler is labeled as a protection class III instrument and must only be plugged into the connector labeled with External CAN of the autoMACS Pro Separator. - Page 158 Pins 1, 4, 5, 8, 9: NC (labeled CAN1 or CAN2) Pin 2: CAN-L Pins 3, 6: GND Pin 7: CAN-H * Depending on the type of power plug, the depth increases by 27 mm or 62 mm. Table 10.1: Technical data of the autoMACS Pro Separator.
-
Page 159: Compliance With Fcc Rules
Technical data Model MACS MiniSampler Footprint without lid 182×148×47 mm (W×D×H) Footprint with lid 280×153×172 mm (W×D×H) Weight 1,5 kg Input voltage 24 VDC Current 0.8 A Sub D9 interface Pins 1, 4, 8: NC with shielding Pin 2: CAN-L Pins 3, 6: GND Pins 5, 9: 24 VDC / 2A Pin 7: CAN-H... -
Page 160: Ec Declaration Of Conformity
10.3 EC declaration of conformity This declaration of conformity is issued under the sole responsibility of the manufacturer: Miltenyi Biotec GmbH Friedrich-Ebert-Str. 68 51429 Bergisch Gladbach Germany The declaration of conformity refers to the machinery identified as follows: Description: Laboratory equipment... -
Page 161: Technical Support
For technical support, please contact your local Miltenyi Biotec representative or the Technical Support team at Miltenyi Biotec headquarters: Miltenyi Biotec GmbH Friedrich-Ebert-Straße 68 51429 Bergisch Gladbach Germany Phone +49 2204 8306-830 Fax +49 2204 8306-89 macstec@miltenyibiotec.de Visit www.miltenyibiotec.com/local to find your nearest Miltenyi Biotec contact. -
Page 163: Limited Warranty
Product; use of accessories, spare parts and/or consumables other than those recommended by Miltenyi Biotec; or normal wear and tear. Miltenyi Biotec‘s product warranty does not cover products sold as is or with all faults, or which had its serial number defaced, altered or removed, or any con sum ables, or parts identified as being supplied by a third party;... - Page 164 Miltenyi Biotec must be informed immediately if a claim is made under such war ranty. If a material or manufacturing defect occurs within the warranty period, Miltenyi Biotec will take the appropriate steps to restore the full usability of your Product.
- Page 166 Unless otherwise specifically indicated, Miltenyi Biotec products and services are for research use only and not for therapeutic or diagnostic use. autoMACS, MACS, and the MACS logo are registered trademarks or trademarks of Miltenyi Biotec GmbH and/or its affiliates in various countries worldwide.
Need help?
Do you have a question about the autoMACS Pro and is the answer not in the manual?
Questions and answers