Table of Contents
Advertisement
This quick start guide explains how to quickly set up and activate your McAfee
NS7200, and NS7300 Sensors in in-line mode. These models have a throughput of 1.5 Gbps, 3 Gpbs, and 5 Gbps
respectively.
All product documentation referenced in this quick start guide is found on the McAfee ServicePortal.
The NS7100/NS7200/NS7300 Sensor model
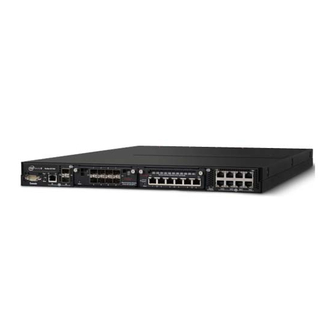
Figure 1 Sensor front panel
Console port (1)
1
RJ-11 port (1) for fail-open control of two built-in SFP+ ports in slot G0. The RJ-11 port supports 1 Gbps (SFP)
2
copper or fiber and 10 Gbps (SFP+) (SR and LR).
SFP+ 1/10 Gigabit Ethernet ports (2)
3
The RJ-11 port controls only the SFP+ 1/10 port pair in passive fail-open mode.
Two slots for I/O modules (Any combination of the interface modules can be used.)
4
•
SFP/SFP+ 1/10 GigE Monitoring ports (8)
•
RJ-45 10/100/1000 Mbps with internal fail-open Ethernet Monitoring ports (6)
•
10/1 GigE SM 8.5 micron with internal fail-open Monitoring ports (4)
•
10/1 GigE MM 50 micron with internal fail-open Monitoring ports (4)
•
10/1 GigE MM 62.5 micron with internal fail-open Monitoring ports (4)
RJ-45 10/100/1000 Mbps Ethernet Monitoring ports (8)
5
McAfee Network Security Platform
NS7x00 Quick Start Guide
Network Security Platform NS7100,
®
Revision D
1
Advertisement
Table of Contents


Need help?
Do you have a question about the NS7200 and is the answer not in the manual?
Questions and answers