Table of Contents
Advertisement
Advertisement
Table of Contents

Related Manuals for Signature EZ Pro Jr. Indoor


Summary of Contents for Signature EZ Pro Jr. Indoor
- Page 2 EZ Pro ™ Jr. Indoor Installation and Programming Guide For EZ Pro Jr. Indoor models: 8204 8274 8206 8276 8209 8279 8212 8282 www.SignatureControlSystems.com...
-
Page 3: Table Of Contents
TABLE OF CONTENTS Features Installation Low Voltage Wiring • Terminal Strip • Connecting Master Valve or Pump-Start Relay • Connecting Rain/Moisture Sensor • Connecting Battery & Starting Controller • Connecting the Transformer • ™ Programming the EZ Pro 6-15 Programming Instructions Programming Overview •... -
Page 4: Features
FEATURES • Programmable delay between zones • Three independent programs • Three start times per program (9 total starts) • Stacking start times • Three scheduling options to suit the needs of plant material or to comply with watering restrictions (days of the week, 1-30 day interval, true odd/even) •... -
Page 5: Installation
INSTALLATION INSTRUCTIONS ™ The EZ Pro Jr. Indoor 8200 Series can be easily mounted indoors. Find a location near a 120V receptacle (230/240V for 8274, 8276, and 8279 models). ™ Install the EZ Pro Jr. Indoor near eye level if possible. Install the top screw in the wall and adjust the depth for a snug fit when the controller is suspended on the screw. -
Page 6: Connecting Rain/Moisture Sensor
INSTALLATION INSTRUCTIONS Connecting Rain/Moisture Sensor ™ The EZ Pro Jr. Indoor is equipped to operate a sensor with normally-closed leads. To install a sensor, remove the factory-installed jumper wire from the sensor connector on the terminal strip and insert the sensor wires. Refer to the sensor manufacturer’s instructions for specific installation details. -
Page 7: Connecting The Transformer
INSTALLATION INSTRUCTIONS Connecting the Transformer 120 VAC in United States, Canada and Mexico; 230 VAC in Europe, and 240 VAC in Australia and South Africa NOTE: Refer to and follow local codes if different from these instructions. CAUTION: Disconnect 120V (230/240V for 8274, 8276, 8279 models) power Connect the AC Power connector from the transformer to the plug provided on the left side of the terminal strips and route the cable through the slot provided in the case. -
Page 8: Programming The Ez Pro ™ Jr
PROGRAMMING INSTRUCTIONS Programming Overview ™ The EZ Pro Jr. Indoor can be programmed under AC power or powered from ™ the two AA alkaline batteries. Before programming the EZ Pro Jr. Indoor, it may be helpful to become familiar with some general programming guidelines: •... -
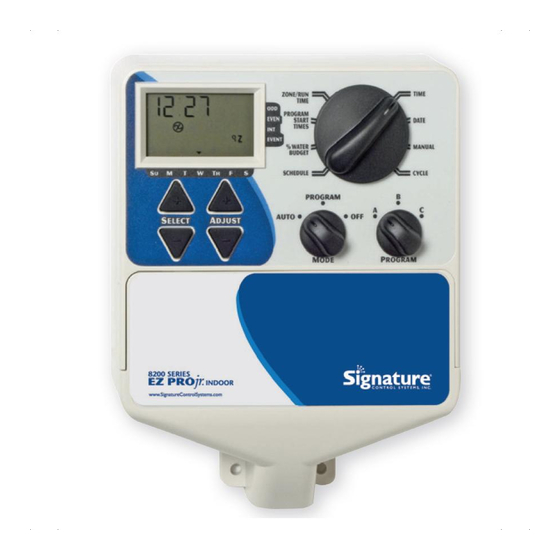
Page 9: Front Panel Layout
Looking at the front panel (See figure 3), you see a large LCD, 4 rubber buttons, one large rotary dial, and two small rotary dials. The rubber buttons are marked SELECT and ADJUST and are the core of Signature’s exclusive SELECT&ADJUST programming. The keys are identified with ‘+’ or ‘–’ for increasing or decreasing the segment you’re working on. - Page 10 PROGRAMMING INSTRUCTIONS FIGURE 3 NOTE: The MODE dial must be in the PROGRAM position. NOTE: Every time the ‘+’ or ‘–’ key is pressed, the display will increase or decrease one unit. Hold the ‘+’ or ‘–’ key for three seconds to initiate a fast scroll.
-
Page 11: Set Time Of Day
PROGRAMMING INSTRUCTIONS Set Time of Day Turn the large dial to the TIME position. Press SELECT to select between hours, minutes, and 12/24 hour mode. Press ADJUST to scroll to the correct time or adjust between 12/24 mode. ‘A.M.’ will not appear on the LCD when in A.M. -
Page 12: Set Start Times
PROGRAMMING INSTRUCTIONS Set Start Times A START TIME is the time of day a program will start running. ™ The EZ Pro Jr. Indoor allows three start times per program. Turn the large dial to the START TIMES position. Press SELECT to select the start time you want to set (1, 2, or 3). -
Page 13: Programming Instructions - Program Mode
PROGRAMMING INSTRUCTIONS - PROGRAM MODE ™ If % WATER BUDGET is set for 110% or greater, the EZ Pro Jr. Indoor will split the run time in half to reduce runoff. Half of the calculated run time will operate for each zone in that program, followed by the second half of the run time for each zone. -
Page 14: Set Water Days Scheduling Option
PROGRAMMING INSTRUCTIONS - PROGRAM MODE • INTERVAL waters every X number of days (from 1 to 30 days) (i.e., water every 3 days, waters every 10 days, etc.). A value of 1 in an interval schedule means to water every day. When using the interval option, you have the flexibility to tell the controller what day to start the interval program on (up to 30 days out). -
Page 15: Set Odd/Even Day Scheduling Option
PROGRAMMING INSTRUCTIONS - PROGRAM MODE Set Odd/Even Day Scheduling Option Turn the large dial to the SCHEDULE position. The last scheduling option chosen for the current program appears on the LCD. To set either an ODD or an EVEN schedule press the SELECT button till an arrow appears on the LCD next to the appropriate schedule (ODD or EVEN). -
Page 16: Set Event Day Scheduling Option
PROGRAMMING INSTRUCTIONS - PROGRAM MODE Set Event Days Programming (Optional) Turn the large dial to the SCHEDULE position. The last scheduling option chosen for the current program appears on the LCD. Press both the SELECT ‘+’ and SELECT ‘–’ together. A flashing indicator will appear next to Event Days on the LCD. -
Page 17: Programming Instructions - Auto Mode
PROGRAMMING INSTRUCTIONS - AUTO MODE Set the Rain Sensor Bypass ™ The EZ Pro Jr. Indoor is equipped with a Rain Sensor Bypass. This will cause the controller to water even if the rain sensor is tripped. To activate: bypass the controller must be in AUTO Mode. While in Auto Mode press both the SELECT ‘+’... -
Page 18: Advanced Features
ADVANCED FEATURES - AUTO MODE ™ The EZ Pro Jr. Indoor incorporates two manual/test procedures for checking the function of the controller or allowing you to bypass the current program to water immediately. The following section will show you how to set up the controller to: •... -
Page 19: Run A Program Cycle Manually
ADVANCED FEATURES - AUTO MODE ™ he EZ Pro Jr. Indoor incorporates Signature’s ManualAdvance feature in the MANUAL procedure. ManualAdvance allows you to cease the currently running zone and immediately advance to any new zone you select. With the MANUAL or CYCLE procedure running a zone, Press SELECT to advance to a new zone. -
Page 20: Technical Data/Specifications
TECHNICAL DATA Transformer 24 VAC internal transformer; 20 VA, .83A for zones and logic. The transformer can run a pump or master valve and one zone valve, maximum. Surge Protection 600 watts TVS on zone outputs 9J Mov on secondaries. (see Circuit Breaker below) Sensor Operation ™... - Page 21 TECHNICAL DATA Display Program letter Time, Date, Start Time, A, B or C Run Time, Basic Date, Water Budget Month AM PM indicator Rain Sensor suspend Year, Interval Even watering symbol Days, Water Interval Budget, Zone No AC symbol Event number Low battery warning Su M T W Th F...
- Page 22 TECHNICAL DATA 10. Default Settings (12 hour mode) 12:00 A.M. Sunday Date is 01/01 2003 No Run Times (zone 01, —:—) No Start Times (start number 01, —:—) 100% Water Budget Every day watering schedule Mode dial is at OFF position Program dial is on A program 5 second delay between zones 11.
-
Page 23: Troubleshooting/Service
TROUBLE SHOOTING/SERVICE SYMPTOM POSSIBLE CAUSE SOLUTION No output to zone, pump, master • AC disconnected • Check AC source, if AC is not valve or no AC indicator lit detected by the controller, the no AC indicator will be lit No AC and blank display •... -
Page 24: Fcc Rules
Signature Control Systems, Inc. warrants all electronic products to be free of defects in material and workmanship for a period of two (2) years from the original date of purchase. In the event of such defects, Signature will repair or replace, at it’s option, the product or the defective part.
Need help?
Do you have a question about the EZ Pro Jr. Indoor and is the answer not in the manual?
Questions and answers